Project 4. (Almost) Instant Moustache and Hair Transplants  A project later in the book deals with digital graffiti, but this project was partly inspired by some old-fashioned moustache-type graffiti. On the way home recently I came across a political poster where someone had used a permanent black marker and had taken the liberty of making some poor politician look like a clown. After getting over the initial shock of this dastardly work of art, I imagined that something like this would make a good digital darkroom project. Instead of using a black marker, digital or otherwise, the Clone Brush could be used and instead of drawing crude line art, a real hair transplant could be performed. If you think that sounds like fun, fire up your digital darkroom tools (your PC and Paint Shop Pro X), plug in your camera, and grab some images so we can get started. For this project, you'll need two portraits. At least one of the two should feature someone who has facial hair. Of course, you could do something similar to this project but transplant hair from one portrait to another. It depends on what you want from the results and what source material you have available. In any event, the steps will be similar to those outlined here. If you don't have a couple of portraits to work with, feel free to use the same ones I'm using. They are available for download (Tough Guy.tif and Portrait on the Island.tif) from the companion website. 1. | Open the two photographs you'll be using for this project. You can see the two photos I'll be using in Figure 1.17.
Figure 1.17. The two gracious models. 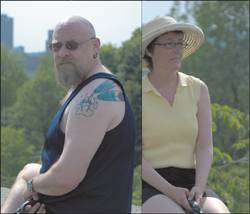
|
Copying, Pasting, Resizing, and Placing Notice how the two portraits are about the same size. Although this isn't critical, it does help if the two faces are nearly the same size. 2. | Make the photo you want to take the hair from active by clicking its title bar. Choose the Selection tool and set the Selection type to Rectangle. Click and drag a marquee around the head; then select Edit, Copy to copy the head to the Clipboard.
| 3. | Make the other image active by clicking its title bar. Select Edit, Paste As New Layer to paste the head into the second photograph.
| 4. | Select the Pick tool and use it to resize the head so it matches the head in the second photograph. Be sure to drag from the corner handles to maintain the aspect ratio.
If necessary, use the Pick tool to rotate the image a little so the two heads match as closely as possible. You can see my effort in Figure 1.18.
Figure 1.18. Move, resize, and place the head. 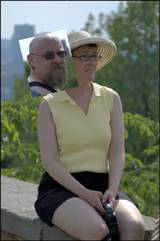
Note Those of you with a sharp eye and a keen mind might have noticed that the gentleman's head looks a little different between Figures 1.17 and 1.18. I flipped (mirrored actually) the head because of the difference in lighting angles and to help the angles of the heads match more closely. The head was flipped using Image, Mirror. Mirror flips an image on its horizontal axis; the Flip command, also from the Image menu, flips the image vertically. |
Creating a Custom Clone Brush Because copying hair isn't like copying other objectswhat with hair being messy and feathery and so ona good plan of attack is to use something other than the plain default round shape for the brush to be used in the cloning process. A number of custom brushes are available (see Figure 1.19). Figure 1.19. Custom brushes. 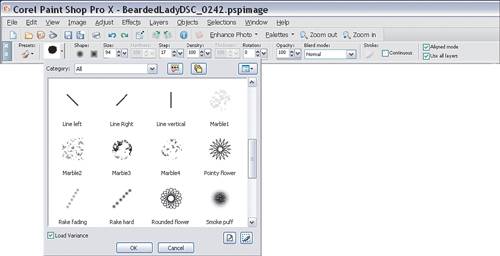
To see the available brushes, simply select a brush tool, such as the Clone Brush. Any one of these may do a better job than the round brush, but if none of these brushes strikes your fancy, you can choose to create your own. Here's how: 5. | Create a new image by selecting File, New. Make the image about 200 x 200 pixels and use the same resolution that your photos are using. Many cameras and scanners use 200300 dpi, but you should check your equipment's dpi. Also make sure that the Color is set to Transparent.
| 6. | Set a fairly small brush size of about 20 pixels or so. Set the foreground color to black, and click and drag with your mouse to draw a blobby shape (see Figure 1.20). This shape will become your brush, so try to get a shape with some texture to the edges. Soft, rounder edges on the brush work best for this project rather than harder, jagged ones.
Figure 1.20. Meet Blobby the Brush. 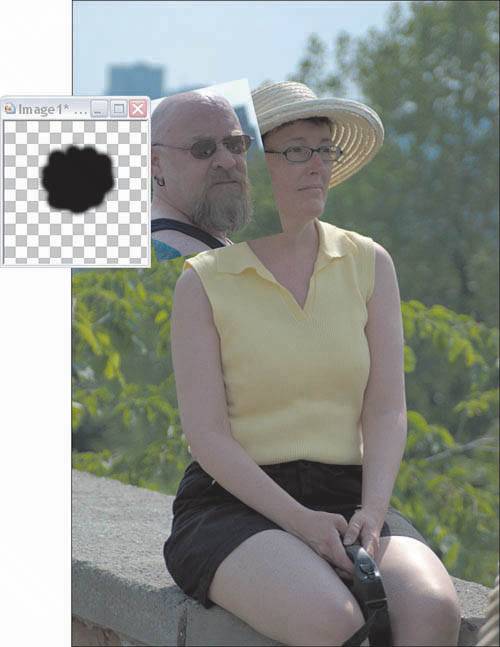
| 7. | With your brush drawn, choose Selections, Select All.
| 8. | Select the Clone Brush to activate its option bar (below the menu and menu icons). Activate the custom brush pull-down menu, and click the Create Brush Tip from Selection icon in the lower-right corner of the dialog box. This brings up the Create Brush Tip dialog box (see Figure 1.21).
Figure 1.21. Create a new brush from a selection. 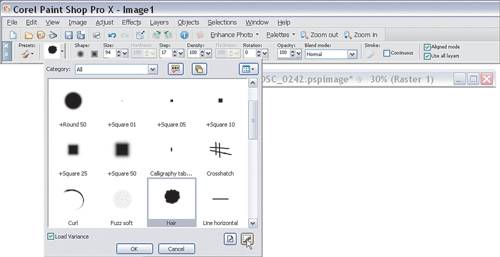
| 9. | In the Create Brush Tip dialog box, name the new brush tip (see Figure 1.22). Leave the check mark in the Save Variance box and leave the default Step setting of 32. This setting will be changed as you work. Click OK to create your new brush tip.
Figure 1.22. The Create Brush Tip dialog box. 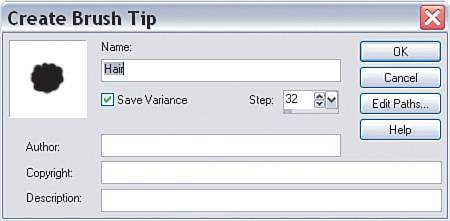
| 10. | Now that the brush tip has been created, feel free to close the image you used to create it. You won't need it any longer.
|
Transplant Time Now that you have the two photos in place and your newly created brush tip to help with the cloning, it's time to do the hair transplant. The transplant will be done using the Clone tool to copy the hair from one layer of the image to another. We could simply copy the hair right over the face in the second portrait, but a better idea is to use an extra layer to clone the hair onto. This approach makes cleanup and modifications much easier. 11. | Figure 1.23 shows the two layers that are already in the image. The bottommost layer is the one with the whole image present. As usual, because this image was loaded directly from a digital camera file, the layer is called Background. And, because the second layer was the first bitmap or raster layer created (from the Paste As New Layer done in step 3), it's called Raster 1. Activate the bottom layer by clicking its entry in the Layers palette.
Figure 1.23. Create a new layer to hold the cloned hair. 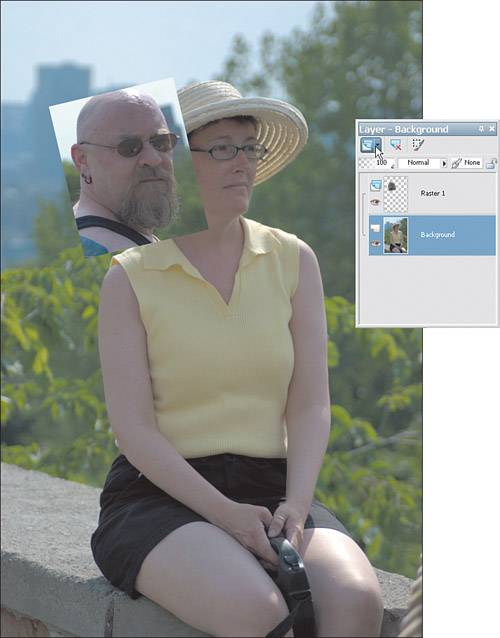
Tip You can rename the layers if you like, and certainly this is recommended for larger projects. For now, I'll leave the default names. If you'd like to change the names of the layers in your project, though, simply click each layer in turn in the Layers palette. This presents you with the opportunity to change the names. | 12. | Click the New Raster Layer icon, shown in Figure 1.23, to create a new layer between the two existing layers. If you'd like, you can name this layer hair or cloned hair, or something similar.
| 13. | Select the Clone Brush and set the brush tip to your newly created brush tip.
| 14. | Set the brush size to about 40 or 50, and set the step to about 10 or 15. You might want to play with and experiment with the settings to see how they affect the cloning process.
| 15. | Right-click somewhere in the hair. Pick somewhere you can identify in the two photos, such as the area just below the nose. Right-clicking sets the source for the brush.
| 16. | Check that the new layer is active (it will be blue in the Layers palette, while inactive layers are gray) and that the Use All Layers option is selected for the Clone Brush.
| 17. | Click and drag where you want to paint the hair in. You should start at the same place as where you clicked for the source, but this time you'll be defining the start of the destination area, so click under the other nose (see Figure 1.24).
Figure 1.24. Using the Clone Brush tool to perform a hair transplant. 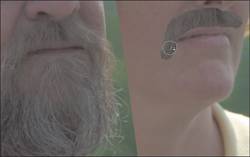
Tip The clone brush has two partsone that shows the source (the left cursor in Figure 1.24) and another that shows the destination (the right cursor in Figure 1.24). You should learn to keep an eye on both brushes to get a better idea of what you're cloning and to where. | 18. | Continue cloning the hair from one layer to the other. If you get too much hair, simply use the Eraser tool to remove it. That's one reason a new layer was createdto hold the hair transplant.
| 19. | From time to time, you might want to resample by right-clicking again in the hair to create a new source area. If you find that you can't really get it right, delete the layer and try again. The Clone Brush is one of those tools that requires a little patience and practice time. You can see the results of my effort in Figure 1.25.
Figure 1.25. The final hair transplant image. 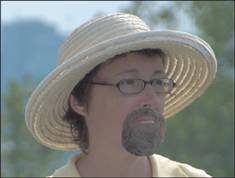
|
|