Emulating 3D Tracking


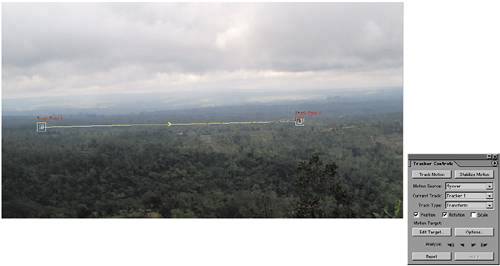
Finally, there has to be something to make everyone's head hurt, not the least mine. Although most major studios have access to 3D tracking these days, you may run into a situation where you don't. This workaround will do the trick for you, using the plain old After Effects 2D tracker. Just keep in mind that it will work only on shots in which the ground plane is clearly visible as you travel forward (or backward) in imaginary Z space.

I first used this setup on an aerial shot of a forest for the television movie Superfire; images from the movie appear in Section III of this book. For this shot, the forest needed to be covered with smoke, but the point of view was from a moving helicopter, banking slightly to the right. The idea was to track in a series of smoke planes to give the illusion of a bank of smoke, but each one had to be positioned separately because of the movement in 3D space.

You could track each smoke layer separately, but for five layers, this would take, oh, about five times as long to set up. Instead, for a shot that travels along the imaginary Z axis, it's possible to triangulate the relative position of the smoke layers as they offset into the distance and foreground and average them to create an offset.

Here's basically how it works for a shot in which the camera tracks forward over the ground plane:

1.

Create a rotation/scale track on two points that represent the background of your platethey are the most distant trackable points (visible at the start and end of the shot) from the camera's point of view. Apply this track to a new null called layerMotion1 (Figure 10.20).

Figure 10.20. A Position and Rotation property is set for two points in the distant background; choose two that are clearly visible throughout the shot.


2.

Create a separate one-point track that represents the foreground of your plate, closer to the camera position. Apply this track to a new null called FG. Along with the two previous points, this completes the triangle you need to re-create distance effects (Figure 10.21).

Figure 10.21. To be sure that the foreground point remains in frame to the end of the shot, it can be helpful to track it in reverse.


3.

Apply a Slider Control to layerMotion1. Change the Slider Control's name to Distance. (The names are for clarity; you can create whatever names you like.)

4.

Create two more nulls, name them BG1 and BG2, expose their position values (P), and then apply an expression to each. Pickwhip the value of each of the two attach points from the two-point track you made in step 1. Yes, the resulting code path is gnarling-looking. This step is mostly just to bury these paths so they don't show up in the main expression!

5.

Now comes the expression. To the Position property of layerMotion1, apply the following expression:

 fg = thisComp.layer("FG").position; (this_comp.layer("BG1").position + this_comp. layer("BG2").position) * 0.5; placement = effect("Distance"). param("Slider")/-100; bg + ((bg  fg) * placement) 

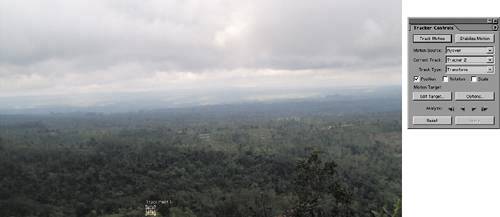
And you're donealmost. What you now have is a null, layerMotion1, that can be offset using the Distance slider value. You then parent any layers that belong to that plane of motion to layerMotion1. You next duplicate layerMotion1 to create layerMotion2 with a different offset value, to create a separate plane of motion, then layerMotion3, and so on until you have enough layers to create the illusion of depth.


Adobe After Effects 6. 5 Studio Techniques
Adobe After Effects 6.5 Studio Techniques
ISBN: 0321316207
EAN: 2147483647
Year: 2006
Pages: 156

flylib.com © 2008-2017.
If you may any questions please contact us: flylib@qtcs.net