Fixing Typical Problems
| As you now well know, because I've taken every opportunity to drill it into your head, the number one solution to most matte problems is to break the image being matted into multiple sections rather than trying to get one matte in one pass. You can divide the matte as follows:
All other tricks fall short if you're not willing to take the trouble to do this. And now for some more bad news. On SetNo matter how advanced and well paid you are, in most cases, your time is going to be far cheaper than that of a film crew on set. That meansshocking, I knowyou're going to have the opportunity to fix some things in post that should have been handled correctly on set, but weren't. I would call it job security but that's just too cynical.
If you're fortunate enough to be supervising the effects shoot itself (it's worth it for the craft services alone), you can do all sorts of things to ensure that the footage will key successfully later on. A hard cyclorama, or cyc (pronounced like psych), painted a uniform key color is far preferable to a temp cloth background. If you can't rent a stage that has one, the next best thing might be to invest in a roll of floor covering and paint that, so that you get the smooth transition from floor to wall, as in Figure 6.28 (assuming you're including the floor in your shot). Regarding the floor, it's also important for people not to walk across the cyc in street shoes, which will quickly contaminate it. Figure 6.28. On a stage with no hard cyclorama, you can create the effect of onethe curve where the wall meets the floorusing blue-screen cloth instead. It doesn't behave as well (note the hotspot on the curve), but it will certainly do in a pinch and is much preferable to removing the seam caused by the corner between the wall and floor.
Assuming you're starting with a background that is not only the correct color but is footprint free and has as few seams and other variations as possible, the most important concerns are lighting it correctly and balancing the foreground and background lighting. This job is, of course, best left to a professional, and any kind of recommendations for a physical lighting setup are beyond the scope of this book. But, hey, here are a few things you can keep in mind even if your role is only that of the effects supervisor on set:
If the setup permits, bring a laptop with After Effects on it and with some representation of the scene into which the footage you're taking is going to be keyed. This can be enormously helpful not only to you but to the gaffer and director of photography, to give them an idea of where to focus their efforts. You will have to work with the camera operator to get a live signal, and with a film camera it may require the addition of a video tap, but it is possible and useful. Finally, particularly if you're on set when a locked shot is being set up, once the lighting has been finalized and before action is called on the shot, ask the camera operator to shoot a few frames of clean platethe background with no foreground characters or objects to be keyed out later. There are all sorts of ways this can be handy. Matte ProblemsIt's an ugly fact of life that there will be times that you have to cheat and alter your matte. If you're going to do it and you're not using the built-in tools for it in Keylight, make sure you're at least using the right tool for the joband that you're using it with as light a touch as you can manage.
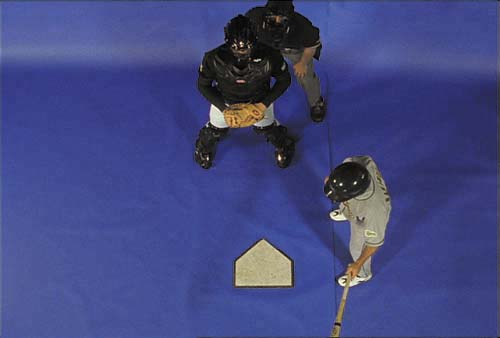
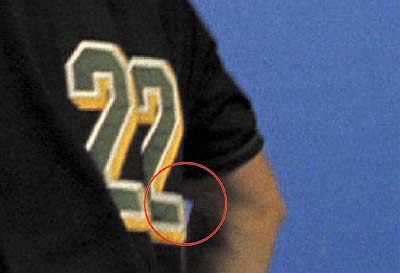
For whatever reasonthe placement of the effect in the Effects menu or maybe the nameMinimax is employed by artists who would enjoy far more success with one of the Matte Tools: Matte Choker or Simple Choker. Minimax is old school: It works in whole pixel increments to choke and spread pixel values. It has some interesting usesbut not for subtle matte edits. It is a quick way to spread or choke a matte, particularly when you lack alpha channel information. In most cases, however, Simple Choker is the tool you're looking for. It allows you to choke or spread a matte (by entering a positive or negative number, respectively) at the subpixel level (by inputting decimal values). That's all it does. It's really no different from the corresponding control in Keylight, but you can use it on any alpha channel, not just one created by Keylight (or any keyer). Matte Choker adds tools to introduce softness to the choke. The good thing is that its default is set at an effective starting point for many mattes. The bad thing is that softness controls tend to add more error to the process and are often the sign of a bad key. Don't be afraid to "settle" for Simple Choker: It is often up to the job without monkey-wrenching anything. Edge SelectionIf you have a copy of the Composite Wizard plug-ins, Deluxe Edge Finder is one of the most useful tools in there: It allows you to make a grayscale map outlining only the edges of your alpha channel, which you can apply as a luma matte to an adjustment layer. Then you have an adjustment layer whose effectsa blur, a levels adjustment, or a holdoutapply only to the edge. If you don't have Composite Wizard, no worries; you just have to take a few extra steps to make your own. The simplest way to do this is to apply Shift Channels with Take Alpha From set to Full On and the three color channels set to Alpha. Next, apply Find Edges (often mistaken for a useless, trippy, psychedelic effect because, as with Photoshop, it appears in the Stylize menu), and check the Invert box (Figure 6.29). Figure 6.29. The output from Keylight is shifted from the alpha channel to the color channels. Find Edges then takes all the contrast (gray) areas and makes a lovely edge selection from them, which can be used as a luma matte applied directly to the footage or to an Adjustment layer with the effects you want to apply. A typical use is to blur the edge slightly using this selection, in which case you want to blur the background and foreground together.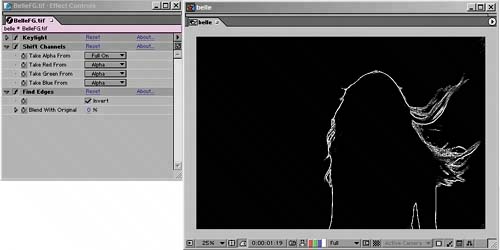 If you want to choke or spread this edge matte, this is a good time to bust out Minimax. The default setting under Operation in this effect is Maximum, which spreads the white edge pixels by whatever amount you specify in the Radius setting. Minimum chokes the edge in the same manner. If the result appears a little crude, an additional Fast Blur will soften the edge (Figure 6.30). Figure 6.30. Need thicker, softer edges? A quick Minimax set to the default Maximum allows you to specify a Radius by which the white area will grow. If the result looks a little chunky, a quick Fast Blur will soften it back. This is very useful, for example, when there is motion blur on the object that needs to be controlled in the edges.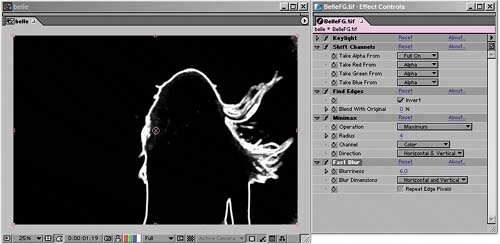 Once you're done, apply the result as a luma matte. You should not need to pre-compose before doing so. So what can you do with an adjustment layer with an edge matte applied to it? One great use is to apply a blur on the adjustment layer in the master comp, so that any blur you apply affects the blend area between the foreground and background. This is another way around a matte that is too hard and crunchy. Sometimes a subtle Levels adjustment helps your composited edge, and a desaturation operation using Hue/Saturation has the same effect as choosing gray as an edge replacement color in Keylight. Matte HolesIf you followed my instructions for keying closely, you should not have a problem with noise or holes in your foreground, because you are using a heavily choked core matte to close them. However, in cases where your background on set had fundamental problemsuneven lighting, seams, dirt on the flooryou may find noise and holes in your background. You need a way to close these without affecting your edges. The perfect software solution for such cases exists, but unfortunately it is a third-party tool: Miracle Alpha Cleaner, which is also a part of the Composite Wizard set. But before you run out to buy Composite Wizard, a further caveat: Most artists ultimately give up using Miracle Alpha Cleaner because they stop believing in miracles. That is to say, it's an automated tool that frequently fills holes that should have remained unfilled, such as the little triangular gap that sometimes opens up under outstretched arms (Figure 6.31). Figure 6.31. Using an automated solution, such as Pinnacle's Miracle Alpha Cleaner (part of the Composite Wizard pack), to fill holes in the foreground matte will also close holes that you want to keep, such as this tiny gap under the pitcher's arm. For that reason, veteran effects compositors tend to avoid these solutions, although they are tempting.
I hate to be the one to break it to you, but holes in your matte present a situation in which you're probably going to have to break out your rotoscoping skills (or refine them using tips from the next chapter). It's usually not as bad as you think to work this way; the painstaking part of keying is defining the edge. Things like holes can be fixed with crude masks or by tracking in paint strokes (more on this in the next two chapters). Matte FringingFringing around the edge of a feather matte is usually the result of an alpha having been applied separately. For example, it could occur if, in attempting to process color spill outside of Keylight, you applied the Keylight matte as a track matte. Don't panic and choke all that detail out of your edge! There is a better solution, but it is hidden away in the Channel menu. Remove Color Matting is designed specifically to suck color out of edges that are behaving as premultiplied rather than straight (if that distinction eludes you, review Chapter 3). Typically, premultiplied images have been matted against black, leaving a dark fringe around the edges. Remove Color Matting uses black as the default Background Color, and this is the only user-adjustable parameter in this effect. Therefore you may apply this plug-in and find that, boom, your problem is solved. If not, you can use the eyedropper to sample the background. If the fringing is bright colored, premultiplication may have occurred against white or gray.
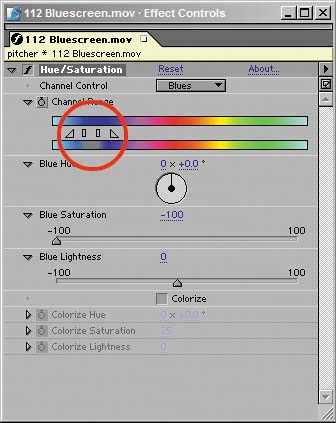
Color SpillColor Spill doesn't have to be a big deal. If you're not happy with the spill suppression you get from Keylight or whatever keyer you are using, you have other options once you apply the matte as an alpha track matte to the source footage. Sometimes the Spill Suppressor tool that is included with After Effects will do the trick for you. It uses a simple channel multiplication formula to pull the background color out of the foreground pixels. All you have to do is use the eyedropper tool to select a sample from the background color (you can even copy your original choice of screen color from Keylight) and leave the setting at 100%. If even Spill Suppressor pulls out foreground color that you want to keep, then it is probably advisable to open up Hue/Saturation and try to target and desaturate the specific hue that is causing you problems. This sounds positively Neanderthal in its lack of subtlety, but it works a surprising amount of the time, provided you can identify the spill color that needs to be removed. Open Hue/Saturation, and select a channel under Channel Control that you think might be the one that needs attentionsay, blues. Look closely at Channel Range. You might not have noticed the little controls underneath the upper color spectrum (Figure 6.32). These allow you to set the color range as precisely as you like. The inner hash marks control the range affected by the controls below; the region between those and the outer, triangular markers is the feather area. Figure 6.32. The little hash marks and triangles under the upper gradient of the Channel Range control let you specify a region to desaturate. It's crude but in some cases effective for knocking a particular color out of your scene.
In most cases what you'll be doing to remove spill is selecting a channel, refining it, and lowering Saturation to reduce spill. Here's how to gauge which pixels are affected: Before lowering saturation, crank it up to 100. The pixels in the affected range will be easy to spot. |
EAN: 2147483647
Pages: 156