 | Bug Alert, or Not?Does a bug still count as a bug if the development team knows about it and has decided to leave it as-is to be backward-compatible? I'll let you be the judge. Say there's one part of an overlaid element that you want to mask and reduce to partial opacity, say 50%. You create a mask for the area to be dialed back, set it to Subtract, and set Mask Opacity to 50%. But instead of the anticipated result, displaying the layer at full opacity and the masked area at 50%, the masked area is subtracted 100% and the rest of the layer displays at 50% opacity! This is the identical result to applying the same mask in Add mode with Invert checked, only in that case the behavior is at least anticipated. The workaround is to add a mask at the top of the stack, giving the mask the dimensions of the entire layer (double-click the Rectangular Mask tool). The Subtract mask will now work properly relative to this first mask, set to Add mode. |
|
Putting masks in motion for visual effects work is also known as rotoscoping, which is covered in greater depth in Chapter 7. There are all kinds of uses for masks, however, and that chapter is fairly specialized, so here is an overview of some things to pay attention to when putting a mask in motion. Interpolation Basics You can set a temporal ease on a mask keyframe, but you have no corresponding spatial curves with masks. Each point travels in a straight line to its position in the following keyframe. This means that to precisely mask an object traveling in an arc, you need to set a lot more keyframes than for an object traveling in a single direction. The real bummer about mask keyframes is that you can't select a group of them and translate the mask; as soon as you move, rotate, or scale it, your selection snaps to the current keyframe only. There is a workaround. You can duplicate the layer being masked and use it as an alpha track matte for an unmasked source of the same layer, in which case you're free to transform (or even motion track) the duplicate using the normal layer transforms. It's not a perfect solution by any means, but it is often useful and hardly anyone thinks of it. Moving, Copying, Pasting, and Masks You can freely copy mask shapes from one source (a different mask, a different keyframe in the same mask animation, Illustrator, or Photoshop) and paste them into an existing mask channel. You just have to follow some rather strict rules that depend on the situation: With no keyframes involved in the source or target: Selecting the mask itself and pasting it to another layer automatically applies it as-is to a new mask or to any mask that is selected. Source mask has Mask Shape keyframes, but target has none: Highlighting the mask (not the specific keyframes) and pasting creates a new mask as if pasting from time 0. Highlighting any or all Mask Shape keyframes pastes a new mask with keyframes starting at the current time. Target layer has masks with or without keyframes: To paste Mask Shape keyframes into a particular mask at a particular time, highlight the target mask before pasting. Highlighting the target Mask Shape property highlights any keyframes and replaces them (not usually what you want).
In all cases, if the target layer is a different size or dimension from the source, the mask stretches to maintain its relationship to the layer boundaries. In many situations, pasting Mask Shape keyframes blindly in this manner is not what you're after, but a rather obscure feature in the Layer window will help you. The Target pull-down along the bottom of the window has a unique function: When you choose an existing mask as the target, you can start drawing a new mask anywhere in frame and it will replace the shape in the target mask layer (Figure 3.21). Figure 3.21. This pull-down menu at the bottom of the Layer window makes it easy for you to create a mask shape from scratch, replacing the shape in the target mask. If the target mask has keyframes, After Effects creates a new keyframe wherever you draw in a new shape for that mask. 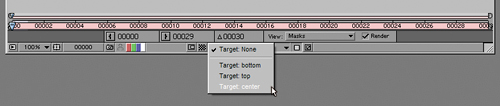
First Vertex  | The Smart Mask Interpolation tool (available via a palette found in the Window menu) is designed to smooth transitions between two radically different shapes. It's useful for stylized motion graphics of detailed masks transitioning from one to the next, but less useful for effects masking and rotoscoping because it's a bit too automated. The result, while sometimes pleasing, doesn't usually obviate the need to more carefully keyframe an accurate mask transition. |
When pasting in shapes or radically changing the existing mask by adding and deleting points, you may run into the issue of how the points line up. Hidden away in the mask context menu, and available only with a single vertex of the mask selected, is the Set First Vertex command. If you are having problems with mask points twisting around to a ismatched point during an interpolation, setting the First Vertex to two points that definitely correspond should help straighten things out. It also can be necessary for effects that rely on mask shapes, such as the Reshape tool (described in Chapter 7). | The mathematical descriptions of blending use values normalized to 1; in other words, the full range of pixel values is 0 to 1 instead of 0 to 255, as it typically appears in your color controls. A medium gray on any channel is 0.5 instead of 128, pure white is 1, and pure black is 0 (Figure 3.23). This makes it much simpler to show the calculations that are actually used to create the blended pixels, because the internal math typically is based this way. For information about overbright values, which have a value greater than 1,see Chapter 11, "Issues Specific to Film and HDR Images." Figure 3.23. The Info palette can display pixel values in several different modes, including decimal values, shown here with the cursor over a medium gray. The values are normalized to a maximum luminance value of 1.0 and a minimum of 0.0, which make calculations more straightforward than 0 to 255, the standard 8-bit range. Select a color mode for the Info palette via its wing menu; whatever mode you select is thereafter also used by the Adobe color picker. 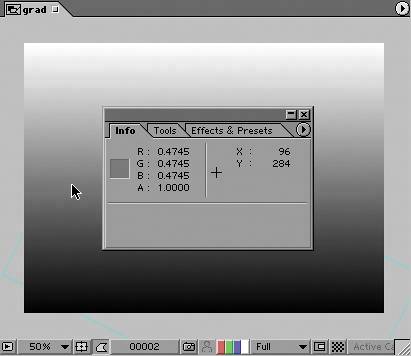
|
|