Blending Modes: The Real Deal
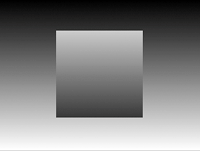
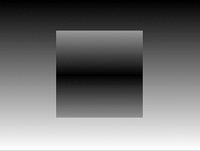
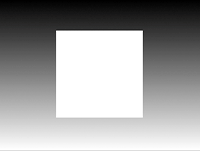
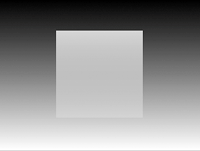
| After Effects includes 34 blending modes, each created with a specific purpose (Figure 3.22). For effects work, however, the majority of them are not particularly recommended. In fact, traditional optical compositing would effectively include only two of them: Add and Multiply. Figure 3.22. You have 34 blending modes, but how many will you really use?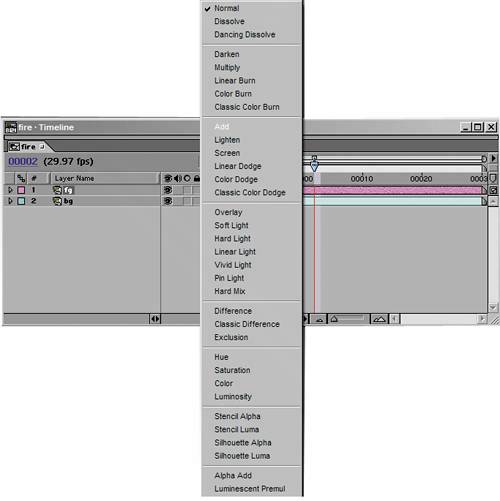 So that's it? Use these two or none at all? Not quiteI'll point out a few other useful modes as well. Once you understand how your options work, you can make informed compositing decisions, rather than lazily playing Go Fish by trying one mode after the other until you see something you kind of like. Remember, blending modes are all based on mathematical operations for combining pixels in the layer containing the given blending mode and the pixels behind iteither below it in the stack, if all the layers are 2D, or positioned behind it in 3D space, if all the layers are 3D. To help you understand what the various blending modes are doing, Figures 3.24 through 3.30 show you what happens when a masked gradient is blended with its exact inverse. Remember that color operations are fundamentally no different than grayscale, except that they happen via three channels instead of one. Figure 3.24. Compare Figures 3.25 through 3.30 to this one, which shows a masked section of a gradient over its exact inverse. Blending here is set to Normal.
Figure 3.30. Difference bases the luminance of the foreground pixels on the amount of difference between the foreground and background source. In this case, pixels along the vertical center have no difference and are black, with the difference increasing as pixels move toward the upper and lower edges.
Figure 3.25. The same combination with Add mode applied to the masked foreground area, which becomes full white as each pixel in the background is added to its inverse in the foreground.
Figure 3.26. Screening results in combined pixels that are not as bright as with Add, but which are combined in a similarly linear manner resulting in a flat color.
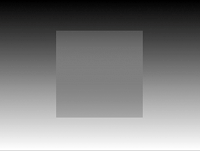
Figure 3.27. Multiplying a value with its inverse causes it to be zero or full black. This is like having the two gradients on two separate pieces of film and laying one over the other, making the combination darker because less light passes through the denser (darker) areas.
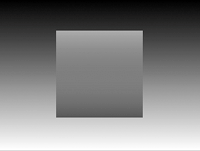
Figure 3.28. Overlay is a combination of Screen and Multiply; areas of the background below 50% brightness are multiplied, those above 50% are screened.
Figure 3.29. The inverse of Overlay: This time areas of the foreground below 50% brightness are multiplied, those above 50% are screened.
Add and ScreenAdd and Screen modes both brighten the image. Screen typically yields a subtler effect than Add, which results in brighter values overall. Add mode is every bit as simple as it sounds; the formula is
where A is a pixel from the foreground layer and B is a background pixel (although they are obviously interchangeable in this formula). The result is clipped at 1 for normal 8- and 16-bit pixels; any pixels that add up to a value of more than 1 take the value of 1, full white.
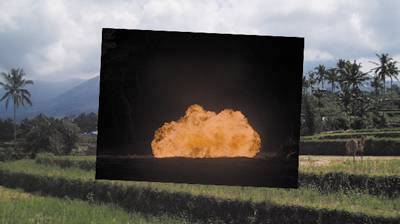
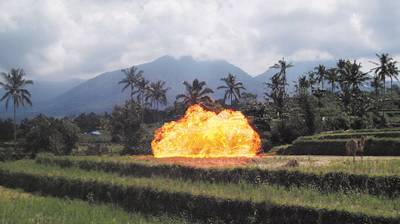
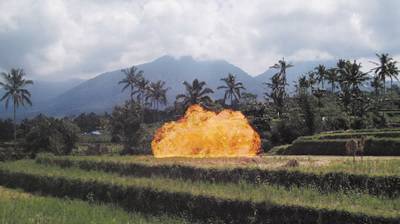
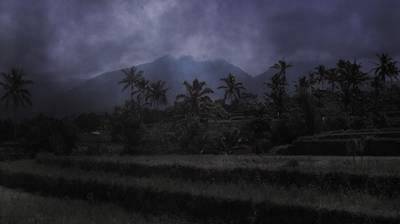
This mode is used a lot; it brightens the overall image, but black in the foreground becomes transparent, effectively adding a value of 0 to the background. It is useful for laying fire and explosion elements shot in negative space (against black) into a scene, adding noise or grain to an element, or any other element that is made up of light and texture (Figures 3.31a, b, and c). Figure 3.31a, b, and c. Add mode takes the source foreground element, the fire shot against a black background shown in 3.31a, and adds its pixel values channel by channel to the background (3.31b), causing the pure black pixels to disappear completely (3.31c).
Screen mode has an influence similar to Add mode's, but via a slightly different formula. The pixel values are inverted, multiplied together, and the result is inverted:
Note that with this formula, fully white pixels stay white, fully black pixels stay black, but a mid-range pixel (0.5) takes on a brighter value (0.75), just not as bright as would be with Add (1). You use Screen much like Add. Screen is most useful in situations where Add would blow out the highlights too muchglints, flares, glow passes, and so on (Figure 3.32). Figure 3.32. Using Screen on an element brings it in more softly; notice there's less brightness in the areas of overlapping fire. A similar effect could be achieved using Add plus a Levels correction to the foreground to reduce its Output White value.
MultiplyMultiply is another mode that is as simple as it sounds; it uses the formula
This would seem to make the values much higher until you recollect that we are dealing only with values between 0 and 1. Multiplying them together, therefore, actually has the effect of reducing midrange pixels and darkening an image overall, although pixels that are full white in both images remain full white. In optical compositing (the way this was all done before we had computers) the equivalent of multiply was layering two images, one over the other, combining their densities such that the dark areas of one image held out light from the other image. Multiply literally has the inverse effect of Screen mode, darkening the midrange values of one image with another. It is useful in cases where you have dark tones that you want to include in an image without replacing the lighter tones as much, for example to layer in texture, shadow, or dark fog to a background (Figure 3.33). Figure 3.33. Dark smoke (actually a grayscale fractal noise pattern with no alpha channel) is multiplied over the background, darkening the areas that are dark in either the foreground or background further.
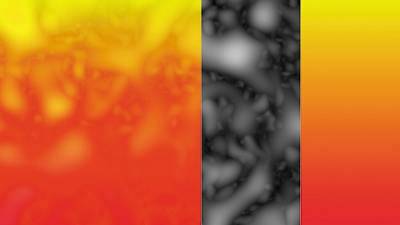
Overlay and the Light ModesOverlay uses the bottom layer to determine whether to screen or multiply. If the top layer is lighter than 50%, it is screened. Below 50%, it is multiplied. Hard Light does the same, only using the top layer to determine whether to screen or multiply, so the two are inverse effects. Reversing layer order and swapping Overlay for Hard Light yields an identical result. These modes, along with Linear and Vivid Light, can be most useful for combining a layer that is predominantly color with another layer that is predominantly luminance, or contrast detail (Figure 3.34). This is how you create textures; for example, a lot of the lava texturing in the Level 4 equence of Spy Kids 3D was created by combining a hand-painted color heat map with moving fractal noise patterns using Hard Light. Figure 3.34. Overlay and its inverse, Hard Light, are useful for combining color and texture. Here, an instant lava lamp texture was created using the components shown at the right: a solid with Fractal Noise applied set to Overlay mode on top of a red-to-yellow gradient.
This type of usage is fine, but don't start fishing in the various Light modes when combining images. They don't work with overbright levels (explored in Chapter 11), and this method of adjusting images is a warning sign that you haven't thought things through in terms of what you're trying to do. DifferenceDifference is a subtraction mode that inverts a pixel in the background according to how bright the foreground pixel is. There is one very specific use for Difference that is never rendered: You can line up two identical layers using this mode. When all of the pixels line up properly, layer details disappear. HSB and Color ModesThe Hue, Saturation, and Brightness modes each combine the given value from the foreground layer with the other two from the background layer. Saturation applies the foreground saturation to the background hue and luminance values, Hue combines the foreground hue with the background saturation and luminance, and Brightness uses the foreground luminance in combination with the hue and saturation of the background. Color takes both the hue and saturation of the top layer, using only the luminance from the underlying background (Figure 3.35). Figure 3.35. Setting a deep-blue-colored solid to Color mode and overlaying it on the plate footage has the effect of tinting the colors in the image blue. Subtler uses of this mode are explored in Chapter 12, "Working with Light."
Keep these modes in mind as a shortcut to channel operations in which you might want the color from a foreground combined with the detail (luminance) of the existing background. Stencil and SilhouetteThe Stencil and Silhouette blending modes apply transparency information to all of the layers below them in the composition. The Stencil modes use the light pixels, and Silhouette the dark pixels, of either the Alpha or Luminance values to determine the areas that remain visible in the layers below the current layer. You should keep these in mind for that rare occasion where they save you extra setup work. Alpha Add and Luminescent PremultiplyAlpha Add and Luminescent Premultiply are special-case blending modes that affect semi-transparent edge pixels only. Have you ever tried matting a layer with an alpha channel over the same layer with the alpha channel inverted? Figures 3.36a through d show the typical result: a semi-opaque line tracing the edge of the alpha, where the pixels remain semi-transparent because they are blended together in the same manner as semi-opaque layers. Alpha Add adds the actual values of the alpha pixels without compensating for the opacity effect, so two 50% opaque pixels become 100% opaque. Figure 3.36a through d. (left to right) Laying a matted object over a background with the inverse matte seems as though it should result in a fully opaque image (3.36a, b). Instead, edge pixels become semi-transparent (3.36c). Alpha Add does just what the title implies, adding the alpha values together so that inverse mattes total up to 100% throughout the image (3.36d).
Why would you combine a layer with itself, inverting the alpha? You probably wouldn't. But you might combine two layers with overlapping transparency that should work this wayfor example, two parts of the same layer. Luminescent Premultiply is an alternative method of removing premultiplication from source footage, retaining bright values that would otherwise be clipped. Premultiplication over black causes all semi-transparent pixels to become darker; removing the black values while adding transparency, which is what removing premultiplication does, can cause them to appear dimmer than they should. This is useful for bright overlaid elements that come in with alpha channels and premultiplication, such as flares and explosions; you can set the footage to interpret as Straight on import and use this mode instead of Normal to overlay the element. It's another trick to keep in your arsenal should you ever see the symptoms (dim translucent elements) for which it is recommended. |


EAN: 2147483647
Pages: 156