Animation Offsets
| The two most common ways to offset a transform animationto have a layer change its position, rotation, and scale from a point other than its centerare intuitive, easy to use, and well documented. In an individual layer, move the anchor point from the center to a specific point in the frame, typically using the Pan Behind tool (keyboard shortcut: Y). Details on that are in the "Editing the Anchor Point" section. You can center several layers around a single layer by parenting them to that layer. The children take on all of the transforms of the parent layer (not Opacity, which, remember, isn't a real transform) plus whatever offsets they already have. The number one piece of advice when setting an anchor point or a parent-child relationship is to do so before animating, if at all possible, because the only places where this gets tricky have to do with editing the anchor point or the parent-child relationship when Transform keyframes are already in place. The problem is that these settings work as offsets, and can change the current Position frame, messing up the animation as a whole. The development team is consistent in their design of extra animation features: You can activate the features without changing what is already set up in the composition. So when you change an anchor point position, for example, After Effects performs an offset to the position of the layer in the exact opposite direction so that the layer maintains the same apparent position. And when you parent a layer to another layer, you are setting the default relationship between the parent and child at the frame where you parent; nothing changes in the Composition window on that frame.
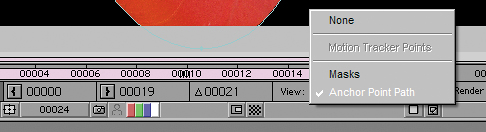
That's nice and clear. But reset an offset anchor point in the middle of a Position animation, and the Position keyframe where you reset it changes. Or undo parenting at a frame other than the one where you set it, and its Position value changes, but it appears to remain in the same place. Weird. You can override this default behavior, moving the anchor point or undoing parenting without changing the Position value in either case, by holding down the Alt (Option) key as you make the change. Editing the Anchor PointThere are a bunch of ways to edit the anchor point position, and the effect on existing Position data varies with each method. The most straightforward method is to edit the anchor point with the Pan Behind tool (Y) right in the Composition window; doing so causes Position to offset to maintain its current appearance. For a similar result, if you edit the anchor point numbers in the timeline, it is like holding down the Alt (Option) key using the above methods: The Position data does not change. If you want to edit animated anchor point data, you may have a difficult time in the Composition window. Activate the Layer window, and under the View pull-down, change the default of Masks to Anchor Point Path (Figure 2.25). Figure 2.25. Masks, rather than the anchor point path, appear in the Layer window by default. Change that with this menu at the bottom of the Layer window.
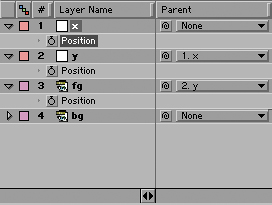
Editing the Parent HierarchyWhen setting up (or, if necessary, dismantling) a parent-child relationship, you have a choice of methods. You can choose the target parent layer from the pull-down menu in the Parent column of the timeline. Or, you can use the pickwhip control next to the pull-down menu, clicking and dragging from the pickwhip icon of the child layer to the target parent layer. If you have several layers selected and want to parent them all to a single layer, either method will set them all to the same parent. Parenting does an effective job of sticking even when you change layer order or you duplicate or rename the parent. You can select all of the children of a parent layer by choosing Select Children from the bottom of the context menu. You can remove parenting from all selected layers by choosing None from the pull-down menu. Nulls and the Parenting CureKeep parenting in mind whenever you are trying to solve a problem that involves individualizing transforms. A prime example is the lack of separate transform channels in After Effects. Position, Anchor Point, and Scale properties share a single keyframe for all three channels. Animators who are used to being able to keyframe these as separate channels sometimes find this a bit of a drag. There is a way to solve this problem with expressions sliders, but I'll leave that aside in favor of one that's easier to set up: a null axis hierarchy. Null objects are quite useful, invisible, nonrendering layers that occupy only a single point in space, although they are based on layers with dimensions that show up in the Composition window (Figure 2.26). You can create a null by context-clicking an empty space in the Timeline window and choosing New > Null Object (you can choose it from the Layer menu, as well). Figure 2.26. A null object in After Effects looks like the outline of a 100-by-100-pixel layer, but cannot show up in renders. The reason for showing the outline is to give you something to easily recognize and grab.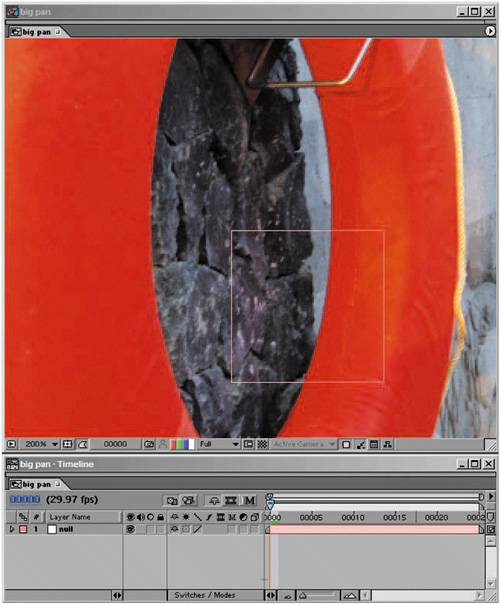 Consider an example of creating a hierarchy for 2D Position. This addresses a concern some animators have with After Effects: that it does not provide the ability to keyframe transforms on separate axes individually. Figure 2.27 shows the basic setup, in which two nulls are created, one called X and the other Y; the layer is parented to Y, which is then parented to X. Ideally there would be a way to now lock the second (Y) Position value in X, and the first (X) value in Y, but there's not, so you must remember to adjust only the X Position value in X and the Y Position value in Y. If it's important to you to stagger keyframes between the two values, however, this is an effective-workaround. Figure 2.27. You may never need to animate a layer on separate axes, but it's a good example of how a parent hierarchy can help you out. The foreground (fg) layer is parented to the Y control, which is in turn parented to the X control. The idea is to animate only the X Position value of X and only the Y Position value of Y, so that the timing of each channel can vary (which it cannot with standard keyframes).
Except for one thing: After Effects 6.5 has no curve editor, nowhere to see the animation data from two distinct channels together. So visually coordinating this edit may turn out to be a hassle. As a matter of full disclosure, I will add that I have rarely ever needed to set things up this way; I tend either to anticipate the problem by animating in a certain order to avoid it, or to use expressions to tie each animation channel to a slider (described in Chapter 10, "Expressions"). |
EAN: 2147483647
Pages: 156