| VPN has several different attributes that you must configure before you can establish a VPN tunnel allowing remote users to connect. Fortunately, ASDM has a built-in wizard that steps you though exactly what needs to be done to configure your ASA/PIX Security Appliance to allow the connection of VPN clients. This section covers two steps to configure your ASA/PIX Security Appliance for VPN connectivity: Downloading and Installing the Cisco VPN Client Cisco uses some proprietary technology in IPSec VPN, such as Dead Peer Detection, that tracks and recovers dropped VPN tunnels. Therefore, you should use only the Cisco VPN client when connecting remote users. Connectivity with other clients might work, but it's likely it will require significant configuration tweaking and that you will lose some VPN features. In this example, you use the Cisco VPN client. CAUTION You must install and test the VPN client on a machine other than the machine you are using for your ASDM configurations. If not, when you bring up the VPN tunnel, you will no longer be connected to your ASA/PIX Security Appliance.
To download the client, follow these steps: Step 1. | Go to Cisco.com.
| Step 2. | Click Login and enter with your Cisco username and password.
| Step 3. | In the left column of the web page, highlight Technical Support and drop down to Downloads.
| Step 4. | Choose VPN Software.
| Step 5. | Choose Cisco VPN Client.
| Step 6. | Choose Download Cisco Strong Encryption Software under Export Licensing Controls.
In this example, the operating system the author is working with is Windows 2000 Professional, so the image selected is vpnclient-win-msi-4.0.5.C-k9.exe; this might vary depending on your platform and operating system.
| Step 7. | Click Yes on the screen that verifies legal export restrictions and enter appropriate responses to reflect your VPN deployment.
Caution The VPN client includes strong cryptography and thus is export-restricted. If you are downloading this software from a country that is not approved for VPN usage, do not click Yes on this page and terminate your installation immediately. Not doing so constitutes a violation of United States export laws. | Step 8. | Click the VPN Client Image link.
| Step 9. | Enter your CCO username and password.
| Step 10. | Save the image to your hard drive.
You have finished with your browser and can close it if you want.
| Step 11. | Click the VPN Client Installation image.
| Step 12. | Create a folder on your desktop called VPN.
| Step 13. | Unzip the VPN client file into the VPN folder.
| Step 14. | Click vpnclient_setup.exe to install the VPN client.
| Step 15. | Click Next on the Welcome screen.
| Step 16. | Read the license agreement; if you agree, accept it and click Next.
| Step 17. | Either choose the default to install VPN in the program files directory or browse to the appropriate direct and click Next.
| Step 18. | Click Next at the Ready to Install prompt to start the unpacking, copying, and installing of the VPN client.
| Step 19. | Click Finish when the installation has completed; a reboot is also required for the changes to take effect.
|
After your system has rebooted, the VPN client is ready for configuration. First, however, you must enable the ASA/PIX Security Appliance to configure VPN connectivity. Configure VPN on the ASA/PIX Security Appliance Now that you have a VPN client installed on a PC, you can enable VPN service on the ASA/PIX Security Appliance. In this example, you terminate the VPN tunnel on the outside of the ASA/PIX Security Appliance. In this case, because you have only two services (web and mail), both on the demilitarized zone (DMZ), you simply verify that VPN is working by logging on to the security appliance using the VPN client and then pinging a client on the inside interface of the ASA/PIX Security Appliance. NOTE You cannot ping the inside interface of the ASA/PIX Security Appliance itself from a VPN client.
Doing so successfully proves that the tunnel is working because the 192.168.1.0 network is a private address, and the ping will never succeed unless VPN has connected the VPN client as an inside user of the ASA/PIX Security Appliance: Step 1. | To start, choose VPN Wizard from the Wizards pull-down menu.
| Step 2. | You will be presented with two options, one option to connect another ASA/PIX Security Appliance or router to the VPN network and a second option to connect a remote VPN client. For this example, choose the option to connect to remote-access VPN. (See Figure 11-2.) Click Next.
Figure 11-2. VPN Tunnel Type 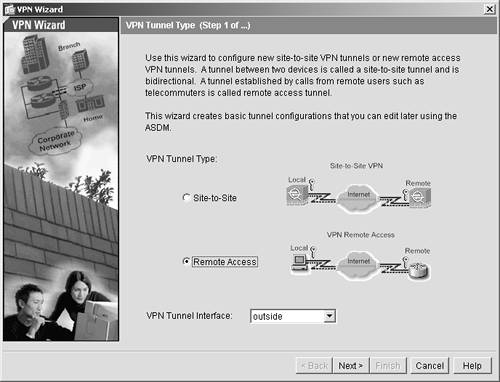
| Step 3. | Click the Remote Access option button. Doing so tells the security appliance that you are creating a configuration for the type of VPN client you installed on your computer. Then click Next.
Figure 11-3. VPN Remote Client Type 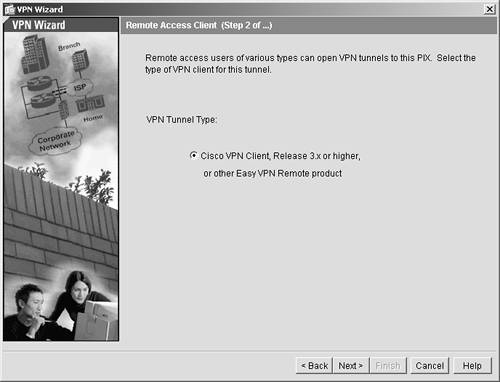
| Step 4. | You can enter any name you want for the tunnel group. For this example, enter vpntunnelgroup. You will also be entering many of the values from the next screens in the properties of your VPN client in the next section.
| Step 5. | You need to enter a preshared key for the client to authenticate the ASA/PIX Security Appliance. Again, you need to think security best practices and use a hard-to-guess preshared key. For this example, use the value Qwert1234.
| Step 6. | You could enter a certificate here if you plan to deploy certificates in your VPN network. For more information regarding certificates, go to the technical documentation on the Cisco website at http://www.cisco.com/go/pix.
Your entries should look like those in Figure 11-4. Click Next.
Figure 11-4. VPN Wizard Group Authentication 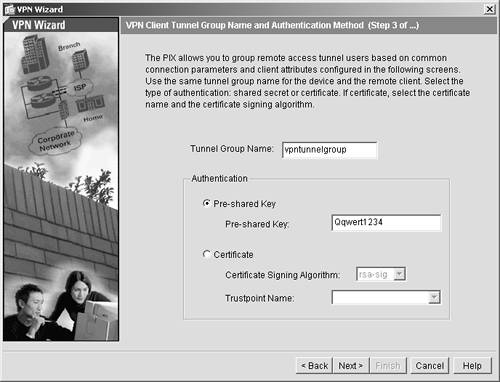
| Step 7. | Because in this example you use the local authentication, you need to click the Authenticate Using the Local Authentication Database option button, and then click Next. If you have an AAA server, you could elect to the use it instead for authentication. (See Figure 11-5.)
Figure 11-5. VPN Local Authentication 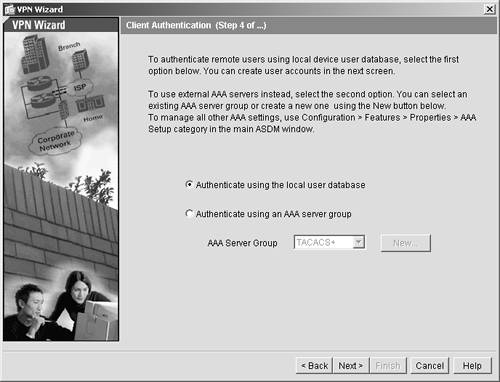
| Step 8. | You now need to add a user who can use the VPN client to authenticate to the ASA/PIX Security Appliance. Enter remote1 for the username and qwert1234 for the password. ASDM requires you to enter this password twice to verify that your entry is correct.
| Step 9. | Click Add to put the user into the local database.
Your screen should look like Figure 11-6.
Figure 11-6. VPN User Information 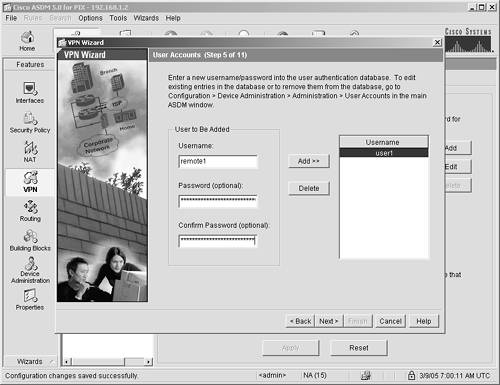
| Step 10. | Click Next.
|
You now need to define addresses that you are going to assign to the VPN users. Because you want outside users to be part of the inside of your network, you must use the same subnet you've been using for inside addresses. The valid range of private addresses on your inside is 192.168.1.1 through 192.168.1.254. You already used part of this address range for DHCP and inside interfaces. DHCP is using 192.168.1.100 through 192.168.1.200, and the inside interface is 192.168.1.1. Also, you might want to have some addresses fixed so that you can run ASDM; therefore, assume that the addresses 192.169.1.2 through 192.168.1.10 are also used. Use the range 192.168.1.50 through 192.168.99 for the addresses to be allocated to VPN clients: Step 1. | Enter a pool name; call it vpnpool.
| Step 2. | Enter your starting address as 192.168.1.50 and the ending address as 192.168.1.99.
| Step 3. | Enter a subnet mask of 255.255.255.0.
| Step 4. | Your entries should look like Figure 11-7. Click Next.
Figure 11-7. VPN Address Allocation 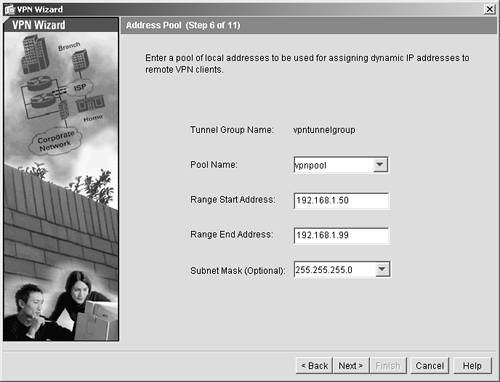
You will now be presented with the Client Attributes screen (as shown in Figure 11-8).
Figure 11-8. VPN Client Attributes 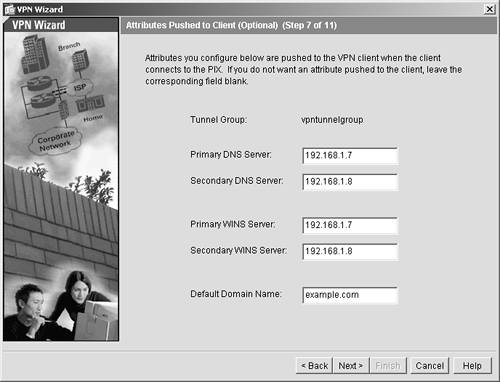
| Step 5. | Enter the DNS address given to you by your ISP or the IP address of your corporate DNS server.
| Step 6. | If you are using Microsoft networking in your deployment, enter the IP address for the WINS servers.
| Step 7. | Enter your domain name. (In this example, use example.com.)
| Step 8. | Your entries should look similar to Figure 11-8. Click Next.
Now you are ready to enter VPN parameters.
| Step 9. | The first VPN screen defines how public keys (IKE) will be exchanged with your VPN client. Keys must be encrypted to mitigate possible man-in-the-middle attacks against your data. The data must also be authenticated, and you must choose a method for this encryption and authentication.
The defaults on this panel are more than adequate to provide security for a client key exchange.
| Step 10. | Accept the defaults by clicking Next.
The second VPN screen defines how encrypted data (IPSec) will be exchanged with your VPN client. Data must be encrypted to mitigate possible man-in-the-middle attacks. The data may also be authenticated to ensure that it was sourced from the VPN client and not an attacker who might have successfully launched a man-in-the-middle attack against your VPN session.
| Step 11. | Use 3DES as the default encryption method and use SHA as the data authentication method.
Your screen should look like Figure 11-9.
Figure 11-9. IPSec Attributes 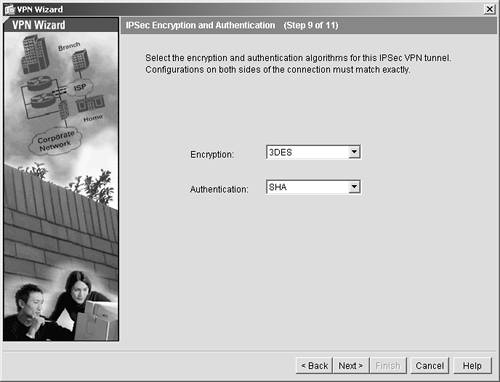
| Step 12. | Click Next.
| Step 13. | In the next panel, you can narrow down which addresses the VPN client can see when logged on to the ASA/PIX Security Appliance. Accept the default, which allows the VPN client to see all resources.
To find out more about filtering resources and split tunneling, again refer to Cisco.com at http://www.cisco.com/go/pix.
| Step 14. | Click Next.
| Step 15. | The VPN Summary panel now displays. (See Figure 11-10.) Review your entries. If you see that you made an error, use the Back button to go back and make corrections to your configuration. If you accept the configuration as is, click Finish to end the wizard.
Figure 11-10. VPN Summary Panel 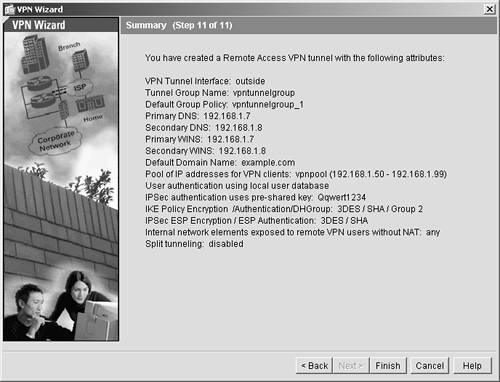
|
You are now ready to configure your VPN client and then log on to your ASA/PIX Security Appliance VPN. Configure and Connect Using the VPN Client Now that you have installed the Cisco VPN client on your PC and configured the ASA/PIX Security Appliance to accept an inbound VPN tunnel on the outside interface, you are ready to configure the VPN client on your PC and log in to the ASA/PIX Security Appliance. These steps are specific to VPN Client 4.0(5), but they should be similar in future versions: Step 1. | Launch the VPN client on your PC by navigating to Start > Programs > Cisco Systems VPN Client > VPN Client. Now, the first thing that you need to do is to create a connection called ClientTest.
| Step 2. | Click the Connection Entries pull-down and choose New.
| Step 3. | Enter a descriptive connection entry: Remote VPN Connection.
| Step 4. | Enter the outside IP address of the ASA/PIX Security Appliance of the Host box: 199.199.199.199.
| Step 5. | Click the Authentication tab. Enter the VPN group from your ASA/PIX Security Appliance configuration, vpntunnelgroup, as the group authentication name.
| Step 6. | Enter the group password you configured on the ASA/PIX Security Appliance: qwert1234. Enter this twice; the second time is for confirmation. Your entries should be similar to Figure 11-11.
Figure 11-11. VPN Client Setup 
| Step 7. | Click Save to save the information permanently to the VPN client properties.
Now, you need to test your VPN and verify your VPN connectivity.
| Step 8. | Highlight the connection you just created in your VPN client called Remote VPN Connection and click the Connect icon on the navigation bar.
| Step 9. | The Username and Password screen shown in Figure 11-12 displays. Enter the credentials you created for your VPN user. The username was remote1; the password was qwert1234.
Figure 11-12. VPN Logon 
| Step 10. | Click OK.
| Step 11. | To verify that you have logged on to your ASA/PIX Security Appliance, double-click the VPN client toolbar icon. It redisplays your VPN client application.
| Step 12. | Click the pull-down Status/Statistics. You should see that the address allocated to your client is 192.168.1.50, which is the first address from the VPN client pool. (See Figure 11-13.)
Figure 11-13. VPN Statistics 
| Step 13. | Ping a client on the inside of the ASA/PIX Security Appliance from the Windows DOS command line of the VPN client to ensure that your connection is completed.
If you don't have a client to ping, the easiest way is to connect a separate PC in DHCP mode to the switch connecting to the inside ASA/PIX Security Appliance interface. This client will get a DHCP address of 192.168.1.100. You can then ping 192.168.1.100.
|
CAUTION The inside interface of the security appliance is not pingable from a VPN client.
Using the VPN Client with NAT If a remote ISP uses network address translation (NAT) to allow connections to the Internet, this scenario will break IPSec-encrypted VPN connections. VPN and NAT can be a tricky combination. VPN is dependent on addresses not changing. Therefore, special features are built in to the ASA/PIX Security Appliance to ensure that VPN will work if NAT is being used on the client side of the network. Take this warning seriously; it is a common scenario. To find out whether NAT is broken, bring up the Status > Statistics screen on the VPN client. Do a ping to any address. If you see that the Received or Sent Packets designation is zero, you have a NAT problem, and you should take the steps outlined here to enable VPN functionality with NAT. Configuring the ASA/PIX Security Appliance to Allow NAT for VPN In many cases, ISPs are using NATed addresses so that they can preserve the number of IP addresses they are using. Because of the way IPSec uses addresses in envelopes and the way NAT changes those address in the middle of your connection, you need complete special configurations before these users can access your network. Follow the steps here to allow NATed VPN connectivity to your network. On the VPN client, you make a duplicate of the existing connection and then add NAT functionality to that entry. To do so, follow these steps: Step 1. | Launch the VPN client.
| Step 2. | Right-click the connection you already created called Remote VPN Connection and choose Duplicate.
| Step 3. | Right-click the duplicate connection and choose Modify.
| Step 4. | Change the name to Remote VPN Connection - NAT.
| Step 5. | Click the Transport tab, and then click the IPSec over UDP option button. (See Figure 11-14.)
Figure 11-14. VPN NAT Connection 
| Step 6. | Click Save.
|
|