| ASDM has two main components, both of which are explored in this chapter: Pull-down menus Navigation bar
These two components have several subcomponents that are addressed in detail in this chapter. In many cases, subcomponents have several layers of detail. The enable/disable state of some menu items will change depending on the current selection of the GUI and rights of the logged-on user. Because of this, the navigation bar is discussed with appropriate information interjected about the pull-down menus as the chapter progresses. If you followed the instructions in Chapter 3, "Getting Started with the ASA/PIX Security Appliance," you should be able to access the ASDM GUI. The following is a summary of the steps you need to take to connect your PC to the ASA/PIX Security Appliance for ASDM access: Ensure that your PC is connected to Ethernet 1 on the ASA/PIX Security Appliance via a crossover cable or a switch. Ensure that your PC has the IP address 192.168.1.2. On the Windows operating system, launch either Internet Explorer 6.0 or greater or Netscape 7.1/7.2. Netscape 7.0 and Mozilla 1.7.3 are also supported on Sun Solaris and Linux. Java 1.4.2 or 1.5.0 must be installed on any browser platform that you select. (The examples in this book use Microsoft Windows.)
To start the ASDM on your Windows PC, follow these steps: Step 1. | Enter the command https://192.168.1.1/admin. The screen in Figure 4-1 will display.
Figure 4-1. ASDM Start Screen 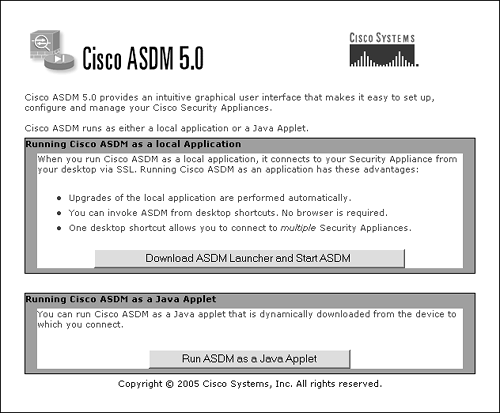
| Step 2. | When the screen from Figure 4-1 displays, you can select either to launch ASDM as a Java applet or as a Windows application. (This book uses the Java applet; but if you select to use the application, there will be differences in what you see on the screen.)
| Step 3. | Appropriately answer all the prompts for passwords and certificate acceptance. One of the advantages of using the ASDM launcher application is that you don't need to respond to the certificate dialog boxes seen when using the Java applet.
|
When you have successfully connected to the ASA/PIX Security Appliance, the panel shown in Figure 4-2 displays on your browser. Figure 4-2. ASDM Main Menu 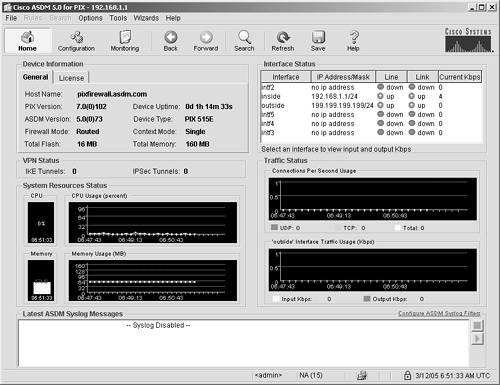
Exploring the Pull-Down Menus Across the top of the page in the ASDM display are seven pull-down menus. The menus are labeled File, Rules, Search, Options, Tools, Wizards, and Help. Table 4-1 provides a general overview of each pull-down menu. A more detailed explanation is provided in the section following the table. Table 4-1. Pull-Down Menu Command SummaryPull-Down Menu | Summary |
|---|
File | Contains commands to save configuration files and internal log buffer to the Flash memory in the ASA/PIX Security Appliance and various other locations. | Rules | Used to insert items into a rules list. This pull-down is active only when the Configuration icon is selected in the navigation bar and the security policy or NAT panels are active. Note that functions in the Rules menu are also accessible on the toolbar, in the rules panels, and from the buttons or right-mouse click menus in the tables. | Search | Used to search items that exist in a rules list. This pull-down is active only when the Configuration icon is selected and the security policy or NAT panels are active. | Options | Sets global behaviors of ASDM such as previewing commands or prompting when ASDM is exited. | Tools | Contains tools for common system tasks for the ASA/PIX Security Appliance. This includes Flash, file management, image and ASDM upgrades, a CLI tool to allow direct execution of most ASA/PIX commands, and system reloads. | Wizards | Houses the two wizards that are available with ASDM: the VPN Wizard and the Startup Wizard. | Help | Provides full access to three ASDM help systems, including a table of contents and an online help search. |
Many items within the pull-down menus contain submenus and information to help troubleshoot or configure the ASA/PIX Security Appliance. Detailed information about each item follows. File Menu The File menu contains common functions for Flash and file operations that you might need to perform on the ASA/PIX Security Appliance. The File menu pull-down contains 11 items, as shown in Figure 4-3 and described in the list that follows: Refresh ASDM with Running Configuration on the Device This menu item enables you to ensure that the configuration you are displaying in ASDM is the current running configuration. The running configuration contains the commands that are currently active on the security appliance. This arrow turns to red when the ASDM configuration is out of sync with the ASA/PIX Security Appliance. Reset Device to Factory Default Configuration Choosing this menu item erases the current configuration on the ASA/PIX and sets all commands back to their factory default settings. Show Running Configuration in New Window ASDM will display the running configuration in a new browser window. This provides you with the opportunity to see the commands that are current on your security appliance in the ASA/PIX native command-line interface format. Save Running Configuration to Flash This option saves the current running configuration to Flash. It overwrites the current startup configuration, and the next time the security appliance is booted, is the active configuration. Save Running Configuration to TFTP Server This option enables you to save the current running configuration of your ASA/PIX to a TFTP server. This can be a valuable tool if something happens to the memory of your ASA/PIX Security Appliance and you need to do a restore from a remote source. If you select this option, you are prompted for the IP address and directory of your TFTP server. Save Running Configuration to Standby Unit This option enables you to copy the current configuration to another ASA/PIX Security Appliance if you are using an active/standby configuration. Standby features are beyond the scope of this book; you can find further information regarding standby features on the Cisco website. Save Internal Log Buffer to Flash This enables you to save your system log to the Flash on the ASA/PIX Security Appliance. In most cases, administrators would want to save the buffer to a syslog server, but this feature is useful if you syslog server is inaccessible or you are logging a small amount of real-time data from analysis or troubleshooting. Print The Print option enables you to print information contained in only select pages of the ASDM GUI. Clear ASDM Cache Like most web applications, ASDM saves reusable information in a cache file. This option enables you to clear the cache, if you want. This cached data is saved in a compressed format on your PC. If you leave the files in cache, ASDM saves reusable information in a cache file to speed up future access. The cached files are not a significant resource on your PC; the average size of the encrypted cache files is between 5.0 and 6.0 MB. Clear Internal Log Buffer When troubleshooting an error message in a security appliance, it is often useful to clear out old messages so you can see only the sequence of messages applicable to your troubleshooting. The Clear Internal Log Buffer option accomplishes this task. Exit This option disconnects your ASDM session from the ASA/PIX Security Appliance and shuts down the ASDM GUI. You are prompted to both save configuration changes and to verify that you really want to exit from the application.
Figure 4-3. File Menu Pull-Down 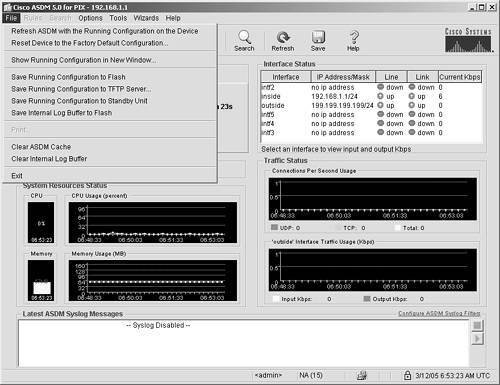
Rules Menu The Rules menu is activated only when the Configuration > Security Policy or the Configuration > NAT functions are chosen from the navigation bar. The basic function of the Rules menu is to make it easier for you to place commands within long lists of items, such as the rules list and the network address translation (NAT) list. All of the functions in the Rules menu can be done by right-clicking the display panels if you navigate into the Configuration > Security Policy and the Configuration > NAT functions. For deploying commands more quickly when using ASDM, right-clicking tends to be faster than using the pull-down menu. Figure 4-4 shows the activated Rules menu. Figure 4-4. Rules Menu Pull-Down 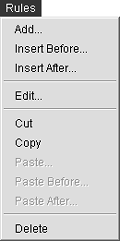
Each command in this menu helps you to control the order in which items appear in the list. The Configuration/Security Policy list is a compilation of all the access rules that you have configured in your security appliance. Using the Rules pull-down menu, you can easily add, copy, and paste rules as desired. It's an excellent tool to help you keep rules in an order that makes sense to you. By default, ASDM lists rules in the order in which they are entered for each interface. An exhaustive explanation of each rule option isn't necessary because these actions are similar to commands that PC users deal with on a daily basis. Search Menu The Search menu is activated only when the Configuration > Security Policy or the Configuration > NAT functions are chosen from the navigation bar. The basic functions of the Search menu are to make it easier to search the fields of the rules that might be long and to find keywords within the list. The activated Search menu is shown in Figure 4-5, and the options are described in the list that follows: Search by Field This option enables you to perform a text search within either the Security Policy or NAT list. To help you narrow your search, this option enables you to perform a search with an any or all qualifier; in addition, it displays a pick list of known values. For example, if you choose Search by Source Address, the Value field will contain a selection box in which you can click and see all known source addresses. You can then click the desired source address, expediting your search. Search by Host/Network When this option is selected, a dialog box displays enabling you to search on one of the ASA/PIX Security Appliance interfaces. You can just highlight the network you want to search, and the resulting data displays within the ASDM active window. Clear Search Selections This option clears any of the data that had been found and highlighted by the previous search.
Figure 4-5. Search Menu Pull-Down 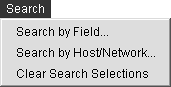
Options Menu The Options menu enables you to control how ASDM displays certain data. Figure 4-6 shows the Options menu, and the list that follows describes the options available from this menu: Show Commands Ignored by ASDM on Device The commands that show up in this list are commands that aren't supported by ASDM. To see any commands that have been ignored, choose this pull-down menu item. Preferences Figure 4-7 illustrates the preferences controlled by this menu item. Figure 4-7. Preferences Options 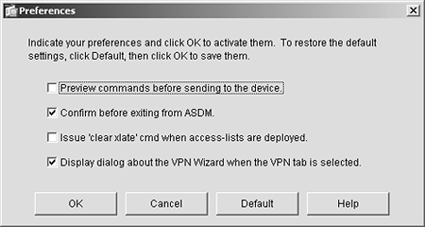
Figure 4-6. Options Menu Pull-Down 
These preferences are saved in a file and applied for subsequent ASDM sessions: Preview Commands Before Sending to the Device This preference causes ASDM to display the native ASA/PIX commands every time a change is made in ASDM. Many advanced users prefer this option so that they can see exactly which commands are being sent to the ASA/PIX Security Appliance. This option serves as an excellent way with which to become familiar with the new ASA/PIX version 7 command set. Confirm Before Exiting ASDM When this option is enabled, ASDM prompts you before you disconnect from the security appliance and exit the application. This is on by default to help keep users from exiting ASDM unintentionally. Issue "Clear Xlate" Cmd When Access-Lists Are Deployed The xlate table is a data structure that keeps track of connections through the security appliance. When an access list is closed, those connects are still active until the xlate table is cleared. This option clears the active connections table on the device for you, instead of you having to go to a command menu and enter the CLI command. Display Dialog About the VPN Wizard When the VPN Tab Is Selected This option instructs ASDM to prompt you with a menu to give you the choice of whether you would like to use the VPN Wizard if you are accessing the VPN configuration. It encourages you to use the wizard because it's a step-by-step process that will ensure that you set up all commands correctly.
Tools Menu The Tools menu enables you to control various aspects of ASDM related to file management, system reloads, manual command entry, and service group setup. Figure 4-8 shows the Tools menu, and the list that follows describes the options available from the Tools menu: Command Line Interface This option enables you to enter either a single native ASA/PIX version 7 command or multiple ASA/PIX version 7 commands into ASDM and have it sent to the security appliance. You can either enter the command you want or select a command from the Command drop-down. The result of the command displays in a window on the same page. Ping This option is a shortcut for the ping command. You just enter the IP address in the query box and then see the results in the window below. Note You can also enter the ping command in the Command Line Interface option.
Service Groups This option is used to define service groups, which is a way to group protocols for ease of use with other commands. For instance, you might want a group of users who are using file-sharing applications to be lumped together for certain types of access controls. Service groups are discussed in further detail in Appendix B, "ASA/PIX Version 7 Advanced Features." File Management This option enables you to perform operations such as copying, deleting, moving, and viewing files in Flash. Directories can also be created in Flash, where the same operations can be performed. Upload Image from Local PC This option enables you to upload, using HTTPS, an ASDM or ASA/PIX operating system file from your local PC to Flash on the ASA/PIX Security Appliance. Features include local PC file navigation and navigation on the Flash file system of the security appliance. Note If you are just doing an upload, and not doing an upgrade, be careful not to name the destination file the same as the active file on the security appliance.
File Transfer This option enables you to use HTTP/HTTPS to copy files to the ASA/PIX Security Appliance and also to use FTP and TFTP to move files back and forth between the security appliance and TFTP or FTP servers. System Reload This option enables you to schedule a system reload or to cancel a reload currently scheduled. It also provides you with the option to save your current configuration before proceeding with the reload.
Figure 4-8. Tools Menu Pull-Down 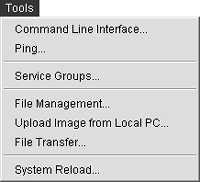
NOTE When the ASA/PIX reloads, ASDM disconnects and you must restart ASDM if you need further access to the security appliance.
ASDM Wizards Menu The Wizards menu enables you to launch the VPN Wizard and the Startup Wizard. Both of these wizards are covered in detail later in this book. The VPN Wizard is covered in Chapter 11, "Deploying VPNs"; the Startup Wizard is covered in Chapter 5, "Deploying Secure Internet Connectivity." Help Menu The Help menu provides you with several different layers of assistance in using ASDM. Figure 4-9 shows the Help menu pull-down, and the following list describes the available options: Help Topics This option provides context-sensitive help, including a search page, subject index, and a glossary. Help for Current Screen As you go from screen to screen in ASDM, you can choose Help for the Current Screen from the Help pull-down menu. A full explanation of the screen usage is presented in a browser-type display. Release Notes This option displays the release notes for the installed version of ASDM. Getting Started This option is a brief overview of how to use ASDM to begin configuring the ASA/PIX Security Appliance. Glossary This option displays a link to the glossary of terms used in the Help subsystem. Feature Search This option is used for finding panels in ASDM that match the supplied keywords. Legend This option presents you with a screen displaying all the icons that are used in ASDM, the section in which they are used, and a definition of them. About Cisco ASA/PIX Security Appliance This option displays the current licensing information and version of the ASA/PIX Security Appliance to which ASDM is connected. About Cisco ASDM 5.0 The following information displays if you are running ASDM from a browser: - Host name - ADSM user - ASDM version - Browser running ASDM - Operating system running ASDM - ASA/PIX device type - ASA/PIX operating system version - User privilege level - Java version installed
Figure 4-9. Help Menu Pull-Down 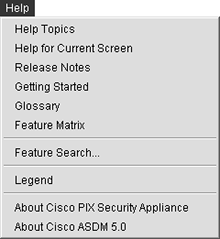
Exploring the Navigation Bar The navigation bar provides access to the main areas of ASDM. Figure 4-10 shows the contents of the bar. The navigation bar contains three buttons that enable you to do the bulk of the work for configuring and monitoring the ASA/PIX Security Appliance: Home Configuration Monitoring
Figure 4-10. Navigation Bar 
The remaining buttons are used for navigating ASDM, saving files, and obtaining help: Back Forward Search Refresh Save Help
Table 4-2 provides an overview of each item on the navigation bar. A more detailed explanation is provided in the section following the table. Table 4-2. Navigation Bar OverviewNavigation Icon | Summary |
|---|
Home | This is the default screen seen when ASDM launches. It primarily contains status and device information of the security appliance and ASDM. | Configuration | This is the main portion of ASDM. It contains all the configuration options for the ASA/PIX Security Appliance. | Monitoring | The Monitoring icon offers options to monitor many of the security appliance features and functions. This includes graphing and table views. | Back arrow | This allows backward navigation through previously viewed ASDM screens. | Forward arrow | This allows forward navigation through previously viewed ASDM screens. | Search | This icon finds the ASDM panel that matches user-entered search criteria. | Refresh | The Refresh icon reloads the current ASA/PIX configuration to the ASDM application. This icon turns red when ASDM is not in sync with the ASA/PIX Security Appliance configuration. | Save | This icon saves any changes made through ASDM to the ASA/PIX Security Appliance running configuration. A copy of the running-config is saved to Flash memory. | Help | This contains context-sensitive help. |
Many items within these navigation bar icons contain configuration panels and information to help troubleshoot or configure the ASA/PIX Security Appliance. Detailed information about each navigation icon follows. Home Navigation Icon The Home navigation icon displays real-time information about the ASA/PIX Security Appliance. (See Figure 4-11.) Figure 4-11. Home Navigation Icon 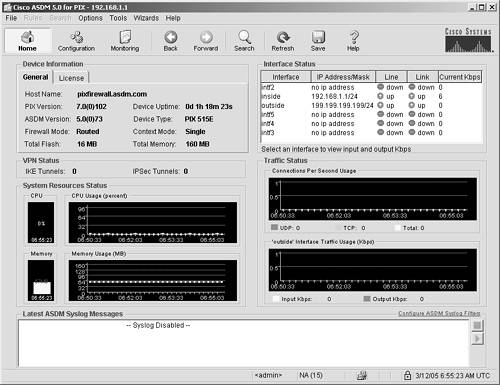
In the upper-left corner, there are two tabs under Device Information. One tab is labeled Licensing and displays pertinent information about the license that is installed in the ASA/PIX Security Appliance. The other is labeled General and displays information about the ASA/PIX Security Appliance, such as the following: ASA/PIX version Device type Memory information ASDM version
Below the Device Information section is a panel called VPN Status, which displays information about VPN tunnels. Below the VPN Status section is a panel called System Resource Status. This panel displays information about the ASA/PIX Security Appliance CPU and memory usage. At the bottom of the screen is a panel that displays the latest ASDM syslog messages. ASDM gives you the option on the right side of this panel to configure filters for syslog messages, enabling you to see only the messages that you consider important for your network. In the upper-right corner of the Home navigation icon screen, the Interface Statistics panel displays. This panel shows the following: If you click the interface, the input and output traffic statistics for that interface display just under the Interface Statistics panel. Below the Interface Statistics panel is the Traffic Status panel. This panel displays, in graph form, the UDP, TCP, and total connections per second. Below the Traffic Status panel is a second panel that displays traffic usage on the outside interface. This graph can prove helpful in determining whether a denial-of-service (DoS) attack is being launched against the outside interface of the security appliance or whether an excessive amount of traffic is being serviced by the security appliance. Configuration Icon The Configuration section of ASDM contains most of the functions needed to configure and control the features of your security appliance. Eight features are listed under the Configuration icon. (See Figure 4-12.) Figure 4-12. Configuration Navigation Icon 
The following features are available under the Configuration icon: Interfaces Security policies NAT VPN Routing Building blocks Device administration Properties
Although this list of features represents a comprehensive set of tasks that need to be accomplished to fully configure the ASA/PIX Security Appliance, most deployments can be done using the defaults already configured as part of ASDM. Many of these features are optional depending on your networking requirements. For instance, routing, VPN, and building blocks might not be required in many small business network deployments. This chapter touches on each of these features so that you learn the capabilities of the ASA/PIX version 7 operating system and ASDM. However, the configurations deployed in this book follow the defense-in-depth model and are covered in the following chapters: Chapter 5, "Deploying Secure Internet Connectivity" Chapter 6, "Deploying Web and Mail Services" Chapter 7, "Deploying Authentication" Chapter 8, "Deploying Perimeter Protection" Chapter 9, "Deploying Network Intrusion Prevention" Chapter 10, "Deploying Host Intrusion Prevention" Chapter 11, "Deploying VPNs"
Interfaces The Interface panel, shown in Figure 4-13, enables you to control the features of the hardware interfaces on your ASA/PIX Security Appliance. Figure 4-13. Interface Features Panel 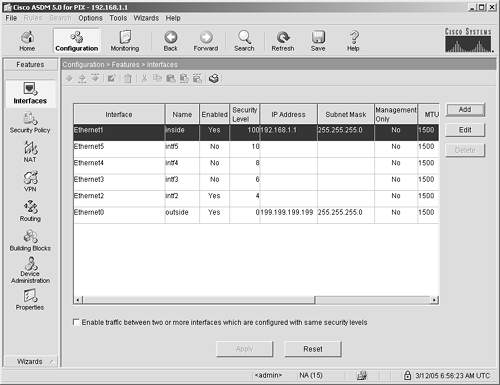
This panel enables you to configure the network and security characteristics, as well as enable or disable the hardware interfaces. Security Policy The Security Policy panel, shown in Figure 4-14, has four subpanels: Access Rules AAA Rules Filter Rules Service Policy Rules
Figure 4-14. Security Policy Features Panel 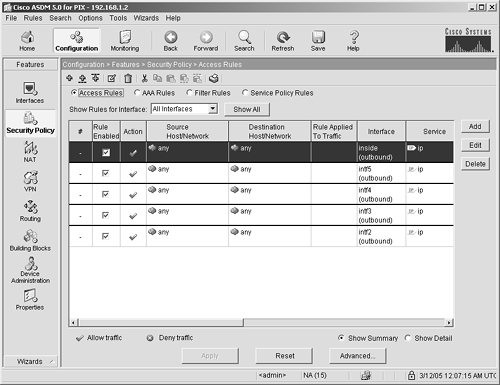
To add, delete, modify, or move elements in any of the panels within the Security Policy feature (see Figure 4-14), you have three options. You can either right-click the panel and use the pop-up screen, use the icons across the top of the current panel, or use the pull-down menu labeled Rules. Access Rules These rules enable you to decide what traffic will be allowed to traverse your security appliance. By default, most traffic sourced from the inside interface of the security appliance is allowed to go to the outside interface and return back to the inside. By default, all traffic sourced from the outside is blocked from going to your inside network. If you are hosting any network services, such as web servers or mail servers, on the inside of your network, you must create an access list to let that traffic through the security appliance. The traffic flow on an ASA/PIX Security Appliance is defined by a value called a security level. By default, traffic flows freely from an interface with a high security level to an interface with a lower security level. For example, the inside interface has a security level of 100, and an outside interface has a security level of 0. Therefore, by default, traffic can flow from the inside to the outside without any configuration. Note Defining access rules is a must for any security appliance deployment. Configuring inbound network services is addressed in Chapter 6.
AAA Rules These rules enable you to authenticate traffic coming from the outside of your security appliance or going into your security appliance. You can define a AAA server to authenticate users, or you can use this panel to define local users. The only traffic that can be authenticated is traffic that uses a protocol that has the capability to accept a username and password. The ASA/PIX Security Appliance supports four such applications: - - HTTP Web traffic
- - HTTPS Encrypted web traffic
- - Telnet Text-based terminal traffic
- - FTP File Transfer Protocol
Authentication rules can also be activated or deactivated based on the time of day or day of week. For example, you can limit users to access only these services from 8 A.M. to 5 P.M., Monday through Friday. In addition, you can limit authentication rules to certain IP addresses, users, or service groups. Filter Rules Many virus, worms, and spyware can be spread using malicious code embedded inside of web traffic. To help prevent this spread, these filter rules look deep into packets and can filter out ActiveX and Java applets that might cause malware to spread to the inside hosts on your network through day-to-day web browsing. You can use this filter panel to create an exclusion rule that allows or disallows ActiveX or Java from specific sites. Another powerful feature of the ASA/PIX Security Appliance is URL filtering. You can implement URL filtering using the filter rules. Using a third-party vendor such as WebSense, you have the ability to control which websites your users can access from the inside of your network. The software packages are easy to use; often with just a single click you can filter out all known porn sites, hacker sites, sport sites, or file-sharing sites. URL filtering can also catch URL attacks such as a Unicode attack which, when crafted correctly and sent to a vulnerable system, can execute the DOS command prompt. Caution In some of the 50 states, deploying URL filtering is a freedom of information issue versus the right of an employer to protect company assets. You might want to get legal advice if you suspect this is an issue in your state.
Service Policy Rules Like filtering rules, these rules also look deeply into packets to determine whether the packet is valid and should be passed through the security appliance. Service policy rules classify traffic by protocol or sets of protocols and then apply rules to allow or reject content based on configurations that you have previously defined. This is discussed further in Chapter 8. The subpanels within the service policy rules enable you to classify your traffic and then apply rules to that traffic. Consider inbound web traffic as an example, but remember that this is just an example, and it is not necessarily recommended to use this policy on your security appliance. Service policy rules enable you to create a policy that resets a connection if an outside user is trying to send a URL longer then the largest URL you have on your web server. This policy could mitigate several attacks such as a hacker trying to manually send a SQL request to access unauthorized data or trying to send a large URL to overflow the buffer of your web server. Policy rules give you several other options to mitigate attacks or recover bandwidth used by unauthorized activity, including the following: - Stop certain types of traffic that is not adhering to the RFC specifications. - Stop certain types of files from being transferred within a protocol such as HTTP or SMTP (mail). Often attackers send files compressed in formats such as Zip GZip to evade signature recognition used by most antivirus vendors. - Stop certain types of peer-to-peer (P2P) network file-sharing programs that can take up unauthorized bandwidth and transfer files into your environment of which you have no control. - Stop instant messaging. - Stop tunneling of protocols within other protocols, especially port HTTP. - Enforce maximum number of connections allowed to a certain port to prevent CPU overload during peak usage or DoS attacks. - Randomize TCP sequence numbers on a per-protocol basis to reduce the possibility of TCP hijacking. - Apply quality of service to certain data flows or protocols.
Click the Show Detail option button at the bottom of the Security Policy panel to see which protocols are inspected by default. To see the details of each inspection, browse through the Edit panel's Traffic Classification, Traffic Match, and Rule Action tabs. In the Rule Action panel, click the Configure button to see a detailed inspection for each protocol. NAT Figure 4-15 shows the NAT panel, which has four main functions, as described in the list that follows. NAT is a feature that allows private addresses to be translated and routed to the Internet, as discussed in detail in Chapter 5. The options exist to add, delete, modify, or move any elements in any of the panels within the NAT panel. You can either right-click the panel and use the pop-up screen, use the icons across the top of the current panel, or use the pull-down menu labeled Rules. Enables Traffic to Traverse the Security Appliance Without Address Translation Checking this box will allow traffic to traverse back and forth through the security appliance without using address translation. The only time you should consider doing this is if all the addresses behind your security appliance are publicly routed Internet addresses. Translation Rules This panel enables you to set up address translations that will allow you to use private Internet addresses on the inside of your security appliance while still accessing public Internet devices. The most common form of NAT used is port address translation, also called PAT. If you use PAT, the addresses from inside your security appliance assume the outside interfaces' IP addresses before they are routed to the Internet. Because all Internet devices know how to return traffic to your security appliance, the security appliance will know what to do when the traffic comes back to it. The security appliance will just check its NAT tables and be able to recognize the true source of the packet and send it back to the host on the inside of your network. For the purposes in this book, PAT is used for inside hosts, and static NAT is used for public servers. In Chapters 5 and 6, PAT and NAT are deployed to allow Internet access. Note NAT is a complex subject. For an in-depth discussion on implementing NAT, go the Cisco website and access the URL http://www.cisco.com/go/nat. Even though this link is for Cisco IOS, the concepts are the same for the ASA/PIX Security Appliance.
Translation Exemption Rules This panel enables you to exclude certain traffic from NAT translation, which is sometimes required in complex VPN deployments. Manage Pools NAT pools are addresses allocated for use by NAT on a per-interface basis on the ASA/PIX Security Appliance.
Figure 4-15. NAT Features Panel 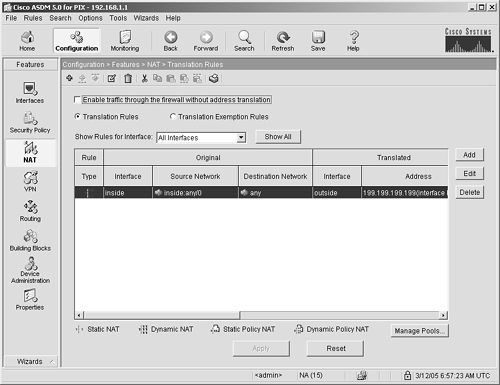
VPN The VPN panel is used to configure VPN tunnels that terminate on the ASA/PIX Security Appliance. The VPN panel has four main functions: General Allows basic high-level VPN configuration options IKE Enables key setup and exchanges between the ASA/PIX Security Appliance and VPN clients IPSec Allows the necessary configuration to encrypt traffic between the ASA/PIX Security Appliance and VPN clients Address Management Enables the allocation of IP addresses to remote VPN clients
NOTE IPSec VPN step-by-step configuration is addressed in detail in Chapter 11.
VPN General Features The VPN General option has five different configuration panels: VPN System Options Client Update Tunnel Group Group Policy Default Tunnel Gateway
The following list describes each panel: VPN System Options Enables you to configure high-level VPN commands that globally affect how the security appliance will use VPN. You have three options, as described in Table 4-3. Table 4-3. VPN System OptionsOption | Description |
|---|
Enable IPSec Authenticated Connection Through the Security Appliance | If this option is selected, VPN tunnels that have been authenticated can pass any traffic through the security appliance, bypassing access lists. If this option is not selected, you must create access lists to allow traffic to the inside network after it is decrypted by the ASA/PIX Security Appliance. | Permit VPN Communication to Peers Connected to the Same Interface | This allows hub-and-spoke VPN. Traffic from the source peer is encrypted when it arrives on the security appliance. The ASA/PIX Security Appliance sees the destination is another VPN client and forwards it back out the same interface to another VPN client. This is useful for P2P communications such as VoIP and instant messaging. | Limit the Number of Active VPN Sessions | This limit affects the load-balancing calculation for VPN load balancing. |
The Live Client Update From this panel, you can enable updates for VPN client software. You do so by first placing the client software on a web server and then setting the location with the edit key. When a client logs on to the server, it automatically starts the update process. By using the Live Client panel, you can optionally update all clients that are currently connected to the security appliance. Figure 4-16. VPN Live Client Update Panel 
The Tunnel Group Configuration This panel enables you to set characteristics for IPSec VPN tunnels. The Group Policy This panel enables you to configure policies for a group of VPN users. For example, you can set IPSec groups to perform the following: - Only access the ASA/PIX Security Appliance at certain times - Receive the same DNS and WINS server addresses - Enable Perfect Forward Secrecy to reduce the chance of key compromise - Enable compression to reduce the amount of traffic traversing the tunnel - Enable banners to be displayed by the client when connected - Enable IPSec over UDP to resolve some issues caused by NAT and VPN - Force a client security appliance to be active on the client before a connection can be established - Enable characteristics of a hardware VPN client connecting to the ASA/PIX Security Appliance
Default Tunnel Gateway This panel enables you to configure a static route to be applied to IPSec VPN tunnels.
IKE Features The IKE (Internet Key Exchange) option has three different configuration panels, as follows: Global Parameters These configuration options enable you to set parameters for all IKE sessions terminating on your security appliance. You can specify which interface the IKE sessions will terminate on, although it will almost always be on the outside interface. These parameters can be left as default unless, for some reason, a client is connecting that doesn't support the global options you have selected. Policies This panel enables you to select values for the policies that are used for the key exchange process. The values in this screen must match the client IKE policies. If you are using the Cisco VPN client, you can use the defaults, which cause the policy to be downloaded to the client and a connection established. Certificate Groups Management This panel has two subpanels; however, certificates are not yet widely used on the Internet, so they are not covered in this book. If you need information regarding certificate authentication, refer to Cisco.com.
IPSec Features The IPSec option has four different configuration panels, as follows: IPSec Rules This panel enables you to configure the entire set of IPSec policies. The policies allow the creation of the policies for encryption algorithms, the IPSec peers, and access lists that define traffic that will be protected by the IPSec tunnel. Tunnel Policy This panel enables you to modify or create tunnel policy, which includes encryption algorithms, IPSec peers, and access lists that define traffic that will be protected by the IPSec tunnel. Transform Sets Transform sets define how the IPSec data will be encrypted and authenticated. All of the commonly used transform sets have already been defined in ASDM. You use this configuration panel only if you need to add a new transform set or modify an existing transform set. Pre-Fragmentation The enabling of prefragmentation is the default for the security appliance IPSec behavior. This means that if the ASA/PIX receives packets that exceed the maximum transmission unit of the VPN tunnel and must be fragmented, the packet will be encrypted, the don't fragment bit will be cleared, and the packet will be sent as an individual packet rather than as a set of fragmented packets.
IP Address Management Features The purpose of IP address management is to allocate the IP addresses to clients that have successfully connected to the ASA/PIX Security Appliance using a VPN client. The IP Address Management feature contains two panels: Assignment This panel enables you to define the source that will be responsible for allocating addresses to VPN clients. The options are AAA server, DHCP, or internally defined address pools. IP Pools The IP Pools panel enables you to manually configure the pool of IP addresses that will be allocated to remote VPN clients upon connection to the ASA/PIX Security Appliance.
Routing The Routing panel shown in Figure 4-17 is used to configure routing protocols for the ASA/PIX Security Appliance. An exhaustive description of security appliance routing is beyond the scope of this book. This section highlights the available routing options with a brief description of their use. Figure 4-17. Routing Features Panel 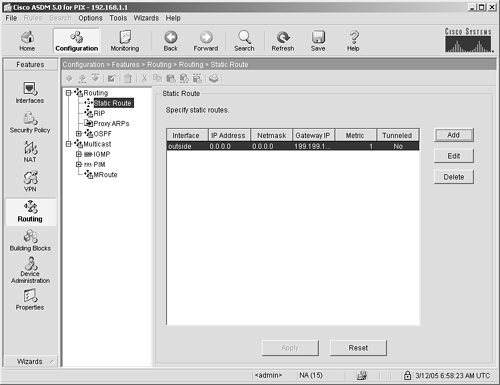
Table 4-4. Routing FeaturesRouting Element | Description |
|---|
Static routing | Manually configured routing tables defining the next hop for a particular route. | RIP | A routing protocol that can learn routes based on the fewest number of hops. | Proxy ARPs | A configuration option that instructs the ASA/PIX to respond to ARP requests for hosts that it knows about or NAT addresses that it contains in its pools and addresses from the other end of VPN tunnels. | OSPF | A link-state protocol that determines the shortest path to a destination. | IGMP | Internet Group Management Protocol. Refer to http://www.cisco.com/go/multicast for complete information regarding multicast protocols. | PIM | Protocol Independent Multicast. Refer to http://www.cisco.com/go/multicast for complete information regarding multicast protocols. | mRoute | Refer to http://www.cisco.com/go/multicast for complete information regarding multicast protocols. |
Building Blocks The Building Blocks panel, shown in Figure 4-18, is used to build policies and network elements that can be easily used or shared by other features within ASDM. Figure 4-18. Building Blocks Features Panel 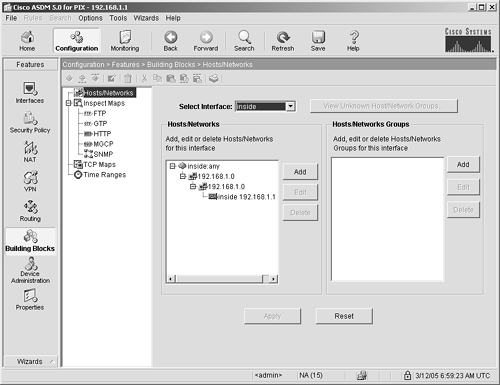
The Building Blocks feature contains four panels, as follows: Hosts/Networks This panel enables you to create an entry for a network or host in ASDM that can then be used with building policies in other ASDM panels. This panel also gives the option of creating the hosts and networks in groups. Inspect Maps This panel enables you to create custom inspect maps for specific protocols. After the map is created here, it can be accessed by other sections of ASDM that apply maps to rules. For example, if you decide that a hacker might be trying to compromise your web server by entering URLs that are more then 512 bytes, you can create an inspect map for HTTP defining the maximum URL size to be 511 and report this event to syslog. The inspect map can then drop the traffic. Time Ranges You can use this panel to define time ranges that can then be applied to any policies created in the Security Policy feature. For example, by selecting Time Range, you can create a range that starts Saturday morning at 8 A.M. and ends Sunday nights at midnight. You can then name this time entry weekends. You can then apply the weekends time range to an access policy. TCP Maps The TCP Maps panel provides you the option to configure inspection on your TCP traffic that goes through and terminates on the ASA/PIX Security Appliance.
Device Administration The Device Administration feature contains several panels, as shown in Figure 4-19. The functions in this list are all important in deploying a secure locked-down configuration on your security appliance. Pay special attention to warnings in this section that point out weaknesses in certain protocols: Device The Device panel enables you to enter or modify the name of the ASA/PIX Security Appliance or the domain name associated with the security appliance. Password This panel enables you to change the enable (privileged) password and the Telnet password on the security appliance. Caution Using Telnet is highly discouraged because during the logon sequence, the password is sent over the network in clear text. If an attacker is sniffing your network, this type of password will be easily stolen.
AAA Access Enable authentication, authorization, and accounting for device administration on the ASA/PIX Security Appliance. Note In this book, for simplicity, all authentication is performed from the local database.
User Accounts This panel enables you to enter users and passwords into your local ASA/PIX authentication database. Caution Use hard-to-guess passwords and usernames. Don't use words that are in the dictionary. Use at least eight characters, including uppercase, lowercase, numeric, and special characters. Attacks that use a dictionary to guess passwords are easy to run, and these guidelines provide fairly good mitigation against these types of attacks.
Banner You can define three banners that will then display when you log in to the ASA/PIX Security Appliance with a text tool such as SSH or through the console. The banners do not display when you connect to the security appliance using ASDM. The banners are as follows: - Session banner - Login banner - Message-of-the-day banner
You can enter any text you like as banners. However, from a security perspective, in the Session and Login banners, you should say something such as, "You have logged on to a secure device. If you are not an authorized user, log out immediately or face the possibility of criminal consequences." Do not "welcome" users to your network devices, and do not say "please." There has been litigation in which this type of language was determined to be an open invitation to stay on a network device even if you were an intruder. RFC 2196 has guidelines on what information to put in your banner messages. Caution There have been cases where hackers have broken into a system and subsequently were caught. However, because the administrator didn't post a proper warning at login, the hackers were not prosecuted. So be sure to follow this best practice.
Console The Console panel enables you to configure the amount of idle time that lapses before the console session times out. A timeout will require the user to log back in if further access is required. The default is zero minutes, which means the console doesn't time out. However, from a security best practice point of view, you should set this option to 15 minutes or less. This ensures that if you do walk away, the console session will eventually time out. Therefore, the session cannot inadvertently be accessed by a random person who happens upon your PC or terminal with the connection still open. ASDM/HTTPS The ASDM panel enables you to specify the IP address of a device or devices that can use ASDM to connect to the ASA/PIX Security Appliance. Telnet The Telnet panel enables you to specify the IP address of a device or devices that can use Telnet to connect to the ASA/PIX Security Appliance. Caution Telnet passes the username and password in clear text on the network. These credentials can easily be stolen by anyone with a network sniffer. Telnet should not be used, if at all possible, because it can easily allow access to your security appliance.
Secure Copy This panel enables you to secure copy to transfer configuration files. There are some limitations with secure copy. To see these limitations, bring up the Secure Copy panel in ASDM and, from the Help menu, and choose the option Help for Current Screen. Secure Shell The Secure Shell (SSH) panel enables you to specify the IP address of a device or devices that can use SSH to connect to the ASA/PIX Security Appliance. In addition to the IP address, you can specify the version of SSH supported by the security appliance. SSH version 1 and version 2 are supported in ASA/PIX version 7. Management Access The Management Access panel enables you to specify an interface to be used strictly for management purposes. SMTP This panel enables you to define a mail server to which alerts will be delivered if critical messages are sent to the syslog server. To configure the e-mail address where log messages are sent, go to the ASDM panel Configuration > Features > Properties > Logging > E-mail Setup. SNMP This panel enables you to configure the ASA/PIX Security Appliance to send Simple Network Management Protocol information and traps to an SNMP server. Caution SNMP is not highly recommended by security experts because messages are sent in the clear and community strings; SNMP passwords can be captured off of the network.
ICMP Rules The ICMP Rules panel enables you to configure the ASA/PIX Security Appliance to allow certain types of pings to traverse the security appliance. In most cases, you would want to allow only ICMP reply, MTU discovery, and network unreachable messages to come in from the Internet. ICMP has a long and colorful history of being used as a protocol for DoS and even some unauthorized-access attacks. TFTP Server TFTP is the most popular protocol for upgrading ASA/PIX images and ASDM images and for storing ASA/PIX configurations. This panel enables you to configure the default TFTP server to be used by your security appliance. TFTP is not secure! There is no password to authenticate the traffic, and the traffic passes the network in the clear. Therefore, you should take the following precautions: - The TFTP server must be located on the secure side (i.e., the inside) of your ASA/PIX Security Appliance. - The TFTP server should only be running when it is going to be used. - The TFTP server should be on an isolated management interface on this security appliance, if at all possible. - The TFTP server should be running both antivirus and host intrusion prevention software. - If you have switches on your network, your Layer 2 network should be locked down according to Cisco SAFE best practices. You can find more information on this on the Cisco SAFE home page at http://www.cisco.com/go/safe, "SAFE: L2 Application Note."
Clock If you don't have any time-sensitive applications that require all the devices on your network to have synchronized time, you can use this panel to set the time on the ASA/PIX Security Appliance. If you do have time-sensitive applications, you need to use NTP, which is described in the next paragraph. NTP Network Time Protocol is used to synchronize clocks between network devices. There is an NTP server that runs the main system clock. All other devices communicate with that server to get the time to update their clocks on a periodic basis. From the NTP panel, you can enable the ASA/PIX Security Appliance as an NTP client. Optionally, you can specify authentication to NTP servers. Keeping your network device clocks in sync can make troubleshooting easier, because events from different devices can be correlated by time stamp. Using a common time source such as NTP makes this easier. Boot Image Configuration This panel enables you to configure the default boot image for the ASA/PIX operating system. In addition to the default image, you can specify and list four boot images and specify a boot sequence for each image. FTP Mode The FTP Mode panel enables you to configure the FTP mode as active or passive for uploading or downloading images. The client initiates the data and control sessions in passive mode. Certificate Certificate administration is beyond the scope of this book. If you need information on certificate administration for the security appliance, refer to the Cisco website at http://www.cisco.com/go/pix and select technical documentation.
Figure 4-19. Device Administration Features Panel 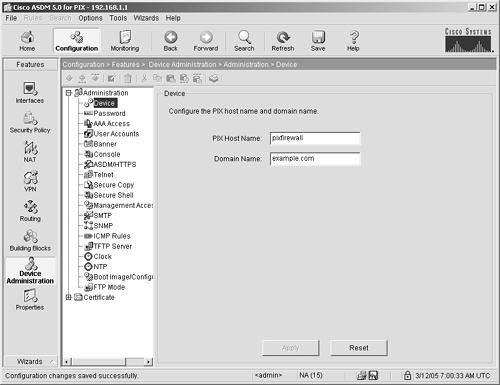
Properties Feature The Properties panel, shown in Figure 4-20, is used to configure less-frequently used features and logging. Figure 4-20. Properties Features Panel 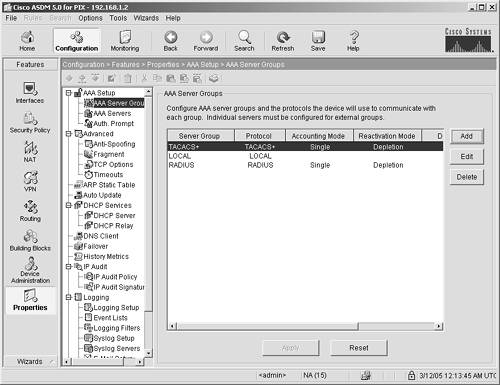
The Properties panel contains several subpanels. The features in this list represent global options such as DNS configurations, static ARP entries, management reporting, authentication parameters, intrusion prevention, and advanced security. Many of these features are discussed in more detail in Appendix B: ARP Status Table This feature enables you to configure static ARP entries for certain IP addresses or to turn on proxy ARP on a per-interface and per-IP address basis. DNS Client The DNS client enables you to configure as many as six DNS servers that can resolve IP addresses for the ASA/PIX Security Appliance. DHCP Server This feature enables you to configure the ASA/PIX Security Appliance to be a DHCP server. As such, it automatically allocates IP addresses when requested by a network device. A detailed step-by-step procedure on how to do this is in Chapter 5. DHCP Relay DHCP relay enables you to configure a server to which the ASA/PIX Security Appliance can forward requests if the DHCP server is not in the broadcast zone of the security appliance. The ASA/PIX will keep state when it sends the request so that it can forward the DHCP response to the originating network device. Failover This feature enables you to configure failover between a primary and secondary security appliance. As stated before, failover is beyond the scope of this book. For more information, refer to the technical documentation on the Cisco website at http://www.cisco.com/go/pix. Logging Setup This enables you to configure logging on the ASA/PIX Security Appliance. Many logging options are available, such as adding debug messages to syslog, changing the format of the syslog file, changing the ASDM and internal ASA/PIX buffer sizes, and configuring the logging to be sent to an FTP server or Flash before the syslog is written over. Syslog messages on the Home panel and the log viewer also rely on configurations applied using this panel. Event Lists This feature enables you to create criteria for a syslog event as opposed to turning on logging by only syslog level. This enables you to reduce the number of syslogs, focusing on just the areas you're interested in. Logging Filters Logging filters enable you to configure the ASA/PIX to send syslog events to the following different locations: - ASA/PIX console - ASA/PIX internal buffer - Telnet sessions - Syslog servers - SNMP traps - E-mail - ASDM event logger
Syslog Setup This feature enables you to determine which type of syslog messages will be sent to the syslog subsystem. Syslog Servers This enables you to configure the IP addresses or syslog servers to which the ASA/PIX can send its syslog data. This panel also enables you to define the port to use for syslog, as well as define the format of the syslog file. Caution The syslog server should be on the inside of your security appliance and should have host intrusion prevention software installed and running. Attackers often look for hosts accepting syslog data for two reasons: 1) to find out information about your network, and 2) to edit the syslog data to cover their tracks after an attack.
E-Mail Setup This feature enables you to configure the IP address of the e-mail server to send critical events, the e-mail address to which to send the events, and a filter to define which events should be sent. AAA Server Group This enables you to name an AAA group and assign either RADIUS, NT Domain, LDAP, SDI, Kerberos or TACACS+ as authentication protocols. Caution If you are running an authentication server, it is important that it is one of the most secure servers in your network. Think security best practices; the authentication server should be on the inside of your security appliance or on an isolated interface and should have intrusion prevention software running on it.
AAA Setup AAA Setup enables you to configure your AAA server IP address, the authentication protocol to be used, and the interface relative to your ASA/PIX Security Appliance. In addition, even though RFCs have defined the network port on which an authentication server listens, you can change this port in the Configuration panel. If you do this, you must also change the port on your authentication server. The only reason you might want to do this is to hide where authentication is happening. If a hacker runs a scan against your servers and sees TCP port 49 open, the hacker will know that it's a TACACS+ server. If you've changed the port to TCP 4646, when hackers see that on a scan, the information will be much harder for them to use for exploiting your system. Auth Prompts This feature enables you to define three prompts that can be displayed to the user: - - Prompt Displayed upon Telnet, SSH, or console authentication
- - User Accepted Message Displayed when a user passes authentication
- - User Rejected Message Displayed when a user fails authentication
Again, think security best practices. If you choose to create prompts, don't give anything away in your messages that might help a hacker. For example, don't give any hint of what type of device or operating system for which they are being presented a prompt. If authentication fails, the message should simply say, "Authentication failed." It is not possible on the ASA/PIX Security Appliance, but one of the mistakes early security programmers made was returning a prompt that said either invalid username or invalid password when a user failed authentication. Thus, a hacker easily knew that he had half of the credentials and he knew which half. URL Filtering This feature enables you to configure third-party vendor software for URL filtering. As stated earlier in this chapter, URL filtering enables you to control which websites your users can access from the inside of your network. The software packages are easy to use; often with a single click, you can filter out all known porn sites, hacker sites, sport sites, or file-sharing sites. URL filtering can also catch URL attacks such as a Unicode attack. This panel is more specific than the previous panel discussed because it enables you to define which third-party server you are using as a filtering server. Auto Update This feature enables you to configure the ASA/PIX Security Appliance to connect to a VMS AutoUpdate server and automatically have its operating system updated. Either HTTP or HTTPS can be used to accomplish this task. You can specify that certificate authentication and username password authentication must take place before the auto-update can occur. You must specify the location on the auto-update server where the new ASA/PIX operating system is located. IP Audit Policy The IP Audit Policy enables you to define intrusion detection and prevention policies. The default policies are set up for intrusion detection, as opposed to intrusion prevention. This means that the policies don't prevent attacks from happening. Instead, they send an alarm to the syslog server if a signature is triggered. You can use this panel to define a custom policy to drop packets and then apply that policy to an interface. IP Audit Signatures This panel enables you to view and enable or disable the 51 default intrusion detection prevention signatures. These signatures are common attacks and don't normally generate false positive alarms. Therefore, a drop action with these signatures is not an overly dangerous policy to enforce. It might be wise to configure your e-mail syslog events to send you an e-mail if an intrusion detection signature is triggered; this will give you the opportunity to research the alarm and determine whether it poses a serious problem to a device on your network. Anti-Spoofing This feature enables you to configure your security appliance to not pass spoofed source addresses to the Internet. A spoofed address is a source address that has been changed from its real source and then sent on to the network. Normally, if you are seeing spoofed addresses from the inside of your network, it means that a device is trying to do some sort of malicious activity. Anti-Spoofing on the ASA/PIX uses a technology called Unicast Reverse Path Forwarding (uRPF) to determine whether an address is spoofed. When you turn on the Anti-Spoofing feature, packets containing spoofed addresses are dropped by the ASA/PIX Security Appliance. You can enable this option per interface on the security appliance. Note If you want more information about uRPF, refer to RFC 2267 at http://www.ietf.org. You can find all RFCs online at http://www.ietf.org/rfc/rfcxxx.txt, where xxxx is the number of the RFC. If you do not know the number of the RFC, you can try searching by topic at http://www.rfc-editor.org/cgi-bin/rfcsearch.pl.
Fragments This feature enables you to configure protection from fragment attacks (frag attacks) by configuring how long fragments can be queued until the fragment cache is flushed, the size of fragmented packets, and the number of fragments in a chain. The ASA/PIX Security Appliance uses this configuration information to determine whether fragmented packets are valid or whether they need to be dropped. TCP Options This feature enables you to configure the following: - The TCP packet sizes for proxy connections, which can help cause less TCP fragmentation if a proxy is used to handle web requests and responses. - The forcing of a TCP connection to linger in a wait state for 15 seconds, which can help TCP connects to gracefully close down during some unexpected timing conditions. - The resetting of inbound TCP connections sends a reset to the source address if a connection is blocked by an access list. If this is not set (or reset), the request is silently discarded. - The resetting of outbound TCP connections sends a reset to the source address if a connection is blocked by an access list. If this is not set, the request is silently discarded.
Timeouts This feature enables you to configure the ASA/PIX Security Appliance to clean up sessions and connections that have been opened but rendered inactive after a certain amount of time. This condition could represent a hacker probing the security appliance for open ports, DoS attacks, or just connects where one end or the other has gone silent. Timeouts are set for each common web protocol, as well as for address translations and authentication events. The pull-down Help menu for this panel provides an in-depth discussion for each of the 14 timeout values. The default values are usually adequate for most companies deploying the ASA/PIX Security Appliance. If you know you are being hit with a DoS attack targeting a specific port or protocol, you might want to decrease the timeout period so that the security appliance cleans up the dead connections more frequently. If you are using authentication, the default to re-authenticate you is 5 minutes. If you want a longer or shorter timeout period, you must modify the authorization absolute parameter. You can also apply timeouts using the Service Policy Rules panel. The rules set up in these panels take priority over the default rules described. SUNRPC Server This enables you to determine which Remote Procedure Calls (RPCs) you want to allow through your security appliance. This is not an issue for most users. However, for some, their applications need RPC functionality to traverse their security appliance. This panel enables these users to define which RPC calls will be allowed. History Metrics This panel enables you to configure the security appliance so that it can store ASDM data that can be viewed for time intervals up to 5 days.
Monitor Navigation Icon The Monitor feature menu contains functions needed to monitor traffic and services on the ASA/PIX Security Appliance. Seven features are listed under the Monitor navigation icon. (See Figure 4-21.) Figure 4-21. Monitor Navigation Icon 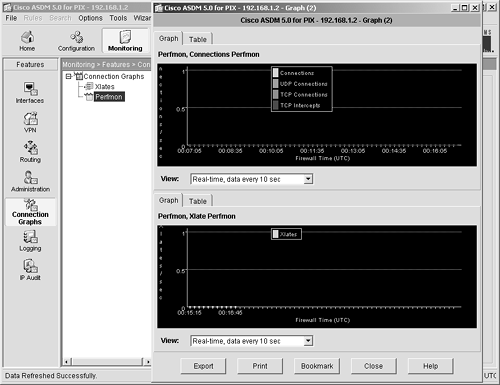
The following features are available under the Monitor navigation icon: Interfaces VPN Routing Administration Connection graphs Logging IP audits
This list of features represents a comprehensive set of ASDM options to monitor many keys features of the ASA/PIX Security Appliance. Interface Monitor Features Table 4-5 provides a summary of all the panels available in the Interface Monitor navigation screen, along with the data that is reported for each element of the Interface Monitor feature. Table 4-5. Interface Monitor FeaturesInterface Monitor Feature | Data Displayed |
|---|
ARP Table | Interface, IP address, MAC address | DHCP Server Tables | IP address, MAC address, lease expiration | DHCP Client Leases | DHCP lease information pertinent if one of the ASA/PIX interfaces is set up as a DHCP client | DHCP Statistics | Counters for all DHCP message types | Dynamic ACLs | Hit counters for access control lists | Interface Graphs (inside and outside) | Dynamic graphing for all packet and error information for each ASA/PIX interface. |
Routing Monitor Features Table 4-6 provides a summary of all the panels available in the Routing Monitor features screen, along with the data that is reported for each element of the Routing Monitor feature. Table 4-6. Routing Monitor FeaturesRouting Monitor Feature | Data Displayed |
|---|
Routes | Protocol, type, destination, gateway, metric/administrative distance | OSPF LSAs | For LSA types 1,2,3,4,5,7 area, router ID, advertiser, age, sequence number, checksum, link count | OSPF Neighbors | Neighbor, priority, state, dead time, address, interface |
VPN Monitor Features Table 4-7 provides a summary of all the panels available in the VPN Monitor features screen, along with the data that is reported for each element of the VPN Monitor feature. Table 4-7. VPN Monitor FeaturesVPN Monitor Feature | Data Displayed |
|---|
Sessions | Session counts, username, encryption type, login time, client type, bytes in and out | Encryption Statistics | Sessions and percentage per algorithm | Protocol Statistics | Sessions and percentage per protocol | Global IKE/IPSec Statistics | Various IPSec and IKE statistics and hit counts | Crypto Statistics | Various statistics and hit counts for IPSec, IKE, and SSL | IPSec Tunnel Graphs | Graph IPSec and IKE active tunnels |
Administration Monitor Features Table 4-8 provides a summary of all the panels available in the Administration Monitor features screen, along with the data that is reported for each element of the Administration Monitor feature. Table 4-8. Administration Monitor FeaturesAdministration Monitor Feature | Data Displayed |
|---|
ASDM/HTTPS Sessions | Sessions ID, IP address | Telnet Sessions | Sessions ID, IP address | Secure Shell Session Statistics | Client, user, state, version, and encryption statistics | AAA Locked Out Users | Locked time, failed attempts, users | Authenticated Users | User, IP address, dynamic ACL, and timeout statistics | AAA Servers | Server group, IP address, protocol, and request statistics | CRL | CRL info per trust point | DNS Cache | Host, IP address, permanent, idle time, active | Block Graphs | Graph blocks used, blocks free | CPU Graphs | Graph CPU utilization | Memory Graphs | Graph memory used, memory free | Failover Status | Output of show failover command | Failover Graphs | Graph various failover statistics |
Connection Graphs Monitor Features Table 4-9 provides a summary of all the panels available in the Connection Graphs Monitor features screen, along with the data that is reported for each element of the Connection Graphs monitor feature. Table 4-9. Connection Graphs Monitor FeaturesConnection Graphs Monitor Feature | Data Displayed |
|---|
Graph Xlates | Graph xlate utilization | Graph Perfmon | Graph performance for AAA, inspects, web, connections, xlates |
Logging Monitor Features Table 4-10 provides a summary of all the panels available in the Logging Monitor features screen, along with the data that is reported for each element of the Logging Monitor feature. Table 4-10. Logging Monitor FeaturesLogging Monitor Feature | Data Displayed |
|---|
Live Log | Displays real-time syslog messages | Buffer Log | Displays buffered syslog messages |
IP Audit Monitor Features Table 4-11 provides a summary of all the panels available in the IP Audit Monitor features screen, along with the data that is reported for each element of the IP Audit monitor feature. Table 4-11. IP Audit Monitor FeaturesIP Audit Monitor Feature | Data Displayed |
|---|
IP Audits | Displays graph information for 16 attack signatures |
Back Arrow Navigation Icon The Back arrow navigation button is analogous to the back arrow on a web browser. It takes you back to the previously viewed screen. Forward Arrow Navigation Icon The Forward arrow navigation button is analogous to the forward arrow on a web browser. If you have backed up while navigating, it will take you forward to the previously viewed screen. If you haven't navigated backward, the button remains inactive. Search Navigation Icon The Search button on the navigation bar is one of the handiest tools available to help you navigate through ASDM; its purpose is to assist you in finding any panel in the ASDM application. When you click the Search button, you are prompted with a search panel, as shown in Figure 4-22. Figure 4-22. Search Navigation Tool 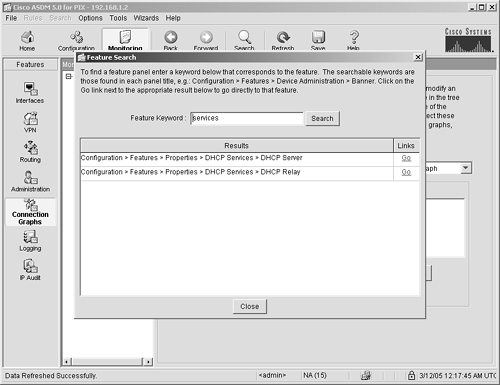
Enter a keyword into the Feature Keyword text box, click the Search button, and the feature search will display all the paths that contain the keyword in your search. The results include a link that you can click to take you straight to the desired feature panel. Figure 4-30 shows the results from the keyword "access," where three navigation paths were displayed: AAA Access Access Group Access Rules
From the result list, clicking the Go link at the end of the navigation path will take you directly to that panel. Refresh Navigation Icon The Refresh navigation icon enables you to refresh ASDM with the current configuration on the ASA/PIX Security Appliance. Use this button when you have made changes to a panel that you haven't saved and you want the panel to revert to its previous state. If you want to see the changes in your ASDM session when a change was made to the security appliance via either another ASDM connection or a console connection, you should use this button. CAUTION A warning prompt displays before ASDM is refreshed with the running configuration if you have unsaved changes.
Save Navigation Icon The Save navigation icon enables you to write the current ASDM configuration to Flash on the ASA/PIX Security Appliance. This action is equivalent to the write memory command in the security appliance CLI. Changes take effect immediately when they are applied using ASDM, but they do not become permanent until you perform a save. Help Navigation Icon The Help navigation icon brings up the Adaptive Security Device Manager Online Help screen. This screen enables you to access context-sensitive help, which includes the following: Help contents Help screen Help search Help glossary Help index About ASDM Using Help
|