A time may come when you need to actually use the backup files you have created using the Backup utility. You might have to restore data to your computer that has either been lost because of a system failure or inadvertanly deleted (which happens all too often when you share folders on a network).
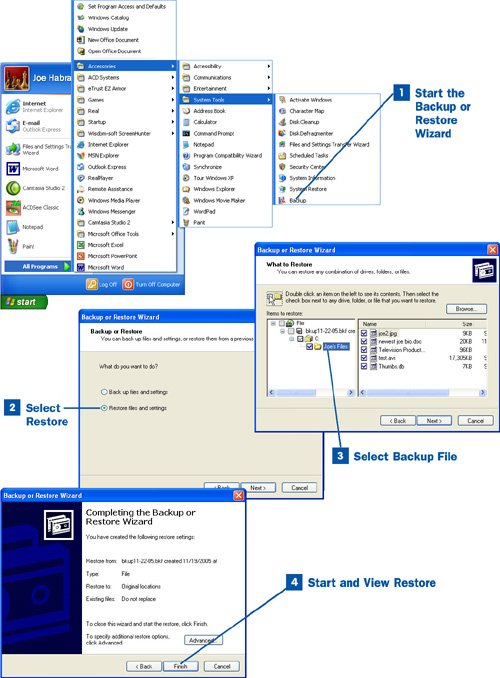
 Start the Backup or Restore Wizard
Click the Start button and select All Programs, Accessories, System Tools, Backup. When the initial screen of the Backup or Restore Wizard opens, click Next to continue.
 Select Restore
On the next wizard screen, click the Restore files and settings option button. Then click Next to continue.
 Select Backup File
On the next wizard screen, select the backup file you want to restore to the computer. You can click the file heading and expand its contents to view a list of recent backups. To view the contents of a particular backup file, expand the backup file (using the plus symbols to the left of the drives and folders). Use the check box next to an item such as a drive, folder, or file to specify the items you want to restore to the computer.
If the backup file you want to restore is not listed on the wizard screen or is on a share on another computer in the workgroup, click the Browse button. The Open Backup File dialog box opens; click Browse again to open the Select File to Catalog dialog box. Use the My Computer icon on the left side of the dialog box to locate backup files on your computer. To navigate to backup files held in network shares on other computers, click the My Network Places icon. When you have located the file you want to open; select it (whether it is on a local drive or a share on the network) and then click Open in the Select File to Catalog dialog box. Then click OK to close the Open Backup File dialog box and return to the wizard.
You can now select the individual items you want to restore using the appropriate check boxes (or you can select the entire backup file). When you have selected the files to be restored, click Next to continue.
Tip
You can choose to restore all the files in a backup file or target the restore by selecting specific files. Expand the backup file by double-clicking it to view its contents. If you want to restore all the files in the backup file, select the check box for that backup file. If you want to restore only certain files, locate those files and select the check boxes to select the files as needed.
 Start and View Restore
The final wizard screen provides a summary of the restore settings. Click the Finish button to start the restore. The Restore Progress dialog box opens. A progress indicator provides you with the progress of the restore. When the process is complete, you can view a report for the restore by clicking the Report button. The report provides the start and completion time for the restore process and also lists the number of items that were restored (it does not provide a list of the folders or files restored). To close the Restore Progress dialog box, click the Close button.
When you have restored the files to your computer, open Windows Explorer by clicking the Start button and then clicking My Computer to take a look at your hard drive and see whether the files have been restored properly. If you set up the restore correctly, the files should be found in their original folders.