Because the advanced wizards provide only slightly more control over a backup or restore, and because the Automated System Recovery Wizard is unusable with Windows XP Home Edition, you might wonder why you would ever want to use the advanced mode. The real value of the advanced mode is that it allows you to schedule backups. You can specify all the parameters for the backup such as backup type, files to be backed up, destination for the backup, and also schedule a date and time when the backup should occur. This task explains how to schedule a backup (restore is discussed in  Restore Backed Up Data).
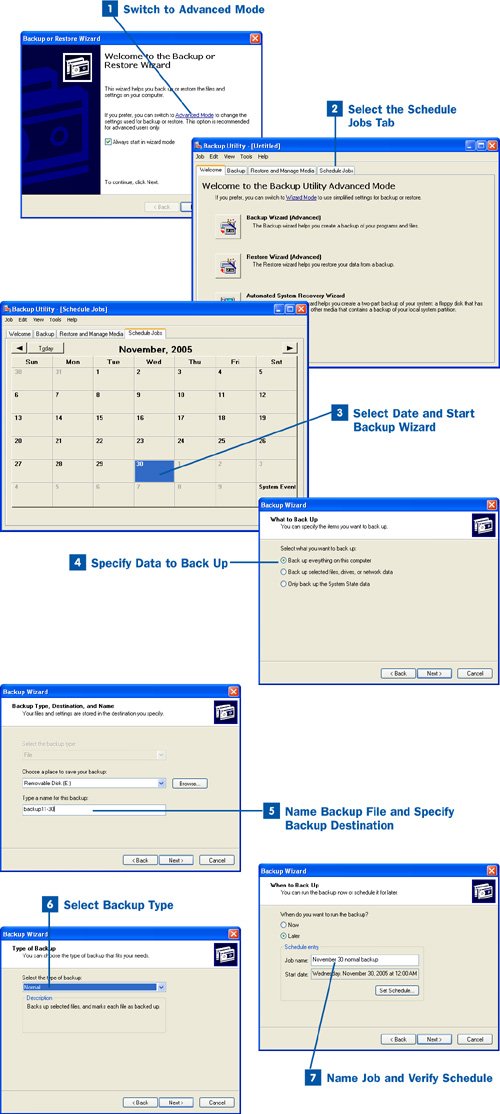
 Switch to Advanced Mode
Start the Backup utility by clicking the Start button and selecting All Programs, Accessories, System Tools, Backup. On the first screen of the Backup or Restore Wizard, click the Advanced Mode link. The Backup Advanced Mode window opens.
 Select the Schedule Jobs Tab
The Advanced Mode window of the Backup utility lists the Backup Wizard (Advanced), Restore Wizard (Advanced), and the Automated System Recovery Wizard. The only difference between the advanced wizards provided on this screen and the wizard you used in  Use the Windows Backup Wizard is that the advanced wizards let you select the backup type (normal, incremental, daily, and so on) and choose to have the data validated after the backup is complete. We will look at the "new steps" provided by the advanced backup wizard as we configure a scheduled backup job in this task.
Four tabs are provided on the Advanced Mode window of the Backup utility:
Welcome: Lists the advanced wizards, which can be started by clicking the appropriate button.
Backup: Allows you to specify the files to be backed up and the destination for the backup; also provides a Start Backup button to start the backup. You can set the type of backup before running the backup by selecting Tools, Options. In the Options dialog box, select the Backup Type tab and then use the drop-down list box to select the type of backup you want to perform.
Restore and Manage Media: Allows you to select the media used for your backups and select the backup files to restore.
Schedule Jobs: Allows you to schedule a backup by selecting a date and time and then choose the backup type, the backup filename, and the destination drive for the backup.
Click the Schedule Jobs tab. We can now schedule and define a backup for the computer.
 Select Date and Start Backup Wizard
Select a date for your next backup by clicking a date on the calendar. Then click Add Job. The Backup Wizard (Advanced) starts. Click Next to bypass the wizard's initial screen.
 Specify Data to Back Up
On the next wizard screen, specify the data you want to back up using the option buttons provided (Back up everything on this computer, Back up selected files, drives, or network data, or Only back up the System State data). If you selected the Back up selected files, drives, or network data option, click Next and specify the files using the drive and folder check boxes provided. Then click Next again.
 Name Backup File and Specify Backup Destination
On the next screen, supply a name for the backup file and also specify the destination for the backup.
Use the Drive drop-down list to specify the drive for the backup destination (this option lists any external drives connected to your computer that were recognized when you started the Backup utility). If you want to specify a remote location as the backup destination (such as any shared drive, including flash drives and shares on other computers in the workgroup, or a specific folder on any of your local drives), click the Browse button. In the Save As dialog box that opens when you click Browse, click the My Network Places icon and then locate the remote share you want to use as the backup destination.
After you name the backup file and specify the backup destination (click Save to close the Save As dialog box, if you browsed for a location), click Next to continue.
 Select Backup Type
On the next screen. use the Select the type of backup drop-down list to specify the type of backup you want to schedule; the default is Normal. Other options are described in the "Types of Backups" section of  About Backing Up and Restoring Data.
When you have selected the type of backup you want to perform, click Next to continue. The next wizard screen provides the option of verifying the data after backup, which can determine whether the backup was successful. It is up to you whether you want to verify the backup data; your decision really depends on how important the data is to you. To use it, select the Verify data after backup check box and click Next to continue.
 Name Job and Verify Schedule
On the next wizard screen, type a job name (this required name is just a job name; it is not the backup filename). The job is scheduled to take place Later and the date on which the backup will be performed is listed. If you want to change the date and time, click the Set Schedule button to open the Schedule dialog box, which allows you to schedule a specific date or recurring backup day with a specific time. When you have finished setting the schedule, including the time for the backup and recurring backups, click OK.
You will return to the wizard. Click Next.
Tip
When you set a recurring backup schedule using the Set Schedule dialog box, you select a particular day of the week and then a specific time on that day. Select a day of the week and a time when you know you will have the computer on but won't need to use the computer. Backing up files slows the system and makes it more difficult for you to continue working while the backup is proceeding. Again, select a day and time when the system is up and running but when you know that you are typically not using the computer.
The final wizard screen appears with a summary of the settings for the backup job. Click Finish. You return to the calendar on the Schedule Jobs tab of the Backup utility; the new job appears as an icon on the date you specified. When you have finished working with the advanced mode window, you can close it.
The job will run when scheduled. Make sure that the drive you use as the destination for the backup is attached to your system (such as a external Flash drive or USB hard drive, which is plugged into a USB drive on your computer) and is turned on before the scheduled backup runs. If you are backing up over the network to a remote share, make sure that the computer that hosts the share is on and available on the network.
If you want to modify a backup job you have scheduled (its icon appears on the calendar on the Schedule Jobs tab of the Backup utility window), double-click the job icon on the calendar day. The Options dialog box for the job opens. To change the time or date for the job, click the Properties button on the Scheduled data tab of the Options dialog box. The Schedule Job dialog box opens. Use the Schedule tab to change the date or time and then click OK to return to the Options dialog box for the scheduled job. If you want to delete a scheduled job, click the Delete button on the Scheduled data tab of the job's Options dialog box. The job is deleted from the calendar.