65. Use the Windows Backup Wizard  BEFORE YOU BEGIN BEFORE YOU BEGIN
|
|---|
 About Backing Up and Restoring Data About Backing Up and Restoring Data
|
The Windows Backup utility actually can function in two different modes: wizard mode and advanced mode. When you use the wizard mode, the utility provides the Backup or Restore Wizard, which walks you through the process of either backing up or restoring your files. The advanced mode allows you to control various settings related to the backup and restore process, such as selecting the type of backup (normal, daily, or incremental) or selecting to not overwrite existing files when doing a restore. The advanced mode also provides you with the ability to schedule backup jobs so that the backups run automatically. When you run the Backup utility using the Backup or Restore Wizard, the default type of backup that is performed is a normal backup of all the files in the selected folders. If you want to change the type of backup the next time you back up your files (such as changing from normal to incremental), you must use the advanced mode. When you start the Backup utility from the Start menu, the software scans your system for backup drives such as USB hard drives or USB flash removable drives. Make sure that the drive you want to use as the destination for your saved archive file is attached to your computer (such as an external USB drive) before starting the Backup utility. If you are going to back up to a computer on the network that is sharing a drive or folder or are backing up to an external network drive, make sure that the computer or drive is available on the network (meaning the computer that shares the backup location is up and running on the network). You can back up data from a network location to a destination drive on your computer that you specify, and you can also back up local data (data on your computer) across the network to a remote share or drive. Moving data across the network will take time, and you must decide for yourself whether backing up data over the network or from your computer to an attached drive such as a USB external drive is the better option. The Backup utility is designed to prepare a Windows system (however, not Windows XP Home Edition) for automated recovery using the Automated System Recovery (ASR) Wizard. Because the Backup utility was originally designed for earlier versions of Windows, it cannot correctly restore the system recovery files to a computer running Windows XP Home Edition. So, you can basically ignore the ASR wizard and plan on using the System Restore feature, which is discussed in  Create a System Restore Point and Create a System Restore Point and  Restore the System. Restore the System. Tip If you want the Backup utility to automatically start in advanced mode the next time you start it, deselect the Always start in wizard mode check box on the initial wizard screen.
 Use the Windows Backup Wizard Use the Windows Backup Wizard
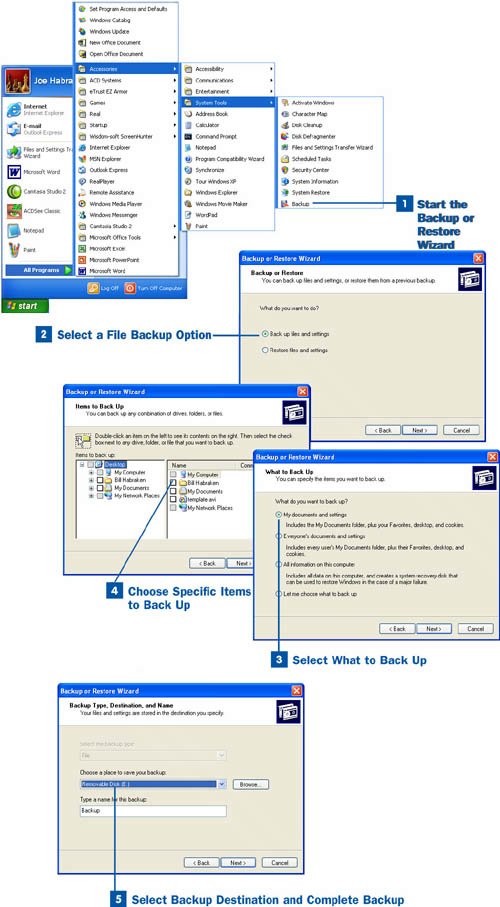
 Start the Backup or Restore Wizard Start the Backup or Restore Wizard
Click the Start button and select All Programs, Accessories, System Tools. In the System Tools folder, select Backup. The Backup or Restore Wizard opens. Click Next to bypass the wizard's initial screen.  Select a File Backup Option Select a File Backup Option
The next wizard screen asks whether you want to back up or restore files. Click the Back up files and settings option button and then click Next to proceed to the next screen.  Select What to Back Up Select What to Back Up
The next screen provides options in relation to what you want to back up. Select one of the following: My documents and settings: This option backs up My Documents (including subfolders such as My Pictures) and also backs up settings related to the Windows desktop and Internet Explorer (such as cookies and your web favorites). Everyone's documents and settings: This option backs up the My Documents folder for all users on the computer as well as their system files related to the desktop, cookies, and so on. All information on this computer: This option creates a system recovery disk and backs up all the information on the computer's hard drive. The system recovery disk and the backup file created from this type of backup can be used to restore your Windows system in case of a major meltdown. This backup requires a destination drive with a lot of storage space and also takes the longest time of the backups listed here. Let me choose what to back up: This option allows you to move to an additional wizard screen where you can specify the drive and folders you want to back up. This is the best option if you are backing up only specific folders containing important files.
If you select one of the first three options, proceed to step 5 to specify the backup destination and complete the backup process. If you choose the All information on this computer option, you must also have a floppy disk available to complete the backup. If you select Let me choose what to back up as your backup option, go to step 4. After selecting one of the What to Back Up options, click Next to continue.  Choose Specific Items to Back Up Choose Specific Items to Back Up
If you selected the Let me choose what to back up option in step 3, you must select the actual locations on your computer that you want to back up. In the Items to Back Up screen of the wizard, select the check box for the drive, folder, or subfolder you want to back up. To expand a drive or folder to see its contents, click the plus symbol to the left of the drive or folder name. You can select multiple folders by selecting the check boxes for the folders. If you plan to back up data from the network (meaning that you are backing up data from a remote location to the backup destination you specify in step 5), click the My Network Places icon to expand it and then locate the share (by name) and select it. You can actually back up any files that are contained in a remote share. Selecting a shared folder backs up the shared data over the network, so remember that backing up data across the network will take more time than a backup to a directly attached backup device. Whether you are backing up local data or data in a share, make sure to place a check mark next to the folder, share, or filename. When you have finished making your selection, click Next to continue. Note Although these steps look at selecting folders and files to be backed up using the Windows Backup utility, other backup software products (such as the backup software that comes with an external USB hard drive) offer similar sets of steps in terms of selecting files for backup and selecting the location for the backup. Just remember, however, that not all the backup software that comes with USB drives offers the ability to back up data over the network the way the Window s XP utility does.
 Select Backup Destination and Complete Backup Select Backup Destination and Complete Backup
The next screen provides a Choose a place to save your backup drop-down list box you can use to specify the destination drive (such as a USB drive) or other location for the backup. Alternatively, click the Browse button and browse to the location that will store your backup file. If you want to back up your local data (drives or folders selected in step 4 that are located on your computer) to a remote network share, click the My Network Places icon that appears in the Save As dialog box (which opens when you click the Browse button). Locate and select the remote share in the My Network Places window. You must also specify the filename for the backup. The default filename is Backup, but you should create a more descriptive name (for example, you can include the date, such as backup11-20-05). After specifying the backup filename and selecting the location for the backup, click Next (if you used the Browse option, specify a name for the backup file and then click Save in the Save As dialog box to return to the wizard); you can then click Next to continue). Note Backup software such as the Windows XP Backup utility doesn't really see any difference between local folders (on your computer) and shared folders on the network. This means that you can back up data located remotely on the network (such as a share on another computer); you can also back up your local data to remote locations on other computers.
A final screen appears, summarizing the steps that you have completed. Click Finish to complete the process. The Backup Process dialog box opens, showing the progress of the backup. When the process is complete, you can close the Backup Process dialog box by clicking Close. After you back up your data, you are safe until you have a problem; then you will have to restore your data, as explained in  Restore Backed Up Data. Restore Backed Up Data.
Tip If you want to view a report related to a backup you have completed using the Backup utility, click the Report button in the Backup Process dialog box. The report provides the date and time for the backup (both the start time and date and the end time and date), the name of the backup file created, and the type of backup that was run (such as a normal backup). The report also includes the number of folders and files backed up. It does not provide a list of the files or folders backed up, however.
|