| To really control your printouts related to a particular presentation, use the various options supplied in the Print dialog box. The Print dialog box enables you to specify what to print, such as handouts or the presentation as an outline; it also enables you to specify the printer to use for the printout. For example, you might want to use a color printer for overhead transparencies and a black-and-white printer for your handouts. To set your print options, follow these steps: -
Select the File menu and select Print . The Print dialog box appears with the name of the currently selected printer in the Name box (see Figure 13.2). Figure 13.2. The Print dialog box enables you to control the printer and the printouts. 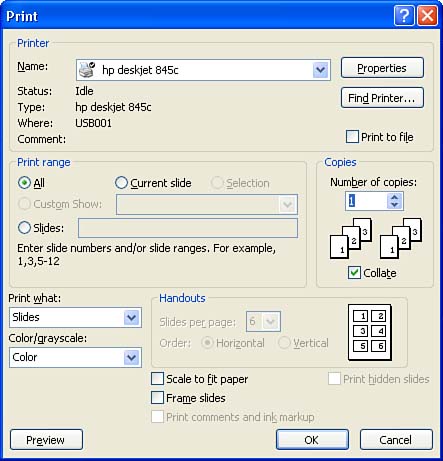 -
If you want to use a different printer, open the Name drop-down list and select the printer you want.  | Printer Properties The Properties button enables you to adjust graphics quality, select paper size, and choose which paper tray to use, among other things. |
-
Choose what to print in the Print Range section: -
Choose All to print all the slides in the presentation. -
Choose Current Slide to print only the currently displayed slide. -
Enter a range of slide numbers into the Slides text box; for example, enter 24 to print slides 2, 3, and 4. -
Open the Print What drop-down list and choose what you want to print. You can print slides, handouts, notes, or outlines. -
If you want more than one copy, enter the number of copies you want into the Number of Copies box. -
Use the Color/Grayscale drop-down box to specify whether the printout should be in color, grayscale, or black and white. -
If you are printing handouts, use the Handouts box to specify the number of slides that should be printed per page and the orientation used for the printed page (Portrait or Landscape). -
Select or deselect any of these check boxes in the dialog box, as required: -
Print to File Select this option to send the output to a file rather than to your printer. -
Collate If you are printing more than one copy, select this check box to collate (1, 2, 3, 1, 2, 3) each printed copy instead of printing all the copies of each page at once (1, 1, 2, 2, 3, 3). -
Scale to Fit Paper If the slide (or whatever you're printing) is too large to fit on the page, select this check box to decrease the size of the slide to make it fit on the page. Now you won't have to paste two pieces of paper together to see the whole slide. -
Frame Slides Select this check box if you want to print a border around each slide. -
Print Hidden Slides If you have any hidden slides, you can choose whether to print them. If you don't have any hidden slides, this check box will be unavailable. -
Print Comments and Ink Markup Prints all the comments on the slides of the presentation on a separate comments page. This option also prints any ink markups that you have made using the pen feature when viewing the presentation. | | Preview Your Printout Selection After specifying the various options in the Print dialog box, you might want to preview the printout before you send it to the printer. Click the Preview button. You are taken to the Print Preview screen. If things look good on the Print Preview screen, click Print to send the printout to the printer. |
-
Click OK to print.  |