Working in Multiple Columns Depending on the type of slide that you are creating, you might need to arrange text on a slide in multiple columns. PowerPoint provides three options for placing text into columns on a slide: -
You can use the Title and 2 Column slide layout to create a slide with side-by-side text columns. -
You can place tab stops in a single text box and press Tab to create columns for your text. -
You can use a table to create a two- or multiple-column text grid. In this lesson, you learn about all these methods . Creating Columns with a Slide Layout The easiest way to create columns of text is to change a slide's layout so that it provides side-by-side text boxes. Because the default layout for slides is a slide with a title box and a single text box, you will probably need to use the Slide Layout task pane to change its format to include two text columns. Follow these steps: -
Create a new slide or select a slide that you want to format with the two-column layout (using the Outline or Slides pane). -
Open the task pane (select View, Task Pane ). -
Select the task pane drop-down arrow and select Slide Layout . -
Click the Title and 2 Column slide layout from the Text Layouts section of the Slide Layout task pane to format the slide (see Figure 8.1). Figure 8.1. A two-column slide layout provides two panes in which to enter text. 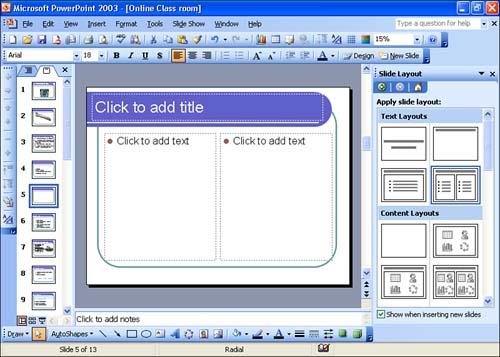 You can then type the text that you want to appear in the two text boxes provided on the slide.  | Position the Cursor on a Slide Layout to See Its Description If you position the cursor on any of the slide layouts in the Slide Layout task pane, a tip appears, describing the layout. |
Using Tabs to Create Columns You can also create multiple columns in a text box using tab stops. To set the tabs for a multicolumn list, perform the following steps: -
Open the presentation and select the slide you want to work with in Slide view. -
Make sure that the ruler is showing in the PowerPoint window (select View , then Ruler if necessary). -
Select Insert , then Textbox . Drag the mouse to create a textbox that is as wide as the area on the ruler that you will use to set the tabs. The ruler area will display the usable area on the slide (white) and the margins on the slide (dark gray). If you do not see the ruler, select the View menu and then select Ruler to display the ruler.  | Text Box from the Drawing Toolbar You cannot easily place tabs in a textbox created using the Drawing toolbar. Use the Insert menu as outlined in the steps to place a textbox that will contain tabs. |
-
Click anywhere inside the text box. After the insertion point is in the text box, you can set the tabs. -
If you already typed text inside the text box, select the text. -
Click the Tab button at the left end of the ruler until it represents the type of tab you want to set (see Table 8.1 for more information on the type of tabs available). -
Click in various positions on the ruler to place a tab stop using the type of tab you currently have selected. Figure 8.2 shows several tab stops that have been placed in a text box. Figure 8.2. The ruler enables you to create tab stops for a text box.  -
Repeat steps 6 and 7 if you want to set different types of tab stops at different positions. -
To change the position of an existing tab stop setting, drag it on the ruler to the desired position. To delete an existing tab stop setting, drag it off the ruler. -
(Optional) To hide the ruler, select the View menu and then select Ruler . Table 8.1. Tab Button Stop Types | Button Appearance | Tab Stop Type | |  | Aligns the left end of the line against the tab stop. | |  | Centers the text on the tab stop. | |  | Aligns the right end of the line against the tab stop. | |  | Aligns the tab stop on a period. This is called a decimal tab and is useful for aligning a column of numbers that uses decimal points. | Creating a Table Tables can also be used to place text in side-by-side columns. You can create tables that provide two columns, three columns, or any number of columns that you require. Tables are also very useful when you want to display numerical information in a grid layout or information that you want to arrange in rows. A table is a collection of intersecting columns and rows. The block created when a column and a row intersects is often referred to as a cell . The easiest way to create a table on a slide is to use the Table layout. Follow these steps: -
Create a new slide or select a slide that you want to format with the Table layout (using the Outline or Slides pane). -
Open the task pane (select View, Task Pane ). -
Select the task pane drop-down arrow and select Slide Layout . -
Scroll down through layouts in the task pane, and then click the Title and Table layout. This assigns the Title and Table layout to the current slide (see Figure 8.3). Figure 8.3. The Table layout enables you to place a table on a slide. 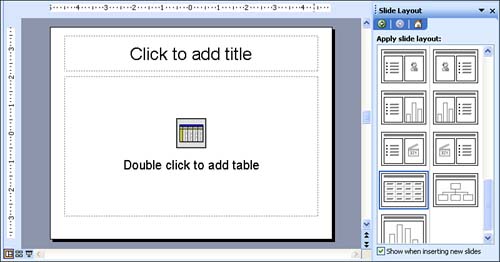 -
After you assign the Title and Table layout to the slide, you can set the number of columns and rows for the table. Double-click the Table icon on the slide. The Insert dialog box appears. -
Specify the number of columns and rows that you want in the table and then click OK . The table is placed on the slide. You can also insert a table onto an existing slide. This allows you to include a table on a slide where you don't want to change the slide's layout as discussed in the preceding steps. Follow these steps: -
Display the slide on which you want to place the table. -
Select the Insert menu and then choose Table . The Insert Table dialog box appears. -
Enter the number of columns and rows that you want to have in the table. -
Click OK . The table appears on the slide. When the table appears on the slide, the Tables and Borders toolbar also appears in the PowerPoint window (we will use this toolbar in a moment). After you have a table on a slide, you can work with it like this: -
Click inside a table cell and enter your text. You can move from cell to cell by pressing Tab to go forward or Shift+Tab to go back. Enter text as needed. -
If you need to resize the table, drag a selection handle, the same as you would any object. -
To adjust the row height or column width, position the mouse pointer on a line between two rows or columns and drag. The mouse pointer becomes a sizing tool when you place it on any column or row border. -
If you want to change the style of the borders around certain cells on the table (or the entire table), select the cells (drag the mouse across the cells to select them). You can then use the buttons on the Tables and Borders toolbar to change the border attributes (see Figure 8.4). Use the Border Style button and the Border Width button to change the border style and border line weight, respectively. If you want to change the border color, use the Border Color button. Use the buttons on the Tables and Borders toolbar to adjust the thickness and style of the table gridlines. Figure 8.4. Border attributes for the table can be changed using the buttons on the Tables and Borders toolbar. 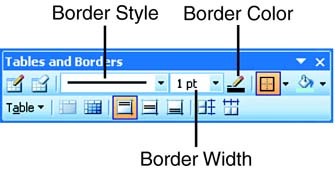 To make a table appear to be multiple columns of text without the table borders, turn off all the gridlines in the table. To do so, select all the cells in the table; then right-click and choose Borders and Fill . In the Format Table dialog box that appears (see Figure 8.5), click each of the border buttons provided on the table diagram to turn the border off for each side of each cell in the table. Click OK to return to the table. Figure 8.5. The Format Table dialog box can be used to control border lines and other table attributes. 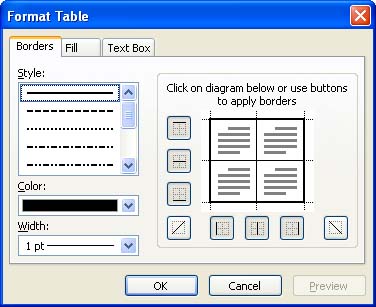  |