Copying Data to Other Cells
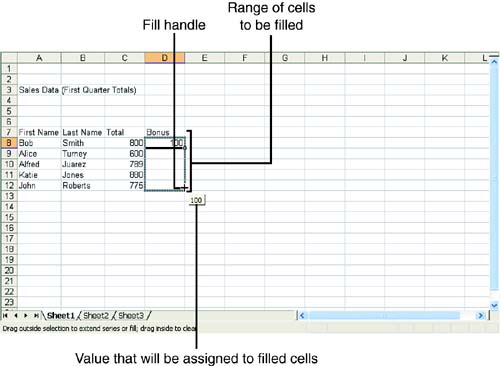
Copying Data to Other CellsAnother way to enter labels or values onto a sheet is to use the Fill feature. You can copy (fill) an entry into surrounding cells. For example, suppose you have a list of salespeople on a worksheet, and they will each get a $100 bonus. You can enter the 100 once and then use the Fill feature to insert multiple copies of 100 into nearby cells. To use the Fill feature for copying, follow these steps:
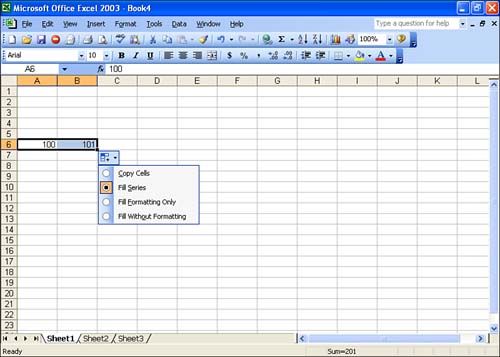
When you release the mouse, a shortcut box for Fill options appears at the end of the cells that you filled. Copy Cells is the default option for the Fill feature, so you can ignore the shortcut box for the moment. It does come into play when you enter a series in the next section.
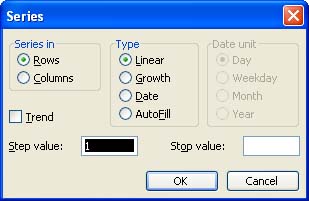
Entering a Series of Numbers, Dates, and Other DataEntering a value series (such as January, February, and March or 1, 2, 3, 4, and so on) is accomplished using the Fill feature discussed in the preceding section. When you use the Fill feature, Excel looks at the cell holding the data and tries to determine whether you want to just copy that information into the adjacent cells or use it as the starting point for a particular series of data. For example, with Monday entered in the first cell of the series, Excel automatically inserts Tuesday, Wednesday, and so on into the adjacent cells when you use the Fill feature. Sometimes Excel isn't quite sure whether you want to copy the data when you use Fill or create a series. This is where the Fill options shortcut box comes in. It enables you to select how the Fill feature should treat the data that you have "filled" into the adjacent cells. Figure 2.6 shows the creation of a data series using Fill. Figure 2.6. Fill can also be used to create a series of data in adjacent cells. When you create a series using Fill, the series progresses by one increment. For example, a series starting with 1 would proceed to 2, 3, 4, and so on. If you want to create a series that uses some increment other than 1, you must create a custom series. Entering a Custom SeriesIf you want to create a series such as 10, 20, 30, where the series uses a custom increment between the values, you need to create a custom series. Excel provides two ways to create a custom series. To create a custom series using Fill, follow these steps:
You can also create a custom series using the Series dialog box. This enables you to specify the increment or step value for the series and even specify a stop value for the series.
|
EAN: N/A
Pages: 660