Section 5.1. Copying Pixels
5.1. Copying PixelsWe can only get so far in our image processing with getPixels() before we need to know where a pixel is. For example, if we want to copy just part of a picture to another picture, we will need to know the x and y values to start with and end at. 5.1.1. Looping Across the Pixels with a Nested LoopWe can't use a single for loop if we want to keep track of the x and y values for a pixel. We have to use two for loopsone to move horizontally across the columns, and the other to move vertically to get every pixel. The method getPixels() did this inside itself, to make it easier to write simple picture manipulations. But if you want to access each individual pixel, you'll need to use two loops, one for each dimension of the picture. The inner loop will be nested inside the outer loop, literally, inside its block. Your loops will look something like this: // loop through the columns (x direction) for (int x = 0; x < getWidth(); x++) { // loop through the rows (y direction) for (int y = 0; y < getHeight(); y++) { // get the current pixel at this x and y position pixel = getPixel(x,y); // do something to the color // set the new color pixel.setColor(aColor); } } This will process all the y values from top to bottom in the first column and then all the y values in the next column and so on until all the pixels are processed. You could also process all the x values in the top row and then all the x values in the next row and so on using this: // loop through the rows (y direction) for (int y = 0; y < getHeight(); y++) { // loop through the columns (x direction) for (int x = 0; x < getWidth(); x++) { // get the current pixel at this x and y position pixel = getPixel(x,y); // do something to the color // set the new color pixel.setColor(aColor); } } Does it matter which way you process the pixels? Not if all you are trying to do is process all the pixels. Both of these loops will process all the pixels in a picture. For example, here's Program 13 (page 119), but using explicit pixel references. Program 18. Lighten the Picture Using Nested Loops |
 /** * Method to lighten the colors in the picture */ public void lighten2() |
Let's walk through (trace) how it would work. Imagine that we just executed picture.lighten2().
The code picture.lighten2() executes the object method in the Picture class public void lighten2(). The method is implicitly passed the current picture object (you can refer to the current picture object using the keyword this).
The code Color color = null; and Pixel pixel = null; declares the variables color (an object of the Color class) and pixel (an object of the Pixel class). Both of these are initialized to null (not referring to any object yet). These variables will be needed when we are looping through the pixels. We could declare these in the for loop but then they would be redeclared each time through the loop. It is better to declare them once before the loop and change them each time through the loop.
The code for (int x = 0; x < getWidth(); x++) declares a variable x of type int which will be initialized to 0 and then a check will be made to see if x is less than the width of the current Picture object. If x is less than the width, then the body of this for loop will be executed. After the body of the loop has been executed one time the value in x will be incremented and the continuation condition will be tested again.
The code for (int y = 0; y < getHeight(); y++) declares a variable y of type int which will be initialized to 0. The test checks that y is less than the height of the current Picture object. If y is less than the height then the body of this for loop will be executed. After the body has executed the value in y will be incremented and the continuation condition will be tested again.
[Page 134] The code pixel = getPixel(x,y); sets the variable pixel to refer to the Pixel object at the given x and y location in the picture.
The code color = pixel.getColor(); sets the variable color to refer to the Color object at the current pixel.
Next comes color = color.brighter();. This creates a new lighter (brighter) Color object based on the original Color object and sets the variable color to refer to that new Color object.
The code pixel.setColor(color); sets the current pixel's color to be the lighter color.
Each time we reach the end of the inner for loop, the y value will be incremented by 1 and then the value of y will be compared to the height of the picture. If the value of y is less than the height, the statements in the body of the loop will be executed again. If the value of y is equal or greater than the height, execution will jump to the next statement (the outer loop).
Each time we reach the end of the outer for loop the x value will be incremented by 1 and then the value of x will be compared to the width of the picture. If the x value is less than the width of the picture, the commands in the loop body will be executed. If the value of x is equal or greater than the width of the picture, execution will continue at the statement following the body of the loop.
5.1.2. Mirroring a Picture
Let's start out with an interesting effect that is only occasionally useful, but it is fun. Let's mirror a picture along its vertical axis. In other words, imagine that you have a mirror, and you place it on a picture so that the left side of the picture shows up in the mirror. That's the effect that we're going to implement. We'll do it in a couple of different ways.
First, let's think through what we're going to do. We want to copy the pixel in the first column and first row (0, 0) to the pixel in the last column and first row (width 1, 0). We will copy the pixel in the second column and first row (1, 0) to the second to last column and first row (width 2, 0). We will continue to do this until we reach the middle of the picture (width/2). Remember that the index for the last column is one less than the width so each time through the loop we are copying from the (x, y) to (width 1 x, y).
What if we have an even number of pixels? The smallest even number of pixels is two. The mirrorPoint would be (2/2 = 1). The first time through the loop this would copy from (0, 0) to (width 1 0, 0) which is (1, 0). Then x would increment and the inner loop would stop since x isn't less than the mirrorPoint (Figure 5.1).
Figure 5.1. Once we pick a mirror point, we can just walk x halfway and copy from (x, y) to (width 1 x, y).
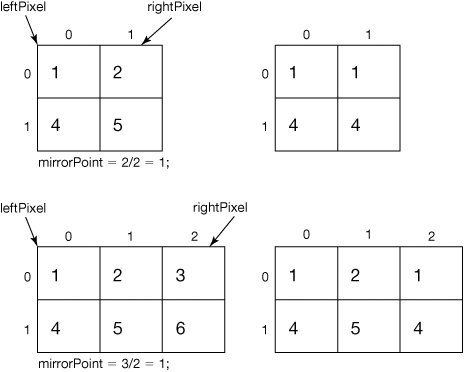
What if we have an odd number of pixels? We don't want to copy the middle pixel. Let's try it with three pixels. The mirrorPoint would be (3/2 = 1). Remember that integer division results in an integer result and the fractional part is thrown away. The first time through the loop this would copy from (0, 0) to (width 1 0, 0) which is (2, 0). Then x would increment and the inner loop would stop since x wouldn't be less than the mirrorPoint.
Take a look at Figure 5.1 to convince yourself that we'll actually reach every pixel (except the middle one if there are an odd number of pixels) using this scheme. Here's the actual program.
Program 19. Mirror Pixels in a Picture along a Vertical Line (This item is displayed on pages 135 - 136 in the print version)
/** * Method to mirror around a vertical line in the middle * of the picture based on the width */ public void mirrorVertical() { int width = this.getWidth(); int mirrorPoint = width / 2; Pixel leftPixel = null; Pixel rightPixel = null; // loop through all the rows for (int y = 0; y < getHeight(); y++) { // loop from 0 to the middle (mirror point) for (int x = 0; x < mirrorPoint; x++) { leftPixel = getPixel(x, y); |
We'd use it like this, and the result appears in Figure 5.2.
> String fileName = "C:/intro-prog-java/mediasources/caterpillar.jpg"; > Picture picture = new Picture(fileName); > picture.show(); > picture.mirrorVertical(); > picture.repaint();
Figure 5.2. Original picture (left) and mirrored along the vertical axis (right).

Can we mirror horizontally? Sure!
Program 20. Mirror Pixels Horizontally, Top-to-Bottom (This item is displayed on pages 136 - 137 in the print version)
/** * Method to mirror around a horizontal line in the middle * based on the height. It copies the top mirrored to * the bottom */ public void mirrorHorizontal() { int height = this.getHeight(); int mirrorPoint = height / 2; Pixel topPixel = null; Pixel bottomPixel = null; // loop through the columns for (int x=0; x < getWidth(); x++) { // loop from 0 to just before the mirror point |
We'd use it like this, and the result appears in Figure 5.3.
> String fName = "C:/intro-prog-java/mediasources/redMotorcycle.jpg"; > System.out.println(fName); C:/intro-prog-java/mediasources/redMotorcycle.jpg > Picture picture = new Picture(fName); > picture.show(); > picture.mirrorHorizontal(); > picture.repaint();
Figure 5.3. A motorcycle mirrored horizontally, top to bottom (left) and bottom to top (right).
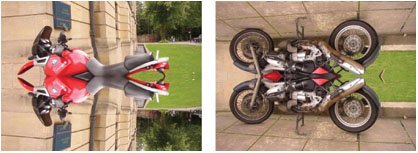
Now this last method copies from the top of the picture onto the bottom (see Figure 5.3). You can see that we're getting the color from topPixel which is from (x,y)that will always be above mirrorPoint since smaller values of y are nearer the top of the picture. To copy from the bottom up, simply change the color at the top pixel to the color of the bottom pixel (Figure 5.3).
Program 21. Mirror Pixels Horizontally, Bottom-to-Top (This item is displayed on pages 137 - 138 in the print version)
/** * Method to mirror around a horizontal line in the middle * based on the height of the picture. It copies the bottom * to the top. */ |
We'd use it like this, and the result appears in Figure 5.3.
> String fName = "C:/intro-prog-java/mediasources/redMotorcycle.jpg"; > Picture picture = new Picture(fName); > picture.show(); > picture.mirrorHorizontalBottomToTop(); > picture.repaint();
Mirroring usefully
While mirroring is probably mostly used for interesting effects, occasionally it has some more serious (but still fun!) purposes. Mark took a picture of the Temple of Hephaistos which is in the ancient agora in Athens, Greece, when traveling to a conference (Figure 5.4). By sheer luck, Mark got the pediment dead horizontal. The Temple of Hephaistos had its pediment damaged. Mark wondered if he could "fix" it by mirroring the good part onto the broken part.
Figure 5.4. Temple of Hephaistos from the ancient agora in Athens, Greece. (This item is displayed on page 139 in the print version)

This time we don't want to mirror one-half of the picture onto the other half. We just want to mirror the pixels from the good side of the pediment on the left onto the bad side on the right. We also don't want to mirror all the pixels in the y direction. We just need the pixels from the top of the pediment to the bottom of the pediment. We can use the explorer to find out the value for those pixels (Figure 5.5). The pediment starts at x=13 and the middle is at x=276. The highest part of the pediment is at y=27 and it ends at y=97.
Figure 5.5. Coordinates where we need to do the mirroring. (This item is displayed on page 139 in the print version)

How do we mirror just a small part of a picture? Well, we still need a point to mirror around. We will use 276 for that instead of half the width like we did in the method mirrorVertical(). Let's start by copying the mirrorVertical() method and changing the name to mirrorTemple() and set the mirror point to the value 276. We just want to copy from x=13 to x<276. We can start y at the top of the pediment 27 (instead of 0) and copy while it is less than 97 (instead of the height of the picture). Then we will copy from the pixel at (x, y) to a pixel at the mirror point plus the distance from the mirror point to the current x (mirrorPoint + (mirrorPoint x)).
Program 22. Mirror Part of a Picture Vertically (This item is displayed on pages 139 - 140 in the print version)
/** * Method to mirror part of the temple picture around a * vertical line at a mirror point */ public void mirrorTemple() { int mirrorPoint = 276; Pixel leftPixel = null; Pixel rightPixel = null; |
To use this method try this.
> String fileName = "C:/intro-prog-java/mediasources/temple.jpg"; > Picture picture = new Picture(fileName); > picture.explore(); > picture.mirrorTemple(); > picture.explore();
The final picture is in Figure 5.6it worked pretty well! Of course, it is possible to tell that it was digitally manipulated. For example, if you check the shadows, you can see that the sun must have been on the left and the right at the same time.
Figure 5.6. The manipulated temple.

You may be tired of typing the full path name to each file. You can save the name of the directory that has your media in it and then use
FileChooser.getMediaPath(fileName)
to get the full path name.
The method FileChooser.getMediaPath(fileName) generates a complete path for you by returning a string with the saved directory name followed by the base file name. The default media directory is "c:/intro-prog-java/mediasources/". If you wish to use a different media directory you should execute
FileChooser.setMediaPath(directory)
first! Using FileChooser.setMediaPath(directory) lets you specify the place (directory) where you store your media.
The temple example is a good one to ask ourselves about. If you really understand, you can answer questions like "What's the first pixel to be mirrored in this method?" and "How many pixels get copied anyway?" You should be able to figure these out by thinking through the programpretend you're the computer and execute the program in your mind.
If that's too hard, you can insert System.out.println() statements, but you might change the ending values on the loops so that it won't take too long to finish:
/** * Method to mirror part of the temple picture around a * vertical line at a mirror point */ public void mirrorTemple() { int mirrorPoint = 276; Pixel leftPixel = null; Pixel rightPixel = null; // loop through the rows for (int y = 27; y < 28; y++) { // loop from 13 to just before the mirror point for (int x = 13; x < 17; x++) { System.out.println("Copying color from " + x + " to " + (mirrorPoint + (mirrorPoint - x))); leftPixel = getPixel(x, y); rightPixel = getPixel(mirrorPoint + (mirrorPoint - x), y); rightPixel.setColor(leftPixel.getColor()); count = count + 1; } } }
This will loop through the first four pixels. When we run this we get the following:
> String fileName = "C:/intro-prog-java/mediasources/temple.jpg"; > Picture picture = new Picture(fileName); > picture.mirrorTemple(); Copying color from 13 to 539 Copying color from 14 to 538 Copying color from 15 to 537 Copying color from 16 to 536
It starts copying at x = 13 to mirrorPoint + (mirrorPoint x) which is 276 + (276 13) = 539. Next it increments x and copies from x = 14 to 276 + (276 14) = 538. Each time through the loop x will increment and the distance from the mirrorPoint to x will decrease.
How many pixels did we process? We can have the computer figure that one out, too. Just add a count that starts at 0 and increment it each time we copy a pixel. After the loop finishes print out the value of count.
/** * Method to mirror part of the temple picture around a * vertical line at a mirror point */ public void mirrorTemple() { int mirrorPoint = 276; Pixel leftPixel = null; Pixel rightPixel = null; int count = 0; // loop through the rows for (int y = 27; y < 97; y++) { // loop from 13 to just before the mirror point for (int x = 13; x < mirrorPoint; x++) { leftPixel = getPixel(x, y); rightPixel = getPixel(mirrorPoint + (mirrorPoint - x), y); rightPixel.setColor(leftPixel.getColor()); count = count + 1; } } System.out.println("We copied " + count + " pixels"); }
This one comes back with We copied 18410 pixels. Where did that number come from? You can calculate how many times you execute the commands in a for loop with end start + 1. We copy 70 rows of pixels (y goes from 27 to 96 (because of the <97) which is 96 27 + 1 = 70). We copy 263 columns of pixels (x goes from 13 to <276 which is 275 13 + 1 = 263). 70 * 263 is 18,410.
EAN: N/A
Pages: 191