Using UDDI
As described in Chapter 5, Universal Description, Discovery, and Integration (UDDI) is an accepted industry specification for publishing and locating Web services. Using UDDI, organizations can publish business contact information, services, and interfaces through a common directory ”which can either be located in a public UDDI directory or internally hosted via an intranet.
In simple terms, UDDI can be thought of as a phone directory or Domain Name System (DNS) for Web services. As you've seen in the examples in this chapter, to call a Web service, the client relies on knowing a particular URL. For example:
http://server/dotNETWebService/StockService.asmx
One problem with this is the URL doesn't naturally describe the service or reveal anything about the business that's hosting the service. Judging from the name of this example, you can tell that it might have something to do with stocks, but you can't gather much additional information. For instance, what company offers this service? Is this service hosted in a location near you? Another problem with URLs is their transient nature. A URL endpoint can change from month to month. You need a way to uniquely identify services, a way that is independent of the nonstatic and nondeterministic URL.
The UDDI directory allows these URLs (known in the directory as access points ) to be associated with services (which provide additional information about the functionality offered ) and businesses themselves . The business information can hold a point of contact, information about the type of business, and categorization to allow flexibility for searches.
Interoperability Benefits of Using UDDI
UDDI expands the possibilities when developing solutions that have a requirement to interoperate by giving .NET or Java clients (or any client that supports Web services) the ability to perform dynamic lookups for available services ” some of which can be hosted on the same platform as the client.
For interoperability between .NET and J2EE, using UDDI offers the following benefits:
-
Common Web service publication Using UDDI gives a universal view of Web services regardless of whether they were created or hosted using .NET, Java, or any other platform or language.
-
Dynamic configuration The UDDI registry can be accessed by developers and administrators who want to search and publish new Web services. It can also be accessed programmatically in client applications. These client applications, which can be written in either .NET or Java, can use UDDI to dynamically configure a Web service proxy without relying on a hard-coded URL. This can also include the dynamic rebinding of URLs. If multiple access points for a service exist and the chosen access point fails to respond, the client can requery UDDI to find another compatible service instance from the same provider.
-
Web service reuse Within an organization that has many development units, it's possible to create multiple Web services that perform the same function. Using UDDI allows developers to browse through a list of available Web services ”which can be .NET or Java based ” in order to enable reuse and prevent the duplication of a service.
-
Location-specific Web services Using categories in UDDI, a location can be assigned to an individual Web service. This Web service can then be replicated throughout the organization, but the location category can help local clients find the closest version of the Web service in order to aid in performance.
UDDI Registries
The UDDI directory is referred to as a registry . Currently, four nodes make up a public registry named the UDDI Business Registry (UBR). For more details, see http://www.uddi.org/find.html . Public UDDI entries are replicated between each of these four nodes.
This registry allows any developer, team, or organization to publish location information for services that are publicly available. In addition, Microsoft, IBM, and SAP host a test version of the registry in order to allow developers to test registration and publication of services before moving into production.
These registries work well for organizations that want to write and publish Web services that will be available publicly, but UDDI also offers a lot of advantages for internal use. Configuring a UDDI registry internally can be a great idea because it creates a single point of administration for Web services within a company. UDDI running internally can provide many benefits to applications that rely on Web services today.
A number of product offerings are available to enable you to run an internal UDDI registry:
-
Microsoft UDDI is available as a core service within Microsoft Windows Server 2003.
-
IBM IBM has a UDDI registry as part of its WebSphere product offering, based on DB2.
-
The Mind Electric (TME) GLUE from The Mind Electric is packaged with a UDDI server.
Many other vendors have implementations of UDDI as well. When choosing a vendor, it's a good idea to always ensure that the offering is compliant with the latest version of UDDI and that the vendor participates in the UDDI specification process and the UBR (because of its extensive interoperability test suites). The version of UDDI that we'll discuss here is v2.0.
To demonstrate the samples presented in this book, I'll use UDDI Services in Windows Server 2003. However, the sample code will work perfectly well with any UDDI v2.0 “compliant registry.
Using UDDI Services in Windows Server 2003
As mentioned, UDDI is a core service in Windows 2003. As with other application server “specific services, UDDI is installed through the Add/Remove Programs component of the Windows Control Panel. To install UDDI Services for Windows Server 2003, from the Windows control panel, select Add/Remove Windows Components from the Add/Remove Components . Within that list, check the UDDI Services box, as shown in Figure 6.7.
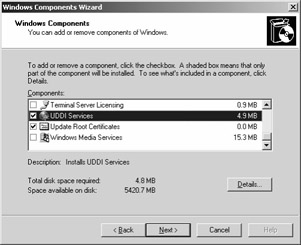
Figure 6.7: Selecting UDDI Services to install on Windows Server 2003.
The UDDI registry can use an instance of either Microsoft SQL Server 2000 Desktop Engine (MSDE) or Microsoft SQL Server 2000 installed on the same machine. Use the next page of the wizard to configure this for your own environment. For production environments, where performance is key, I recommend using SQL Server to take advantage of functionality that's shipped with the product. For small-scale usage and running the samples in this chapter, however, MSDE will work fine.
After selecting the database location, follow the wizard to the next step, which asks whether SSL is required for publishing and administration of the site. Again, for production implementations of UDDI, the recommended choice is to require SSL because without it, user credentials will be passed across the network in clear text. For the purpose of these samples, however, you do not need SSL. Figure 6.8 shows this selection of SSL encryption.
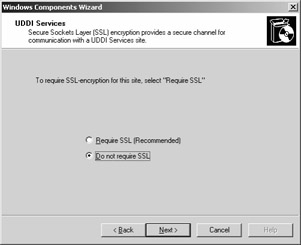
Figure 6.8: Selecting SSL encryption for the UDDI Services site.
Proceed through the wizard. In the next step, the wizard prompts for a location to install the database files, the default of which is C:\Inetpub\uddi\data. Accept this default.
In the next step of the wizard, use the Network Service account to configure the UDDI Service, unless there's a preference to use another account to start the service.
The penultimate step of the wizard is to provide a site name for the UDDI site, as shown in Figure 6.9. This name won't be used programmatically in these samples; instead, it's used as a friendly name for the site.

Figure 6.9: Specifying a site name for the UDDI Services site.
The final step of the wizard is to select whether the UDDI Server will use self-registration to document the available interfaces. This is required for at least one of the servers in a multi-instance UDDI site. For this sample, ensure that the check box is checked, as shown in Figure 6.10, and continue.
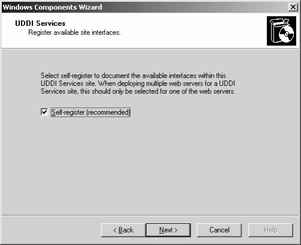
Figure 6.10: Setting self-registration for UDDI Services.
The wizard will now complete, and all required files will be installed. After this, the UDDI Services for the Windows Server 2003 installation is complete.
Microsoft UDDI SDK
To complement the UDDI Services for Windows Server 2003, a UDDI SDK is available. This SDK contains the required .NET libraries to allow you to develop clients that can make UDDI-specific calls. It's available as part of the Platform SDK (now known as the Microsoft Windows Software Development Kit) and can be downloaded from http://www.microsoft.com/msdownload/platformsdk/sdkupdate/default.htm.
To download the SDK on Windows Server 2003, be sure to set your security settings correctly within Internet Explorer. The SDK is updated using an ActiveX control, which must be downloaded. As a result, Internet Explorer must be configured to allow the download of ActiveX controls. You might also need to disable the Internet Explorer enhanced security configuration for the purpose of the download. Once the SDK has been installed, you can revert the browser to a more secure setting.
When installing the SDK, I recommend selecting the Core SDK. For the Core SDK option, ensure that the Build Environment is selected. This will install components to C:\Program Files\Microsoft SDK. After installation has completed, you need to register the UDDI components by running C:\Program Files\Microsoft SDK\Bin\UddiSdkRegister.exe.
One of the tools included with the SDK is the UDDI Publish Wizard. This wizard can be used to publish any Web service (based on either .NET or Java) to any UDDI v2.0 “compliant registry.
After UDDI Services for Windows Server 2003 has been installed, you can use the publishing wizard to publish this chapter's previous samples in the registry. To perform this after the SDK has been installed and registered, start the wizard by selecting UDDI Publish Wizard from the Microsoft Visual Studio .NET 2003 Tools program menu or by running C:\Program Files\Microsoft SDK\Bin\UddiPublishWizard.exe. The wizard will be launched, as shown in Figure 6.11.
To publish the Web service, we'll need to provide information about the location of the UDDI registry, a name, a description, an access point, and WSDL for the service. Click the Next button to proceed.
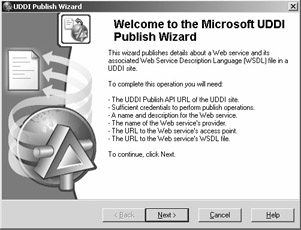
Figure 6.11: The Microsoft UDDI Publish Wizard.
The publishing wizard needs to communicate with the UDDI server to publish the required services. To authenticate against the UDDI server, the wizard offers two options: Windows Integrated Authentication and UDDI Authentication.
If you're using UDDI Services for Windows Server 2003, which we set up in the last section, you can use Windows Integrated Authentication. To run this sample with another UDDI server, you will need to select UDDI authentication and present the required credentials. Once this is done, click the Next button to proceed.
The wizard now prompts for the location of the UDDI registry that you want to publish the service to, as shown in Figure 6.12. Two options are presented: you can either use a UDDI registry that's exposed via Active Directory or specify the URL of the UDDI registry. To locate the UDDI registry installed on the same machine, use the following URL: http://localhost/uddi/publish.asmx .
If you're using UDDI Services for Windows Server 2003 on a different server, simply replace localhost with the name of the machine that you're using. If you're using a different implementation of a UDDI registry, consult the documentation for the publishing URL you should use.
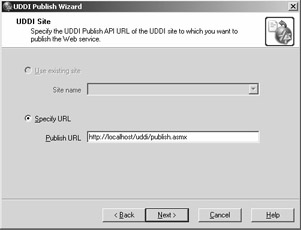
Figure 6.12: Specifying a publishing URL for the UDDI site.
The next stage of the wizard is to either select or create a new provider (or business) to publish the Web service under. Because this is a new installation of UDDI, there aren't any existing providers, so we'll create our own. Given that we've been dealing with fictitious stock-trading Web services in this chapter, the provider will have the following characteristics:
-
Provider name Woodgrove Bank
-
Provider description We supply the best stock-trading Web services on the planet!
Figure 6.13 shows this provider name and description. You of course are free to choose your own business name and description if you don't care for these.
| Tip | The Categorize button, shown in Figure 6.13, appears a number of times throughout the wizard and allows categories to be assigned to providers and services. For implementations of UDDI Services for Windows Server 2003, this button can be used to label the provider in order to provide faster and easier search capabilities. For example, you might want to use the Categorize button to assign a location category. Suppose that you want to replicate a number of Web services throughout your organization ”maybe for each remote office. In this example, based on the location category, UDDI can be used to return the access point for a Web service that's local to the calling client. 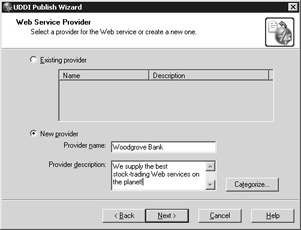 Figure 6.13: Setting the name for the new provider, Woodgrove Bank. |
Once you've entered the provider name and description, click the Next button. It's now time to enter details for the Web service itself. For this example, we'll publish the Web services already presented in this chapter. In the UDDI registry, we'll enter two Web services ”the service to buy stocks, which is hosted on the .NET Framework, and the service to sell stocks, which is hosted on the Java platform.
We'll enter the information for the .NET Web service first, as shown in Figure 6.14.

Figure 6.14: Creating a new service to purchase stocks.
Enter the following information:
-
Service name Buy Stocks
-
Service description This Web service can be used to get the bank's recommendations for stocks to purchase and to place an order with us.
-
Service URL http://localhost/dotNETWebService/StockService.asmx
Again, alternate names and descriptions can be chosen. The service URL is the URL of the .NET Web service that was created in Chapter 5 and is the one we've been working with throughout this chapter. Notice how this URL (also known as the access point ) is indeed the point where the service is accessed and is not the published WSDL document. Ideally, you should replace localhost with the name of the machine that offers the Web service.
Click the Next button to continue through the wizard. The next stage, shown in Figure 6.15, is where you supply the interface definition ”the location and description of the WSDL document.
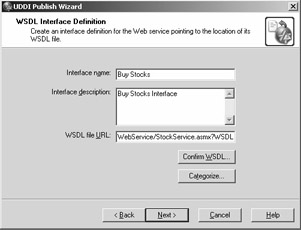
Figure 6.15: Setting the interface description and WSDL file URL.
For this sample, use the following details:
-
Interface name Buy Stocks
-
Interface description Buy Stocks Interface
-
WSDL file URL http://localhost/dotNETWebService/StockService.asmx?WSDL
Notice the Confirm WSDL button in the wizard. This will launch the WSDL file in a separate Internet Explorer window in order to confirm that this is the correct location.
Click the Next button to continue. You've now supplied enough information to the wizard to publish the Web service. This information is summarized in the final dialog box. After reviewing this information, click the Publish button. If publishing is successful, the wizard will complete.
You've completed the Web service that allows you to buy stocks published in the UDDI registry. Before running the sample code, rerun the publishing wizard, but this time supply the details for the Sell Stocks Web service, which was hosted using GLUE.
As you run through the wizard for a second time, you'll notice that many of the fields and setting are now completed, and when it comes to selecting a provider, the one you entered in the previous step ”Woodgrove Bank ”should be available for selection, as Figure 6.16 shows.
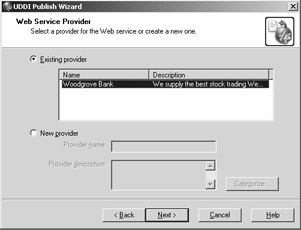
Figure 6.16: Selecting the existing provider.
For the service to work with the previous sample in Java, use the settings shown in the following list and Figure 6.17:
-
Service name Sell Stocks
-
Service description This Web service can be used to get the bank's recommendations for stocks to get rid of and to place an order with us.
-
Service URL http://localhost:8004/JavaWebService/StockService
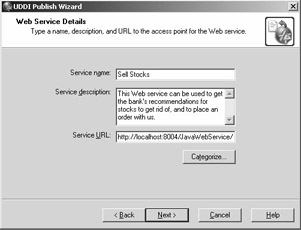
Figure 6.17: Entering the Web service details for the Sell Stocks service.
For the interface definition, use the setting shown in the following list and Figure 6.18:
-
Interface name Sell Stocks
-
Interface description Sell Stocks Interface
-
WSDL file URL http://localhost:8004/JavaWebService/StockService.wsdl
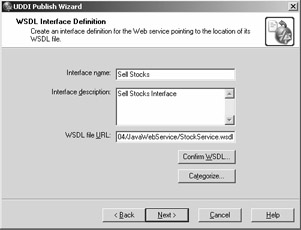
Figure 6.18: Interface definition for the Sell Stocks service.
Once this is complete, the two Web services will be published in the UDDI registry.
Next let's look at how this works under the covers. After that, we'll see how to create clients in both .NET and Java to use UDDI to get a reference to the published services.
Exploring the UDDI Registry
You've now seen how the UDDI Publish Wizard can be used to publish a Web service into the UDDI registry. This interface offers a great way to publish Web services, but it's also important to know what's being created under the covers. When it comes to using the SDK to program against the UDDI registry, you should know how providers and services are structured.
In addition to the wizard, UDDI Services has its own Web-based interface ”for both publishing and exploring the directory. This interface can be accessed by browsing to http://localhost/uddi (you can replace localhost with the machine name of your UDDI server), as shown in Figure 6.19.
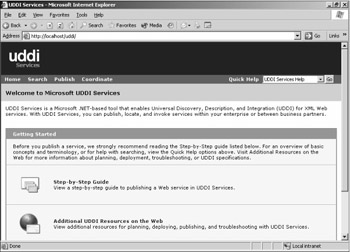
Figure 6.19: Using the Web user interface for UDDI Services.
After running the UDDI Publish Wizard, you can use this interface to discover exactly what has been created. To locate your provider, click on the Search option at the top of the page, and in the screen that follows , select the Providers tab. As shown in Figure 6.20, enter the name of the provider that you want to locate (in this case, Woodgrove ).
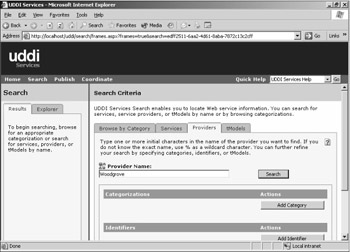
Figure 6.20: Entering the provider name for searches.
Enter all or part of the provider name, as was created using the publishing wizard. Click the Search button to locate that provider. The results from the search are displayed in the left-hand panel. As you can see in Figure 6.21, we've managed to locate our provider, Woodgrove Bank.
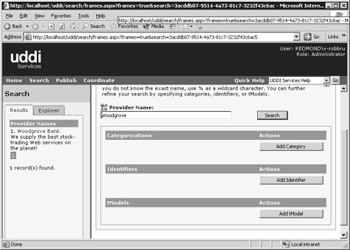
Figure 6.21: Search results from UDDI Services.
Click the provider name in the search window. This will display the root of the provider and list all the services that the provider offers.
Figure 6.22 shows how once the Woodgrove Bank provider is selected, you can investigate the details associated with the business. As the owner of the service, you can also modify any of the information (such as name, description, categories, and so on).
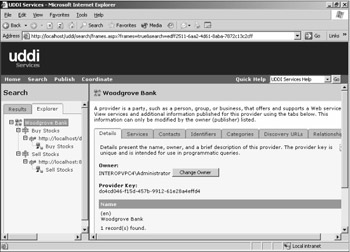
Figure 6.22: Browsing services available from a provider.
Within the explorer tree, located underneath the Woodgrove Bank provider, are our two services: Buy Stocks and Sell Stocks. Listed underneath the services are the access point and interface information required for each, as shown in Figure 6.23. The URL that's displayed directly underneath the service is known as a binding . This binding contains the access point (the URL that you must call to invoke the Web service) and the interface information.
The binding represents the connection between the access point (the URL) and the interface (the WSDL file that describes the service). Figure 6.24 shows this information.
You might be wondering why the service doesn't just list the access point and the WSDL as one piece of information. This information is listed separately to allow multiple instances of the same service to be deployed by using the same interface definition. For example, if you want to offer the Buy Stocks and Sell Stocks services at multiple locations or across a number of servers in a group , you can create additional services but still use the same interface for each.
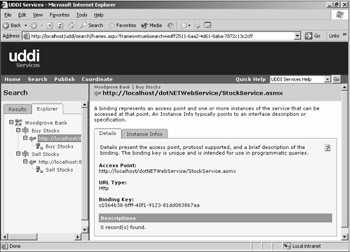
Figure 6.23: Navigating to the binding of a provider.
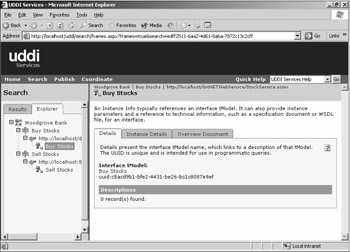
Figure 6.24: Viewing details of the service.
Finally, let's look at the interface. In UDDI terminology, this interface is also known as the tModel (Technical Model). You see this term used when you create your clients.
You might also notice how every object within the registry has a unique ID (UUID). For identification purposes, tModels are prefixed with the text uuid before the UUID. For example, the tModel in Figure 6.24 has a UUID of uuid:c5acd9b1-bfe2-4431-be26-bc1c8087e9ef. The one that's created in your directory will have a different identifier. This is a unique way of referencing any object within the registry and can be used by clients to quickly access exact parts of the registry without having to perform a full search.
Consuming by Using a .NET Client
By now you have a good understanding of how to publish to a UDDI registry and use the Web user interface that comes with UDDI Services for Windows Server 2003 to search and edit information within the UDDI registry.
Now let's look at how to build a .NET client to perform a search against the registry and invoke a Web service based on the results returned. The sample located in the C:\Interoperability\Samples\Point\WebServices\UDDI\dotNET directory contains a simple client that accesses the registry that we configured earlier. The client code demonstrates some of the UDDI SDK for .NET calls that are used to access the information.
First, the client imports the required namespaces for the UDDI SDK:
using Microsoft.Uddi; using Microsoft.Uddi.Businesses; using Microsoft.Uddi.Services;
These namespaces are provided as part of the Microsoft.Uddi.DLL file that is included with the SDK installation. After the imports, the first action for the client is to create a new UDDIConnection :
UddiConnection uc = new UddiConnection(_uddiUrl);
The URL supplied is the inquiry URL of the registry. In this case, the URL is http://localhost/uddi/ inquire .asmx . (Notice how this inquiry URL is a Web service; we'll cover this shortly.)
The next step is to run a search against the directory for providers that match by name:
FindBusiness fbs = new FindBusiness(_provider); BusinessList allBusinesses = fbs.Send(uc); BusinessInfo myProvider = allBusinesses.BusinessInfos[0];
The search is conducted by using the FindBusiness class, with the name of the provider (Woodgrove Bank) passed in the constructor. The Send method is used to execute the search, and the result is a list of businesses that match (similar to the list of providers yielded when we performed the same process via the administration interface). From this list of businesses, we extract the information (as a BusinessInfo type) for the first business returned.
The BusinessInfo type contains a business key. This is the unique identifier for this particular business and is used for additional searches because it provides an unambiguous way of representing the business:
FindService fs = new FindService(); fs.BusinessKey = myProvider.BusinessKey; ServiceList ProviderServices = fs.Send(uc);
When you next search for services offered by this business, you provide the business key just shown. This returns a list of services (as a ServiceList ), which you can then iterate through. To complete the sample, display the information for each of the services:
for (int f=0; f<ProviderServices.ServiceInfos.Count; f++) { Console.WriteLine("\nService found: " +ProviderServices.ServiceInfos[f].Names[0].Text); // Get the service detail in order to get the access point GetServiceDetail gsd = new GetServiceDetail(ProviderServices.ServiceInfos[f].ServiceKey); ServiceDetail sd = gsd.Send(uc); // list the default access point and interface. // Assuming that a single one exists for each. Console.WriteLine("Access point: "+sd.BusinessServices[0]. BindingTemplates[0].AccessPoint.Text); String tModelKey = sd.BusinessServices[0].BindingTemplates[0]. TModelInstanceInfos[0].TModelKey; GetTModelDetail gtm = new GetTModelDetail(tModelKey); TModelDetail tmd = gtm.Send(uc); TModel tModel = tmd.TModels[0]; Console.WriteLine("Interface: "+tModel.OverviewDoc.OverviewUrl); } Notice that this code assumes a single access point and a single overview document (which contains the interface WSDL). This is obviously based on the entries defined earlier in the UDDI registry and is simplified to demonstrate the API. For a true browser experience, you could expand the registry tree to list all the available access points and tModels for each service that was found.
Compile the code. Because the sample depends on the UDDI SDK, a reference to the DLL is used. This can be found in the C:\Interoperability\Samples\Config\uddi.nant.properties file. The default setting for this file assumes that the Platform SDK is installed in C:\Program Files\Microsoft SDK\Bin. If this isn't the case for your machine, you should edit as appropriate.
| Note | The UDDI components will work only with version 1.1 of the .NET Framework. If you receive an exception when running the client indicating that this could be a problem, ensure that the system PATH includes an entry to version 1.1 of the .NET Framework (C:\Windows\Microsoft.NET\Framework\v1.1.4322) rather than an entry for the 1.0 release (C:\Windows\Microsoft.NET\Framework\v1.1.3705). |
If you now run this client code, you should get the following result:
Creating a new connection to the UDDI service at: http://localhost/uddi/inquire.asmx Trying to find Woodgrove Bank... Finding services offered by Woodgrove Bank... 2 services were found Service found: Buy Stocks Access point: http://localhost/dotNETWebService/StockService.asmx Interface: http://localhost/dotNETWebService/StockService.asmx?WSDL Service found: Sell Stocks Access point: http://localhost:8004/JavaWebService/StockService Interface: http://localhost:8004/JavaWebService/StockService.wsdl
As this code shows, the client sample has created a new connection to the UDDI registry and performed a search on the businesses within the registry based on the URL supplied. The sample then lists the two services that are published, with their corresponding access points and interface URLs.
Consuming by Using a Java Client
Using the GLUE toolkit, you can perform exactly the same operation in Java. Located in the C:\Interoperability\Samples\Point\WebServices\UDDI\Java directory is the sample code that does this.
The imports required for the UDDI client are as follows:
import electric.util.Context; import electric.uddi.*; import electric.uddi.client.*;
The UDDI-specific classes are located in the electric.uddi and electric.uddi.client packages. In this example, electric.util.Context is used to set the credentials for the UDDI server:
Context context = new Context(); context.setProperty("authUser","DOMAIN\Username"); context.setProperty("authPassword","password"); UDDIClient uc = new UDDIClient("http://localhost/uddi/inquire.asmx",context); A new context is created to hold the username and password. This context uses exactly the same calls that were shown in the "Web Services Authentication and Authorization" section, where we looked at authentication from the Java client. Before compiling the client, edit the Client.java file and replace the authentication details with suitable credentials for your own machine. If you're not running within a domain, use the machine name instead.
| Tip | You might be wondering why the Java client requires credentials while the .NET client did not. Implicitly, the UDDI SDK for .NET uses the default credentials of the locally logged-on user. This is the same as using the DefaultCredentials API you saw earlier in the "Web Services Authentication and Authorization" section of this chapter. This, of course, can be overridden by a username and password, if required. |
Looking back at our Java client, the UDDI client is created, with the URL of the UDDI inquiry Web service:
FindBusinesses fb = new FindBusinesses(); fb.setNames(new Name[]{new Name(_provider)}); BusinessInfos allBusinesses = uc.findBusinesses(fb); BusinessInfo myProvider = allBusinesses.list[0]; To find businesses (providers), the FindBusinesses class is used. Here, you set the search criteria as the name of the provider that you're looking for and instruct the UDDI client to find any matching records. Select the first record from the results that are returned (because you have only a single provider in your test registry), which is of type BusinessInfo :
FindServices fs = new FindServices(); fs.setBusinessKey(myProvider.getBusinessKey()); ServiceInfos providerServices = uc.findServices(fs);
The BusinessInfo type is the object that you'll derive the business key from as you did with the .NET version of the code. The business key is then used to perform a second search for all matching services that belong to that business. GLUE returns this information as an array of ServiceInfos :
for (int f=0; f<providerServices.list.length; f++) { System.out.println("\nService Found: " +providerServices.list[f].getName()); Service service = uc.getService(providerServices.list[f].getServiceKey()); System.out.println("Access point: " +service.getBindings()[0].getAccessPoint().getAddress()); String tModelKey =service.getBindings()[0]. getTModelInstances()[0].getTModelKey(); TModel tModel=uc.getTModel(tModelKey); System.out.println("Interface: " +tModel.getOverview().getOverviewURL()); } The final step is to iterate through the ServiceInfos that were returned and make a final call via the client to retrieve the service information for each ServiceInfo . (This is done by using the getService method to return a service.) From the service, you can drill down into both the default access point and the tModel instances to get both the endpoint for the service and the WSDL location itself.
Compiling and running this code should produce the following output:
Trying to find Woodgrove Bank... Finding services offered by Woodgrove Bank... 2 services were found... Service Found: Buy Stocks Access point: http://localhost/dotNETWebService/StockService.asmx Interface: http://localhost/dotNETWebService/StockService.asmx?WSDL Service Found: Sell Stocks Access point: http://localhost:8004/JavaWebService/StockService Interface: http://localhost:8004/JavaWebService/StockService.wsdl
The UDDI Clients ”Under the Covers
While explaining how the samples worked, I mentioned that under the covers, the UDDI client was simply a Web service itself. You saw how the following piece of code from the .NET sample was used to find all businesses that matched a particular search string:
FindBusiness fbs = new FindBusiness(_provider); BusinessList allBusinesses = fbs.Send(uc); BusinessInfo myProvider = allBusinesses.BusinessInfos[0];
Under the covers, the fbs.Send method is actually constructing a SOAP request to pass to the UDDI registry. If you were to investigate this request ” you can call fbs.ToString to do so ”you'd see something similar to the following:
<?xml version="1.0" encoding="utf-8"?> <find_business xmlns:xsd=http://www.w3.org/2001/XMLSchema xmlns:xsi="http://www.w3.org/2001/XMLSchema-instance" generic="2.0" maxRows="1000" xmlns="urn:uddi-org:api_v2"> <name>Woodgrove Bank</name> </find_business>
What we have here is the body of a SOAP request for find_business , a standard of version 2.0 of the UDDI specification that's used to instruct the UDDI server to carry out the search. The same is also true for messages returned from the UDDI server to the client. The representation for the reply in this case might look like this:
<?xml version="1.0" encoding="utf-8"?> <businessList xmlns:xsd="http://www.w3.org/2001/XMLSchema" xmlns:xsi="http://www.w3.org/2001/XMLSchema-instance" generic="2.0" operator="UDDI Sample" truncated="false" xmlns="urn:uddi-org:api_v2"> <businessInfos> <businessInfo businessKey="a35de1c2-5f5e-42f5-bcd3-6ff0bcfe46ff"> <name xml:lang="en">Woodgrove Bank</name> <description xml:lang="en"> We supply the best stock trading Web Services on the planet! </description> <serviceInfos> </serviceInfos> </businessInfo> </businessInfos> </businessList>
Here you can see the message returned. (You can also try this by using allBusinesses.ToString method from the previous example.) Notice how the business Infos element contains the description of the provider and the serviceInfo elements that have the service keys that will be used to look up further information.
With the layer of abstraction that both the UDDI SDK for .NET and the GLUE UDDI client libraries offer, it's rare to have to deal with the SOAP requests themselves, unless you're either replacing or extending some of the implementation. On the other hand, an appreciation of the structure of the messages that travel back and forth between a UDDI client and server is always extremely useful when troubleshooting problems.
Other UDDI APIs
Both the UDDI SDK for .NET and the GLUE UDDI client libraries contain additional APIs to perform the following tasks :
-
Publishing a new business, service, binding, or tModel.
-
Updating an existing business, service, binding, or tModel.
-
Publishing assertions between two businesses. (An assertion is a parent-child relationship between two business entities.)
We won't look at these APIs in this chapter because they don't offer any additional support for interoperability between .NET and Java. For further information, I recommend reading the documentation that comes with each API.
Can UDDI Be Used for .NET Remoting?
By default, UDDI is used for description and discovery of Web services. In a number of interoperability projects that I've worked on, however, customers have asked whether UDDI can also be used as a lookup service for .NET Remoting endpoints. Recall in Chapter 4 how a client using .NET Remoting also uses a URL to establish the communication with the server ”for example, tcp://localhost:5656 .
Technically speaking, because this is simply a URL, there's nothing to stop this information from being stored in a UDDI directory as an alternate access point for a service. A provider and a service can be created, and the access point can be set to the URL endpoint of the .NET Remoting service. The same UDDI calls can be made from the .NET Remoting client in order to obtain this access point and then configure the URL on the fly by using the System.Runtime.Remoting namespace and APIs instead of storing the information in a configuration file.
From a standards perspective, however, there's no recommended way or best practices for storing .NET Remoting access points in UDDI. Because of this, internal UDDI registries that facilitate lookups of .NET Remoting calls are certainly feasible , but unless the UDDI standard encompasses this technology, this probably won't be consistently or widely used in a public registry.
Best Practices
In following the samples in this chapter, you've encountered a number of new technical terms and concepts. This is compounded by a structure in UDDI that allows maximum flexibility for storing information about providers and services.
To help further understand how UDDI works ”and more importantly, how UDDI should be used with WSDL described services “ ”a best practices white paper is available at http://www.uddi.org . This white paper outlines best practices for constructing and working with entities in the UDDI registry.
EAN: 2147483647
Pages: 132