Using XML Serialization
Now that we've taken a look at the principles of serialization with regard to binary formatting, let's look at our second option, which takes the same approach but uses XML.
In its simplest form, XML is a markup language for documents that contain structured data. The key tenet of XML is that it can be used to describe any data in a human-readable , structured form. Structured information can contain both content (such as words, pictures, annotations, and inserts ) as well as information that defines the content.
This book does not cover the basics of XML; I'm assuming that you already understand some of the principles of this markup language. For additional information on creating XML documents, see one of the many articles and resources that have been written about this topic, including XML Programming (Microsoft Press, 2002).
To discover how XML documents can aid data exchange between applications and services in .NET and Java, let's look at a sample based on our earlier stock data type:
<?xml version="1.0"?> <Stock> <Ticker>CONT</Ticker> <Name>Contoso</Name> <Price>12.45</Price> <Previous>12.23</Previous> <Volume>23</Volume> </Stock>
One of the key observations about this document and XML in general is that ” unlike the output from the binary serializer ”the data is not bound to any platform. Because of the nature of XML, this Stock record can be read by .NET, Java, and even humans . The use of XML in this form doesn't restrict the data from being transferred between platforms, which is crucial when using XML to achieve interoperability between .NET and Java.
One limitation of this XML document is that currently it holds only one Stock record. ( Stock is the root element of our XML document.) Because our examples will show multiple Stock items being stored in XML, let's also define a root element named Stocks . This type can be used to hold one or more stocks:
<?xml version="1.0"?> <Stocks> <Stock> <Ticker>CONT</Ticker> <Name>Contoso</Name> <Price>12.45</Price> <Previous>12.23</Previous> <Volume>23</Volume> </Stock> </Stocks>
As this document shows, the Stock type becomes a subelement within Stocks . This allows you to hold more than one stock in the XML document. For example, the following code adds a second Stock to the document:
<?xml version="1.0"?> <Stocks> <Stock> <Ticker>CONT</Ticker> <Name>Contoso</Name> <Price>12.45</Price> <Previous>12.23</Previous> <Volume>23</Volume> </Stock> <Stock> <Ticker>FTHC</Ticker> <Name>Fourth Coffee</Name> <Price>3.44</Price> <Previous>3.52</Previous> <Volume>16</Volume> </Stock> </Stocks>
XML Parsing
Before we look at XML serialization, let's examine XML parsing , a technique for reading and editing XML documents on either .NET or Java. XML parsers for both platforms are now mature and stable, and many examples are available that demonstrate using these parsers for reading and writing XML data.
Generally, two types of parsers can be used for reading and writing XML data: Document Object Model (DOM) parsers and Simple API for XML (SAX) parsers. DOM XML parsers read the whole document into memory and offer a flexible and easy way to traverse the document hierarchy. These parsers tend to be easy to use, yet they aren't recommended for large XML documents. This is because the entire document needs to be loaded into memory each time, which can impact performance. On the other hand, SAX parsers use streams to read portions of the XML file as needed. This parsing method is much more memory efficient, which increases performance. Yet many SAX parsers lack the ease and flexibility of their DOM equivalents. For example, SAX parsers cannot traverse backward through an XML file.
To parse XML in .NET using DOM, you can use the XmlDocument and XmlElement classes from the System.Xml namespace. These classes provide methods that allow you to traverse an XML document and add or modify its elements.
To parse XML in Java, we'll use packages and classes from Electric XML to achieve a result very similar to that obtained by parsing XML in .NET. (For details on Electric XML, see the "Running the Sample Code in This Book" section in Chapter 1.) The Electric XML Document and Element classes will allow us to parse an XML document.
Running the Sample Code
To see how to use XML parsing to read and write a shared XML document, we'll look at two samples, one for .NET and the other for Java. Each version of the sample code reads and writes a shared stock.xml file from a location specified by a passed parameter, which is very similar to the binary serialization sample shown earlier. A summary of the information in the XML file is displayed, and a new Stock record is written to the file.
The sample code for this interoperability example can be found in the C:\Interoperability\Samples\Data\XML\Parsing directory. It shows how to pass a Stock record as an XML document between .NET and Java. This example is the first technical option for doing so covered in the book, and it demonstrates basic usage of the DOM parser for both platforms.
The sample code directory contains four directories: dotNET, Java, Shared, and PerformanceTest. The first three subdirectories contain the sample code and map to the previous example, while the last subdirectory, PerformanceTest, will be discussed later in the "Introducing the Interoperability Performance Tests" section in this chapter. The sample code can be compiled and executed using the run target with the provided NAnt and Ant scripts in the dotNET and Java directories, respectively. Be sure to run the .NET and Java samples in sequence to see how they are both able to read and write data in the same file.
The .NET sample code
Stepping through the main elements of the .NET sample code, you can see how generic XML parsing works as part of the .NET Framework. First, you declare a using statement for the System.Xml namespace:
using System.Xml;
This namespace contains all the classes required to perform XML parsing. After reading the arguments to obtain the name of the XML file, the next step is to load that file from disk. This is performed with the Load method from the XmlDocument class:
XmlDocument doc = new XmlDocument(); doc.Load(xmlFile);
Now the XML is in a DOM structure that you can read and manipulate. Next, you need to iterate through all the Stock records within the document. This will yield an XmlNodeList containing each of the companies to extract more data from. To do so, use the GetElementsByTagName method on the XmlDocument :
XmlNodeList allStocks = doc.GetElementsByTagName("Stock"); Once all the Stock records are contained in an XmlNodeList , you can step through the list to extract the finer details, such as the ticker symbol, price, and other values stored:
Console.WriteLine("There are "+allStocks.Count +" Stocks in this document"); for (int f=0; f<allStocks.Count; f++) { Console.WriteLine("Stock Found:"); foreach (XmlElement n in allStocks.Item(f)) { Console.WriteLine("The value of "+n.Name+" is " +n.ChildNodes[0].Value); } } All in all, this is a relatively simple piece of code for walking through a nested piece of XML in a document. The next step is to create a new stock based on the XML structure we've been using and write it to the XmlDocument . To create the new stock, first create each of the Stock element's child elements ( Ticker , Price , and so on). After these elements are created, create the Stock element itself and add all the child elements to it:
XmlElement newTicker = doc.CreateElement("Ticker"); newTicker.InnerText = "NWND"; XmlElement newName = doc.CreateElement("Name"); newName.InnerText = "Northwind Traders"; XmlElement newPrice = doc.CreateElement("Price"); newPrice.InnerText = "20.33"; XmlElement newPrevious = doc.CreateElement("Previous"); newPrevious.InnerText = "20.00"; XmlElement newVolume = doc.CreateElement("Volume"); newVolume.InnerText = "34"; XmlElement newStock = doc.CreateElement("Stock"); newStock.AppendChild(newTicker); newStock.AppendChild(newName); newStock.AppendChild(newPrice); newStock.AppendChild(newPrevious); newStock.AppendChild(newVolume); You now have a fully formed stock ”in this case, for the Northwind Traders company. To complete the update, you need to write the Stock to the XmlDocument and output the file to disk:
XmlNodeList root = doc.GetElementsByTagName("Stocks"); root.Item(0).AppendChild(newStock); XmlTextWriter tw = new XmlTextWriter(xmlFile,System.Text.Encoding.ASCII); doc.WriteTo(tw); tw.Close(); doc.Save(Console.Out); As this code shows, you obtain the Stock element's parent by searching for the Stocks tag, and you add the new Stock node as a child of this element. The final stage is to save the document to both the XML file that was passed as a parameter and to the console for display.
The Java sample code
Stepping through the Java sample code, you'll see that the calls made to the Electric XML Document and Element classes are similar to the methods we used for .NET. The main class starts by importing the electric.xml and java.io packages for reading and writing the document:
import java.io.File; import electric.xml.*;
Again, after accepting the parameter required for the file location, a new XML document is created and loaded with the XML data from the stock.xml file. A NodeList of type electric.xml.NodeList is created with the company records that are read from the XML file:
Document document = new Document(new File(xmlFile)); NodeList allStocks = (NodeList)document.getElementsByTagName("Stock"); Once this is complete, you can iterate through the Stock records, displaying the data for each:
for (int f=0; f<allStocks.size(); f++) { System.out.println("Stock Found:"); NodeList stockInfo = (NodeList)allStocks.item(f).getChildNodes(); for (int g=0; g<stockInfo.size(); g++) { System.out.println("The value of " +stockInfo.item(g).getNodeName()+" is " +((Element)stockInfo.item(g)).getText()); } } Finally, as with the .NET version of this code, we create a new Stock record that will be written back to the XML document. In this case, we've chosen Fourth Coffee:
Element newTicker = (Element)document.createElement("Ticker"); newTicker.setText("FTHC"); Element newName = (Element)document.createElement("Name"); newName.setText("Fourth Coffee"); Element newPrice = (Element)document.createElement("Price"); newPrice.setText("4.67"); Element newPrevious = (Element)document.createElement("Previous"); newPrevious.setText("4.88"); Element newVolume = (Element)document.createElement("Volume"); newVolume.setText("56"); Element newStock = (Element)document.createElement("Stock"); newStock.appendChild(newTicker); newStock.appendChild(newName); newStock.appendChild(newPrice); newStock.appendChild(newPrevious); newStock.appendChild(newVolume); Once the new stock is created, add it to the Stocks element in the document and save the file:
NodeList root = (NodeList)document.getElementsByTagName("Stocks"); root.item(0).appendChild(newStock); document.write(new File(xmlFile)); document.write(System.out); More Efficient Parsing
This simple example shows XML parsing for both .NET and Java, using relatively similar methods and classes. You probably noticed that this wasn't the most efficient way of parsing the document, despite using similar code for both versions.
The .NET Framework and Electric XML libraries have more efficient ways of parsing. The examples shown here are designed to just illustrate the basics of parsing a document using similar code; they do not demonstrate a best-practices approach to working with XML.
Limitations of Parsing XML
In addition to making the code more efficient, we could expand this sample code in many ways to offer additional functionality. For example, we could use network sockets on both the .NET and Java sample applications to pass the XML document between the two platforms (as opposed to writing to a shared file), or we could even store the XML document on an HTTP resource to allow sharing among multiple machines across the Internet.
XML parsing for data exchange does have its limitations, however. Using the parsing methods described in this section can work well for accessing and reading distinct data elements from documents. But when it comes to working with the data in an XML document, the commands to perform operations can quickly become verbose and unwieldy for developers.
For example, if you want to perform some business logic or calculations on the company data read in the previous sample, you have no natural way of using the parser to map objects within the XML document to classes created in either .NET or Java. For a more flexible approach, you need a way to map data stored in an XML document to objects and classes that you define and that work within your application. As previously mentioned, this mapping, or binding, is commonly known as XML serialization.
XML serialization takes document creation to a new level. It shields the developer from much of the underlying XML parsing and allows her to concentrate on developing the application and data types. This doesn't mean that all the XML parsing tools and classes are removed from the process ”they are still very present. However, XML serialization offers a layer of abstraction that simplifies the process of converting an object from one platform into an XML document that can be easily read by another platform.
XML Serialization for the .NET Platform
The .NET Framework contains classes and APIs to perform XML serialization. The System.Xml.Serialization.XmlSerializer class allows types within the .NET Framework to be serialized to an XML document and allows XML documents to be converted back into the relevant types. (As mentioned earlier, this process is known as deserialization.)
Serializing an Object to XML
Within the XmlSerializer class, serialization is performed as follows :
XmlSerializer mySerializer = new XmlSerializer(typeof(myType)); mySerializer.Serialize(myStream, myType)
The Serialize method of an XmlSerializer object takes the object passed as the second parameter and serializes that object to an XML document. If the serialization is successful, the serialized object is written to a stream, which can be an in-memory stream, a file, or a network socket.
Deserializing an Object from XML
The Deserialize method works in exactly the opposite way:
XmlSerializer mySerializer = new XmlSerializer(typeof(myType)); Object myType = mySerializer.Deserialize(myStream);
The XML document is passed to the serializer as a stream, the document is read and deserialized, and if the deserialization is successful, an object is returned. As shown in the following code, the Deserialize method returns an object with a type of System.Object , thus the returned value must be cast appropriately before being assigned to the target type:
Stocks myStocks = (Stocks)mySerializer.Deserialize(myStream);
The descriptions of the previous two examples use the wording if the serialization is successful and if the deserialization is successful because sometimes serialization and deserialization fail. This can happen for a number of reasons.
One of the main reasons for this failure is that the incoming XML document isn't well-formed. For example, the document might contain fields that the serializer isn't expecting, or it might not include the correct namespaces or types. Conversely, some objects can't be correctly serialized to XML at all. These include objects in the .NET Framework that implement IDictionary . In addition, for objects to be serialized, their class must be declared public and have a valid no-argument constructor.
In many of the cases just mentioned, trying to serialize an object will cause the XmlSerializer to throw a System.InvalidOperationException , indicating that the application had trouble serializing the object or type to an XML document.
XML Serialization for the Java Platform
A number of XML Serializers available for the Java platform use Java classes to generate XML documents. As with the parsing example shown earlier in this section, we'll use the libraries contained in Electric XML to illustrate this.
Serializing an Object to XML
The Electric XML serializer is invoked by first declaring a new object of type electric.xml.io.IWriter :
IWriter writer = new LiteralWriter(namespace, classname);
LiteralWriter accepts two parameters. The first defines the XML namespace for the document; the second defines the name of the class.
You can use two types of IWriter for serialization, EncodedWriter and LiteralWriter . The EncodedWriter class employs an encoding scheme that's used by the majority of the SOAP community for sending RPC-style data between endpoints. We'll investigate this in Chapter 6, "Connectivity with XML Web Services, Part 2," when we cover passing types between platforms by using XML Web services. The LiteralWriter class (as well as the LiteralReader class) provides a direct mapping between Java objects and XML elements. In general, LiteralWriter is not as advanced as EncodedWriter , but it offers a great introduction to serialization because it uses the encoding style used by the XmlSerializer in .NET.
Once IWriter is created, you can use write methods within the class to populate data. To write generic objects, you can use the writeObject method:
writer.writeObject(myObject);
After objects have been written to IWriter , extract the XML document by calling the getDocument method on the IWriter object itself:
electric.xml.Document document = writer.getDocument();
As shown, the getDocument method returns an XML document of type electric.xml.Document . From here, you can pass the document to a memory stream, network, or file by using the Document.write method on the XML document that's returned.
Deserializing an Object from XML
Deserializing an object by using Electric XML requires the opposite set of commands. First, the XML document is read into a new instance of a LiteralReader :
IReader reader = new LiteralReader(document);
To deserialize the object from XML into its native form, you use the readObject method:
Stocks myStocks = (Stocks)reader.readObject(Stocks.class);
As you can see, the IWriter and IReader implementations within Electric XML complement the similar serialization functions found in .NET.
What About JAXB?
You might be wondering why Java Architecture for XML Binding (JAXB) hasn't been mentioned yet. JAXB is a specification along with a reference implementation that provides an API and tools to automate the mapping between Java objects and XML documents, in much the same way as the serialization techniques discussed in this chapter.
Although JAXB has been in development for some time, at the time of this writing, the product was still in a beta release phase. Rather than using sample code that might change before the final release of JAXB, I've based the code in this book on the Electric XML serializer.
Despite this, testing of the early JAXB implementation against the XmlSerializer in .NET was performed. You can see how the JAXB parser is used by first creating an instance of JAXBContext :
JAXBContext jc = JAXBContext.newInstance("com.test.Package"); From this context, you can derive either a Marshaller (to serialize the data) or an Unmarshaller (for deserialization). The Unmarshaller takes an input stream parameter from which the XML document is read and returns an object that can be cast into the type that's required:
Unmarshaller u = jc.createUnmarshaller(); Stocks myStocks = (Stocks)u.unmarshal(new FileInputStream("stock.xml")); The Marshaller works in exactly the opposite way ”an object is passed with an output stream for the resulting XML document:
Marshaller m = jc.createMarshaller(); m.marshal(myStocks, System.out);
| More Info | Additional information regarding the JAXB implementation can be found via the Java Community Process at http://www.jcp.org/en/jsr/detail?id=31 . |
Using XML Serialization and Ensuring Type Compatibility
We've looked at some basic commands for serializing to and deserializing from XML by using classes from both the .NET Framework and Electric XML. However, one question remains: How do we ensure that the XML document that's created by using serialization in either .NET or Java is compatible with the other platform? As mentioned, binary formatters exist in both .NET and Java, but neither platform can read a binary serialized file from the other platform because of serialization incompatibilities. To ensure that a document you produce is compatible with both platforms, you can use XML Schema.
Introducing XML Schema
The easiest way to explain XML Schema is to show how it applies to the previous example. Let's expand upon the XML document that was discussed toward the start of this section, on page 52:
<?xml version="1.0"?> <Portfolio> <Stocks> <Stock> <Ticker>CONT</Ticker> <Name>Contoso</Name> <Price>12.45</Price> <Previous>12.23</Previous> <Volume>23</Volume> </Stock> </Stocks> </Portfolio>
Notice how we've modified the XML document by adding a root element named Portfolio . Doing this allows the flexibility for the portfolio to hold other items in the future ( bonds , mutual funds, and cash, for example).
As you saw earlier, within this portfolio, this document uses XML to describe a single Stock and the elements or values within it. If you pass this XML document between .NET and J2EE, you'll have two potential problems.
First, you have to determine what Price is. Looking at the value of 12.45, you can guess that it might be a double or float. But it could be a string value as well. The XML document doesn't describe the type of the data that it holds.
Second, the document describes a type named Stock . Application A might use this definition for a Stock item, but application B might have its own definition. Nothing is differentiating the XML document named Stock from another document with the same name.
These problems can be overcome by using XML Schema (as well as XML namespaces). XML Schema allows you to create and use an XML Schema Definition (XSD) document to define types and constraints for each element within the document. By using XML Schema with XML namespaces, you can distinguish a Stock type from another data type with the same name or structure.
What Is an XSD?
XSDs are XML documents with a predefined structure. The elements and nodes within these documents are used to describe data types and elements for another document. Let's use the XSD for our Portfolio and Stock data types as an example:
<?xml version="1.0" encoding="utf-8" ?> <xs:schema elementFormDefault="qualified" xmlns:xs="http://www.w3.org/2001/XMLSchema"> <xs:complexType name="Portfolio"> <xs:sequence> <xs:element minOccurs="0" maxOccurs="1" name="Stocks" type="ArrayOfStock" /> </xs:sequence> </xs:complexType> <xs:complexType name="ArrayOfStock"> <xs:sequence> <xs:element name="Stock" type="Stock" maxOccurs="unbounded" minOccurs="0" /> </xs:sequence> </xs:complexType> <xs:complexType name="Stock"> <xs:sequence> <xs:element name="Ticker" type="xs:string" /> <xs:element name="Name" type="xs:string" /> <xs:element name="Price" type="xs:float" /> <xs:element name="Previous" type="xs:float" /> <xs:element name="Volume" type="xs:int" /> </xs:sequence> </xs:complexType> <xs:element name="Portfolio" type="Portfolio"></xs:element> </xs:schema>
Let's examine how the structure is defined in this XSD. First, the XSD defines a common namespace (http://www.w3.org/2001/XMLSchema). This namespace allows elements used within the document (for example, xs:complexType ) to be uniquely declared within an XML document even when other elements with the same name but a different namespace are also used.
The first definition in this XSD is of the Portfolio :
<xs:complexType name="Portfolio"> <xs:sequence> <xs:element minOccurs="0" maxOccurs="1" name="Stocks" type="ArrayOfStock" /> </xs:sequence> </xs:complexType>
This complex type entry defines Portfolio and indicates that it includes either zero or a single array of Stock objects ”in other words, Portfolio could contain no Stock objects or could contain a group of Stock objects. The definition for this array is as follows:
<xs:complexType name="ArrayOfStock"> <xs:sequence> <xs:element name="Stock" type="Stock" maxOccurs="unbounded" minOccurs="0" /> </xs:sequence> </xs:complexType>
The ArrayOfStock type defines the array needed. As just shown, this array will contain anywhere from zero to an infinite (unbounded) number of Stock objects:
<xs:complexType name="Stock"> <xs:sequence> <xs:element name="Ticker" type="xs:string" /> <xs:element name="Name" type="xs:string" /> <xs:element name="Price" type="xs:float" /> <xs:element name="Previous" type="xs:float" /> <xs:element name="Volume" type="xs:int" /> </xs:sequence> </xs:complexType>
After the Portfolio and ArrayOfStock are defined, you define the Stock element itself. Each field within the Stock is written as a separate element. Each element name is defined as well as a standard basic type.
Finally, the XSD contains a top-level element: Portfolio . This is because the XSD tool in the .NET Framework that we'll use shortly requires a top-level element for the document in order to automatically generate a data type.
<xs:element name="Portfolio" type="Portfolio"></xs:element>
Creating an XSD
As a developer, how do you go about creating the XSD document? Because the XSD is in XML format, you of course can use any text editor. However, to make things easier, you should use a tool that provides a graphical representation of the schema and helps create a useful XSD document. One such tool is Microsoft Visual Studio .NET. You can use the integrated development environment (IDE) to switch between a graphical representation of the schema (which tends to be easier to work with when defining data types) and the actual XSD document.
To create an XSD document using Visual Studio .NET, launch the IDE and create a new project, as shown in Figure 3.3. The type, language, and location of the project aren't important at this stage because you won't compile the project. To demonstrate this process, I'll create a C# project in my C:\Temp directory.

Figure 3.3: Creating a new project in Visual Studio .NET.
After the solution has been created, right-click the project ”in my demonstration this is XSDSample ”in Solution Explorer (the pane toward the top right of the IDE), and then select Add New Item. Alternatively, you can select Add New Item from the Project menu. This will bring up the Add New Item dialog box, shown in Figure 3.4.
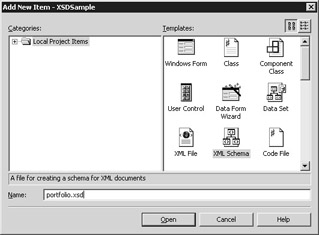
Figure 3.4: Adding an XML Schema to a project in Visual Studio .NET.
A list of new items is displayed. Because you're creating a new XSD, select XML Schema from the list of available items and name the XSD portfolio.xsd. As shown in Figure 3.5, the new XSD will be created as part of the solution and will be opened graphically within the IDE.
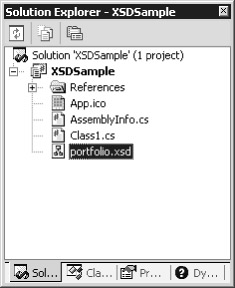
Figure 3.5: The new XSD document in Visual Studio .NET.
At the moment, it doesn't look like much. And of course, we don't have any types or elements defined within the document. Let's start creating some types for the XSD. We'll start with the Stock type.
In the main window in the IDE, with the portfolio.xsd file displayed in the designer surface window, right-click Add/New complexType. Name the type Stock , and within the complex type, define the fields shown in Table 3.2.
| Data Field | Type |
|---|---|
| Ticker | string |
| Name | string |
| Price | float |
| Previous | float |
| Volume | int |
Once complete, the type should look similar to the one shown in Figure 3. 6.
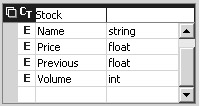
Figure 3.6: The Stock type in the XSD.
One nice feature of using the XSD designer in Visual Studio .NET is having the ability to switch between this graphical view of the schema and the actual XSD document, as depicted in Figure 3.7. To do this, either click the XML icon at the bottom of the designer surface or right-click the main window and select View XML Source.
Figure 3.7 shows the schema displayed in its native XML format. As you can see, by defining the graphical view of the Stock type, we've created the required XSD elements within the document. To add more data types, either click the Schema icon at the bottom of the main window or right-click the designer surface again and select View Schema.
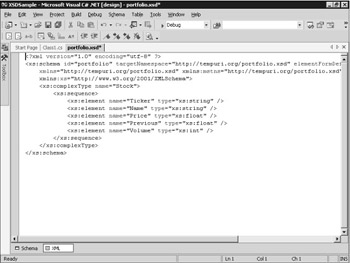
Figure 3.7: Viewing the XSD document in Visual Studio .NET.
Add a new complexType named ArrayOfStock . This type will have one child element named Stocks , that has a data type of Stock . As you add this type, the XSD designer automatically displays a graphical hierarchy of the relationship between the ArrayOfStock and Stocks types, as Figure 3.8 shows.
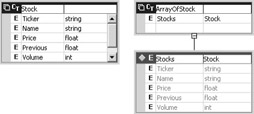
Figure 3.8: Adding the ArrayOfStock data type to the XSD document.
As discussed earlier, the array will have between zero and an infinite number of Stock items. To configure this, select the Stocks element that is connected to the ArrayOfStock element, and in the Properties window (toward the bottom right of the IDE), locate the minOccurs and maxOccurs fields.
Enter for the minOccurs property, and unbounded for the maxOccurs property, as shown in Figure 3.9. This will allow an unbounded (infinite) number of stocks to be contained in the array.
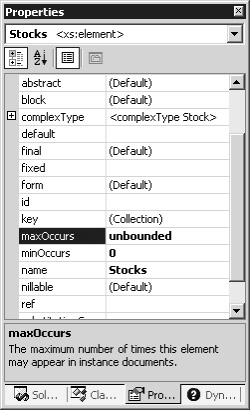
Figure 3.9: Setting the properties for the array type.
Now that you have defined the stock and a stock array, you need to define the Portfolio type itself. To do this, add a new complexType named Portfolio , as shown in Figure 3.10. This type will contain one element named Stocks , and that element's type will be ArrayOfStock .
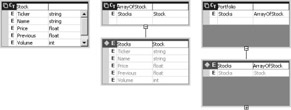
Figure 3.10: Adding the Portfolio type to the schema.
You might be wondering why we have to define the ArrayOfStock type ” and why we just don't define Portfolio as having an unbounded number of Stock elements instead. We define this ArrayOfStock type to produce the Stocks element within the Portfolio element. As mentioned earlier, this categorization allows for other types to be added to the portfolio in the future.
The final step for defining types is to create a top-level element within the document. This will define Portfolio as the top-level object. To do this, right- click the main window and select Add/New Element.
Give the new element the name Portfolio and a type of Portfolio, as shown in Figure 3.11. Ensure that this type is not contained within parentheses because this will create a second XML element.
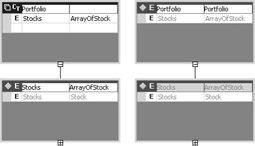
Figure 3.11: Completing the schema.
The XSD is almost complete now. The final step is to set a namespace to uniquely identify the XSD as yours so that if anyone else generates the same schema, you can differentiate between the types.
To set the namespace, click the main part of the window, and in the Properties window, locate the targetNamespace property. The default namespace is currently set to http://tempuri.org/portfolio.xsd. Change this to http://www.microsoft.com/interoperability/package/ .
Now save the document. Congratulations! You've completed an XSD that you'll use to allow XML serialization to exchange types between .NET and J2EE.
Generating Types from an XSD
We now have an XSD that defines a portfolio containing stocks. You might be wondering what benefits we gained by creating the XSD first and whether it would have been easier to just create the classes from scratch in .NET and Java. Although it might have been easier to craft something as simple as this stock type just by writing the class, by using an XSD, you guarantee that you build data types and a schema in a format that's common to both platforms. This is especially important for solutions that use more complex types.
Now that we have an XSD, let's use it to generate some classes for both platforms. We'll do this from a command prompt, so ensure that the portfolio.xsd file is saved in Visual Studio .NET. At a command prompt, navigate to the directory containing the portfolio.xsd file, as it was saved by the IDE. In the sample created earlier, this directory is C:\Temp\XSDSample.
If you chose not to create the sample, or want to compare the XSD file with the one generated in our sample, a correct XSD can be found in the C:\Interoperability\Samples\Data\XML\Serialization\XSD directory.
Next we'll run two tools that generate classes based on our new XSD: XSD.EXE, which generates types for .NET, and schema2java, which generates types for Java.
Generating a class in .NET from the XSD
XSD.EXE is a command-prompt tool that ships with the .NET Framework SDK. If you have Visual Studio .NET installed, this tool should be run from the Visual Studio .NET Command Prompt (found in the Microsoft Visual Studio .NET 2003/Visual Studio .NET Tools' Program Group). If you don't have Visual Studio .NET, this tool can be run directly from the .NET Framework directory.
XSD.EXE is a tool that can be used to generate either classes or data sets from XSD documents and to generate XSD documents from existing classes. For a full list of arguments, type XSD /? at the command-prompt window.
For this sample, we'll generate classes from the portfolio.xsd file that we created. To do that, run the following command from the directory that contains this portfolio.xsd file:
XSD /c portfolio.xsd
If all is successful, you'll get the following output:
Microsoft (R) Xml Schemas/DataTypes support utility [Microsoft (R) .NET Framework, Version 1.1.4322.573] Copyright (C) Microsoft Corporation 1998-2002. All rights reserved. Writing file 'C:\temp\XSDSample\portfolio.cs'.
The XSD tool has taken the XSD and generated the required classes. The output for this has been stored in portfolio.cs. Open this file now in Visual Studio .NET:
//----------------------------------------------------------------- // <autogenerated> // This code was generated by a tool. // Runtime Version: 1.1.4322.342 // // Changes to this file may cause incorrect behavior and will // be lost if the code is regenerated. // </autogenerated> //----------------------------------------------------------------- // // This source code was auto-generated by xsd, Version=1.1.4322.342. // using System.Xml.Serialization; /// <remarks/> [System.Xml.Serialization.XmlTypeAttribute(Namespace="http://www.microsoft.com/interoperabililty/package/")] [System.Xml.Serialization.XmlRootAttribute(Namespace="http://www.microsoft.com/interoperabililty/package/", IsNullable=false)] public class Portfolio { /// <remarks/> [System.Xml.Serialization.XmlArrayItemAttribute("Stocks", IsNullable=false)] public Stock[] Stocks; } /// <remarks/> [System.Xml.Serialization.XmlTypeAttribute(Namespace="http://www.microsoft.com/interoperabililty/package/")] public class Stock { /// <remarks/> public string Ticker; /// <remarks/> public string Name; /// <remarks/> public System.Single Price; /// <remarks/> public System.Single Previous; /// <remarks/> public int Volume; } As you can see, this file contains two classes. (The classes are written using C#, which is the default for the XSD tool, although other languages can be specified with the appropriate command-line parameters.) The Stock class contains the required elements for the stock type, and the Portfolio class contains an array of Stock objects. In addition, where applicable , the tool has used the XmlRoot and XmlType attributes to annotate the classes with the defined namespace.
Generating a class in Java from the XSD
Let's now perform the same process to generate code that can be used for the Java platform. To perform a similar function to the one performed by the XSD tool in .NET, you can use a tool named schema2java, which ships with Electric XML. The schema2java tool can be found in the bin directory of the C:\Interoperability\Tools\Glue installation.
If this bin directory is in your system PATH , you can run this tool in the directory containing the target XSD document:
schema2java portfolio.xsd
If all is successful, the following files will be created:
write file Stock.java write file Portfolio.java write file portfolio.map
Portfolio.java contains the generated Java class:
public class Portfolio implements java.io.Serializable { public Stock[] Stocks; } And similarly, Stock.java contains the definition for the Stock class:
public class Stock implements java.io.Serializable { public String Ticker; public String Name; public float Price; public float Previous; public int Volume; } Notice how both classes look similar to the ones generated for C# by the XSD.EXE tool; however, they're specific to Java. The third file is a mapping file, specific to Electric XML, and is not required by our sample code.
We now have the classes required for both .NET and Java, based on the common XSD that we defined. Now let's use XML serialization to pass data between the .NET and Java platforms.
Using the Generated Classes with XML Serialization
The sample code for testing XML serialization can be found in the C:\Interoperability\Samples\Data\XML\Serialization directory. This directory already contains classes that were generated from an XSD. On the other hand, you can also use the classes that were created in the previous subsection.
The .NET example code uses the Portfolio class to create a portfolio containing two companies that are prepopulated with sample information. This Portfolio object is then serialized to the XML file whose name was passed as a parameter. After this serialization is complete, the .NET example code prompts the user to run the Java version while it pauses.
The Java sample code deserializes the XML data into the Java-specific data types that were created from the XSD. After the objects are deserialized, the prices for the companies stored within the portfolio are updated. The updated objects are then reserialized back into the XML file. After the Java sample has completed, the .NET sample can be resumed in order to read in the new values.
Running the sample code
To run the code, compile both the .NET and Java samples within the dotNET and Java subdirectories of the Serialization directory. To run the samples after compiling the code, open two command-prompt windows . This example requires the code in .NET to be run simultaneously with the code in Java, and using two command-prompt windows will help you see both processes in action. To execute the .NET sample, enter the following at the command line:
SimpleSerializer ..\shared\portfolio.xml
When prompted, switch to the second command-prompt window and run the Java sample code, which can easily be done using the run target with the provided Ant script.
The .NET sample code
Stepping through the listing for the sample code (SimpleSerializer.cs) will show us how to first initialize the sample company data by using the SampleData method:
private static Portfolio SampleData() { Stock NWND = new Stock(); Stock CONT = new Stock(); NWND.Ticker = "NWND"; NWND.Name = "Northwind Traders"; NWND.Price = 50.12; NWND.Volume = 123; CONT.Ticker = "CONT"; CONT.Name = "Contoso"; CONT.Price = 12.45; CONT.Volume = 23; Stock[] myStocks = new Stock[]{NWND,CONT}; Portfolio myStocks = new Portfolio(); myStocks.Stocks = myStocks; return myStocks; } After calling the SampleData method, you have an object (a complex data type) of type Portfolio named myStocks . This object contains the two companies that you'll serialize to XML and pass to the sample code in Java. The next task is to serialize the object. The following code achieves this:
XmlSerializer sz = new XmlSerializer(typeof(Portfolio)); System.IO.FileStream fs = System.IO.File.Open(xmlFile,System.IO.FileMode.Create); Console.WriteLine("Serializing portfolio to the XML file..."); sz.Serialize(fs,myStocks); fs.Close(); The first thing this code does is create a new instance of the serializer. To initialize the serializer, the code passes to it the type of the object to serialize. The sample uses typeof(Portfolio) to indicate that you'll be serializing an object of type Portfolio . After the serializer has been initialized , create a new FileStream with a path to the file, as specified in the parameters that were passed to run the example code. Upon closer examination, you can see that the serialization occurs in the following line:
sz.Serialize(fs,myStocks);
The code passes the FileStream ( fs ) for the new file created and the object to be serialized. (Earlier, we created the myStocks object in the code from the sample data.) After the serialization is complete, the FileStream is closed and the user is prompted to press a key to indicate that serialization is complete.
The XML file that's generated at this point should look similar to the following. You can view this file by opening it in Microsoft Internet Explorer, Visual Studio .NET, Microsoft Notepad, or your favorite XML editor.
<?xml version="1.0"?> <Portfolio xmlns:xsd="http://www.w3.org/2001/XMLSchema" xmlns:xsi="http://www.w3.org/2001/XMLSchema-instance" xmlns="http://www.microsoft.com/interoperabililty/package/"> <Stocks> <Stock> <Ticker>NWND</Ticker> <Name>Northwind Traders</Name> <Price>50.12</Price> <Previous>0</Previous> <Volume>123</Volume> </Stock> <Stock> <Ticker>CONT</Ticker> <Name>Contoso</Name> <Price>12.45</Price> <Previous>0</Previous> <Volume>23</Volume> </Stock> </Stocks> </Portfolio>
The Java sample code
The XML document contains the two stocks that are defined in the portfolio and the data that you set for each of the stocks.
As you saw, the sample updates the prices for the two companies in the portfolio, serializes the objects into the XML file, and then rereads the file in .NET to check that the changes have been applied and that the objects can still be deserialized successfully.
If we look through the SimpleSerializer class in Java, we can see that before the objects are read, we configure a number of Electric XML settings. These settings ensure that the decoding and encoding of the XML document is compatible with the XmlSerializer in .NET.
ArrayTypeFactory.setDefaultArrayType("electric.xml.io.array.LiteralArrayType"); LiteralWriter.setWriteTypes(false); SchemaProperties.setNamespaces(NAMESPACE_PREFIX); These settings ensure the XML document is configured to contain elements that are literal types (and not encoded with the SOAP formatter). The final line also sets the namespace correctly (to http://www.microsoft.com/interoperability/) so that it matches the namespace used by the types in .NET.
After the objects are deserialized, two companies in the portfolio are updated with the following code:
myStocks.Stocks[0].Previous = myStocks.Stocks[0].Price; myStocks.Stocks [0].Price += 1.20; myStocks.Stocks [1].Previous = myStocks.Stocks[1].Price; myStocks.Stocks [1].Price -= 0.50;
To write the updated object back to the XML file, use the following lines of code:
IWriter writer = new LiteralWriter(NAMESPACE_PREFIX+"package/", Strings.getLocalJavaName(Portfolio.class.getName())); writer.writeObject(myStocks); document = writer.getDocument(); document.write(new File(xmlFile));
Here, a new instance of IWriter is created, with the correct XML namespace and the name of the class that will be written to the XML document. (Again, we'll use LiteralWriter to ensure compatibility with the XML serializer in .NET.) The writeObject method is used to serialize the object to the electric.xml.Document object. This document is then written back to the portfolio.xml file that was read earlier.
Starting with a Class
The previous example of creating an XSD first and then generating the required .NET and Java classes from it is great for ensuring data compatibility between the two platforms; however, it does assume that you're creating both sides of the application anew.
Some of the business requirements covered in Chapter 2 presented scenarios that involved creating solutions that interoperate with existing systems. Chances are these existing systems already have had their data types defined ” and it's probable that no good justification for developing a new schema to replace them exists.
Generating an XSD from an existing class in Java
The good news is that you can still use the XSD tools to generate documents from data types that already exist ”you just have to use these tools in a slightly different way. For example, imagine that you have an existing data type already defined in Java and that you need to create an equivalent data type in .NET. Ideally, you'll want to do this by using an XSD.
Earlier we used the schema2java tool in Electric XML to generate a Java class from a defined XSD. Fortunately, a tool named java2schema performs exactly the opposite function. Using java2schema, you can reference an existing Java class and generate an XSD from there. Note that the existing Java class has to be a compiled class, not source code.
Before we look at the sample, we need to make some global modifications to the Electric XML implementation. These modifications are required to correctly configure the tools that will generate the XML and XSD from the Java classes.
To make these modifications, first navigate to the C:\Interoperability\Tools\Glue\lib directory. This directory contains all the classes for the GLUE and Electric XML libraries. From this directory, extract the default configuration file, using the following command:
jar xvf glue-all.jar glue-default-config.xml
This will extract the glue-default-config.xml file from the JAR file. Overwrite this XML file with the version contained in the C:\Interoperability\Samples\Data\XML\Serialization\XSD directory. This new version contains changes for the namespacePrefix , writeTypesForLiteral , and defaultArrayType settings so that they are compatible with .NET.
To replace the file and update the JAR file, run the following command:
jar uvf glue-all.jar glue-default-config.xml
The modifications to the JAR file are now complete. To see how we can now generate the XSD from the Java class, navigate to the C:\Interoperability\Samples\Data\XML\Serialization\Java directory. After you compile and run the previous sample, this directory will contain two class files: Portfolio.class and Stock.class.
From this directory, run the following command:
java2schema Portfolio
The tool will read the class files (using a process known as reflection ) and will generate the required XSDs from the data types it finds.
| Tip | What is reflection? At run time, reflection allows an application to examine a class as well as that class's methods, declarations, properties, and fields. Reflection functionality is provided by a set of APIs that exist in both .NET and Java. |
The output should be similar to the following:
write file Portfolio.xsd write file ArrayOfStock.xsd write file Stock.xsd write file Portfolio.map
Notice that the java2schema tool has created a single XSD for each type. Although this is technically valid, you'll need to combine these files to get them into a format you can use with .NET. (The XSD.EXE tool can handle multiple XSDs, but not when the target namespace is the same in each XSD.)
To combine the files, open Stock.xsd and ArrayOfStock.xsd in a text editor. Cut out the complex type definitions between the < xsd:complexType > tags in each of the XSDs and paste them into the portfolio.xsd file. (Placing these definitions after the definition for the Portfolio element, but still within the < xsd:schema > element, is fine.)
Remember how we needed a top-level element for the XSD tool in our previous sample? You need to create such an element again because the java2schema tool does not automatically generate this element. Insert the following line of code:
<xsd:element name="Portfolio" type="n2:Portfolio"/>
between the < xsd:schema > tags in the document. Save the new portfolio.xsd document.
You now have a valid portfolio.xsd document that can be used with the XSD tool to generate a .NET class. As you did in the previous example, run the XSD command to generate the required classes:
XSD /c portfolio.xsd
This will generate the portfolio.cs class, which can be examined and compiled.
Generating an XSD from an existing class in .NET
To complete the picture, let's look at how to generate an XSD from an existing .NET class. Again, this is useful when existing classes have already been defined in .NET and you need to generate compatible classes in Java.
As you did in the previous Java example, navigate to the directory that contains the compiled code from the previous sample (C:\Interoperability\Samples\Data\XML\Serialization\dotNET). In this directory, you'll find an assembly named SimpleSerializer.exe. This assembly not only holds the main class for the sample code, but it also contains the data types.
To generate an XSD from these classes, run the XSD tool. Use the /c switch again, but this time, supply the executable as the parameter:
XSD /c SimpleSerializer.exe /type:Portfolio
The /type parameter is used for specifying the types to generate a schema for. Because a .NET assembly can hold multiple types, this parameter is used to ensure that you select the correct type. If all is successful, you'll get the following output:
Writing file "C:\Interoperability\Samples\Data\XML\Serialization\dotNET\schema0.xsd".
Unlike the java2schema tool, the XSD tool places the complete schema within Schema0.xsd. You can reuse the Electric XML tool to generate a Java class from the XSD file:
schema2java schema0.xsd
| Warning | On some machines on which I used the XSD.EXE tool, I noticed that the file was encoded with a character set that had a nasty habit of inserting a few rogue characters at the front of the file. If you get an electric.xml.ParseException: java.io.IOException: expected '=', got 'v', exception when using the schema2java tool on an XSD that has been generated by the XSD.EXE tool, open the XSD document in a text editor and resave it to delete all characters before the opening <?xml > tag. |
Upon successfully creating the classes required for Java, you'll see the following output:
write file Portfolio.java write file Stock.java write file schema0.map
These files can then be used in new Java applications.
XSD in the Real World
In this section, we've uncovered the notion of using an XSD to define data that needs to be exchanged between the .NET and Java platforms. First we created our own XSD. Then we generated classes for both Java and .NET, compiled and ran the serialization sample, and from these classes, regenerated the XSD to close the loop.
Using an XSD to create the schema first and then generate classes certainly isn't without its pitfalls. You saw this in the example where we had to make slight adjustments to accommodate each tool. That said, using XSDs to generate types is a very powerful technique. Not only do XSDs go a long way in guaranteeing that the types you create have a reproducible version on the other platform, but XSDs also lie at the foundation of the Web Services Description Language (WSDL), which we'll cover in Chapter 5, "Connectivity with XML Web Services, Part 1." Knowing how XSDs work and how the underlying technology uses XSDs is a great step toward understanding how data types are transported via Web services.
XSD Type Mapping
To help summarize this discussion on XSDs, Table 3.3 shows the mappings between XSDs, .NET, and Electric XML. This table can be useful when working with XSDs to ensure that the basic types are what you expect. We'll use similar tables throughout the book as we look at other technologies.
| XML Data Type | .NET Data Type | Electric XML Data Type |
|---|---|---|
| AnyUri | String | java.net.URL |
| base64Binary | Byte[] | Byte[] |
| Boolean | Boolean | boolean |
| Byte | SByte | byte |
| DateTime | DateTime | date |
| Decimal | Decimal | BigDecimal |
| Double | Double | Double |
| Float | Single | float |
| HexBinary | Byte[] | electric.Util.Hex |
| Int | Int32 | int |
| Long | Int64 | int |
| NegativeInteger | String | int |
| nonNegativeInteger | String | int |
| nonPositiveInteger | String | int |
| Short | Int16 | short |
| UnsignedInt | UInt32 | int |
EAN: 2147483647
Pages: 132