Understanding Score Layers
| [ LiB ] |
Understanding Score Layers
When working on a score, you are placing and editing symbols on three different layers: the note layer, the layout layer, and the global layer.
The note layer represents MIDI events that you may open from a MIDI track. These MIDI events become note symbols on the note layer. On this same layer, you also find other note dependant information that is represented by symbols, such as tempo changes, dynamic indications , or special symbols that represent how notes should be interpreted graphically, such as a trill or an arpeggio. These symbols are all present as long as the note symbols associated with them are present. When you move a note or a bar containing a note, the associated symbols follow. On the other hand, Cubase allows you to lock certain elements on note layers, or create your own set of note layer events that can't be edited by assigning these elements to a layer and activating it. For example, in Figure 16.6, the note layers 1 and 3 are active (editable) and layer 3, when active, lets you edit stem lengths and keys. In other words, when layer 3 is disabled, you can't edit stems and keys. When working on a dense musical project, controlling the aspects that can or cannot be modified makes editing easier.
Figure 16.6. Layer control options.
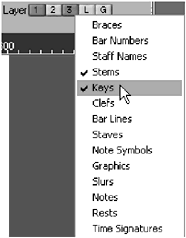
The layout layer represents elements that quite often define a group of instruments on a score and define how an instrument appears on a page. For example, a bracket across a brass section is considered as a layout item. You might decide that each brass part contains six staves per sheet by defining a layout called brass and then applying this same layout to all the instruments in that section. However, symbol elements that are in one layout do not appear in another layout, so when you want to have certain indications repeated on all the parts , use a symbol that is part of the global layer. Think of the layout layer as a preset setting for a group of instruments, where you can save the number of bars per staff, staves per page, and layout symbols for this particular layout. To lock the layout layer from editing, you can deactivate it from the layer control options (see Figure 16.6).
The global layer represents symbols that are not associated with notes but give indications to the musician on how to play a part and are part of the greater picture (global) of the score. For example, coda indications or rehearsal markings are considered layout symbols. To better understand the layout layer, let's look at an example. When preparing a big band arrangement, you need to create individual parts for each musician and a score for the conductor. Starting with the conductor's score, open all the tracks corresponding to the instruments in the arrangement, and then move notes, quantize note symbols so that they look good on paper, and add certain indications. Chances are, when you create the individual music sheets, you'll want to see the same indications on each sheet. Take, for example, rehearsal marks such as letters identifying different sections of a song. These indications are placed and saved in the layout layer. To lock the global layer from editing, you can deactivate it from the layer control options (see Figure 16.6).
Global Settings
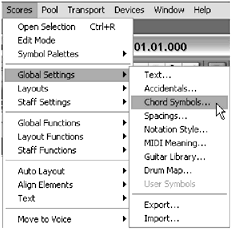
These settings influence the properties of global symbols, as described earlier, as well as settings that relate to how Cubase handles specific representation of symbols (see Figure 16.7), such as accidentals in the current score or text sets, which are style templates that you can assign to different types of text in your score.
Figure 16.7. The Global Settings options.
Text Settings
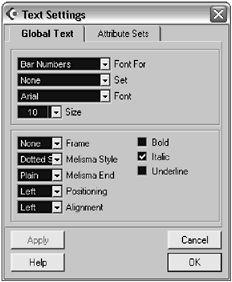
The Text Settings in the Global Settings submenu offer two tabs of options: the global text and text attribute sets. The Global Text tab sets font attributes for different parts of your score, including bar numbers , track names , time signatures, and so on (see Figure 16.8). The Attribute Sets tab lets you create template text sets that you can use throughout your score.
Figure 16.8. The Text Settings dialog box.
How To
To create a text attribute set:
-
Select Global Settings > Text from the Score menu.
-
Click the Attribute Sets tab in the Text Settings dialog box.
-
In the Set field, type a name for your set. For example, if you want to create a set for lyrics, call your set "Lyrics." When you add lyrics, you can apply that set (similar to styles in Word for all you Word experts) to them without having to set your font, size, and attributes each time.
-
Change the font, its size, and its attributes (Bold, Italic, or Underline).
-
Select a frame type if you want to see a frame around your text.
-
Select a proper Melisma style setting. A melisma is a line that appears after a syllable when you are adding lyrics to indicate that the syllable is stretched over many notes. Figure 16.9 illustrates this. The melisma style represents the line itself, and the melisma end is how the line should end. In Figure 16.9, the melisma style is solid, the end is plain, and the text's attribute is italic. You learn how to use melisma when looking at how to use text later in this chapter.
Figure 16.9. Example of a text set using a melisma.

-
Adjust the Positioning field to the left or right. This influences which side of the text is used to align this text with notes when the notes are moved around.
-
Adjust the Alignment field as appropriate (left, center, or right). This only makes a difference when you have more than one line of text. It is similar to a paragraph alignment setting, aligning the text to the left, to the center, or to the right.
-
Press the Store button to store this set.
-
Press Apply to accept your changes and then click OK.
The set you have just created is accessible in the Score > Text > Font Setting option or in the Text Settings dialog box found under Global Settings > Text as well.
Accidentals Settings
The Accidentals dialog box, as shown in Figure 16.10, lets you determine how accidental notes should appear in your score. An accidental is an altered note that doesn't belong to the key signature. The rule for accidentals is that when one appears in a bar, each time the same note appears in this bar, it keeps the accident active until the next bar. If you want to add precision to this setting by repeating the accident each time the same note appears in the same bar, you can tell Cubase to repeat the accident . The right part of this page offers you a choice of most common tensions used and a sharp or flat setting for each one. The paramount rule is to go for clarity. Repeat an accidental in the same bar wherever there is a potential for confusion. Even though an accidental is cancelled by a bar line, a cautionary (bracketed) accidental in the next bar is often helpful.
Figure 16.10. The Accidentals dialog box.
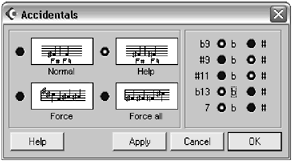
For example, if you have a Cm with a flat ninth note, you can decide to show this as either a D flat or as a C minor chord with an augmented octave (C sharp). As a rule of thumb, keep flat tensions as flat notes and sharp tensions as sharp notes. Therefore, in our example, a musician would prefer reading a D flat rather than a C sharp.
How To
To set the accidentals preferences in a score:
-
Select Global Settings > Accidentals in the Scores menu.
-
Select the options you want to apply to your score. The dialog box is divided into two sections. On the left, you can choose how the accidental notes are handled and on the right, you can select how you want specific tensions in a chord to be represented.
-
Click Apply and then click OK.
Chord Symbols
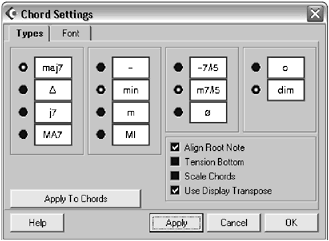
The Chord Symbols in the Global Settings submenu offer two tabs of options: the chord types and chord font settings.
The Chord Types tab displays different ways of showing chord symbols. How to set up this page depends on how you prefer seeing chords displayed and from which scoring school you are. Different schools of thought exist on this subject, so the choice is up to you.
The Chord Font tab offers you three styles of music chords: English, with the A to G scale; DoReMi (which is French for C, D, E), with the Do to Si (C to B) scale; and German, which is similar to the English style except that the B key letter is replaced by the H key letter and B flats become B.
You can select the font type and a font size for each part of the chord. Look at the sample in Figure 16.11 to see how the change affects the layout of the chord.
Figure 16.11. The Chord Settings dialog box.
Other Global Settings
The Spacing option found in the Global Settings submenu is where you can tell Cubase how much space you want between elements on your score layout. You can set each element to a default value, or you can change it to customize the display of your score. To change a value, you select the field and enter the value manually.
The Notation Style option offers three tabs of options: switches, beam and bars, and options. All of these options define how you want certain elements to be displayed in a score. For example, the Beams and Bars tab displays properties for bar numbering and layout in your score and beam properties, such as angles of beams when tied beams are slanted .
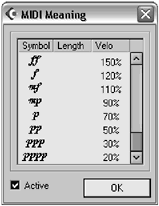
MIDI Meaning (Figure 16.12) offers a way to tell Cubase how you want it to interpret through MIDI velocity and length values the musical notation markings you added to the current score. For example, if you inserted a dynamics value of "ff" or fortissimo (very loud), when Cubase plays back the passage, it will send out MIDI notes with a velocity 50 percent louder than what it currently is. So if you've entered all notes step-by-step, using the pencil tool, or your keyboard, at a default velocity value (lets say 64), then Cubase will play that note at a velocity of 96 (50 percent louder than the default value). Another example, if you set up a staccato accent symbol (.) to mean Length=25%, Velocity=110%, notes with this accent would be played back with a quarter their actual length and 1.1 times their actual velocity.
Figure 16.12. MIDI Meaning dialog box.
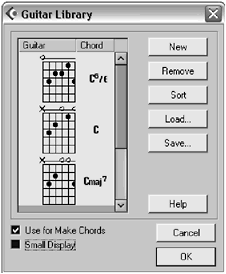
When working with chord intensive songs and creating guitar parts at the same time, you will find it useful to use the Guitar Library. This tool allows you to create and collect different guitar chord symbols along with their chord names (see Figure 16.13). In this dialog box, you can create new chords, remove them, and save them to a file.
Figure 16.13. The Guitar Library dialog box.
How To
To create chords for your guitar library:
-
Select Global Settings > Guitar Library from the Scores menu.
-
Click the New button to create a new chord. A blank fretboard appears.
-
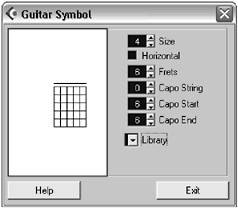
Double-click the fretboard to open the Guitar Symbol editor (see Figure 16.14). This dialog box is divided into two parts. On the left, you will find the fretboard. Clicking a fret adds a finger position on the fret. Clicking it again removes it. You can also click above the fretboard to add open string or an indication not to play this string (an X is inserted). Consecutive clicks change the symbol from one to the next. Clicking the top-left corner outside of the fretboard adds position numbers. In the right section, you can enable the large symbol display or the horizontal symbol display by checking the Large or Horizontal check boxes. The Frets field changes the number of frets displayed in the symbol, whereas the Capo fields creates Capodaster symbols across the strings.
Figure 16.14. The Guitar Symbol dialog box.
-
Create your chord by adding the appropriate finger symbols in the fretboard on the left.
-
When done, click OK. This chord creates a new guitar symbol in your library.
How To
To add a guitar symbol in your score:
-
Select Symbol Palettes > Others from the Scores menu.
-
Click the Guitar Chord symbol in the Tool palette.
-
Click in the score where you want to add a guitar symbol. The Guitar Symbol dialog box appears.
-
Either select a chord that you have created earlier from the Library drop-down menu, or create the chord as was described earlier. This dialog box differs slightly from the one you used when creating a guitar chord for the library because it has an Apply button rather than an Exit button.
-
Click the Apply button to insert the symbol in your score. You can also insert the notes associated with your chord by clicking the Insert Notes button.
-
Continue adding guitar chord symbols and then close the dialog box when you are done.
You can easily save your guitar chord library for later use with another project by clicking the Save button in the Guitar Library dialog box. To load a previously saved library, simply click the Load button instead and browse your hard disk for the file. Finally, to remove a guitar chord from your library, simply select it and click the Remove button.
It is also possible to create drum parts by using an existing drum map associated with a MIDI drum track through the Score Drum Map Settings dialog box (see Figure 16.15). This dialog box associates a drum instrument to a different pitch for the score layout and changes the head of the note in this score to represent an instrument, making it easier for a drummer to read. You can also change the voice that is assigned to each drum instrument when working with polyphonic voice layouts.
Figure 16.15. The Score Drum Map Settings dialog box.
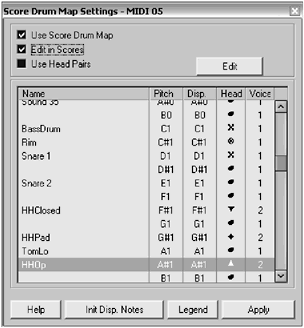
Here's a look at the options available in this dialog box:
-
Use Score Drum Map check box. Associates the drum map used for the selected drum track and associates the name of each instrument in the drum map. When you click the Legend button, Cubase adds a note in the score for each instrument defined at the pitch used in the score to help the drummer understand how you've laid out the drum part.
-
Edit in Scores check box. Makes changes directly in the score's window, updating any changes you make there in this dialog box. For example, if you move the Bass Drum from an E3 to a D#3, the change appears here as well.
-
Use Head Pairs check box. Associates a note length value to the symbol displayed in the score. When an instrument plays a note that is long (longer than a quarter note), the head in the left column is used. If the instrument plays a shorter note (shorter than or equal to a quarter note), the head in the right column is used. Note that this option is not selected in Figure 16.15, so you only see one column of note heads. The Edit button edits the pairing of note heads.
-
Drum map display. Is a series of rows in which each row represents an instrument and its properties. The columns show the instrument's name, the pitch associated with this instrument according to the drum map (which you can't change), the pitch displayed in the score, the note head associated with the instrument, and the voice assignment. The displayed note has no effect on the I-note, O-note setting for the drum map. The purpose of this option is to make it easy to lay out your drum part in a staff without having notes appearing far below a staff. Assigning instruments to voices allows you to control the direction of the note stems by using the polyphonic staff settings covered later in this chapter.
-
Initial Display Notes button. Resets the displayed note value to the original pitch note value in the score.
-
Legend button. Adds a series of notes at the current quantize value interval (also using the quantize length value setting for the note lengths). This serves as a guide to the drummer so that he/she can understand which note value is associated with the drum's instrument (see the bottom part of Figure 16.16).
Figure 16.16. A before and after look at a MIDI drum part being edited in the Score Editor.
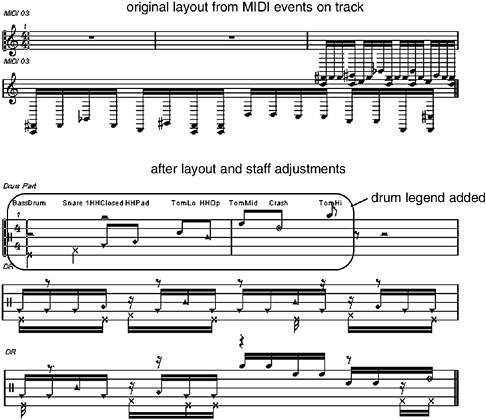
Figure 16.16 shows a MIDI drum part opened in the Score Editor on top. Notice that the notes appear low on the treble clef staff. You can also see that the stems are all going in the same direction; accidents appear because some notes are associated with black note pitches and the spacing between each note is limited. All of this makes it very difficult for a drummer to understand what exactly needs to be played. On the lower half, the MIDI events have been formatted for the score layout of a drum part. A legend appears at the beginning, showing the drummer which note plays what. Also, the HiHat has been assigned to a second voice, allowing for stems to be sent up while the kick and snare have stems pointing down, making it easier for the drummer to interpret.
The last two options in the Global Settings submenu export all of your settings to a file for use in another project or in another studio and import setting files that you have previously saved.
Layout Settings
The Layout Settings submenu in the Scores menu manages layouts that are available in your project and switches from one layout to another. Usually, a layout is created when you open the Score Editor with a certain number of tracks or a single track selected. For example, if you open the Score Editor after selecting all the brass tracks, piano, bass, and drum tracks, and start editing the layout for these tracks, a layout is created.
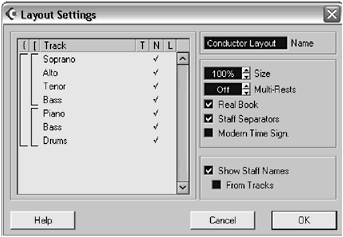
The Layout Settings dialog box (see Figure 16.17) edits this layout. This dialog box is divided into two parts. On the left, you will find the tracks that are currently part of this layout. The first and second columns are used to add braces or brackets.
Figure 16.17. The Layout Settings dialog box.
How To
To add braces or brackets in a layout:
-
From the Scores > Layout Settings, select the layout you want to edit from the available layouts in your project.
-
Once selected, go back to the Scores > Layout Settings and select the Setup option. The Layout Settings dialog box appears (shown in Figure 16.17).
-
Click and hold in the braces or brackets column next to the first track where you want to begin joining the braces or brackets. With your mouse button still depressed, drag it down over the tracks you want to join together.
-
Click OK when done.
Notice in Figure 16.17 that the braces span over all the tracks in this layout, whereas the brackets divide the four first tracks from the rhythm section.
-
The T column displays the time signature above the staff rather than inside the staff itself. Clicking in the track row in this column adds a check mark, indicating that this track will be displayed this way.
-
The check in the N column determines if the track's name appears at the beginning of each track. Notice also that there is a check box in the lower-right corner of the other section of this window. The Show Staff Names option supersedes the N column in the sense that it determines if the names appear or not. Then you can add a check in the track's row to display a name for this track. You may also check the From Tracks option if you want Cubase to take the names from your tracks in the project window.
-
The L column determines if the layout symbols that you have inserted are visible next to this track. In other words, you can decide if a rehearsal mark, for example, is repeated over each track in this layout.
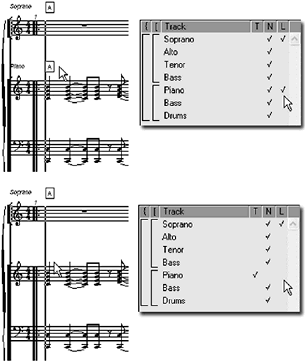
Looking at Figure 16.18, you can see in the top half that the L and N columns for the Piano part are checked. Consequently, the rehearsal mark and the name "Piano" appear above the piano staves. In the lower half, the N and L columns are not checked; therefore, the rehearsal mark and the name above the piano staves do not appear in the score's layout.
Figure 16.18. How the layout settings affect the appearance of the score.
How To
To rename a layout:
-
Select the layout you want to edit from the Layout Settings submenu in the Scores menu.
-
Then select Layout Settings > Setup from the Scores menu to open the Layout Settings dialog box.
-
In the upper-right corner, in the Name field, type the new name you want to give to your layout. In Figure 16.17, the layout has been renamed "Conductor Layout."
In the right portion of the Layout Settings dialog box, you will find the following items:
-
The layout's Name field. This field changes the name of the current layout.
-
The Size option. By default, a layout is set at 100% size. However, if you want to fit more tracks into one page, you might reduce the size until all the staves from the instruments in your orchestra fit in a single page. This can be very useful when creating an orchestral score.
-
The Multirests option. By default, this option is set to Off. However, if you want to display several complete bars of silence as a multirest symbol, showing the number of bars that the musician has to count instead, you can set the minimum number of bars you can have before the layout will tie the rests in a multirest symbol (see Figure 16.19).
Figure 16.19. Example of a multirest symbol; this tells the musician that he/she has to count thirteen bars of silence.

-
The Real Book check box. When this option is selected, the clefs for the instruments in this layout are displayed in the first staff only rather than at the beginning of each stave.
-
The Staff Separators check box. When this option is selected, a special symbol appears between each stave to separate them from the preceding stave. This option is handy when you are working on a multi-instrument layout and your score displays more than one set of staves (called a system) per page.
-
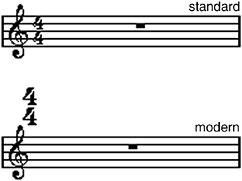
The Modern Time Signature check box. This option changes how the time signature appears in the score's layout. Figure 16.20 shows how the time signature is displayed when this option is not selected (above) and when it is selected (below).
Figure 16.20. The Modern Time Signature not selected above and selected below.
The second option in the Layout Settings submenu found in the Scores menu manages the list of layouts available. Appropriately named Show List , this option brings up a dialog box displaying a list of existing layouts for your current project. You can use the Show List dialog box to do the following:
-
Rename a layout. By double-clicking the name of a layout and renaming it.
-
Delete a layout. By selecting it and clicking the Remove button.
-
Import the layout symbols from another layout into the current loaded layout. By selecting the layout containing the symbols you want to import and clicking the Form button.
-
Switch to another layout. By selecting a layout in the list and clicking the Show button.
-
Remove layouts for which there are no longer track combinations. By clicking the Clean Up button.
Staff Settings
The Staff Settings menu offers various options related to how a selected staff is displayed and how MIDI events on this staff are handled throughout the score. In other words, what relates specifically to a staff's appearance can be controlled through the parameters available in the Staff Settings dialog box (see Figure 16.21).
Figure 16.21. The Staff Settings dialog box displaying the Main tab.
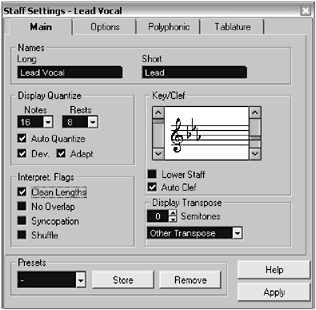
These settings affect everything from the way a staff name is displayed, to the way beams are displayed, and also how many voices are available for polyphonic voice splitting. You can even set up a staff to handle guitar-specific tablatures.
How To
To configure the staff settings:
-
In the Score window, select the staff you want to configure.
-
In the Score menu, select Staff Settings > Setup. Note that you can also open the Staff Settings dialog box by double-clicking to the left of a part.
-
Make the necessary adjustments throughout the four tabs (Main, Options, Polyphonic, and Tablature) and then click Apply.
-
If you want to configure another track, simply select the other track. The Staff Settings dialog box updates its content to reflect the currently selected track.
After you are satisfied with the settings of a track and want to keep these settings for later use on another track, you may save these settings in a preset by clicking the Store button in the Staff Settings dialog box. You can also start with the existing presets by selecting it from the Presets drop-down menu.
For a full description of each item found in this dialog box, you may click the Help button. Cubase displays an online help file for each tab in the dialog box. Understanding each option saves you time and lots of headaches when addressing issues you are having with the staff's layout properties in your score.
| [ LiB ] |