Creating the Creature's Head Before you start modeling the creature's head in Maya, you should sketch a rough drawing of what you want it to look like. It's a good idea to make front and profile view drawings. You will spend a lot more time trying to create a character if you just improvise the character model. If you plan ahead with drawings, you'll progress much faster to the results you want. tip You can scan in a sketch of your character and use the images as an image plane , a bitmap viewer in Maya that's specific to one of the views. For example, a bitmap of your character's profile sketch will appear in the Maya's Side view if it's assigned as an image plane to that view.
Loading an Image for Reference Before you load the scans of your two sketches (front and profile drawings) in Maya, you need to make sure they're as close to the same size as possible, particularly in height. You want the model's Front and Side views to be proportional so that you can switch between the two views and use them to sculpt the creature. With this in mind, you should try to sketch both drawings at the same scale so that you can simply scan them, but if you're in doubt, just resize them to match in a bitmap editor (such as Photoshop). For this chapter, we have divided the images into several parts : face, arms, legs, and torso. This way, you can load each body part as you model those areas. trap When saving the file in Windows .BMP format, do not use this format's optional compressed mode. Maya cannot decode BMP image files that have been compressed.
Tutorial: Loading Image Planes for Reference Continue from the previous tutorial or load the scene file listed here. To model your creature, you'll start off with the face, so first you need to load some reference images: -
RMB-click on the Front viewport to make it active. To import an image, click Hotbox View Image Plane Import Image. Insert the Maya 4.5 Fundamentals CD, select the file below the CD icon here, and then click the Open button to create imagePlane1.   -
Open the Attribute Editor for the image (Hotbox View Image Plane Image Plane Attributes imagePlane1). Change the name of imagePlane1 to FrontFace .  -
In the Attribute Editor, expand the Placement Extras section, and set the Width to 7.5 and the Height to 7.5 (see Figure 7.6). Also, confirm that Offset is set to 0,0 and that Coverage Origin X and Y (under Placement Extras) are set to . Figure 7.6. With the Attribute Editor, you can load images into your scene and modify how they're displayed. 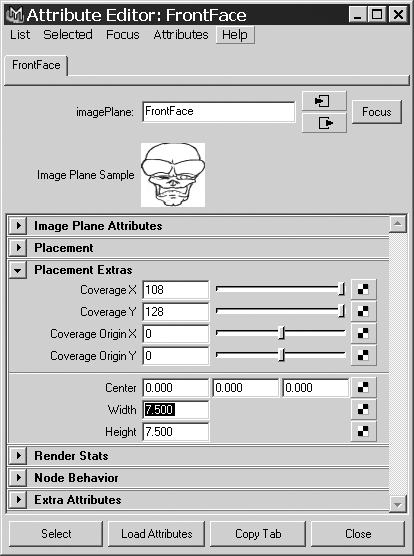 -
To load the image for the head's profile, make the Side view active (RMB-click on it), and then repeat the procedure used to load the FrontFace image, but use FaceProfile.bmp. Name the new image plane SideFace , and resize it in the Attribute Editor as before.  -
Change the layout to Three Panes Split Right (Hotbox Panels Layouts), and turn off the grid in the three views (Hotbox Display Grid). The reference images should be set up as shown in Figure 7.7. Figure 7.7. The viewports with the image planes loaded. 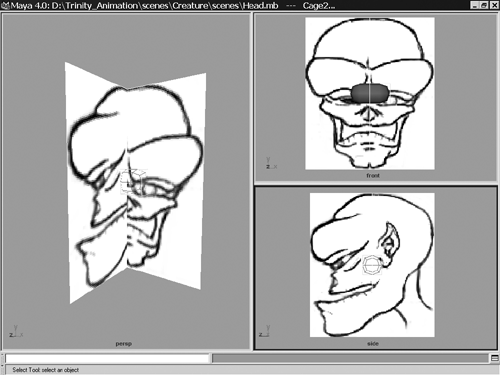 The reference images are now set up, so you can start modeling your character. The two images should be about the same height in the viewports. If not, you can open the Attribute Editor for each one and compare them while tweaking settings. tip At the bottom of the Attribute Editor is the Copy Tab button. You can use it to make a floating window that becomes the attribute panel for a specific scene element. You can tear off a tab for one object's attributes, and then open other attributes in the Attribute Editor while still viewing the tab that was "torn off." It's an easy way to compare settings.
Modeling the Head Using Smooth Proxy modeling is not a difficult method to master. You need only a few simple toolsAppend Polygon, Extrude Faces, and Create Polygonto model. As you create the creature, try to think in terms of working with clay. You are going to be " sculpting " your form by adding parts to it. As you build up from the original object, gradually the head's shape will take form. If you have difficulty visualizing the steps for creating parts of the face, you can always refer to this chapter's figures for help. Tutorial: Blocking in the Head Continue from the previous tutorial or load the scene file listed here. -
Open the Outliner (hotkey: Shift+O ) and select the pCube1SmoothProxyGroup. In the Side view, move this to the base of the neck because you'll build your creature from the neck up. Next , increase the Divisions setting for polySmoothFace1 to get a smoother shape. Select the Smooth cube, open the Channel Box, and in the Inputs section for polySmoothFace1, set Divisions to 2 (see Figure 7.8).   Figure 7.8. Notice the cube's increased complexity after changing the Divisions setting to 2. 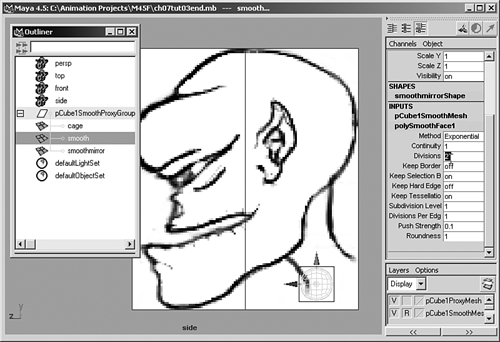 tip When modeling your character, Maya displays a more accurate representation when the divisions are set higher. However, two problems can occur. First, your computer hardware might not be able to handle the added complexity, making it difficult to manipulate the scene because of slow interaction. Second, the dense wireframe mesh of a highly subdivided surface can make it difficult to see the cage you're working with. You can always change the number of divisions, however. You might also want to completely disable the layer with the smoothed subdivided object. Often it's too difficult and slow to work with the smooth version visible and dynamically updating as you edit. Layers are useful for this purpose; simply click the V box in the Layer Editor (below the Channel Box), and the layer disappears. -
Now you'll start extruding faces from the Cage object so that the head shape starts to form. To do that, select Cage in the Outliner, and then select the top face of Cage by RMB-clicking on the cube's edge and choosing Face. Select the face at the top of the cage, and extrude it (Alt+x-hold LMB-hold Extrude Face). When the manipulator handles appear, you can change the new face's rotation, scale, and position to perform the extrusion. As you work through the upcoming edits, be careful not to translate the face in the X direction because it will separate from the mirrored copy. For this first extrusion , translate the face vertically upward about .5 of a unit, as shown in Figure 7.9. Figure 7.9. The top face of the cube has been extruded and translated upward. 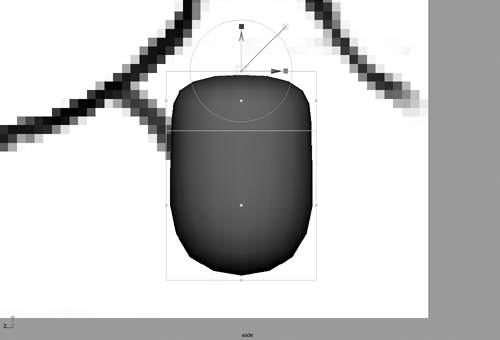 -
Repeat the Extrude Face command (hotkey: g ), and translate the new face about 2 units in the Y direction so that the polygon face is right in line with the base of the eyes. Repeat the extrusion one more time, and move it about 4 units to the top of the head (see Figure 7.10). Figure 7.10. The cube in the Side view after extruding in the Y direction. 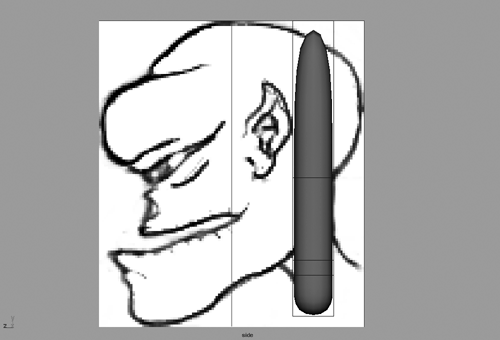 -
In the Perspective view, you can see that the extrusions created two separate pillars rising from the base of the cube. You've probably noticed that when you extruded the face, the two halves of the smooth were not connected at the center. That's because of the new faces created during the extrusion. It's easy to solve this problem, but the image planes are making it difficult to see your selections. Hide the cameras (which in turn hides the image planes) in the Perspective view (Hotbox Show Cameras ). Now you can easily select the faces on the side of the extruded Cage object, as you are already in face editing mode. Simply select each of the three faces between the two extrusions, and press Backspace to delete them. With each deletion, the sides will come closer together (see Figure 7.11). Figure 7.11. Deleting the faces between the two pillars causes the sides to merge together. 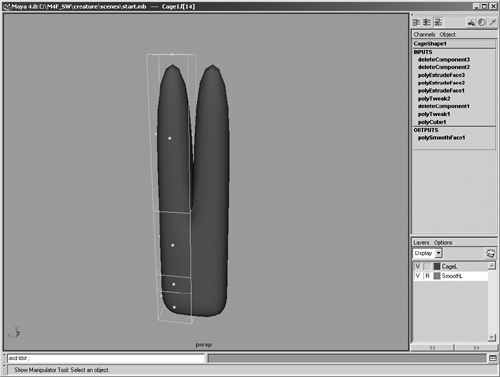 -
The next step is to extrude the faces on the front of the cubes and move them in the Z direction until they reach the front of your creature's head. Right now you have Cage divided into four sections. In the Perspective view, select the polygon faces at the front of the top two sections. Extrude them (Alt+x-hold LMB-hold Extrude Face) about 3 units in the positive-Z direction, and switch to the Side view to move them farther toward the front of the head, leaving a little less than one-fourth of the reference image's profile uncovered. From there, extrude one more time (hotkey: g ), and move the faces about 1.7 units, to the left edge of the drawing (see Figure 7.12). There are now two more sections. Figure 7.12. In the Side view, you can see the new extrusions moving toward the front of the face. 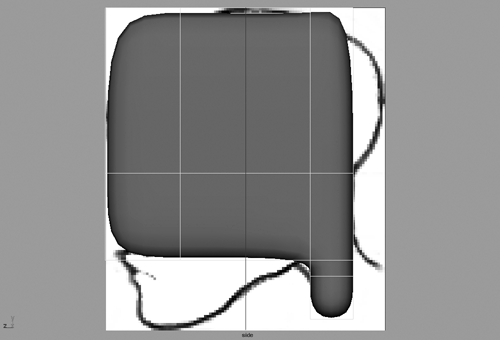 -
Switch to the Perspective view and delete the new faces between the two smoothed sides, as in Step 4. To make it easier, you can hide the Smooth object by clicking the V in the Layer Editor for the pCube1SmoothMesh layer. Working with the Split Polygon Tool Now you get to be a little more creative. To add detail to the creature, you'll use the Split Polygon Tool, which divides a polygon face into two separate faces. For detail work, this tool offers an advantage over NURBS modeling because with NURBS, adding a division adds a curve that wraps around the entire model (unless you're working with NURBS patches). If you try to model a single head composed of NURBS, the result is usually divided into too many NURBS curves to be easy to work with. An exception is creating a model by placing "patches" of NURBS-based surfaces together. The Split Polygon Tool features a setting for the number of snapping magnets , which refer to the number of divisions of a polygon edge that are "snappable." This is similar to the grid, curve, and point snap you've seen in prior chapters for NURBS editing. With snapping magnets set to 2, you can easily divide an edge at the 1/3 and 2/3 points because there will be two equally placed magnets on that edge. The snapping tolerance sets the attraction to the snap points. The higher it's set, the stronger the snap effect. With the Split Polygon Tool, you can add localized detail. By starting off with a rough outline of the head, you can then add detailed features, such as the eyes and mouth. This method is especially effective for visual, interactive modelers who like to build their surfaces as a sculptor might with clay. The Split Polygon Tool is similar to the Create EP Curve Tool you used in NURBS modeling. If you accidentally place a point in the wrong spot, you can reposition it (hotkey: Insert ) or delete it (hotkey: Backspace ). Tutorial: Adding Shape to the Head Continue from the previous tutorial or load the scene file listed here. -
Open the Tool Settings dialog box for the Split Polygon Tool (Alt+x Split Polygon Tool option box). Set the Snapping Tolerance to 50 for extra-strong snapping (see Figure 7.13), and then close the Tool Settings dialog box.   Figure 7.13. In Tool Settings, you can change the settings for point snapping. 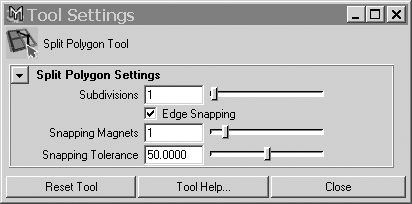 tip Remember that you need to switch out of Component Selection mode (hotkey: F8 ), or you will not be able to select objects. Component mode confines you to picking parts of a selected object, such as faces or vertices. Using the Split Polygon Tool, you'll split the polygons in areas that need more detail. For now, keep it simple and add splits only where necessary. If you add too much detail early in the modeling stage, it's difficult to modify details later because you have to select so many vertices just to begin to make a new edit. To create the brow line and the areas around the eyes and mouth, you'll place points defining the beginning and end of a polygon edge. When you click one of the polygon edges, a green square appears that represents the point, and you LMB-drag the point along the edge until it's positioned at the split's starting point. You can then snap to another edge. Press Enter after you finish placing the points, and your new edges will split all the polygon faces they intersect. Notice that you automatically exit Component mode and return to Object mode when you complete a split polygon operation. -
Switch to the Four View mode so that you can see what you're doing from all angles (Hotbox Panels Saved Layouts Four View). Referring to Figure 7.14, split the upper portion all the way around (Alt+x-hold LMB-hold Split Polygon), and then click on the edges as you work around the mesh. Note that if you click and hold on an edge, you can move the connected point around, and it will snap to the center if you get close to an edge's center point. First follow the upper bold line shown in Perspective view in Figure 7.14; use the Perspective view to rotate around as you work. Allow the magnet snap to force you to the center point as you place each division point in the center of the edge. Figure 7.14. Using Four View mode makes it easier to see exactly where you're placing specific points. 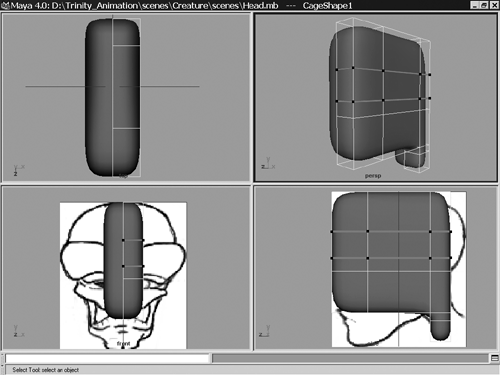 tip You can also click within a face while splitting a polygon, when you need more complex cuts. -
Press Enter when all segments of the upper bold division line are in place and the polygons are divided. Open the Tool Settings dialog box for the Split Polygon Tool (Alt+x Split Polygon Tool option box), and set Snapping Magnets to 3 to get snapped divisions of edges into four parts. Next, follow the lower bold division line (see Figure 7.14). For the lower division lines, you'll need to create the points using the bottom of the three snap points. tip You might need to change the Snapping Magnets setting again to place a point where you need it. If you're splitting a large polygon face, try increasing the setting to 4 so that you have four possible snapping positions . This makes it easier to define areas for a mouth, brow line, or chin, for example. If you want to place split points freeform, just disable edge snapping in the Tool Settings dialog box for the Split Polygon Tool. -
Next, select the vertices by RMB-clicking on Cage and choosing Vertex. In both the Front and Side views, select the perimeter vertices singly or in local groups and use the Move tool to position them at the perimeter of the head drawing. Figure 7.15 shows how the vertices might be placed in the Side view. Simply LMB-drag a vertex you want to move. You can use the Lasso tool to select multiple vertices by drawing a loop around them (hotkey: Ctrl+q ). Where possible, try to move entire rows of vertices at once to keep them in alignment. This method helps keep your model simple, and later it will be easier to animate. Figure 7.15. The neck polygons are split to the crown of the head. 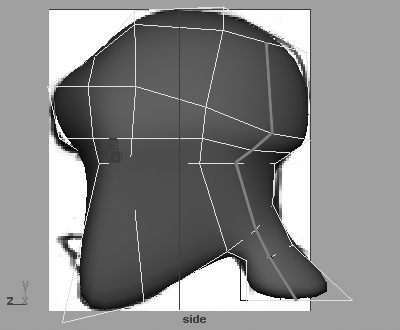 trap Keep the base of the neck flat. Do not move any vertex points at the base in the Y direction. Later you're going to extrude the body from the neck, and if the vertices are not planar, you'll have to reposition them. -
To give the neck some roundness, you'll split the polygons up to the crown of the head and pull them out slightly. Using Figure 7.15 as a reference, apply the Split Polygon Tool from the center of the neck upward, stopping at the crown. After splitting these polygons, RMB-click the Cage object, choose Vertex, and then pull these new vertices out from the head to round the shape. -
The border where the two smoothed cubes meet has a sharp edge, and this obvious seam running vertically through the center of the character's head isn't going to look good. To fix it for now, you'll split the polygons all the way around the head, offsetting from the border edges one fourth of the distance of each edge. You'll need to use the Perspective view to do this. Open the Tool Settings dialog box for the Split Polygon Tool, set Snapping Magnets to 3 , and close the dialog box. Start from the base of the front of the neck and work under the chin, up the head to the top, and all the way around to the back of the neck (see Figure 7.16). Don't split under the neck stub! Figure 7.16. By splitting the polygon faces around the seam where the mirrored cubes meet, you have a smoother connection between the two sides. 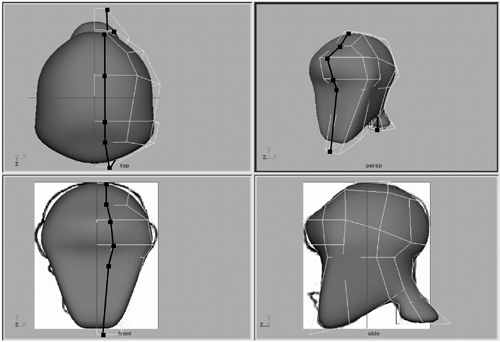 With the split you just made, you can shape the head even more with the new vertices and edges. The edges where the head's two halves meet now blend more smoothly. -
Continue to tweak the head's shape by moving vertices, faces, and edges. Remember to round off the head and adjust features such as the forehead, the back of the skull, and the chin. -
After you have achieved the head's basic outline, save your scene and name it HeadShell . You have created just the basic shell for the creature's final head, but don't worry about it not fitting exactly the way you want. Later, you'll add detail and tweak the vertex points' positions. For now, the key is simplicity. The simpler the shape, the easier it is to modify it later. Creating the Features You'll begin with the eyes because creating eyes for any character is one of the most important tasks . If you are an artist, you realize how essential eyes are in creating a character. The eyes portray emotion, the essence of what brings an animated character to life. Tutorial: Forming the Eye Sockets Continue from the previous tutorial or load the scene file listed here. While creating the head shell, you added division lines to the upper part of the head that yield an ideal starting point for the eyebrow. You can see this area in Figure 7.17.  Figure 7.17. The polygon face that's outlined is where you'll create the eye. 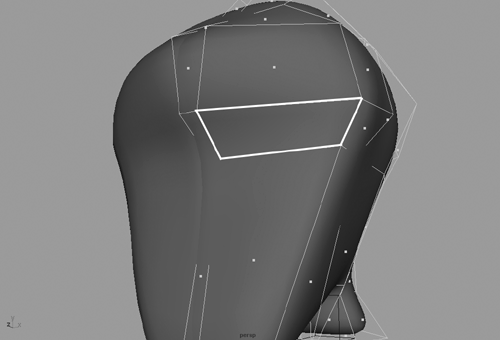 trap If you want to load the scene file noted below the CD icon, you'll have to reload the creature's front and profile sketches for the image planes.
There are a couple of methods for creating the eye socket: You can use the Bevel tool, which is faster, or use the following method, which is a little more time consuming, but is sure to work properly. As an artist, you might like using the following method because it gives you more control. What you'll do next is split the single brow polygon in a way that allows you to create a hole and add detail where needed to create the folds of the eye. -
Select the Cage object. In the Perspective view, zoom into the polygon face where you will create the eye. Select this face by right-clicking and choosing Face, and then selecting this face by clicking on the dot that appears at the center of the face you want to divide. Now choose Hotbox Edit Polygons Poke Faces. This will split the polygon into four equal triangles , as shown in Figure 7.18.  Figure 7.18. Edit Polygons Poke Faces creates an x split to start the division for the eye socket.  -
Use the Split Polygon Tool to successively split each of these four triangles in a "+" configuration. You should end up with eight faces radiating from the same middle point, as shown in Figure 7.19. Figure 7.19. This image shows the new splits; you now have eight separate edges in the original polygon face. 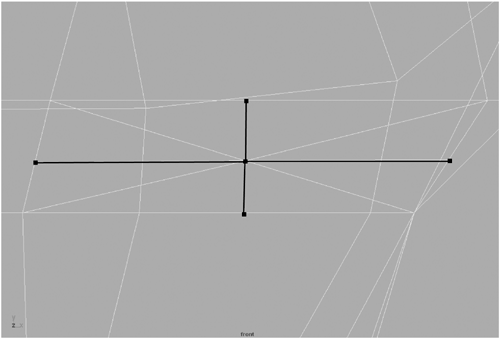 -
Next, you'll use the Split Polygon Tool to split all the edges you just created so that you can create a hole for the eye. Look at a picture of an eye for reference. A good place to position the first point is where you want the corner ( nearest the nose) of the eye to be. Activate the Split Polygon Tool, and click on the eight lines in sequence to make the hole. You should end by clicking on the same point where you began and pressing Enter to complete the split. Split the polygon faces so that you create a path of edges that resemble the basic outline of an eye socket (see Figure 7.20). Figure 7.20. By splitting the eight polygon edges, you can delete the faces within them to create a hole for the eyeball.  -
RMB-click on any edge, choose Face, and select all eight faces within the edges you just created. You should see a spot at the center of each polygonal face. You can hold the Shift key down to select each of the faces, and then press Backspace to delete them. There should now be a hole created for the eye. You can temporarily make the pCube1SmoothMesh layer visible to see how the eye hole is mirrored on the other side. -
Next, you'll extend some of the edges that were used to split the eye. To make the process a little easier, be sure to use edge snapping. Looking at Figure 7.21, you can see that splits are applied to the polygon faces that were directly next to the eye faces. Figure 7.21. Extending edges used to split the eye.  -
Next, select the border edges of the hole by RMB-clicking on an edge of the Cage object, selecting Edge (hotkey: F10 ), and then Shift+clicking on each edge until all eight are selected. With all the edges selected, use the Scale tool to proportion the hole. Depending on the character you're creating, you might want the proportions to be humanoid or something completely alien. Then translate the selection in the negative-Z direction until the edges are between the eye's outer profile edges. -
To modify and shape the eye, switch the view to X-Ray mode to see through the Smooth object's surface (Hotbox Shading Shade Options X-Ray). Then split the polygon faces between the initial eye face you split and the new hole you have. You can do this split in the same way you made the eye hole, by clicking around the perimeter to complete the oval. Then do it again so that you have two rings around the eye hole for manipulation (see Figure 7.22). These splits will give you an edge you can use to create the folds of skin around the eye. Figure 7.22. Creating the two rings of splits; the outer ring is almost complete on the right. 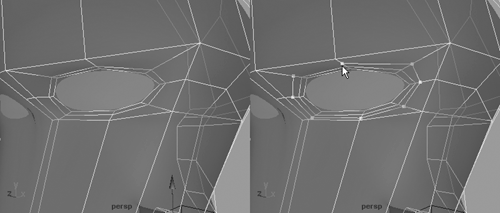 Now you'll move each of the three circles of vertices. The innermost ring will go deeper into the head to create the eyelid's rim. The middle ring will be only slightly larger than the inner ring and will be pushed less deeply into the head. The outermost ring will be pushed deeper into the head in selected areasunder and over the eyeto give the impression of eye sockets and the fatty tissue around human eyes. See Figure 7.23, which is a side cross-section of the head near the eye. Note how the eyelids are created with the two vertices of the cage nearest the eye, and the outer ring is pushed back into the head to make the eye bulge a bit. Figure 7.23. A cross-section of the head, with the Smooth object represented by the bold line and the Cage control points represented by the thinner line. 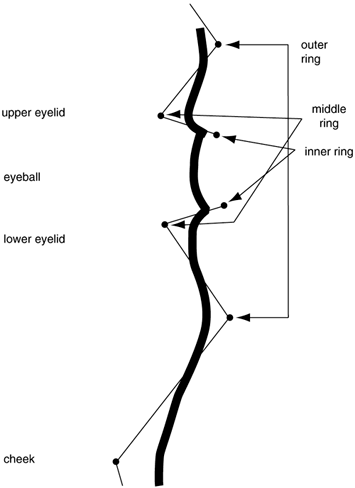 -
Shift-select each of the inner ring of eight vertex points around the eye (hotkey: F9 ), and push these vertices in the Z direction (the blue arrow of the Move transform icon) about 0.1 units. The inner ring vertices you're moving should be positioned where the eyeball will touch the eyelids. Feel free to move them around the other axes to get the best positioning. Next, to create the eyelids, adjust the middle ring vertices one at a time so that they're nearly in front of the inner ring. Finally, adjust the outer ring vertices to form the outer eye socket. Push the top and bottom center vertices of the outer ring in a bit, to form indentations in the head (see Figure 7.24). Figure 7.24. The lower-center vertex of the outer ring is being pushed back into the head to form an indentation under the eye. 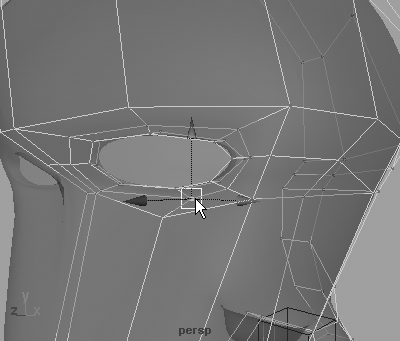 You have a basic shape for the eyelids now, but it probably doesn't resemble the final shape you want. Look at drawings, yourself, or even a friend, and compare your creature's eyelids. Tweak the eyes' components until you get the results you want. You might want to get a mirror and look at the way your eyelids are formed . Try to move the vertices around and position them to improve the eyes' shape. Don't worry about splitting more polygons for detail now because you can come back to that later. When you're finished making modifications, save your scene as HeadEyes . After you have sculpted the eyelids, you should have something that resembles Figure 7.25. Figure 7.25. The eyelids have been shaped by moving vertices to create folds for the skin. 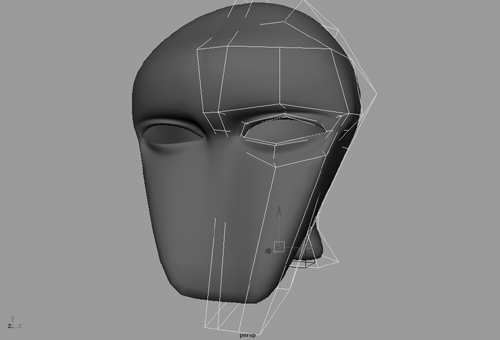 Tutorial: Creating the Mouth Continue from the previous tutorial or load the scene file listed here. To create the mouth, you have to first set up some polygon faces that can be deleted. You'll create those mouth-opening polygons by splitting the existing polygons. Using the Front and Side views, you can establish the lines for the mouth boundaries. -
Using the Split Polygon Tool, you'll split the polygon faces between the chin and the eye. Open the Tool Settings dialog box for the Split Polygon Tool, and deselect the Edge Snapping check box because some of these points will be close together, and snapping would tug your cursor to the wrong point. First, create a vertical split from under the chin that passes the corner of the mouth (identified as 1 in Figure 7.26). Next, using your reference images, split the polygons horizontally just under the upper lip, from the front of the face to the first split you created, indicated with 2 in Figure 7.26.   Figure 7.26. 1) The first vertical split that crosses the corner of the mouth. 2) The horizontal split for the mouth. 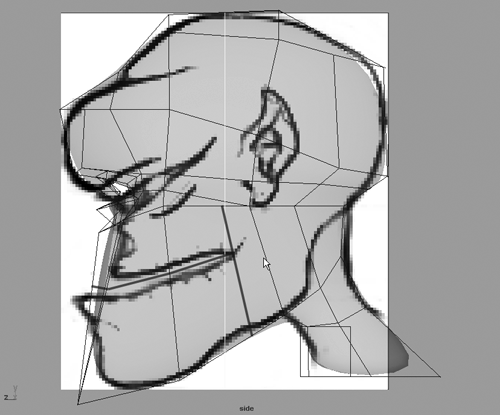 -
Next, using Figure 7.27 as a guide, split an area that encircles the horizontal mouth split created in the previous step. This split line should follow the outer edge of the upper and lower lips. Click each of the 13 points, and press Enter to complete the split. Figure 7.27. Creating a split that follows the outer perimeter of the lips. 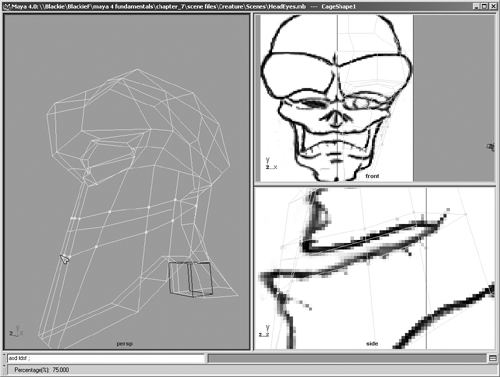 -
Next, using Figure 7.28 as a guide, you'll create a split at the top of the bottom lip. This will yield a set of polygons that can be deleted to form the opening for the mouth. Using the Split Polygon Tool as before, create a horizontal split line that goes from the front of the face to the same vertical line you stopped at for the upper lip. Figure 7.28. Creating a set of polygons to be deleted for the mouth opening.  -
To select and delete the polygon faces that make the mouth opening, RMB-click on Cage and choose Face. Then select the mouth polygons and delete them, as shown in Figure 7.29. Figure 7.29. Selecting the polygons to be deleted for the mouth. 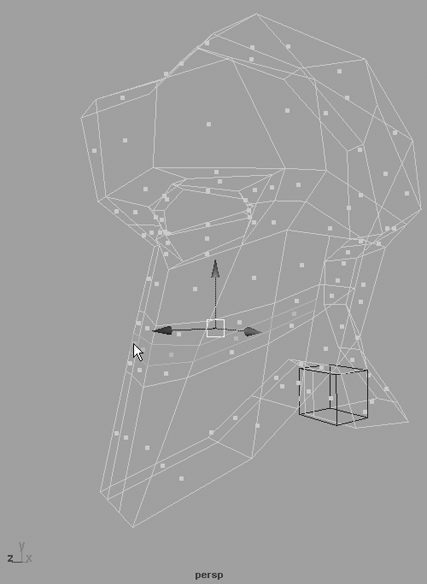 -
To make the lip lines, you'll create a horizontal split at the corner of the mouth. This gives you an anchor point for the lip splits you'll make in the next step. Split as shown in Figure 7.30. Figure 7.30. Adding a split at the corner of the mouth. 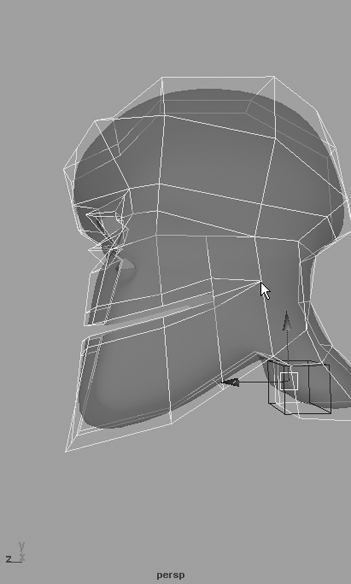 -
Now you'll add lines that enable you to create lips and other details for the mouth. You'll do this by splitting the polygons more, just as you did with the eye. Split the mouth area twice between the inner and outer lip line, and you'll have four edges to use for each lip, as shown in Figure 7.31. Figure 7.31. Splitting the lips lines twice to create detail from the resulting four edges. 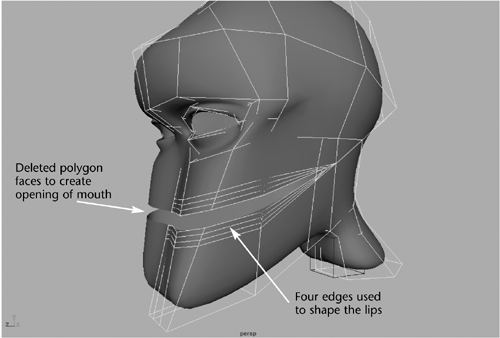 -
Using the same methods as for the eyelids, create the lips. In order, the outer lip ring will mark the starting point for the lips, the next two rings will define the lip width, and the innermost ring will be pushed into the mouth to complete the lips. See Figure 7.32 for reference. Figure 7.32. This figure illustrates what the lips will look like after moving the polygons' edges/vertices. 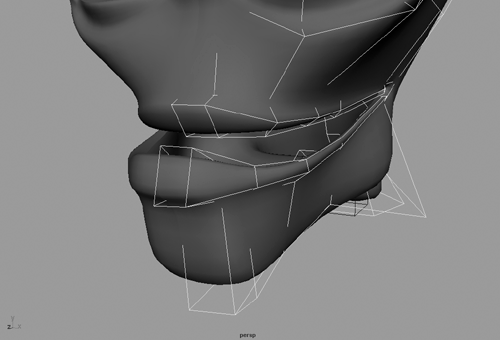 tip If you need to select a group of vertices, often it's difficult to select them all when using the typical drag box. By pressing Ctrl+q, you can enable the Lasso selection tool to draw the selection. -
As you are creating the mouth, you'll probably find that the head's shape needs to be adjusted, too. Don't hesitate to make any changes you think are necessary. For instance, the jaw might be too wide, so you could select the vertices defining that particular area and move them until they are adjusted proportionately. At the crease of the mouth, it would be best to have the edges from the top and bottom lips come to a point so that they close together when you animate the character. -
Save your scene as HeadMouth . Tutorial: Creating the Nose Continue from the previous tutorial or load the scene file listed here. Creating the nose is rather simple. It consists of several extrusions and then slight modification of the vertices. -
A polygon face is located at the center of the head right where the nose should go. RMB-click on Cage, choose Face, and select that polygon face. Perform an extrusion (Alt+x Extrude Face). Move the extruded face out just a little bit, about .1 units. You can see the amount of extrusion in values shown in the Help Line. The extrusion produces four sides around the face, and you don't want the extruded side at the symmetry line. Switch to the Selection Tool (hotkey: q ), and delete the face on the inside of the extrusion that is between the two halves of the head (see Figure 7.33).  Figure 7.33. The polygon face where the nose will go has been selected and extruded slightly. 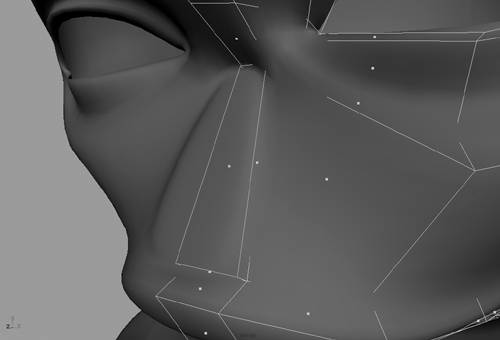 -
Next, select the new nose face and extrude once more. This time, scale the Y down a few percent (the green box handle) and move the face farther away from the head (blue arrow handle). You're building a nasal mound. Avoid scaling along the X axis because it will separate the two smoothed cubes. Delete the inner faces between the smoothed cubes that were created when you performed the extrusion.  -
Repeat Step 2 on the new polygon face. -
Select the last face and extrude once more. This time, do not move the polygon face at all; just scale it a few percent smaller along the Y axis. Also, do not delete the face between the two smoothed halves. The nasal mound is complete. -
Extrude the top face of the nasal mound one more time, and scale the face down a few percent in the Y axis again. Move the face into the head (blue arrow) to create the nasal cavity (see Figure 7.34). Figure 7.34. The polygon face at the tip of the nose extrusion has been scaled down and moved into the head. 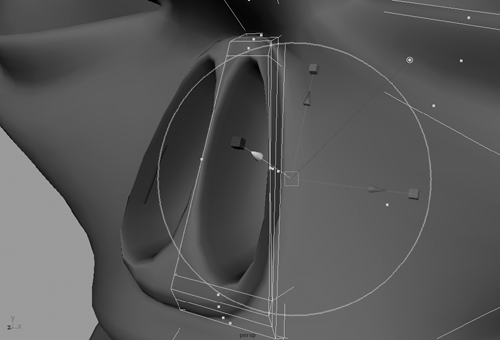 -
Switch to Vertex Selection mode (hotkey: F9 ), and move the vertices around to get the shape you want. We moved the vertices near the bottom of the nose closer to the face and the top vertices were moved farther away for the look we were after, and to avoid any conflict with the mouth opening. Tweaking the Shape of the Face As a final step, you can continue to tweak the shape of the head. You might find many areas that need vertices pulled or faces moved to better approximate the original character sketch. In this example, you can see that the brow has been pulled out to Neanderthal proportions, and the chin has been given a prominent cleft (see Figure 7.35). Figure 7.35. The creature's head has been tweaked and shaped. 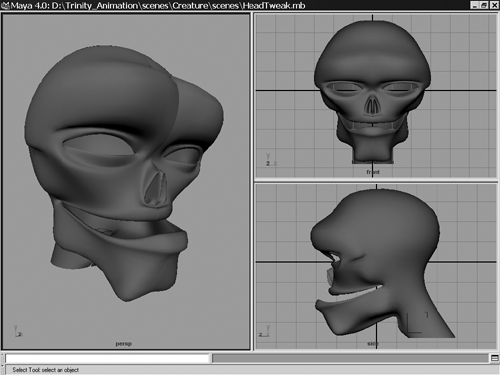 Now that you have the shape of the head well-defined , you're ready to create the eyeballs and fit them to the eye sockets. For eyes, you'll use simple spheres. Tutorial: Fitting the Eyeballs Continue from the previous tutorial or load the scene file listed here. Fitting the eyeballs to the head is just a matter of moving vertices so that the eyelids fit tightly around the sphere used for the eye. -
Create a NURBS sphere (Ctrl+z Sphere), and name it LeftEye .   -
Scale LeftEye to the size you want. Our character has large eyes like the typical "alien" of modern myths, so the Scale value for our sphere is 1.112 . Position the sphere behind the right eyelids. In the Side view, you can translate the sphere until it's almost exactly at the edges of the eyelids, as shown in Figure 7.36. Try to position the eyeball as close as possible without moving through the front of the creature's face. Figure 7.36. Placing the eye in the eye socket. 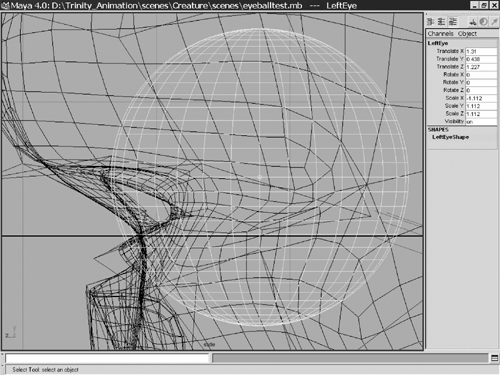 -
After you have the eye in position, you need to move vertices around the eyelid so that they fit almost perfectly on top of the left eye. The object is to eliminate any gaps between the eyelids and the eyeball. This can be a slow process, but it's necessary. You need to grab vertices and translate them so that they're almost perfectly on top of the eyeball. By zooming in close and using Shaded mode, you can detect and fix any gaps, as shown in Figure 7.37. Figure 7.37. By moving border vertices around the eyelids, you can make the eyelids look as though they're covering the eyeball. 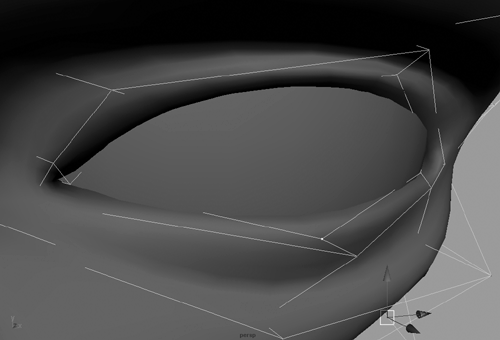 -
After you eliminate the gaps, duplicate the left eye (Hotbox Edit Duplicate option box, and then reset the settings and click the Duplicate button). Next, change the Translate X value from positive to negative for the new sphere to move it into position on the other side of the head. Name the duplicate RightEye . -
Create a new layer, name it EyesL , and assign both eyes to it. Save your scene as HeadEyeBalls . If you like, load the file noted below the CD icon to see the scene with the eyes finished. At this point, you have created the creature's head in some detail. Using a mix of repeated edits to a crude polygon cage, you have added surface detail where needed and fleshed out the facial features. As you might guess, creating the rest of the character is a similar process, combining splits, extrudes, and edits in a method that's a bit like sculpting. Best of all, you can increase or decrease the smoothness level for the actual renderable character by changing the number of divisions. This gives you fast interaction for animating the character when it's set at 1 or 0 divisions and ultra -smooth rendered surfaces, even in close-ups, when set at 2 or more divisions.  Going Further We're leaving the details of creating the rest of the creature to the CD-ROM. A detailed HTML file (noted below the CD icon), viewable in any web browser, will show you the steps of finishing the head and creating the body of the creature. After making the body, arms, and legs, as a last step you stitch the two halves together to complete the character (see Figure 7.38). After you successfully create this character in detail, you should consider creating another character, perhaps something you've drawn, and attempt to model it with polygons.  Figure 7.38. The final character after modeling the ears and teeth and adding the body.  | |