Data Binding
|
Put simply, data binding enables server controls to automatically get values or data from an expression or a data source. Data binding gives you more control over your data and helps you shorten development time of your ASP.NET projects. You can bind almost any type of data to any server control in your Web forms, even though the power of data binding is much more obvious when you are using the three data-binding controls: Repeater, DataList, and DataGrid.
The following section introduces data binding, shows an example of simple data binding with a server control, and explains a data-binding expression. Then, you will see techniques you can use to display and update data using the data- binding technique with the three Web server controls: Repeater, DataList, and DataGrid.
Introducing Data Binding
You bind data to a control using a data-binding expression of the following syntax:
<%# expression %>
Consider having a Label control whose Text property is bound to a variable. Whatever value you assign to the variable, the Label control adjusts its Text automatically. For example, Listing 6-9 binds the variable myString to a Label control named label using the following expression in the body of the Label control:
Text="<%# myString %>"
Alternatively, you can assign the DataSource property of a control to a data source or a collection, such as the following:
control.DataSource = dataSource
or as the following:
control.DataSource = anArray
However, for the actual data-binding operation to happen, you need to call the DataBind method of the control or the page. The DataBind method inherits from the System.Web.UI.Control class. It binds a data source to the invoked server control and all of its child controls. Therefore, in an ASP.NET page, for each control that needs to be bound, you can call the DataBind method of each control or the DataBind method of the Page class to bind all controls in the page (see Listing 6-9).
Listing 6-9: Simple Data Binding
<html> <head> <title>Data Binding</title> <script language="VB" runat="server"> Dim myString As String = "Hello ASP.NET" Sub Page_Load(sender As Object, e As EventArgs) ' calling the DataBind() method of the Page class ' Alternatively, you can call the DataBind method of ' the Label control. DataBind() End Sub </script> </head> <body> <asp:Label runat="server" Text="<%# myString %>" /> </body> </html>
If you run the Web form in Listing 6-9, you will see something similar to Figure 6-3.
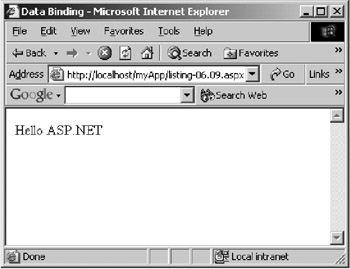
Figure 6-3: Simple data binding
Listing 6-9 illustrates the use of data binding; however, the power of data binding itself is not that apparent. This is because you can simply assign the label's Text property with the value of myString, such as the following:
<asp:Label runat="server" Text="Hello ASP.NET" />
The example in Listing 6-10 gives more reason to use data binding. In this code snippet, an array of strings is bound to a ListBox control.
Listing 6-10: Data Binding an Array to a ListBox Control
<html> <head> <title>Data Binding</title> <script language="VB" runat="server"> Dim colorArray() As String = _ {"Blue", "Pink", "Red", "Orange", "Yellow"} Sub Page_Load(sender As Object, e As EventArgs) colorListBox.DataSource = colorArray DataBind() End Sub </script> </head> <body> <form runat="server"> <asp:ListBox runat="server"/> </form> </body> </html> Figure 6-4 displays the result from Listing 6-10.
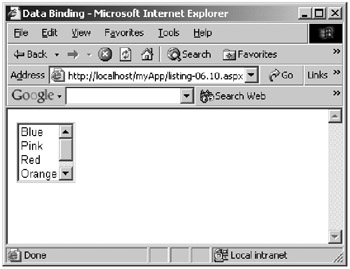
Figure 6-4: Data binding with a ListBox control
Without data binding, the code in Listing 6-10 must be rewritten as that in Listing 6-11 to add some programming to populate the ListBox control.
Listing 6-11: Populating a Control Programmatically
<html> <head> <title>Populating ListBox control programmatically </title> <script language="VB" runat="server"> Dim colorArray() As String = _ {"Blue", "Pink", "Red", "Orange", "Yellow"} Sub Page_Load(sender As Object, e As EventArgs) ' Populating the ListBox Dim itemCollection As ListItemCollection = colorListBox.Items Dim item As Object For Each item In colorArray itemCollection.Add(item) Next End Sub </script> </head> <body> <form runat="server"> <asp:ListBox runat="server"/> </form> </body> </html> Compare the amount of work you do in the Page_Load event handler of both Listing 6-10 and Listing 6-11.
Listing 6-12 shows another example. This example expands on the code in Listing 6-11. Here, the ListBox control's AutoPostBack property is set to True to immediately update the label's value.
Listing 6-12: Using AutoPostBack to Update Values
<html> <head> <title>ListBox programming</title> <script language="VB" runat="server"> Dim colorArray() As String = _ {"Blue", "Pink", "Red", "Orange", "Yellow"} Sub Page_Load(sender As Object, e As EventArgs) If Not IsPostBack Then Dim itemCollection As ListItemCollection = _ colorListBox.Items Dim item As Object For Each item In colorArray itemCollection.Add(item) Next End If End Sub Sub colorListBox_SelectedIndexChanged(sender As Object, _ e As EventArgs) message.Text = colorListBox.SelectedItem.Text End Sub </script> </head> <body> <center> <form runat="server"> <asp:ListBox runat="server" AutoPostBack="True" OnSelectedIndexChanged="colorListBox_SelectedIndexChanged" /> <p> <asp:Label runat="server"/> </form> </center> </body> </html> Listing 6-12 first populates the ListBox control using the following snippet. Note that you only need to do this once, when the page is first loaded. For subsequent requests, the state management mechanism provides the ListBox control with its previous values:
If Not IsPostBack Then Dim itemCollection As ListItemCollection = _ colorListBox.Items Dim item As Object For Each item In colorArray itemCollection.Add(item) Next End If
Note that the ListBox has its SelectedIndexChanged event connected to the colorListBox_SelectedIndexChanged event handler:
OnSelectedIndexChanged="colorListBox_SelectedIndexChanged"
The colorListBox_SelectedIndexChanged event handler updates the Text property of the Label control named message, as in the following code:
Sub colorListBox_SelectedIndexChanged(sender As Object, _ e As EventArgs) message.Text = colorListBox.SelectedItem.Text End Sub
Running the Web form in Listing 6-12 gives you the same result as Figure 6-5.
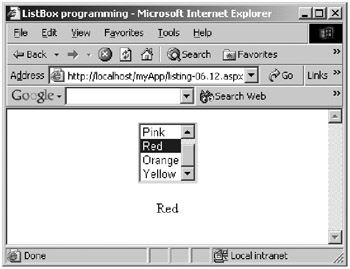
Figure 6-5: Using the SelectedIndexChanged event of the ListBox control
You can obtain the same result using data binding, as demonstrated in Listing 6-13.
Listing 6-13: Data Binding to a ListBox Control
<html> <head> <title>ListBox Data Binding</title> <script language="VB" runat="server"> Dim colorArray() As String = _ {"Blue", "Pink", "Red", "Orange", "Yellow"} Sub Page_Load(sender As Object, e As EventArgs) If Not IsPostBack Then colorListBox.DataSource = colorArray colorListBox.SelectedIndex = 0 DataBind() End If End Sub Sub colorListBox_SelectedIndexChanged(sender As Object, e As EventArgs) DataBind() End Sub </script> </head> <body> <center> <form runat="server"> <asp:ListBox runat="server" AutoPostBack="True" OnSelectedIndexChanged="colorListBox_SelectedIndexChanged" /> <p> <asp:Label runat="server" Text='<%# colorListBox.SelectedItem.Text %>' /> </form> </center> </body> </html> Now, there is no more programming to populate the ListBox control or update the Label control's Text property. You just need to call the DataBind method of the Page class.
Binding Data to the DataGrid Control
In ASP.NET the DataGrid control is the ultimate data-binding control. In addition to formatting data in a data grid, this control allows you to update data in the way that reminds you of working with a Graphical User Interface (GUI) program of a database application such as Microsoft Access. Using the DataGrid control, you can present the data in a row/column format as well as let each cell be edited. Also, a nice additional feature is the easy-to-use automatic paging.
The following two sections present two examples of how to use the DataGrid control. The first demonstrates how to do data editing. The second example demonstrates easy data paging using the DataGrid control.
Data Editing
Listing 6-14 shows how to do data editing.
Listing 6-14: Data Editing with a DataGrid Control
<%@ Import Namespace="System.Data" %> <%@ Import Namespace="System.Data.OleDb" %> <html> <head> <title>DataGrid control</title> <script language="VB" runat="server"> Dim dataView As DataView Dim sql As String = "SELECT * FROM Products" Dim connectionString As String Sub Page_Load(sender As Object, e As EventArgs) connectionString = _ "Provider=Microsoft.Jet.OLEDB.4.0;" & _ "Data Source=" & Request.PhysicalApplicationPath & _ "..\MyDb.mdb" ' Instantiate a new connection object Dim connection As New OleDbConnection(connectionString) Dim dataAdapter As New OleDbDataAdapter(sql, connection) connection.Open() Dim dataSet As New DataSet() dataAdapter.Fill(dataSet, "Products") dataView = dataSet.Tables(0).DefaultView If Not IsPostBack Then BindGrid() End If End Sub Sub BindGrid() myDataGrid.DataSource = dataView myDataGrid.DataBind() End Sub Sub myDataGrid_EditCommand(sender As Object, e As DataGridCommandEventArgs) myDataGrid.EditItemIndex = CInt(e.Item.ItemIndex) BindGrid() End Sub Sub myDataGrid_CancelCommand(sender As Object, e As DataGridCommandEventArgs) myDataGrid.EditItemIndex = -1 BindGrid() End Sub Sub myDataGrid_DeleteCommand(sender As Object, e As DataGridCommandEventArgs) Dim editItem As DataGridItem = e.Item Dim editItemIndex = CInt(editItem.ItemIndex) ' Instantiate a new connection object Dim connection As New OleDbConnection(connectionString) Dim dataAdapter As New OleDbDataAdapter() dataAdapter.SelectCommand = New OleDbCommand(sql, connection) Dim commandBuilder As OleDbCommandBuilder = _ New OleDbCommandBuilder(dataAdapter) connection.Open() Dim dataSet As New DataSet() dataAdapter.Fill(dataSet, "Products") Dim row As DataRow = dataSet.Tables("Products").Rows(editItemIndex) row.Delete() dataAdapter.Update(dataSet, "Products") connection.Close() 'Refresh dataView dataView = dataSet.Tables("Products").DefaultView myDataGrid.EditItemIndex = -1 BindGrid() End Sub Sub myDataGrid_UpdateCommand(sender As Object, e As DataGridCommandEventArgs) Dim editItem As DataGridItem = e.Item Dim editItemIndex = CInt(editItem.ItemIndex) ' Instantiate a new connection object Dim connection As New OleDbConnection(connectionString) Dim dataAdapter As New OleDbDataAdapter() dataAdapter.SelectCommand = New OleDbCommand(sql, connection) Dim commandBuilder As OleDbCommandBuilder = _ New OleDbCommandBuilder(dataAdapter) connection.Open() Dim dataSet As New DataSet() dataAdapter.Fill(dataSet, "Products") Dim row As DataRow = dataSet.Tables("Products").Rows(editItemIndex) Dim priceTextBox As TextBox = CType(e.Item.Cells(1).Controls(0), TextBox) Try Dim newPrice As Decimal = CDec(priceTextBox.Text) row("Price") = newPrice dataAdapter.Update(dataSet, "Products") Catch ex As Exception End Try connection.Close() 'Refresh dataView dataView = dataSet.Tables("Products").DefaultView myDataGrid.EditItemIndex = -1 BindGrid() End Sub </script> </head> <body> <center> <form runat="server"> <asp:DataGrid runat="server" BorderColor="black" BorderWidth="1" CellPadding="3" Font-Name="Verdana" Font-Size="8pt" OnEditCommand="myDataGrid_EditCommand" OnCancelCommand="myDataGrid_CancelCommand" OnUpdateCommand="myDataGrid_UpdateCommand" OnDeleteCommand="myDataGrid_DeleteCommand" AllowSorting="True" AutoGenerateColumns="false"> <HeaderStyle BackColor="#aaaadd" ForeColor="white"/> <EditItemStyle BackColor="yellow"/> <Columns> <asp:BoundColumn HeaderText="Product Name" ReadOnly="True" DataField="Name" /> <asp:BoundColumn HeaderText="Price" ReadOnly="False" DataField="Price"> <ItemStyle HorizontalAlign="Right"/> </asp:BoundColumn> <asp:EditCommandColumn EditText="Edit" CancelText="Cancel" UpdateText="Update" HeaderText="Edit Price"> <ItemStyle Wrap="false"/> <HeaderStyle Wrap="false"/> </asp:EditCommandColumn> <asp:ButtonColumn HeaderText="Delete Item" ButtonType="LinkButton" Text="Delete" CommandName="Delete" /> </Columns> </asp:DataGrid> </form> </center> </body> </html> The DataGrid control in Listing 6-14 contains four columns. The first two columns are bound columns, the first of which is bound to the Name column of the Products table and the second to the Price column of the Products table. The third column contains an EditCommandColumn, and the fourth contains a ButtonColumn, which acts as a Delete button. Each bound column that cannot be changed is marked by its ReadOnly property set to True:
ReadOnly="True"
Figure 6-6 shows the DataGrid control. Note especially the EditCommandColumn.
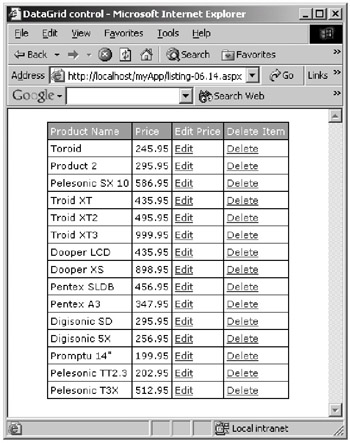
Figure 6-6: The DataGrid control
When a user clicks the Edit command button, the command is automatically replaced by two buttons: an Update button and a Cancel button, as shown in Figure 6-7. Therefore, you have four types of button: Edit, Delete, Cancel, and Update. You click the Edit button when you want to edit an item. Then, after you edit an item, you can either click the Cancel or Update button to cancel the change or make it permanent. The Delete button deletes an item.
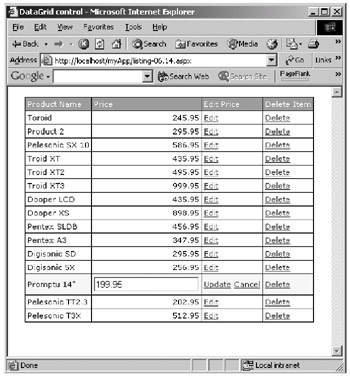
Figure 6-7: The DataGrid control with Update and Cancel buttons
These four buttons invoke the four event handlers as defined in the DataGrid control:
OnEditCommand="myDataGrid_EditCommand" OnCancelCommand="myDataGrid_CancelCommand" OnUpdateCommand="myDataGrid_UpdateCommand" OnDeleteCommand="myDataGrid_DeleteCommand"
The myDataGrid_EditCommand event handler sets the EditItemIndex property. A value of −1 specifies that no item is selected. Specifying a zero or a positive integer to this property makes the item selected. The Edit button for that item will be replaced by the Cancel and Update buttons:
Sub myDataGrid_EditCommand(sender As Object, e As DataGridCommandEventArgs) myDataGrid.EditItemIndex = CInt(e.Item.ItemIndex) BindGrid() End Sub
Clicking the Cancel button cancels the selection by setting the EditItemIndex property to −1:
Sub myDataGrid_CancelCommand(sender As Object, e As DataGridCommandEventArgs) myDataGrid.EditItemIndex = -1 BindGrid() End Sub
The myDataGrid_DeleteCommand and myDataGrid_UpdateCommand event handlers delete an item and update the change to the data source.
Data Paging Using the DataGrid Control
This section illustrates how to use automatic paging with a DataGrid control. To use automatic paging, you need to do two things:
-
Set the AllowPaging property of the DataGrid control to True, and optionally specify the PageSize property:
AllowPaging="True" PageSize="8"
The PageSize property specifies the number of items in one page. If the PageSize property is not set, the default size of 10 is used.
-
Write an event handler for the PageIndexChanged event of the DataGrid control. The purpose of having this event handler is to set the CurrentPageIndex so that the DataGrid control displays the selected page. In this example, the PageIndexChanged is connected to the myDataGrid_PageIndexChanged event handler as follows:
Sub myDataGrid_PageIndexChanged(sender As Object, _ e As DataGridPageChangedEventArgs) myDataGrid.CurrentPageIndex = e.NewPageIndex BindGrid() End Sub
Listing 6-15 gives the code for such a DataGrid control.
Listing 6-15: Data Paging with a DataGrid Control
<%@ Import Namespace="System.Data" %> <%@ Import Namespace="System.Data.OleDb" %> <html> <head> <title>DataGrid control</title> <script language="VB" runat="server"> Dim dataView As DataView Sub Page_Load(sender As Object, e As EventArgs) Dim connectionString As String = _ "Provider=Microsoft.Jet.OLEDB.4.0;" & _ "Data Source=" & Request.PhysicalApplicationPath & _ "..\MyDb.mdb" Dim sql As String = "SELECT * FROM Products" ' Instantiate a new connection object Dim connection As New OleDbConnection(connectionString) Dim dataAdapter As New OleDbDataAdapter(sql, connection) connection.Open() Dim dataSet As New DataSet() dataAdapter.Fill(dataSet, "Products") dataView = dataSet.Tables(0).DefaultView If Not IsPostBack Then BindGrid() End If End Sub Sub BindGrid() myDataGrid.DataSource = dataView myDataGrid.DataBind() End Sub Sub myDataGrid_EditCommand(sender As Object, e As DataGridCommandEventArgs) myDataGrid.EditItemIndex = CInt(e.Item.ItemIndex) BindGrid() End Sub Sub MyDataGrid_PageIndexChanged(sender As Object, _ e As DataGridPageChangedEventArgs) myDataGrid.CurrentPageIndex = e.NewPageIndex BindGrid() End Sub </script> </head> <body> <center> <form runat="server"> <asp:DataGrid runat="server" BorderColor="black" BorderWidth="1" CellPadding="3" Font-Name="Verdana" Font-Size="8pt" AllowSorting="True" AllowPaging="True" PageSize="8" OnPageIndexChanged="myDataGrid_PageIndexChanged" AutoGenerateColumns="false"> <HeaderStyle BackColor="#aaaadd" ForeColor="white"/> <PagerStyle Mode="NumericPages" HorizontalAlign="Right"/> <EditItemStyle BackColor="yellow"/> <Columns> <asp:BoundColumn HeaderText="Product Name" ReadOnly="True" DataField="Name" /> <asp:BoundColumn HeaderText="Price" ReadOnly="False" DataField="Price"> <ItemStyle HorizontalAlign="Right"/> </asp:BoundColumn> </Columns> </asp:DataGrid> <asp:Label runat="server"/> </form> </center> </body> </html>
Figure 6-8 shows the result of the code in Listing 6-15.
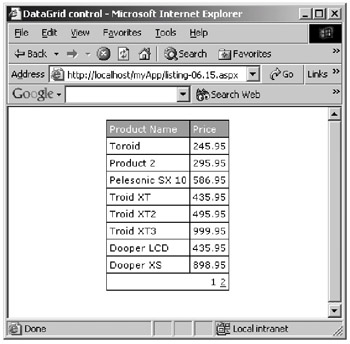
Figure 6-8: Automatic paging with a DataGrid control
Note that the DataGrid control defines a PagerStyle property for the pager. Its Mode attribute can have one of the two possible values: NumericPages and NextPrev (default). With the first, a pager with numbered buttons accesses pages directly. With NextPrev, a pager with Previous and Next buttons accesses the next and previous pages.
|
EAN: 2147483647
Pages: 82