| Ever since NetWare 4.0 was first released, administrators have suggested to Novell that it would be nice to be able to set up password administration in NDS without having to grant rights that enable modification of other parts of the User object or tree. Many solutions have been created to solve this need. For example, Novell's own Developer Support group developed a sample utility, called Change Password Service (developer.novell.com/support/sample/tids/chpasswd/chpasswd.htm), that involved setting up an NLM on the server and building a custom snap-in for NetWare Administrator that communicated the password change to the server. In order to change a user's password without knowing the current password, you needed to have Write rights to the User object's ACL attribute. As a result, many companies resorted to granting help desk Write access to the ACL attribute of every single User object in the tree ”a very long and tedious process. The idea behind using this method was that the password administrators could damage users only if they knew that they could grant themselves additional rights to the User object. This sort of security through obscurity works, but it is dangerous because it leaves the door wide open for those who know what they are doing. REAL WORLD: The Danger of Having Write Access to the ACL Attribute Someone having Write access to another object's ACL attribute is equivalent to having Supervisor rights over the target object. The ACL attribute is where the object trustee information is stored. If you can write to it, you can add a trustee entry, granting yourself Supervisor rights to the object. Therefore, many companies have opted not to grant Write access to users' ACL attributes simply for password management purposes. Instead, they use a third-party solution that employs a proxy user. This limits the risk exposure of the help desk making erroneous modifications. |
However, in order to achieve the desired goal without purchasing an additional product, this method of granting rights was the only way to solve the problem ”until NetWare 5 shipped. With the release of NetWare 5, Novell introduced two features to make setting up help desks a simpler task. The first feature is pseudo-attributes that can be used to grant rights to change passwords and reset intruder lockouts. The second feature is one we have already discussed ”the capability to set rights on a container and make those rights inheritable through the tree. By using these two new features, it is now possible to set up password administration for the entire tree with just a few mouse clicks in NetWare Administrator. To set this up in a tree, you can create a group called Password_Admins . This group is going to be granted rights to set passwords and reset intruder lockouts on accounts through the tree. As Figure 15.23 shows, you start by adding this group to the trustees list. Figure 15.23. Granting the Password_Admins group rights to change passwords in the tree. 
You need to select the Selected Properties item and scroll down to the Password Management attribute. Next, you grant Supervisor rights and check the Inheritable box. Then you find the Reset Intruder Lockout attribute. Next, you check the Supervisor and Inheritable boxes, just as you did with the Password Management attribute. When this is set up, all you need to do is add your help desk staff to the Password_Admins group, and they will be able to change passwords and reset intruder detection. TIP For most help desk administration tasks , rights should be granted to the following attributes: | Locked by Intruder | Password Allow Change | | Login Grace Remaining | Password Expiration Time | | Login Grace Limit | Password Minimum Length | | Login Intruder Attempts | Password Required | | Login Intruder Address | Password Unique Required | | Login Intruder Reset Time | Password Management | | Password Expiration Interval | | You might want to ensure that the following attributes are not under the control of the help desk because these settings should be part of your standard security policy and should not be changeable by non-administrators: Intruder Attempt Reset Interval Intruder Lockout Reset Interval Lockout After Detection Refer to the following TIDs for the minimum DS rights required for specific help desk “ related tasks: -
TID #10051803 ” NDS for NT user passwords and login settings -
TID #10084860 ” Novell Account Management (NAM) 2.1 for Windows 2000 -
TID #10016467 ” Remote control of a workstation in ZENworks -
TID #10057330 ” Managing group memberships -
TID #2949136 ” Reset intruder lockouts -
TID #10011322 ” Minimum rights for a GroupWise administrator -
TID #10015319 ” Password management in NetWare 5 and higher -
TID #10068330 ” Check file system effective rights -
TID #10067797 ” Reset grace logins
NOTE The password administration feature was first introduced in NetWare 5. In order for it to function correctly, all servers in the tree must be running NetWare 5 and higher. NetWare 4.11 servers running DS.NLM 5.99a or later and NetWare 4.10 servers running DS.NLM 5.12 or later will pass the Inheritable attributes on but do not evaluate, and therefore act on, the security properly for rights flagged as Inheritable . Therefore, if your tree still has NetWare 4 servers, the password administrator's workstation must be attached to a non-NetWare 4 server as its primary connection.
Earlier in this chapter, we talked about protecting administrative accounts. Part of that process was not enabling users with less administrative authority than an account to change administrative account passwords. With this setup, how do you accomplish this? To start with, the Password_Admins group rights should be granted at the organizational level and not at the [Root] level. This prevents the Password_Admins group from automatically being able to change the Admin user's password. This works well if the administrative accounts are all located in other organizations in the tree (as is the case in this example). If they are mixed in with the typical user accounts, though, this is not going to work. Let's look at what happens if we set up an IRF on the Admin account that specifically blocks rights to the Password Management attribute. The default right users have to other objects is Browse object rights, and you only granted the Password_Admins group Supervisor rights to the attribute, so all you need to do is block the Supervisor right to the attribute on the Admin user. TIP To place an IRF on pseudo-attributes such as Password Management , you need to use ConsoleOne instead of NetWare Administrator.
A quick check of the Password_Admins group's effective rights to the Admin user reveals the results in Figure 15.24. As you can see in this figure, with the IRF in place, Password_Admins can no longer modify the Admin password. Figure 15.24. The results of checking the Password_Admins group's effective rights to the Admin user's Password Management attribute after setting up the IRF. 
When users want call a help desk for assistance with logging in, there might be a second item that they need the help desk to fix: the number of grace logins. Intruder detection can lock an account out, but so can using up all your grace logins. Help desk staff should be able change the number of grace logins. To set this up, all you need to do is set the Write rights to the Remaining Grace Logins attribute. When you also check the Inheritable option, this item only needs to be set at the container level, and the rights will be inherited for all objects not explicitly blocked with an IRF. As mentioned at the beginning of this section, many password-management solutions use a proxy user. This simplifies rights assignment. In addition, these third-party solutions generally provide a GUI front-end that is a lot easier to use than NetWare Administrator or ConsoleOne ”and loads much faster, too. Many of these applications also provide options to protect certain users' passwords from being changed. Figure 15.25 shows one such example, NDS Admin want (www.dreamlan.com/ndsadmin.htm). Figure 15.25. Excluding Admin and selected users from being managed by the help desk. 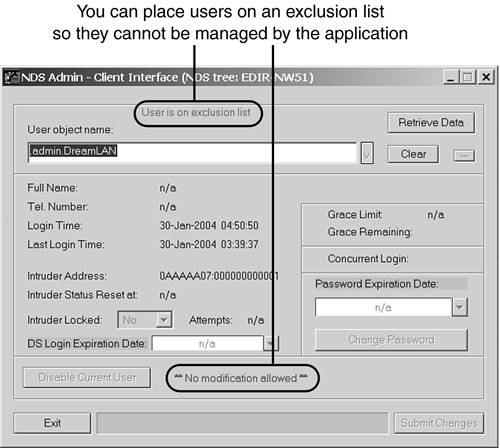
Using RBS You may be wondering why you need to bother with the manual process of setting up security when you can simply use Role-Based Services (RBS). Let's quickly overview RBS. With the introduction of iManager as the direction for a Web-based management tool, a functionality called RBS was introduced. The concept behind RBS is that you have the ability to assign specific responsibilities to users (say, your help desk) and to present them with only the tools (and the accompanying DS rights) necessary to perform those sets of responsibilities and those sets only. For instance, the Help Desk role allows the user to only reset intruder lockouts, create users, reset passwords, and nothing more. RBS allows you to focus the user on a specified set of functions (such as reset intruder lockouts and reset passwords), called tasks . One or more tasks can be grouped together and form a role (such as Help Desk). What a user sees then when he or she accesses iManager is based on his or her role assignments stored in eDirectory. Only the tasks assigned to that user are displayed (see Figures 15.26 and 15.27). The iManager plug-in for that task presents the necessary tools and interface to perform the task. You can assign multiple roles to a single user. You can also assign the same role to multiple users. Figure 15.26. Giving Admin access to all roles and tasks. 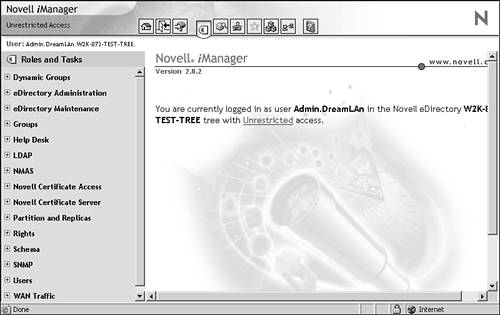
Figure 15.27. Giving Users access to only the roles and tasks you have assigned to them. 
You can either use the existing roles or define additional custom RBS roles based on your organization's needs. After you have created the desired roles, you can assign members to each role. In doing so, you also specify the scope (the starting NDS container or context) in which each member can exercise the functions of the role. A user can be assigned to a role in one or more of the following ways: -
By direct association. -
Through group and dynamic group assignments. If a user is a member of a group or a dynamic group that is assigned to a role, the user has access to the role. -
Through organizational role assignments. If a user is an occupant of an organizational role that is assigned a role, the user has access to the role. -
Through container assignment. A User object has access to all the roles to which its parent container is assigned. This could also include other containers, up to the root of the tree. Therefore, instead of having to go through the steps presented earlier to assign individual rights necessary for a user to perform a specific task, you just use the following simple steps to accomplish the same result by creating role associations and scope assignments: - In iManager, click the Configure button (see Figure 15.28).
Figure 15.28. Modifying iManager role assignments. 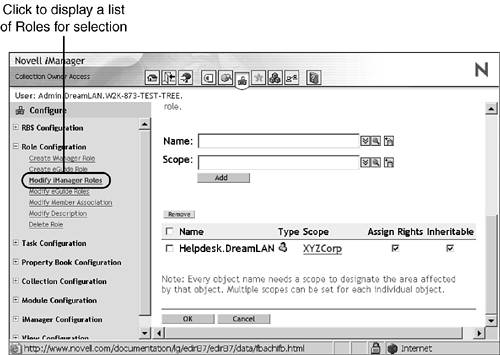
- Click Modify iManager Roles under Role Configuration.
- Click the Modify Members button to the left of the role you want to modify.
- To add an association to the role, specify the full distinguished name of the object (which can be a user, a group, an organizational role, or a container) in the Name field; you can use the Browse button to the right of the field to locate the object. Fill in the Scope field with a container name ; you can also use the Browse button for this.
- Click Add and then click OK.
To remove a role association, you check the box to the left of the listed name(s), click Remove, and then click OK. NOTE For more information about setting up and configuring RBS , refer to the "Managing Objects" section in the eDirectory Administration Guide.
TIP The URL for iManager is https ://ip_address_or_hostname/nps/ iManager.html , and the login requires you to use the LDAP syntax (that is, cn= username ,ou= org_unit ,o= org ) and not the NDS FDN syntax.
On the surface, RBS seems to be the ultimate solution to a security nightmare ”giving help desk users only what they need and not too much, with just a few simple clicks. By defining custom roles and tasks, you can present the exact list of tasks for your help desk users to utilize. However, there is a security loophole that is often overlooked. When you associate a user to a RBS role, the user is granted the necessary DS rights to perform the tasks even when he or she is not logged in to iManager! Here is what happens when you add a user to an RBS role, using the example shown in Figure 15.28: -
User Helpdesk.DreamLAN is added to the Help Desk role with the scope set to O=XYZCorp . -
An rbsScope2 object called XYZCorp is created under the Help Desk Management.Role Based Service 2 container. -
The rbsScope2 object is made a trustee of the scope container ( O=XZYCorp in this case) and granted the necessary rights for the various tasks defined for the Help Desk role (see Figure 15.29). Figure 15.29. DS rights assigned by the Help Desk RBS role. 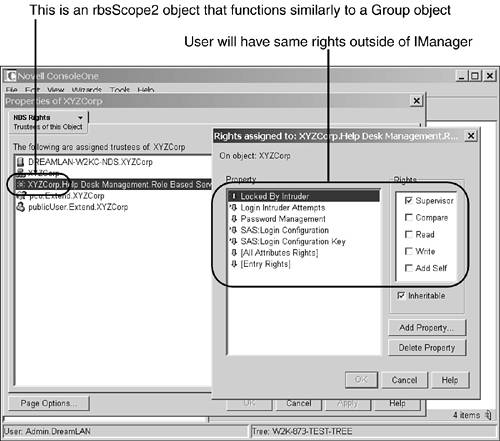
-
The user Helpdesk.DreamLAN is made an rbsMember object of the rbsScope2 object and is made the security equivalent to the rbsScope2 object. All this happens at the eDirectory level, and the assignments are static. This means that Helpdesk.DreamLAN has all these DS rights, even when not using iManager. Therefore, the user can use other management utilities, such as ConsoleOne, to perform additional tasks that are allowed by his or her DS rights but not when using iManager ”not because he or she doesn't have the necessary rights but because iManager didn't have these additional capabilities listed as available tasks. Consider this scenario: The default Help Desk RBS role allows the associated users to create users but not delete users. However, as you recall from the discussion about default ACL templates in Chapter 2, "eDirectory Basics," because of the default ACL template defined for the Top class, the object that creates another object has full control (Supervisor rights) over the created object. This means that although the Help Desk role users will not be able to delete users they created using iManager (because it does not give them the option), they can delete these User objects by using another tool, such as ConsoleOne. Consequently, you must take care when using RBS roles to delegate network management responsibilities. WARNING Many administrators took RBS at its face value: "If iManager doesn't allow a certain task for a role, then it can't be performed by members of that role ”at all. Therefore, it locks down security assignments." You've seen from the preceding discussion that this perception is inaccurate. Therefore, it is important for you to understand what goes on behind the scene of RBS , especially in regard to the DS rights that are assigned for the different roles.
TIP You should use some form of auditing (such as NNA, discussed earlier in this chapter), even just for a short period of time, to ensure that there are no unexpected security weaknesses while using RBS roles.
Because RBS role assignments are based on scopes (DS contexts), you should place your administrative users in containers that are not managed by your typical help desk roles to ensure that these users do not get modified accidentally . You should take the precautions and steps outlined earlier to protect your administrative users. RBS is an excellent tool when used with the right expectation and maintenance. Because it is a Web-based application, its performance and functioning are heavily dependent on a number of factors: -
A working Web server, such as Apache. -
A working Tomcat servlet engine. ( Servlets are protocol- and platform-independent server-side components , or programs, that are used to extend the server's functionality. They are the server-side counterparts to applets , which are software that adds functionality to a client.) -
A functioning Java installation. -
A working LDAP server (which Tomcat uses), such as for authentication purposes. -
A working SSL/TSL certificate. If any one of these components required by iManager fails, iManager will stop functioning. Therefore, you should not rely on iManager as your sole management platform, and you should have your staff also trained in using other tools, such as ConsoleOne. |