DIBs and the CDib Class
There's an MFC class for GDI bitmaps (CBitmap), but there's no MFC class for DIBs. Don't worry—I'm giving you one here. It's a complete rewrite of the CDib class from the early editions of this book (prior to the fourth edition), and it takes advantage of Win32 features such as memory-mapped files, improved memory management, and DIB sections. It also includes palette support. Before you examine the CDib class, however, you need a little background on DIBs.
A Few Words About Palette Programming
Windows palette programming is quite complex, but you've got to deal with it if you expect your users to run their displays in the 8-bpp (bits per pixel) mode—and many users will if they have video cards with 1 MB or less of memory.
Suppose you're displaying a single DIB in a window. First you must create a logical palette, a GDI object that contains the colors in the DIB. Then you must "realize" this logical palette into the hardware system palette, a table of the 256 colors the video card can display at that instant. If your program is the foreground program, the realization process tries to copy all your colors into the system palette, but it doesn't touch the 20 standard Windows colors. For the most part, your DIB looks just like you want it to look.
But what if another program is the foreground program, and what if that program has a forest scene DIB with 236 shades of green? Your program still realizes its palette, but something different happens this time. Now the system palette won't change, but Windows sets up a new mapping between your logical palette and the system palette. If your DIB contains a neon pink color, for example, Windows maps it to the standard red color. If your program forgot to realize its palette, your neon pink stuff would turn green when the other program went active.
The forest scene example is extreme because we assumed that the other program grabbed 236 colors. If instead the other program realized a logical palette with only 200 colors, Windows would let your program load 36 of its own colors, including, one hopes, neon pink.
So when is a program supposed to realize its palette? The Windows message WM_PALETTECHANGED is sent to your program's main window whenever a program, including yours, realizes its palette. Another message, WM_QUERYNEWPALETTE, is sent whenever one of the windows in your program gets the input focus. Your program should realize its palette in response to both these messages (unless your program generated the message). These palette messages are not sent to your view window, however. You must map them in your application's main frame window and then notify the view. Chapter 13 discusses the relationship between the frame window and the view, and Chapter 26 contains a complete palette-aware MDI application (EX26A).
You call the Win32 RealizePalette function to perform the realization, but first you must call SelectPalette to select your DIB's logical palette into the device context. SelectPalette has a flag parameter that you normally set to FALSE in your WM_PALETTECHANGED and WM_QUERYNEWPALETTE handlers. This flag ensures that your palette is realized as a foreground palette if your application is indeed running in the foreground. If you use a TRUE flag parameter here, you can force Windows to realize the palette as though the application were in the background.
You must also call SelectPalette for each DIB that you display in your OnDraw function. This time you call it with a TRUE flag parameter. Things do get complicated if you're displaying several DIBs, each with its own palette. Basically, you've got to choose a palette for one of the DIBs and realize it (by selecting it with the FALSE parameter) in the palette message handlers. The chosen DIB will end up looking better than the other DIBs. There are ways of merging palettes, but it might be easier to go out and buy more video memory.
DIBs, Pixels, and Color Tables
A DIB contains a two-dimensional array of elements called pixels. In many cases, each DIB pixel will be mapped to a display pixel, but the DIB pixel might be mapped to some logical area on the display, depending on the mapping mode and the display function stretch parameters.
A pixel consists of 1, 4, 8, 16, 24, or 32 contiguous bits, depending on the color resolution of the DIB. For 16-bpp, 24-bpp, and 32-bpp DIBs, each pixel represents an RGB color. A pixel in a 16-bpp DIB typically contains 5 bits each for red, green, and blue values; a pixel in a 24-bpp DIB has 8 bits for each color value. The 16-bpp and 24-bpp DIBs are optimized for video cards that can display 65,536 or 16.7 million simultaneous colors.
A 1-bpp DIB is a monochrome DIB, but these DIBs don't have to be black and white—they can contain any two colors chosen from the color table that is built into each DIB. A monochrome bitmap has two 32-bit color table entries, each containing 8 bits for red, green, and blue values plus another 8 bits for flags. Zero (0) pixels use the first entry, and one (1) pixel uses the second. Whether you have a 65,536-color video card or a 16.7-million-color card, Windows can display the two colors directly. (Windows truncates 8-bits-per-color values to 5 bits for 65,536-color displays.) If your video card is running in 256-color palettized mode, your program can adjust the system palette to load the two specified colors.
Eight-bpp DIBs are quite common. Like a monochrome DIB, an 8-bpp DIB has a color table, but the color table has 256 (or fewer) 32-bit entries. Each pixel is an index into this color table. If you have a palettized video card, your program can create a logical palette from the 256 entries. If another program (running in the foreground) has control of the system palette, Windows does its best to match your logical palette colors to the system palette.
What if you're trying to display a 24-bpp DIB with a 256-color palettized video card? If the DIB author was nice, he or she included a color table containing the most important colors in the DIB. Your program can build a logical palette from that table, and the DIB will look fine. If the DIB has no color table, use the palette returned by the Win32 CreateHalftonePalette function; it's better than the 20 standard colors you'd get with no palette at all. Another option is to analyze the DIB to identify the most important colors, but you can buy a utility to do that.
The Structure of a DIB Within a BMP File
You know that the DIB is the standard Windows bitmap format and that a BMP file contains a DIB. So let's look inside a BMP file to see what's there. Figure 11-1 shows a layout for a BMP file.
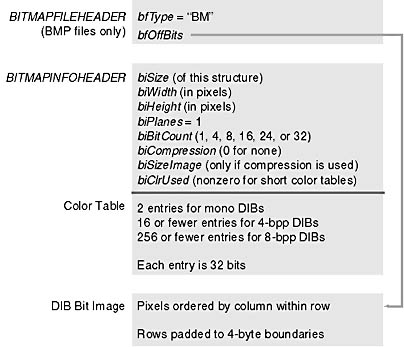
Figure 11-1. The layout for a BMP file.
The BITMAPFILEHEADER structure contains the offset to the image bits, which you can use to compute the combined size of the BITMAPINFOHEADER structure and the color table that follows. The BITMAPFILEHEADER structure contains a file size member, but you can't depend on it because you don't know whether the size is measured in bytes, words, or double words.
The BITMAPINFOHEADER structure contains the bitmap dimensions, the bits per pixel, compression information for both 4-bpp and 8-bpp bitmaps, and the number of color table entries. If the DIB is compressed, this header contains the size of the pixel array; otherwise, you can compute the size from the dimensions and the bits per pixel. Immediately following the header is the color table (if the DIB has a color table). The DIB image comes after that. The DIB image consists of pixels arranged by column within rows, starting with the bottom row. Each row is padded to a 4-byte boundary.
The only place you'll find a BITMAPFILEHEADER structure, however, is in a BMP file. If you get a DIB from the clipboard, for example, there will not be a file header. You can always count on the color table to follow the BITMAPINFOHEADER structure, but you can't count on the image to follow the color table. If you're using the CreateDIBSection function, for example, you must allocate the bitmap info header and color table and then let Windows allocate the image somewhere else.
This chapter and all the associated code are specific to Windows DIBs. There's also a well-documented variation of the DIB format for OS/2. If you need to process these OS/2 DIBs, you'll have to modify the CDib class.
DIB Access Functions
Windows supplies some important DIB access functions. None of these functions is wrapped by MFC, so you'll need to refer to the online Win32 documentation for details. Here's a summary:
- SetDIBitsToDevice—This function displays a DIB directly on the display or printer. No scaling occurs; one bitmap bit corresponds to one display pixel or one printer dot. This scaling restriction limits the function's usefulness. The function doesn't work like BitBlt because BitBlt uses logical coordinates.
- StretchDIBits—This function displays a DIB directly on the display or printer in a manner similar to that of StretchBlt.
- GetDIBits—This function constructs a DIB from a GDI bitmap, using memory that you allocate. You have some control over the format of the DIB because you can specify the number of color bits per pixel and the compression. If you are using compression, you have to call GetDIBits twice—once to calculate the memory needed and again to generate the DIB data.
- CreateDIBitmap—This function creates a GDI bitmap from a DIB. As for all these DIB functions, you must supply a device context pointer as a parameter. A display device context will do; you don't need a memory device context.
- CreateDIBSection—This Win32 function creates a special kind of DIB known as a DIB section. It then returns a GDI bitmap handle. This function gives you the best features of DIBs and GDI bitmaps. You have direct access to the DIB's memory, and with the bitmap handle and a memory device context, you can call GDI functions to draw into the DIB.
The CDib Class
If DIBs look intimidating, don't worry. The CDib class makes DIB programming easy. The best way to get to know the CDib class is to look at the public member functions and data members. Figure 11-2 shows the CDib header file. Consult the ex11c folder on the companion CD-ROM to see the implementation code.
| CDIB.H #ifndef _INSIDE_VISUAL_CPP_CDIB #define _INSIDE_VISUAL_CPP_CDIB class CDib : public CObject { enum Alloc {noAlloc, crtAlloc, heapAlloc}; // applies to BITMAPINFOHEADER DECLARE_SERIAL(CDib) public: LPVOID m_lpvColorTable; HBITMAP m_hBitmap; LPBYTE m_lpImage; // starting address of DIB bits LPBITMAPINFOHEADER m_lpBMIH; // buffer containing the // BITMAPINFOHEADER private: HGLOBAL m_hGlobal; // for external windows we need to free; // could be allocated by this class or // allocated externally Alloc m_nBmihAlloc; Alloc m_nImageAlloc; DWORD m_dwSizeImage; // of bits—not BITMAPINFOHEADER // or BITMAPFILEHEADER int m_nColorTableEntries; HANDLE m_hFile; HANDLE m_hMap; LPVOID m_lpvFile; HPALETTE m_hPalette; public: CDib(); CDib(CSize size, int nBitCount); // builds BITMAPINFOHEADER ~CDib(); int GetSizeImage() {return m_dwSizeImage;} int GetSizeHeader() {return sizeof(BITMAPINFOHEADER) + sizeof(RGBQUAD) * m_nColorTableEntries;} CSize GetDimensions(); BOOL AttachMapFile(const char* strPathname, BOOL bShare = FALSE); BOOL CopyToMapFile(const char* strPathname); BOOL AttachMemory(LPVOID lpvMem, BOOL bMustDelete = FALSE, HGLOBAL hGlobal = NULL); BOOL Draw(CDC* pDC, CPoint origin, CSize size); // until we implement CreateDibSection HBITMAP CreateSection(CDC* pDC = NULL); UINT UsePalette(CDC* pDC, BOOL bBackground = FALSE); BOOL MakePalette(); BOOL SetSystemPalette(CDC* pDC); BOOL Compress(CDC* pDC, BOOL bCompress = TRUE); // FALSE means decompress HBITMAP CreateBitmap(CDC* pDC); BOOL Read(CFile* pFile); BOOL ReadSection(CFile* pFile, CDC* pDC = NULL); BOOL Write(CFile* pFile); void Serialize(CArchive& ar); void Empty(); private: void DetachMapFile(); void ComputePaletteSize(int nBitCount); void ComputeMetrics(); }; #endif // _INSIDE_VISUAL_CPP_CDIB |
Here's a rundown of the CDib member functions, starting with the constructors and the destructor:
- Default constructor—You'll use the default constructor in preparation for loading a DIB from a file or for attaching to a DIB in memory. The default constructor creates an empty DIB object.
- DIB section constructor—If you need a DIB section that is created by the CreateDIBSection function, use this constructor. Its parameters determine DIB size and number of colors. The constructor allocates info header memory but not image memory. You can also use this constructor if you need to allocate your own image memory.
| Parameter | Description |
| size | CSize object that contains the width and height of the DIB |
| nBitCount | Bits per pixel; should be 1, 4, 8, 16, 24, or 32 |
- Destructor—The CDib destructor frees all allocated DIB memory.
- AttachMapFile—This function opens a memory-mapped file in read mode and attaches it to the CDib object. The return is immediate because the file isn't actually read into memory until it is used. When you access the DIB, however, a delay might occur as the file is paged in. The AttachMapFile function releases existing allocated memory and closes any previously attached memory-mapped file.
| Parameter | Description |
| strPathname | Pathname of the file to be mapped |
| bShare | Flag that is TRUE if the file is to be opened in share mode; the default value is FALSE |
| Return value | TRUE if successful |
- AttachMemory—This function associates an existing CDib object with a DIB in memory. This memory could be in the program's resources, or it could be clipboard or OLE data object memory. Memory might have been allocated from the CRT heap with the new operator, or it might have been allocated from the Windows heap with GlobalAlloc.
| Parameter | Description |
| lpvMem | Address of the memory to be attached |
| bMustDelete | Flag that is TRUE if the CDib class is responsible for deleting this memory; the default value is FALSE |
| hGlobal | If memory was obtained with a call to the Win32 GlobalAlloc function, the CDib object needs to keep the handle in order to free it later, assuming that bMustDelete was set to TRUE |
| Return value | TRUE if successful |
- Compress—This function regenerates the DIB as a compressed or an uncompressed DIB. Internally, it converts the existing DIB to a GDI bitmap and then makes a new compressed or an uncompressed DIB. Compression is supported only for 4-bpp and 8-bpp DIBs. You can't compress a DIB section.
| Parameter | Description |
| pDC | Pointer to the display device context |
| bCompress | TRUE (default) to compress the DIB; FALSE to uncompress it |
| Return value | TRUE if successful |
- CopyToMapFile—This function creates a new memory-mapped file and copies the existing CDib data to the file's memory, releasing any previously allocated memory and closing any existing memory-mapped file. The data isn't actually written to disk until the new file is closed, but that happens when the CDib object is reused or destroyed.
| Parameter | Description |
| strPathname | Pathname of the file to be mapped |
| Return value | TRUE if successful |
- CreateBitmap—This function creates a GDI bitmap from an existing DIB and is called by the Compress function. Don't confuse this function with CreateSection, which generates a DIB and stores the handle.
| Parameter | Description |
| pDC | Pointer to the display or printer device context |
| Return value | Handle to a GDI bitmap—NULL if unsuccessful. This handle is not stored as a public data member. |
- CreateSection—This function creates a DIB section by calling the Win32 CreateDIBSection function. The image memory will be uninitialized.
| Parameter | Description |
| pDC | Pointer to the display or printer device context |
| Return value | Handle to a GDI bitmap—NULL if unsuccessful. This handle is also stored as a public data member. |
- Draw—This function outputs the CDib object to the display (or to the printer) with a call to the Win32 StretchDIBits function. The bitmap will be stretched as necessary to fit the specified rectangle.
| Parameter | Description |
| pDC | Pointer to the display or printer device context that will receive the DIB image |
| origin | CPoint object that holds the logical coordinates at which the DIB will be displayed |
| size | CSize object that represents the display rectangle's width and height in logical units |
| Return value | TRUE if successful |
- Empty—This function empties the DIB, freeing allocated memory and closing the map file if necessary.
- GetDimensions—This function returns the width and height of a DIB in pixels.
| Parameter | Description |
| Return value | CSize object |
- GetSizeHeader—This function returns the number of bytes in the info header and color table combined.
| Parameter | Description |
| Return value | 32-bit integer |
- GetSizeImage—This function returns the number of bytes in the DIB image (excluding the info header and the color table).
| Parameter | Description |
| Return value | 32-bit integer |
- MakePalette—If the color table exists, this function reads it and creates a Windows palette. The HPALETTE handle is stored in a data member.
| Parameter | Description |
| Return value | TRUE if successful |
- Read—This function reads a DIB from a file into the CDib object. The file must have been successfully opened. If the file is a BMP file, reading starts from the beginning of the file. If the file is a document, reading starts from the current file pointer.
| Parameter | Description |
| pFile | Pointer to a CFile object; the corresponding disk file contains the DIB |
| Return value | TRUE if successful |
- ReadSection—This function reads the info header from a BMP file, calls CreateDIBSection to allocate image memory, and then reads the image bits from the file into that memory. Use this function if you want to read a DIB from disk and then edit it by calling GDI functions. You can write the DIB back to disk with Write or CopyToMapFile.
| Parameter | Description |
| pFile | Pointer to a CFile object; the corresponding disk file contains the DIB |
| pDC | Pointer to the display or printer device context |
| Return value | TRUE if successful |
- Serialize—Serialization is covered in Chapter 17. The CDib::Serialize function, which overrides the MFC CObject::Serialize function, calls the Read and Write member functions. See the Microsoft Foundation Classes and Templates section of the online help for a description of the parameters.
- SetSystemPalette—If you have a 16-bpp, 24-bpp, or 32-bpp DIB that doesn't have a color table, you can call this function to create for your CDib object a logical palette that matches the palette returned by the CreateHalftonePalette function. If your program is running on a 256-color palettized display and you don't call SetSystemPalette, you'll have no palette at all, and only the 20 standard Windows colors will appear in your DIB.
| Parameter | Description |
| pDC | Pointer to the display context |
| Return value | TRUE if successful |
- UsePalette—This function selects the CDib object's logical palette into the device context and then realizes the palette. The Draw member function calls UsePalette prior to painting the DIB.
| Parameter | Description |
| pDC | Pointer to the display device context for realization |
| bBackground | If this flag is FALSE (the default value) and the application is running in the foreground, Windows realizes the palette as the foreground palette (copies as many colors as possible into the system palette). If this flag is TRUE, Windows realizes the palette as a background palette (maps the logical palette to the system palette as best it can). |
| Return value | Number of entries in the logical palette mapped to the system palette. If the function fails, the return value is GDI_ERROR. |
- Write—This function writes a DIB from the CDib object to a file. The file must have been successfully opened or created.
| Parameter | Description |
| pFile | Pointer to a CFile object; the DIB will be written to the corresponding disk file. |
| Return value | TRUE if successful |
DIB Display Performance
Optimized DIB processing is now a major feature of Windows. Modern video cards have frame buffers that conform to the standard DIB image format. If you have one of these cards, your programs can take advantage of the new Windows DIB engine, which speeds up the process of drawing directly from DIBs. If you're still running in VGA mode, however, you're out of luck; your programs will still work, but not as fast.
If you're running Windows in 256-color mode, your 8-bpp bitmaps will be drawn very quickly, either with StretchBlt or with StretchDIBits. If, however, you are displaying 16-bpp or 24-bpp bitmaps, those drawing functions will be too slow. Your bitmaps will appear more quickly in this situation if you create a separate 8-bbp GDI bitmap and then call StretchBlt. Of course, you must be careful to realize the correct palette prior to creating the bitmap and prior to drawing it.
Here's some code that you might insert just after loading your CDib object from a BMP file:
// m_hBitmap is a data member of type HBITMAP // m_dcMem is a memory device context object of class CDC m_pDib->UsePalette(&dc); m_hBitmap = m_pDib->CreateBitmap(&dc); // could be slow ::SelectObject(m_dcMem.GetSafeHdc(), m_hBitmap);Here is the code that you use in place of CDib::Draw in your view's OnDraw member function:
m_pDib->UsePalette(pDC); // could be in palette msg handlerDon't forget to call DeleteObject for m_hBitmap when you're done with it.CSize sizeDib = m_pDib->GetDimensions();
pDC->StretchBlt(0, 0, sizeDib.cx, sizeDib.cy, &m_dcMem, 0, 0, sizeToDraw.cx, sizeToDraw.cy, SRCCOPY);
The EX11C Example
Now you'll put the CDib class to work in an application. The EX11C program displays two DIBs, one from a resource and the other loaded from a BMP file that you select at runtime. The program manages the system palette and displays the DIBs correctly on the printer. Compare the EX11C code with the GDI bitmap code in EX11A. Notice that you're not dealing with a memory device context and all the GDI selection rules!
Following are the steps to build EX11C. It's a good idea to type in the view class code, but you'll want to use the cdib.h and cdib.cpp files from the companion CD-ROM.
- Run AppWizard to produce \vcpp32\ex11c\ex11c. Accept all the defaults but two: select Single Document and select the CScrollView view base class for CEx11cView. The options and the default class names are shown here.

- Import the Red Blocks bitmap. Choose Resource from Visual C++'s Insert menu. Import Red Blocks.bmp from the \WINDOWS directory. (If your version of Windows doesn't include this bitmap, load it from the companion CD-ROM.) Visual C++ will copy this bitmap file into your project's \res subdirectory. Assign IDB_REDBLOCKS as the ID, and save the changes.
- Integrate the CDib class with this project. If you've created this project from scratch, copy the cdib.h and cdib.cpp files from \vcpp32\ex11c on the companion CD-ROM. Simply copying the files to disk isn't enough; you must also add the CDib files to the project. Choose Add To Project from Visual C++'s Project menu, and then choose Files. Select cdib.h and cdib.cpp, and click the OK button. If you now switch to ClassView in the Workspace window, you will see the class CDib and all of its member variables and functions.
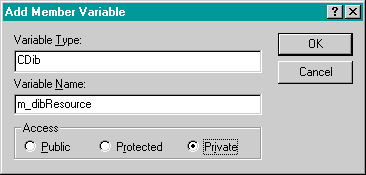
- Add two private CDib data members to the class CEx11cView. In the ClassView window, right-click the CEx11cView class. Choose Add Member Variable from the resulting pop-up menu, and then add the m_dibResource member as shown in the following illustration.
- Edit the OnInitialUpdate member function in ex11cView.cpp. This function sets the mapping mode to MM_HIMETRIC and loads the m_dibResource object directly from the IDB_REDBLOCKS resource. Note that we're not calling LoadBitmap to load a GDI bitmap as we did in EX11A. The CDib::AttachMemory function connects the object to the resource in your EXE file. Add the following boldface code:
- Edit the OnDraw member function in the file ex11cView.cpp. This code calls CDib::Draw for each of the DIBs. The UsePalette calls should really be made by message handlers for the WM_QUERYNEWPALETTE and WM_PALETTECHANGED messages. These messages are hard to deal with because they don't go to the view directly, so we'll take a shortcut. Add the following boldface code:
- Map the WM_LBUTTONDOWN message in the CEx11cView class. Edit the file ex11cView.cpp. OnLButtonDown contains code to read a DIB in two different ways. If you leave the MEMORY_MAPPED_FILES definition intact, the AttachMapFile code is activated to read a memory-mapped file. If you comment out the first line, the Read call is activated. The SetSystemPalette call is there for DIBs that don't have a color table. Add the following boldface code:
- Build and run the application. The bitmaps directory on the companion CD-ROM contains several interesting bitmaps. The Chicago.bmp file is an 8-bpp DIB with 256-color table entries; the forest.bmp and clouds.bmp files are also 8-bpp, but they have smaller color tables. The balloons.bmp is a 24-bpp DIB with no color table. Try some other BMP files if you have them. Note that Red Blocks is a 16-color DIB that uses standard colors, which are always included in the system palette.
Add m_dibFile in the same way. The result should be two data members at the bottom of the header file:
CDib m_dibFile; CDib m_dibResource;
ClassView also adds this statement at the top of the ex11cView.h file:
#include "cdib.h" // Added by ClassView
void CEx11cView::OnInitialUpdate() { CScrollView::OnInitialUpdate(); CSize sizeTotal(30000, 40000); // 30-by-40 cm CSize sizeLine = CSize(sizeTotal.cx / 100, sizeTotal.cy / 100); SetScrollSizes(MM_HIMETRIC, sizeTotal, sizeTotal, sizeLine); LPVOID lpvResource = (LPVOID) ::LoadResource(NULL, ::FindResource(NULL, MAKEINTRESOURCE(IDB_REDBLOCKS), RT_BITMAP)); m_dibResource.AttachMemory(lpvResource); // no need for // ::LockResource CClientDC dc(this); TRACE("bits per pixel = %d\n", dc.GetDeviceCaps(BITSPIXEL)); }
void CEx11cView::OnDraw(CDC* pDC) { BeginWaitCursor(); m_dibResource.UsePalette(pDC); // should be in palette m_dibFile.UsePalette(pDC); // message handlers, not here pDC->TextOut(0, 0, "Press the left mouse button here to load a file."); CSize sizeResourceDib = m_dibResource.GetDimensions(); sizeResourceDib.cx *= 30; sizeResourceDib.cy *= -30; m_dibResource.Draw(pDC, CPoint(0, -800), sizeResourceDib); CSize sizeFileDib = m_dibFile.GetDimensions(); sizeFileDib.cx *= 30; sizeFileDib.cy *= -30; m_dibFile.Draw(pDC, CPoint(1800, -800), sizeFileDib); EndWaitCursor(); }
#define MEMORY_MAPPED_FILES void CEx11cView::OnLButtonDown(UINT nFlags, CPoint point) { CFileDialog dlg(TRUE, "bmp", "*.bmp"); if (dlg.DoModal() != IDOK) { return; } #ifdef MEMORY_MAPPED_FILES if (m_dibFile.AttachMapFile(dlg.GetPathName(), TRUE) == TRUE) { // share Invalidate(); } #else CFile file; file.Open(dlg.GetPathName(), CFile::modeRead); if (m_dibFile.Read(&file) == TRUE) { Invalidate(); } #endif // MEMORY_MAPPED_FILES CClientDC dc(this); m_dibFile.SetSystemPalette(&dc); } EAN: 2147483647
Pages: 332