Section 4.2. Modifying the Configuration
4.2. Modifying the ConfigurationNow that we have a basic configuration file created, it should be modified to support the hardware you have present in the system. For details on how to find out which configuration options you need to select to achieve this, please see Chapter 7. Here we will show you how to select the options you wish to change. There are three different interactive kernel configuration tools: a terminal-based one called menuconfig, a GTK+-based graphical one called gconfig, and a QT-based graphical one called xconfig. 4.2.1. Console Configuration MethodThe menuconfig way of configuring a kernel is a console-based program that offers a way to move around the kernel configuration using the arrow keys on the keyboard. To start up this configuration mode, enter: $ make menuconfig You will be shown a screen much like Figure 4-1. Figure 4-1. Initial menuconfig screen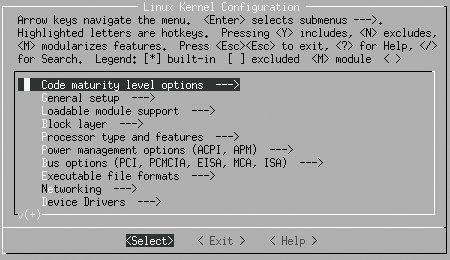 The instructions for navigating through the program, and the meanings of the different characters, are shown at the top of the screen. The rest of the screen containing the different kernel configuration options. The kernel configuration is divided up into sections. Each section contains options that correspond to a specific topic. Within those sections can be sub-sections for various specialized topics. As an example, all kernel device drivers can be found under the main menu option Device Drivers. To enter that menu, move the arrow key down nine times until the line Device Drivers ---> is highlighted, as shown in Figure 4-2. Figure 4-2. Device Drivers option selected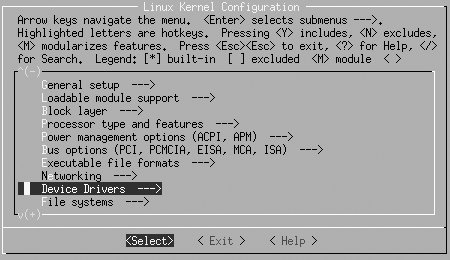 Then press the Enter key. It will move you into the Device Drivers submenu and show it as illustrated in Figure 4-3. Figure 4-3. Device Drivers submenu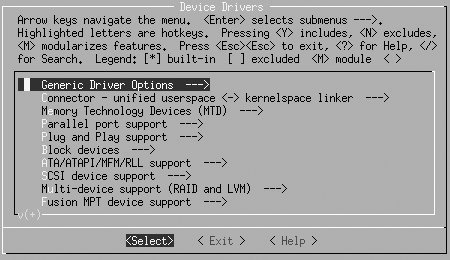 You can continue to move down through the menu hierarchy the same way. To see the Generic Driver Options submenu, press Enter again, and you will see the three options shown in Figure 4-4. Figure 4-4. Generic Driver Options submenu The first two options have a [*] mark by them. That means that this option is selected (by virtue of the * being in the middle of the [ ] characters), and that this option is a yes-or-no option. The third option has a < > marking, showing that this option can be built into the kernel (Y), built as a module (M), or left out altogether (N). If the option is selected with Y, the angle brackets will contain a * character. If it is selected as a module with an M, they will contain an M character. If it is disabled with N, they will show only a blank space. So, if you wish to change these three options to select only drivers that do not need external firmware at compile time, disable the option to prevent firmware from being built, and build the userspace firmware loader as a module, press Y for the first option, N for the second option, and M for the third, making the screen look like Figure 4-5. Figure 4-5. Generic Driver Options submenu changed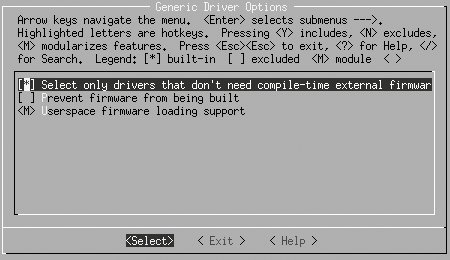 After you are done with your changes to this screen, press either the Escape key or the right arrow followed by the Enter key to leave this submenu. All of the different kernel options can be explored in this manner. When you are finished making all of the changes you wish to make to the kernel configuration, exit the program by pressing the Escape key on the main menu. You will be shown the screen in Figure 4-6, asking whether you wish to save your changed kernel configuration. Figure 4-6. Saving kernel options Press Enter to save the configuration, or if you wish to discard any changes made, press the right arrow to move to the <No> selection and then press Enter. 4.2.2. Graphical Configuration MethodsThe gconfig and xconfig methods of configuring a kernel use a graphical program to allow you to modify the kernel configuration. The two methods are almost identical, the only difference being the different graphical toolkit with which they are written. gconfig is written using the GTK+ toolkit and has a two-pane screen looking like Figure 4-7. Figure 4-7. make gconfig screen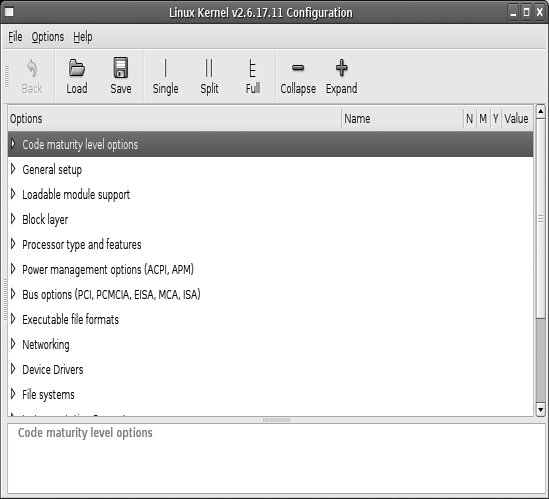 The xconfig method is written using the QT toolkit and has a three-pane screen looking like Figure 4-8. Figure 4-8. make xconfig screen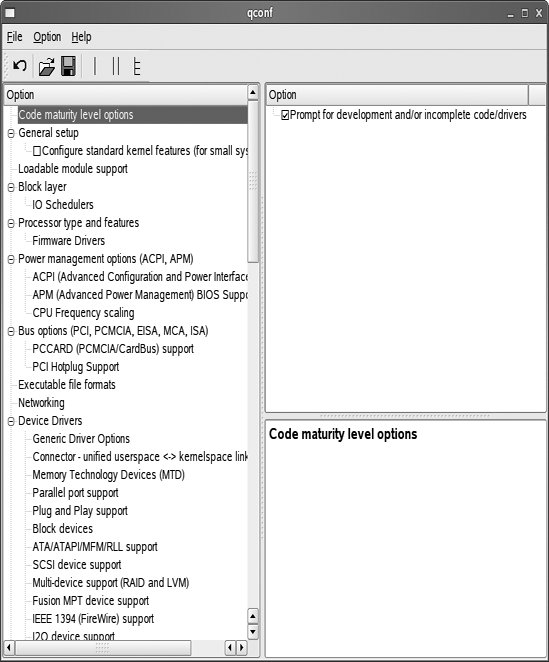 Use the mouse to navigate the submenus and select options. For instance, you can use it in Figure 4-8 to select the Generic Driver Options submenu of the Device Drivers menu. This will change the xconfig screen to look like Figure 4-9. The corresponding gconfig screen is Figure 4-10. Figure 4-9. make xconfig Generic Driver Options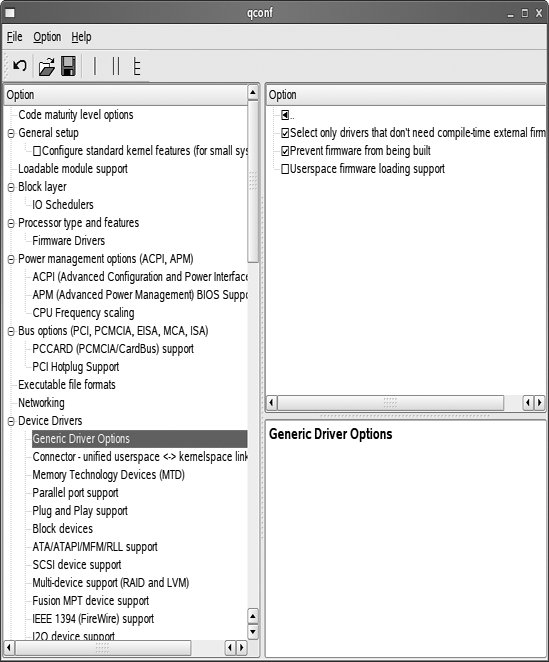 Figure 4-10. make gconfig Generic Driver Options Changing this submenu to disable the second option and make the third option be built as a module causes the screens to look like Figures 4-11 and 4-12. Figure 4-11. make xconfig Generic Driver Options changed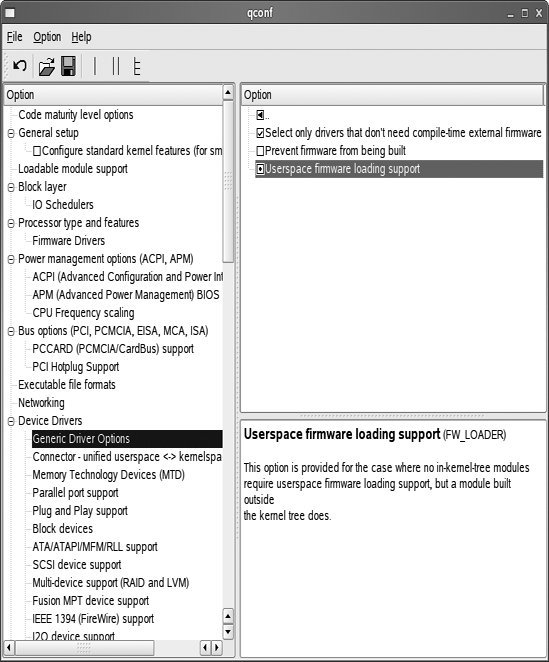 Figure 4-12. make gconfig Generic Driver Options changed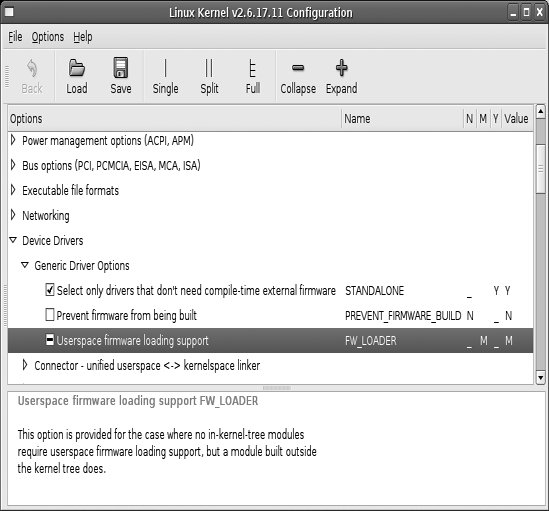 Please note that in the gconfig method, a checked box signifies that the option will be built into the kernel, whereas a line though the box means the option will be built as a module. In the xconfig method, an option built as a module will be shown with a dot in the box. Both of these methods prompt you to save your changed configuration when exiting the program, and offer the option to write that configuration out to a different file. In that way you can create multiple, differing configurations. |
EAN: 2147483647
Pages: 113