| If your worksheet is close to fitting on a single page, you usually can adjust the left and right margins to pull another column or two onto the page. If the worksheet still doesn't fit, you may need to adjust the page setup, via the Page Setup dialog box. To display the Page Setup dialog box, open the File menu and click Page Setup , or click the Setup button on the Print Preview screen. The Page Setup dialog box appears, as shown in Figure 10.3, featuring four tabs: Page, Margins, Header/Footer, and Sheet. The following sections explain the available settings in detail. Figure 10.3. Enter your preferences in the Page Setup dialog box. 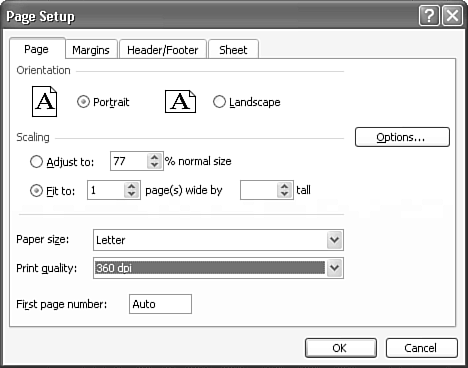 Changing the Page Settings The leftmost tab in the Page Setup dialog box, Page , contains options for specifying the page orientation, the paper size, print quality, and the number at which Excel starts numbering the pages. (See Figure 10.3.) This tab also offers an interesting feature that can shrink your worksheet to fit on one or more pages. The following list explains your options in greater detail: Orientation gives you two choices: Portrait or Landscape. With portrait orientation, the page is taller than it is wide. With landscape orientation, the page is wider than it is tall. You don't need to feed paper into your printer sideways if you choose landscape orientation; Excel rotates the print 90, so rows run along the tall edge of the page. Scaling enables you to shrink your worksheet by a specified percentage or have Excel automatically shrink the worksheet to make it fit on a fixed number of pages. If you have a worksheet that almost, but not quite, fits on a single page, you can have Excel shrink the entire worksheet to make it fit. (If the worksheet is too tall or wide, Excel might not be able to shrink it down enough to fit on the specified number of pages, in which case you must spread the worksheet out over more pages.) Paper Size enables you to specify the dimensions of the paper on which you intend to print your worksheet. You can choose Letter (to print on 8.5-by-11-inch paper), Legal (to print on 8.5-by-14-inch paper), Executive (7.5-by-10-inch paper), A4 (210-by-297-millimeters paper), or whatever paper size your printer supports. Print Quality determines the print quality in dots per inch (dpi) . The higher the setting, the higher the print quality and the slower the printout. First page number determines the number Excel uses to start numbering the pages of your printout. You might, for instance, want to start numbering the pages at 3 if you're printing a report, and the first two pages of the report already are numbered 1 and 2. Adjusting the Page Margins The most intuitive way to adjust page margins is to drag the margin markers in Print Preview, as instructed earlier in this chapter. For more precise control over margins, display the Page Setup dialog box and click the Margins tab. The Margins tab contains spin boxes for setting the top, bottom, left, and right margins and for specifying the distance between the top edge of the page and the header and the distance between the bottom edge of the page and the footer, as shown in Figure 10.4. Figure 10.4. The Page Setup Margins settings enable you to position the worksheet on pages. 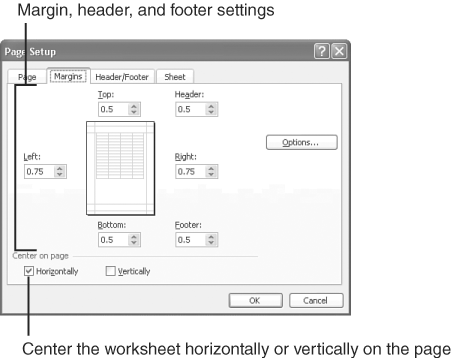 Click the up arrow next to a spin box to increase the setting in increments of .25 inch, or click the down arrow to decrease the setting. You can also click inside a spin box and type the desired setting. Near the bottom of the Margins tab are two options that enable you to have Excel center the worksheet vertically and/or horizontally on a page. Click the check box next to Horizontally to position the worksheet at an equal distance from the left and right edges of the page. Click the check box next to Vertically to position the worksheet at an equal distance from the top and bottom edges of the page. Adding a Header and Footer Excel can print a footer (on the bottom of each page) or a header (at the top of each page) that automatically numbers the worksheet pages for you and prints the file's name , the worksheet title, the date and time, and any other information you want to include. To add headers and footers to your worksheets, follow these steps: -
Do one of the following: Display the Page Setup dialog box and click the Header/Footer tab. Open the View menu and select Header and Footer . The Page Setup dialog box appears with the Header/Footer tab in front. See Figure 10.5. Figure 10.5. Add a header or footer using the Page Setup dialog box's Header/Footer tab. 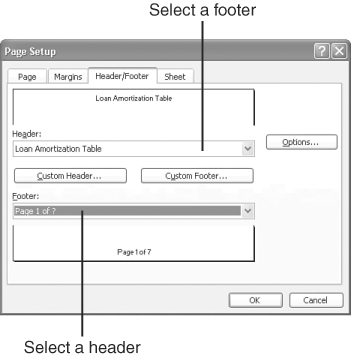 -
To use a header, open the Header drop-down list and click the desired header. -
To use a footer, open the Footer drop-down list and click the desired footer. -
Click OK . To create a custom header or footer (for example, to include your name or company's name), click one of the Custom buttons on the Header/Footer tab. When you do, the Header or Footer dialog box opens, as shown in Figure 10.6; it enables you to create a header or footer consisting of three sections. Type the desired text in each section, and use the dialog box buttons to format the text and insert codes for the date, time, filename, worksheet name, and page numbers. To insert "Page 1 of 5," "Page 2 of 5," and so on, type Page , press the spacebar, click the # button, press the spacebar, and click the ++ button. # inserts the number of the current page, and ++ inserts the total number of pages. Figure 10.6. Create a custom header or footer consisting of three sections. 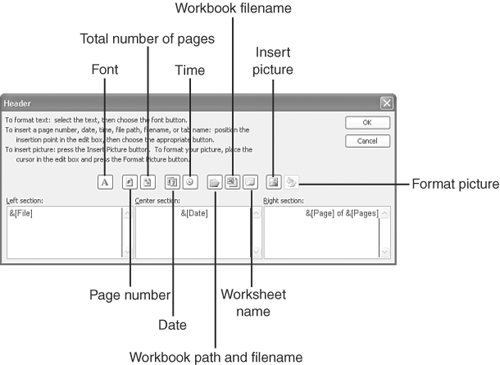 Note  | The Header and Footer features use some odd codes for inserting information. For example, the code for inserting the date is &[Date] and the code for inserting the number of pages is &[Pages] . |
Changing the Worksheet Settings If your worksheet is longer than one page, Excel inserts a horizontal page break to mark the end of one page and the beginning of the next. If your worksheet is wider than one page, Excel inserts a vertical page break along one of the column divisions. Unless you specify otherwise , Excel prints pages from top to bottom, printing all pages to the left of the vertical page break and then pages to the right of the vertical page break. In most cases, you want your pages printed this way, so you can easily read each column from top to bottom. If, however, you typically read the worksheet data from left to right, you want Excel to print the pages from left to right. To change the page order, open the File menu, select Page Setup , and click the Sheet tab, as shown in Figure 10.7. Under Page Order , select Over, Then Down , and then click OK . Figure 10.7. If your worksheet has both horizontal and vertical page breaks, select the desired page order. 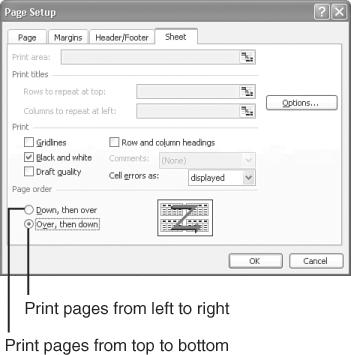 As you can see in Figure 10.7, the Sheet tab contains many more options for controlling the way Excel prints your worksheets. The following list explains those options:  Print Area enables you to select a portion of the worksheet to print. Click the Collapse Dialog Box button that's next to the Print Area box, drag over the portion of the worksheet you want to print, and then click the Collapse Dialog Box button again to bring the Page Setup dialog box back into full view. Print Area enables you to select a portion of the worksheet to print. Click the Collapse Dialog Box button that's next to the Print Area box, drag over the portion of the worksheet you want to print, and then click the Collapse Dialog Box button again to bring the Page Setup dialog box back into full view.  Rows to Repeat at Top enables you to designate rows that you want printed at the top of each page of your worksheet. This capability is useful if you typed column headings at the top of each column. Click the Collapse Dialog Box button that's next to the Rows to Repeat at Top box, drag over the row(s) you want to repeat at the top of each page, and then click the Collapse Dialog Box button again to bring the Page Setup dialog box back into view. Rows to Repeat at Top enables you to designate rows that you want printed at the top of each page of your worksheet. This capability is useful if you typed column headings at the top of each column. Click the Collapse Dialog Box button that's next to the Rows to Repeat at Top box, drag over the row(s) you want to repeat at the top of each page, and then click the Collapse Dialog Box button again to bring the Page Setup dialog box back into view.  Columns to Repeat at Left enables you to designate columns that you want printed at the left of each page of your worksheet. If you typed row headings in a column along the left side of your worksheet, and Excel is inserting a vertical page break, this forces Excel to print the row headings along the left side of each page. Click the Collapse Dialog Box button that's next to the Columns to Repeat at Left box, drag over the column(s) you want to repeat at the left of each page, and then click the Collapse Dialog Box button again to bring the Page Setup dialog box back into view. Columns to Repeat at Left enables you to designate columns that you want printed at the left of each page of your worksheet. If you typed row headings in a column along the left side of your worksheet, and Excel is inserting a vertical page break, this forces Excel to print the row headings along the left side of each page. Click the Collapse Dialog Box button that's next to the Columns to Repeat at Left box, drag over the column(s) you want to repeat at the left of each page, and then click the Collapse Dialog Box button again to bring the Page Setup dialog box back into view. Gridlines tells Excel to print the gridlines that divide the cells . Typically, gridlines are displayed only onscreen to make it easier for you to determine each cell 's boundaries, but if you turn on this option, Excel prints the gridlines. Black and White tells Excel to print the worksheet in grayscale rather than color. If you're printing your worksheets using a black-and-white printer or want to save some money by conserving your printer's color ink, click the check box next to Black and White . Choosing this option can reduce the print time, as well. Draft Quality directs Excel to print a low-quality version of the worksheet. If you're using the worksheet for your own benefit, you might want to turn on this option to save time printing and conserve ink. Row and Column Headings tells Excel to print column letters (A, B, C, and so on) above the columns and print row headings (1, 2, 3, and so on) along the left side of the page. This option does not affect the row and column headings you may have typed in your worksheet or the row(s) and column(s) you chose to repeat at the top or left of every page. Comments prints any comments (notes) you might have added to cells. (See the note under "Adjusting Number Formats," in Chapter 4, "Entering and Editing Labels and Values," for instructions on how to enter a comment.) You can choose (None) to have comments omitted, At End of Sheet to have all comments printed at the end of the worksheet, or As Displayed on Sheet to have comments printed near the cell where you added them. Cell Errors As enables you to specify how you want Excel to print the contents of any cell whose result is an error. You can choose to have errors printed as displayed (as they appear in the worksheet), as <blank> (empty), as --(dashes), or as #N/A (# N/A appears in the cell). Tip  | If comments are not displayed, Excel will not print them, even if you choose to have them printed. To display comments on your worksheet, open the View menu and choose Comments . To display individual comments, right-click the cell that contains the comment and click Show Comment . |
Enter your preferences, and then click the Print Preview button to display the effects of any settings you entered.  |


