Light Mapping
Light mapping is the process of applying a texture that contains lighting information (either monochromatic or color) to a primitive that already has a solid color or a base texture. Direct3D needs highly detailed meshes to compute vertex lighting effects because it computes the effects only at the meshes' vertices. Because light mapping doesn't require Direct3D to compute lighting information for every vertex, you don't need to use the highly detailed meshes that vertex lighting requires. So you'll likely see a performance improvement when you render a low-polygon scene with light mapping rather than a high-polygon scene with vertex lighting. And, because you compute light mapping information at authoring time rather than at run time, you'll achieve even higher speeds at run time with this technique.
Light mapping is sometimes referred to as dark mapping because it is a technique in which you apply a light-map texture as the second blended texture (on top of the fully lit base texture), darkening a scene rather than lighting it. Light maps can produce dramatic lighting effects in your 3D scenes. By applying a varying light map in an iterative process, you can make these effects range from simple shadows to eerie, undulating degrees of darkness. You generate light maps by sending content through a special renderer—often a raytracer or a radiosity algorithm that simply computes lighting and saves the resulting per-pixel lighting in texture maps. A radiosity program is an image-rendering algorithm that uses the principle of conservation of energy in a closed system to model the diffuse interaction of light from surfaces in a 3D scene (especially room interiors). The algorithm examines the geometric interaction between every pair of discrete polygonal facets (triangles) and sets up a set of simultaneous equations whose solution determines the apparent color of each facet. Because Direct3D doesn't have a per-pixel lighting unit, you either need to write your own renderer or use a free, shareware, or commercial tool. You can then apply the computed light map to a 3D scene.
You can use light maps to add monochromatic or colored light to objects and to add effects such as diffuse lighting and specular highlights. To perform light mapping, you apply two textures to a 3D primitive. One of these textures is a uniformly, fully lit base texture. (A brick wall is an example of this type of texture.) The other texture is the light map. Both textures are blended to produce a scene that appears naturally lit. The light map can contain a bitmap that gives the appearance of complex lighting. You can store this lighting information in the light map's alpha values or color values.
You might be asking yourself, "Won't these light maps take up a lot of memory?" You can reuse "normal" texture maps (bricks, floor, blank walls, and so on) quite a bit, but chances are high that the lighting will differ for each face—meaning you'll have one light map per face, which sounds like a huge drain on the available texture memory. To answer this question about memory, you must consider the following aspects of light mapping:
- A light map can have a much lower resolution than a texture map—for example, a 16 x 16, bilinear-filtered light map is often sufficient on top of a 256 x 256 texture map.
- Light maps are often monochromatic, so they can be 4 or 8 bits per pixel rather than 16 or 24. (Plus, light maps often compress well for disk storage.)
- You can analyze the light maps you generate and often discard them in favor of using vertex colors to generate the equivalent effects. For instance, many light maps end up being similar enough to a constant intensity or a linear ramp that you don't need texture maps to create the lighting effect.
- Because light maps typically are small, it's a good idea to combine many of them into a single large texture map to reduce the overhead of changing texture maps while rendering (as discussed Chapter 8).
When combining several light maps into a single texture map, you should be aware of the filtering side effects that can occur between neighboring light maps. Checking the results of the rendered scene is the best way to verify that the light maps stored in the combined textures do what you want.
Figure 11-1, Figure 11-2, and Figure 11-3 illustrate a base texture, a monochromatic light map, and the result of applying both light maps to a surface, respectively.
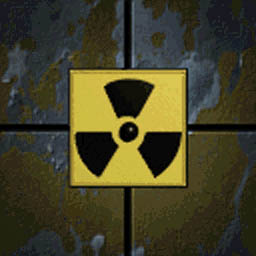
Figure 11-1 Base texture
![]()
Figure 11-2 Monochromatic light map
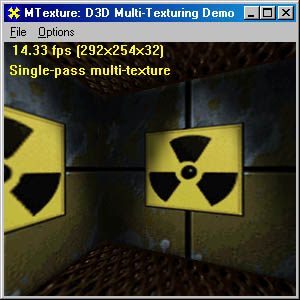
Figure 11-3 Applying the base texture and the light map to a surface
Figure 11-4 and Figure 11-5 show the same scene with a different light map applied. This light map simulates the effect of a flashlight beam hitting the walls in two places. This light map uses a much higher resolution than is necessary. Typically you should use simple textures. As Figure 11-4 illustrates, the higher-resolution light map has only a negligible gain in visual quality—an improvement that's hardly worth its price in memory.
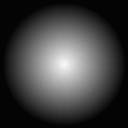
Figure 11-4 Flashlight beam light map
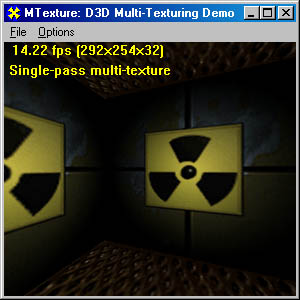
Figure 11-5 Scene with the flashlight beam light map applied
As you can see, effectively applying light maps can greatly enhance a scene's appearance and save rendering time that would be lost if you computed "real" lighting effects.
Light Mapping with Multipass Texture Blending
You can blend the textures used for light mapping in a number of ways. As we discussed in Chapter 8, you can use the older approach of multipass texture blending by applying the D3DRENDERSTATE_SRCBLEND and D3DRENDERSTATE_DESTBLEND enumerated value pair. You can also use the newer SetTextureStageState method to implement multiple-texture blending. Let's first look at the multipass texture blending technique. Later in the chapter, we'll examine the newer approach, multiple-texture blending.
Monochromatic Light Mapping
You can use monochromatic light mapping to darken a scene based on the source alpha information, which is the lighting information that's stored in the alpha values of the light map textures. With this approach, you can use a source primitive as a light map that darkens the frame by scaling its buffer contents.
When you use multipass texture blending to perform light mapping, you render the base texture onto the primitives in one pass and the light map onto the base texture in another pass—rather than applying the textures in a single pass as you would in multiple-texture blending. To use a monochromatic light map, set the source alpha blend state to D3DBLEND_ZERO and the destination alpha blend state to D3DBLEND_SRCALPHA. This code segment shows you how:
device->SetRenderState(D3DRENDERSTATE_ALPHABLENDENABLE, TRUE); device->SetRenderState(D3DRENDERSTATE_SRCBLEND, D3DBLEND_ZERO); device->SetRenderState(D3DRENDERSTATE_DESTBLEND, D3DBLEND_SRCALPHA); |
This code effectively says, "Ignore (multiply by 0) the (nonexistent) color of this light map, and set the final pixel color to be the product of the alpha value of this light map and the color of the underlying texture." In other words, when the alpha value is 1.0, the underlying texture stays at full brightness, and when the alpha value is closer to 0, the underlying texture is further darkened.
Color Light Mapping
You can also use color light mapping, which is similar to the monochromatic light mapping method except that it lets you apply a color light map to a surface. To use color light mapping, set the source alpha blend state to D3DBLEND_ZERO and the destination alpha blend state to D3DBLEND_SRCCOLOR.
The following code illustrates how to color a 3D room by using color light mapping. SEGMENT 1 draws the texture for the room, and SEGMENT 2 draws a light map for the room by blending the light map texture lightmap.bmp with the first textures applied. This code uses multipass rendering.
// Draw the first textures normally. Use the first set of // texture coordinates. m_pd3dDevice->SetTextureStageState(0, D3DTSS_TEXCOORDINDEX, 0 ); m_pd3dDevice->SetTextureStageState(0, D3DTSS_COLORARG1, D3DTA_TEXTURE ); m_pd3dDevice->SetTextureStageState(0, D3DTSS_COLOROP, D3DTOP_MODULATE ); // SEGMENT 1 m_WallData.textureCoords[0].lpvData = &m_avWallVertices[0].tuBase; m_pd3dDevice->SetTexture( 0, D3DTextr_GetSurface("wall.bmp") ); m_pd3dDevice->DrawPrimitiveStrided( D3DPT_TRIANGLELIST, D3DFVF_XYZ | D3DFVF_DIFFUSE | D3DFVF_TEX2, &m_WallData, 24, NULL ); m_pd3dDevice->SetTexture( 0, D3DTextr_GetSurface("floor.bmp") ); m_pd3dDevice->DrawPrimitiveStrided( D3DPT_TRIANGLELIST, D3DFVF_XYZ | D3DFVF_DIFFUSE | D3DFVF_TEX2, &m_FloorCeilData, 12, NULL ); // SEGMENT 2 // Draw the light map using blending, with the second set of // texture coordinates. m_pd3dDevice->SetRenderState( D3DRENDERSTATE_ALPHABLENDENABLE, TRUE ); m_pd3dDevice->SetRenderState( D3DRENDERSTATE_SRCBLEND, D3DBLEND_ZERO ); m_pd3dDevice->SetRenderState( D3DRENDERSTATE_DESTBLEND, D3DBLEND_SRCCOLOR ); m_WallData.textureCoords[0].lpvData = &m_avWallVertices[0].tuLightMap; m_pd3dDevice->SetTexture( 0, D3DTextr_GetSurface("lightmap.bmp") ); m_pd3dDevice->DrawPrimitiveStrided( D3DPT_TRIANGLELIST, D3DFVF_XYZ | D3DFVF_DIFFUSE | D3DFVF_TEX2, &m_WallData, 36, NULL ); // Restore state. m_pd3dDevice->SetRenderState( D3DRENDERSTATE_ALPHABLENDENABLE, FALSE ); |
Light Mapping with Texture Stages
Using multiple-texture blending, you can apply one or more light maps to primitives. Although multiple-texture blending effectively produces the same results as multipass texture blending, as stated earlier, this newer feature enables you to render both a light map and a base texture in a single pass. Multiple-texture blending greatly improves the rendering speed, so you should use it whenever the target system hardware supports it.
Multiple-texture blending offers four light-mapping approaches: monochromatic light maps, color light maps, diffuse light maps, and specular light maps. We've already discussed monochromatic and color light maps in this chapter; the sections that follow will explain diffuse and specular light maps.
// Set up the texture stages. (You don't need to do this // every frame.) m_pd3dDevice->SetTextureStageState( 0, D3DTSS_TEXCOORDINDEX, 0 ); m_pd3dDevice->SetTextureStageState( 0, D3DTSS_COLORARG1, D3DTA_TEXTURE ); m_pd3dDevice->SetTextureStageState( 0, D3DTSS_COLOROP, D3DTOP_MODULATE ); m_pd3dDevice->SetTextureStageState( 1, D3DTSS_TEXCOORDINDEX, 1 ); m_pd3dDevice->SetTextureStageState( 1, D3DTSS_COLORARG1, D3DTA_TEXTURE ); m_pd3dDevice->SetTextureStageState( 1, D3DTSS_COLORARG2, D3DTA_CURRENT ); m_pd3dDevice->SetTextureStageState( 1, D3DTSS_COLOROP, D3DTOP_MODULATE ); m_WallData.textureCoords[0].lpvData = &m_avWallVertices[0].tuBase; m_WallData.textureCoords[1].lpvData = &m_avWallVertices[0].tuLightMap; // Draw the walls in multi-texture mode. m_pd3dDevice->SetTexture( 0, D3DTextr_GetSurface("wall.bmp") ); m_pd3dDevice->SetTexture( 1, D3DTextr_GetSurface("lightmap.bmp") ); m_pd3dDevice->DrawPrimitiveStrided( D3DPT_TRIANGLELIST, D3DFVF_XYZ | D3DFVF_DIFFUSE | D3DFVF_TEX2, &m_WallData, 24, NULL ); // Draw the floor in single-texture mode. m_pd3dDevice->SetTexture( 0, D3DTextr_GetSurface("floor.bmp") ); m_pd3dDevice->SetTexture( 1, NULL ); m_pd3dDevice->DrawPrimitiveStrided( D3DPT_TRIANGLELIST, D3DFVF_XYZ | D3DFVF_DIFFUSE | D3DFVF_TEX2, &m_FloorCielData, 12, NULL ); // Restore state. m_pd3dDevice->SetTextureStageState( 1, D3DTSS_COLOROP, D3DTOP_DISABLE ); |
Diffuse Light Mapping
You can generate diffuse light maps to simulate the illumination of matte surfaces by a point light source. When a point source light reflects off a matte surface, it reflects diffuse light. The resultant brightness of this diffuse light is dependent on the distance of the surface from the light source and on the angle between the surface normal and the vector of the light source direction. Because matte surfaces produce a reflection that looks different from the reflection of shiny surfaces, it's useful to generate a matte surface light map.
The following code shows how to simulate diffuse lighting using texture light maps by adding the diffuse light map to the base texture:
// // Set the base texture. // dev->SetTexture(0,lpTexureBaseTexture ); // // Set up the operation and arguments for the base texture. // dev->SetTextureStageState(0,D3DTSS_COLOROP, D3DTOP_MODULATE ); dev->SetTextureStageState(0,D3DTSS_COLORARG1, D3DTA_TEXTURE ); dev->SetTextureStageState(0,D3DTSS_COLORARG2, D3DTA_DIFFUSE ); // // Set the diffuse light map. // dev->SetTexture(1,lptexDiffuseLightMap ); // // Set the blend stage. // dev->SetTextureStageState(1, D3DTSS_COLOROP, D3DTOP_ADD ); dev->SetTextureStageState(1, D3DTSS_COLORARG1, D3DTA_TEXTURE ); dev->SetTextureStageState(1, D3DTSS_COLORARG2, D3DTA_CURRENT ); |
Specular Light Mapping
You apply specular light maps to primitives in order to simulate shiny, metallic, or glass surfaces that are illuminated by a point light source. To perform this type of light mapping, you must modulate the specular light map with the primitive's texture and then add the monochromatic or color light map.
Because in the real world specular light varies with a person's point of view, you can generate only an approximation of specular light. You don't recompute the specular light map every time the user moves, and you don't shift the texture coordinates. Therefore, a user paying close attention will realize that the specular reflection is not "moving" as his or her viewpoint changes throughout the scene. However, specular light mapping does produce a fair simulation of this effect at a very low computational cost. The following code segment shows how to create this lighting effect:
// // Set the base texture. // dev->SetTexture(0, lpTexureBaseTexture); // // Set up the operation and arguments for the base texture. // dev->SetTextureStageState(0, D3DTSS_COLOROP, D3DTOP_MODULATE); dev->SetTextureStageState(0, D3DTSS_COLORARG1, D3DTA_TEXTURE); dev->SetTextureStageState(0, D3DTSS_COLORARG2, D3DTA_DIFFUSE); // // Set the specular light map. // dev->SetTexture(1, lpTexureSpecularLightMap); // // Set the specular light map operation and arguments. // dev->SetTextureStageState(1, D3DTSS_COLOROP, D3DTOP_MODULATE); dev->SetTextureStageState(1, D3DTSS_COLORARG1, D3DTA_TEXTURE); dev->SetTextureStageState(1, D3DTSS_COLORARG2, D3DTA_CURRENT); // // Set the color light map. // dev->SetTexture(2, lpTexureLightMap); // // Set the color light map operation and arguments. // dev->SetTextureStageState(2, D3DTSS_COLOROP, D3DTOP_ADD); dev->SetTextureStageState(2, D3DTSS_COLORARG1, D3DTA_TEXTURE); dev->SetTextureStageState(2, D3DTSS_COLORARG2, D3DTA_CURRENT); |
The Microsoft DirectX SDK setup program on the companion CD installs a light map project on your hard drive, in the \mssdk\samples\Multimedia\d3dim\src\lightmap directory. The project illustrates a light map applied to a simple 3D room. You might want to compile and run this code now while these concepts are fresh in your mind.
EAN: 2147483647
Pages: 131