Chapter 14. Building a Web Service
| CONTENTS |
IN THIS CHAPTER
- Designing a Web Service
- Building the Web Service
- Creating a WSDL File
- Registering Within UDDI
- Using Java to Access a WSDL Document
- Summary
This chapter will show you how to build a Web service system for news delivery. Using the JSPBuzz as an example, you will build a system for delivering news stories.
The Web services built so far in this book have been simple. Up to this point, we didn't worry about registering the Web services, because the service calls were hard-coded to work between the examples. Because the examples were not in a registry, there wasn't any need to create a WSDL description file. This chapter will take things one step further and walk through the creation of a simple WSDL file. With WSDL, it's possible to define a Web service that others can easily use. The other major new step shows how to register a service within a UDDI registry.
Web services are simple it's the framework around the Web services that's complicated. A framework tends to be large, and building one consists of many tedious steps. Web service frameworks usually have five elements:
-
The actual Web service business logic.
-
A server. This is usually a SOAP server, and this server mediates traffic between a user and the Web service.
-
A WSDL file to describe the Web service.
-
A Web service registry. Typically, a framework provides direct access to one of the public registries, rather than a private registry.
-
Automated code generation for most of the installation and usage of the Web service.
Although the Web service might be a simple class, building the overall framework is a larger and more complicated task. Manually creating every piece of a Web service framework is both time-consuming and prone to errors because of human mistakes. Fortunately, with frameworks most of the work can be automated by software. Using an automated tool is much advised for creating a Web service and the supporting framework. The time savings in using such a tool will be huge from both a development and maintenance perspective, and will more than make up for the cost of using such a tool.
NOTE
Because a framework automates part of the process of building a Web service, using one would actually be a hindrance in teaching you the basics behind building a Web service. Thus, this book doesn't use a framework.
The good news is that many commercial products are being created to fill the need for creating and supporting Web services. In fact, so many tools are popping up, that it's impossible to give a recommendation to any single product. Generally, this book has recommended using open source products because of the low cost and great support. Currently, no satisfactory open source products exist that we can recommend to fill this need. Although several options exist, none are up to the level of quality or completeness that would earn a solid recommendation. Eventually, a solid open source tool will appear; until then, don't hesitate to evaluate various commercial products and choose the solution that fits your needs.
Designing a Web Service
The first step in this chapter will be to build the actual Web service. Designing a Web service is no different than designing any other process establishing a solid goal and defining service requirements are very important parts of the actual building of the service.
Because this chapter represents a small project in itself, the goals and requirements of the example will be outlined for the reader's benefit.
What Is the Goal?
Each Web service should have one goal and only one goal. If you have several goals, then chances are you have several Web services that need to be built. Unlike a general application, which can fulfill many needs, Web services are smaller packages of work for a single task. Keep each Web service as small and atomic as possible.
The goal of the JSPBuzz Web service is to produce a list of links to populate a newsfeed. Each link will take the reader back to the original JSPBuzz document, to the exact location of the news story.
What Are the Requirements?
The requirements should always be written down in a concise and understandable manner. Fortunately, we have a simple set of requirements for the JSPBuzz Web service:
-
Each link in the newsfeed needs to take the user back to the original page displaying the news story.
-
The Web service will permit the reader to type in a search string to narrow what stories are shown in the newsfeed.
-
The code in this version gets its data from a single JSPBuzz issue. However, the code needs to be set up so that in the future it will be easy for the process to work against multiple JSPBuzz documents at the same time.
One advantage to building Web services is that a Web service by itself is just a very small and controllable project. This makes building requirements for the Web service a relatively simple matter.
What Data Does the Service Need?
It's time to talk about data. A Web service server doesn't need to be located with your Web server, which means that a Web service server doesn't necessarily have access to the same resources as your Web server. In our example, the SOAP Web server can conveniently pull the XML files out of the xmlbook Web site. Remember to make sure your Web service has convenient, quick and reliable access to any data source it will require.
Building the Web Service
Much of the code in this example will be familiar, as it will reuse and expand much of what has already been shown in previous chapters. A new change is the directory. Because this code will be used at the JSP Insider site, the code has been placed within the com.jspinsider.jspbuzz package. For this example, the code will be installed on the local Apache SOAP server. This will make it possible to run and test the Web service locally. The example will use dom4j as the API to handle the XML documents.
Building a File Handler
The first class we'll build is a simple file handler. This class will determine where all the various files are located within the system. Because the files will be spread around, it makes sense to have one central class to find the files. Save the code in Listing 14.1 as webapps/soap/WEB-INF/classes/com/jspinsider/jspbuzz/BuzzIssues.java.
Listing 14.1 A Java Class to Define the Location of XML Files
package com.jspinsider.jspbuzz; import java.io.File; import org.dom4j.Document; import org.dom4j.io.SAXReader; public class BuzzIssues { public BuzzIssues() {} public static String ls_tomcat_path = "c:/java/tomcat4/"; public static String buzzurl = "http://www.jspinsider.com/jspbuzz/2001/"; public static String site_path = "webapps/xmlbook/chapter7/"; public static String service_path = "webapps/xmlbook/chapter14/"; public static String currentbuzzXML = ls_tomcat_path + site_path + "buzz_10_09_2001.xml"; public static String currentbuzzJSP = buzzurl + "buzz_10_09_2001.jsp"; public static String currentbuzzXSL = ls_tomcat_path + service_path + "BuzzList.xsl"; public String getcurrentxml(){return currentbuzzXML;} ; public String getcurrentjsp(){return currentbuzzJSP;} ; public String getlistingxsl(){return currentbuzzXSL;} ; } Because the code from the overall example will be used in several places, it isn't a good idea to hard-code the files in the main classes. Instead, this one class will track all the files and provide helper functions to access the information. This particular version is hard-coded to make the example easy. The final production version will be driven by an XML file. This way, new files can be added without recompiling the actual class. Also, additional helper methods can be built to query directories for the various JSPBuzz issues. This would increase the usefulness of this class. Again, the code is not included here, as it's not required for the local example to run.
You will have to update the following line:
public static String ls_tomcat_path = "c:/java/tomcat4/";
The first thing to note is that this code was written for a Windows-based machine. You can use the File.separator string to create a platform-independent file path system instead of employing the hard-coded Windows-based separator (/). If you are using Unix or Linux, you will have to make the appropriate changes for your file path.
It's required to change the value to match your own local Tomcat directory. Also notice this code assumes the xmlbook directory is installed within the same Web context as the SOAP server. While this is the case for this example, in the future remember that your SOAP server could be located elsewhere, including on a different machine.
Building a Search Utility
To make the Web service useful, we want the user to be able to retrieve stories that match a search string. We will expand the QueryElement class found in Chapter 9, "Advanced JSP and XML Techniques," to perform this task.
Save the class in Listing 14.2 as webapps/soap/WEB-INF/classes/com/jspinsider/jspbuzz/QueryElement.java.
Listing 14.2 Searching for String Matches in an XML Element
package com.jspinsider.jspbuzz; import java.util.Iterator; import java.util.StringTokenizer; import org.dom4j.Element; public class QueryElement { public QueryElement() {} public String[] buildSearchArray(String as_search) { StringTokenizer st = new StringTokenizer(as_search); int count = st.countTokens(); int index = 0; if (count > 0) {String[] tokens = new String[count]; while (st.hasMoreTokens()) { tokens[index] = st.nextToken(); index++; } return tokens; } return null; } public boolean findString(String search, Element element) { String[] searchlist = buildSearchArray(search); return findString(searchlist,element); } public boolean findString(String[] searchlist, Element element) { if (searchlist == null) return false; for (int i = 0; i < searchlist.length; i++) { if (findExactString(searchlist[i],element)== false) return false; } return true; } public boolean findExactString(String as_search, Element element) { as_search = as_search.toLowerCase(); if (element.getText().toLowerCase().indexOf(as_search)> -1) return true; Iterator elementlist = element.elementIterator(); while (elementlist.hasNext() ) { Element child = (Element) elementlist.next(); boolean lb_test = findString( as_search, child); if (lb_test) return lb_test; } return false; } } This class has all the functionality of the original class. It has merely been expanded to perform an and-based search on a string array. The new class also contains a helper method buildSearchArray, which can be used to tokenize a string into an array.
Creating an ElementHandler
The Web service will be able to perform a search to select only the articles a user asks to read. This means that it makes sense to build the XML document representation to include only the links the user wants to see. Using a SAX handler, or more specifically a dom4j ElementHandler, lets you also work towards the other long-term goal of being able to search through multiple issues of the JSPBuzz and condense the results to a single dom4j Document. Although this example won't currently merge the files, the overall code structure has been built in modules to support this future enhancement. We will expand the SearchHandler class found in Chapter 9 to perform this task. The class shown in Listing 14.3 should be saved as webapps/soap/WEB-INF/classes/com/jspinsider/jspbuzz/SearchHandler.java.
Listing 14.3 A Handler to Optimize Building a dom4j Document Object
package com.jspinsider.jspbuzz; import java.util.Iterator; import org.dom4j.Attribute; import org.dom4j.Element; import org.dom4j.ElementHandler; import org.dom4j.ElementPath; public class SearchHandler implements ElementHandler { private String search = ""; private String[] searchlist = null; private String linksource = ""; public void setSearch(String as_search) { search = as_search; searchlist = testelement.buildSearchArray(as_search); } public void setLinkSource(String as_source) { linksource = as_source;} private QueryElement testelement = new QueryElement(); public SearchHandler() {} public SearchHandler(String as_search) {setSearch(as_search);} public SearchHandler(String as_search, String as_source) { setSearch(as_search); setLinkSource(as_source); } public void onStart(ElementPath path) {} public void onEnd(ElementPath path) { Element row = path.getCurrent(); /* Remove BuzzStories that don't match the search */ if (search.length()> 0) { if (testelement.findString(searchlist,row) == false) row.detach(); else {attachSource(row);} } else {attachSource(row);} } public void attachSource(Element row) { if (linksource.length() > 0) { Attribute link = row.attribute("linksource"); if (link == null) {row.addAttribute("linksource",linksource); } else {link.setValue(linksource);} } } } Keep in mind that the dom4j ElementHandler we are creating here is applied during the SAX process, so this will be a fast and efficient way to build the Document object.
Now let's examine the new sections. The first builds a search array. It wouldn't make sense to build a search array every time an element is processed by this class. Instead, when the search string is initialized, the code also creates the search array:
public void setSearch(String as_search) { search = as_search; searchlist = testelement.buildSearchArray(as_search); } The other new piece of code is the attachSource method:
public void attachSource(Element row) { if (linksource.length() > 0) { Attribute link = row.attribute("linksource"); if (link == null) {row.addAttribute("linksource",linksource);} else {link.setValue(linksource);} } } This method attaches a new Attribute called linksource to each row Element. The business rule being enforced is that each link being displayed needs to be able to link back to the original story within a JSPBuzz page. The linksource attribute is used to store the parent page containing the story. It should be mentioned that the XML file containing the original JSPBuzz data does not contain this data and shouldn't by design. An XML document should only know about itself and its dataset. Putting information about files using the XML dataset would result in rotten data, because this sort of data is likely to become out of date. What would happen if the destination file were to change, or the page locations were to move? The XML file would be left with bad data embedded within it.
The other problem arises from the requirement that this process will later merge together dozens of JSPBuzz newsletters. We need a way to embed reliable information for each link displayed to the user.
The best solution is to pass in the parent page reference for each individual link as the XML document is parsed. Then, when we do merge multiple documents, each link will safely have a reference to its parent page, or the linksource attribute in this case. This attribute is not used by the original document. Instead, it's used by the temporary dom4j Document to inform a stylesheet how to build a reference link. This way, each kept link will always have a correct and up-to-date reference to the JSP page displaying the original story.
The page being set within the linksource attribute is passed in just before the document is parsed with the setLinkSource method:
public void setLinkSource(String as_source) { linksource = as_source;} The next step is to build the actual Document object containing the data.
Building a Document Object
The code in this step follows previous examples closely, and nothing new has been done. The code, shown in Listing 14.4, should be saved as webapps/soap/WEB-INF/classes/com/jspinsider/jspbuzz/CreateBuzzDocument.java.
Listing 14.4 Building a dom4j Document Object
package com.jspinsider.jspbuzz; import java.io.File; import org.dom4j.Document; import org.dom4j.io.SAXReader; public class CreateBuzzDocument { public CreateBuzzDocument() {} public Document allEntries(String as_xml, String as_link) throws Exception { try{ return findEntries(as_xml,as_link,"");} catch (Exception e) {throw e;} } public Document findEntries(String as_xml, String as_link, String as_search) throws Exception { try { SAXReader reader = new SAXReader(); SearchHandler filter = new SearchHandler(as_search,as_link); reader.addHandler("/jspbuzz/buzzlink",filter); reader.addHandler("/jspbuzz/ramble" ,filter); reader.addHandler("/jspbuzz/topic" ,filter); Document document = reader.read(new File(as_xml)); return document; } catch(Exception e) { throw e; } } } Notice that the code adds multiple handlers with the addHandler method. It would be possible to build various custom event handlers to gain extremely fine control of the final document being created in this process.
Applying a Stylesheet
In Chapter 7, "Successfully Using JSP and XML in an Application," we built the ProcessDom4J object. This chapter's example needs something similar. However, we won't have access to the JspWriter object; this will be a Web service. The output will be passed to the user as a String. This means we need to expand the ProcessDom4J class to do a little more for us in this example.
The code in Listing 14.5 should be saved as webapps/soap/WEB-INF/classes/com/jspinsider/jspbuzz/ProcessDom4J.java.
Listing 14.5 Creating a New ProcessDom4J Object
package com.jspinsider.jspbuzz; import org.dom4j.Document; import org.dom4j.io.DocumentResult; import org.dom4j.io.DocumentSource; import org.dom4j.io.*; import java.io.*; import javax.servlet.jsp.JspWriter; import javax.xml.transform.Transformer; import javax.xml.transform.TransformerFactory; import javax.xml.transform.stream.*; public class ProcessDom4J { public ProcessDom4J() {} public void applyXSL (JspWriter out, Document a_xmlresult, String as_xsl) throws Exception { StreamSource xsl = new StreamSource(new File(as_xsl)); StreamResult result = new StreamResult(out); Transformer transformer; TransformerFactory factory = TransformerFactory.newInstance(); transformer = factory.newTransformer( xsl ); DocumentSource source = new DocumentSource( a_xmlresult ); transformer.transform(source, result); } public String applyXSL (Document a_doc, String as_xsl) throws Exception { try {StreamSource xsl = new StreamSource(new File(as_xsl)); StringWriter writer = new StringWriter(); StreamResult result = new StreamResult(writer); Transformer transformer; TransformerFactory factory = TransformerFactory.newInstance(); transformer = factory.newTransformer( xsl ); DocumentSource source = new DocumentSource( a_doc ); transformer.transform(source, result); return( writer.toString()); } catch (Exception e) {throw e;} } } The new twist to this code is the writing to a String rather than the JspWriter:
StringWriter writer = new StringWriter(); StreamResult result = new StreamResult(writer);
This is accomplished by creating a StringWriter to direct the transformation stream:
return( writer.toString());
The last step is just to take the writer and convert it to a String.
Creating a Stylesheet
We will reuse the buzz_10_09_2001.xml file from Chapter 7. However, we do need to build a new stylesheet to get the results desired for the Web service.
The code in Listing 14.6 should be saved as webapps/xmlbook/chapter14/BuzzList.xsl.
Listing 14.6 Stylesheet to Create Web Service Results
<?xml version="1.0" encoding="UTF-8"?> <xsl:stylesheet version="1.0" xmlns:xsl="http://www.w3.org/1999/XSL/Transform"> <xsl:output method="html"/> <xsl:template match="/"> <div> <p align="center" class="12ptBold"><xsl:value-of select="jspbuzz/title"/></p> <xsl:if test="count(jspbuzz/buzzlink[@type='news']) > 0"> <div class="10ptBold">News</div> <ol><xsl:apply-templates select="jspbuzz/buzzlink[@type='news']"> <xsl:sort data-type="number" select="@position"/> </xsl:apply-templates></ol> </xsl:if> <xsl:if test="count(jspbuzz/ramble) >0"> <div class="10ptBold">Rambles</div> <ol> <xsl:apply-templates select="jspbuzz/ramble"> <xsl:sort data-type="number" select="@position"/> </xsl:apply-templates></ol> </xsl:if> <div class="10ptBold">Links of Interest</div> <ol><xsl:apply-templates select="jspbuzz/buzzlink[@type='link']"> <xsl:sort data-type="number" select="@position"/> </xsl:apply-templates></ol> <xsl:if test="count(jspbuzz/buzzlink[@type='product']) >0"> <div class="10ptBold">Products</div> <ol><xsl:apply-templates select="jspbuzz/buzzlink[@type='product']"> <xsl:sort data-type="number" select="@position"/> </xsl:apply-templates></ol> </xsl:if> <xsl:if test="count(jspbuzz/buzzlink[@type='review']) >0"> <div class="10ptBold">Reviews</div> <ol><xsl:apply-templates select="jspbuzz/buzzlink[@type='review']"> <xsl:sort data-type="number" select="@position"/> </xsl:apply-templates></ol> </xsl:if> <xsl:if test="count(jspbuzz/topic) >0"> <div class="10ptBold">Main Topic</div> <p> <a href="#topic" ><xsl:value-of select="jspbuzz/topic/title"/> </a></p><br/> </xsl:if> </div> </xsl:template> <xsl:template match="jspbuzz/buzzlink"> <li><a href="{@linksource} #{@type} {@position}"> <xsl:value-of select="title"/> </a></li> </xsl:template> <xsl:template match="jspbuzz/ramble"> <li><a href="{@linksource} #ramble{@position}"> <xsl:value-of select="title"/> </a></li> </xsl:template> </xsl:stylesheet> The stylesheet is not very exciting, but it's easier to build the stylesheet than to build the logic within a programming loop. In addition, this will give us the flexibility to swap stylesheets when we want to change the format of the output.
Building the Web Service at Last
We finally have all the pieces to build our Web service. The last step is to build the Java class representing the Web service. The code in Listing 14.7 should be saved as webapps/soap/WEB-INF/classes/com/jspinsider/jspbuzz/BuzzWebServices.java.
Listing 14.7 The Web Service Class
package com.jspinsider.jspbuzz; import org.dom4j.Document; public class BuzzWebServices {public BuzzWebServices() {} public String currentList() { return currentListSearch("");} public String currentListSearch(String as_find) { try { BuzzIssues issues = new BuzzIssues(); ProcessDom4J doxml = new ProcessDom4J(); CreateBuzzDocument buzzdoc = new CreateBuzzDocument(); String ls_jsp = issues.getcurrentjsp(); String ls_xsl = issues.getlistingxsl(); String ls_xml = issues.getcurrentxml(); return doxml.applyXSL (buzzdoc.findEntries(ls_xml,ls_jsp,as_find),ls_xsl); } catch(Exception e) { return e.toString();} } } Notice the brevity of the code. We want to keep this object as clean as possible. The real purpose of this class is to act as a front end for the Web service. All the actual code to make the magic happen should be placed into the various business objects.
Registering the Web Service with Apache SOAP
The last step to perform in building the Web service is to register it with the Apache SOAP server. Before you register the service, don't forget to compile everything and restart Tomcat! If you try to register a Web service when the class file doesn't exist, it will leave a dead entry within the Apache SOAP server registry.
While we didn't use a deployment file, an Apache SOAP deployment file would be similar to what is shown in Listing 14.8.
Listing 14.8 Apache Soap Deployment File
<isd:service xmlns:isd="http://xml.apache.org/xml-soap/deployment" id="urn:jspbuzz.services"> <isd:provider type="java" scope="Request" methods="currentList currentListSearch"> <isd:java class="com.jspinsider.jspbuzz.BuzzWebServices" static="false"/> </isd:provider> <isd:faultListener>org.apache.soap.server.DOMFaultListener</isd:faultListener> </isd:service>
However, it's easy to manually enter the following data using the Apache SOAP Deployment screen:
-
ID: urn:jspbuzz.services
-
Scope: Request
-
Methods: currentList currentListSearch
-
Provider: Java
-
Provider Class: com.jspinsider.jspbuzz.BuzzWebServices
We are done building the Web service. The same Web service has been deployed to the JSP Insider Web site. You will be able to access the service locally from your machine, or remotely from the JSP Insider site.
The next step will be to build a WSDL file to describe this Web service. We are not going to build a test page right away; instead, we will later build a generic class to read the WSDL file to create the actual Web service call. If you want to test this Web service, you can use a simple variation of Listing 3.7 from Chapter 3, "Understanding Web Services."
Creating a WSDL File
Because other programmers might be using the JSPBuzz Web service, it would be a good idea to create a WSDL document to describe the service. As a result, we will publish a WSDL document to enable others easy access to the JSPBuzz Web service. After this document is published, other users can download the WSDL file and determine how to use the Web service. Before creating a WSDL document for this chapter, let's examine WSDL in greater detail.
WSDL is an interesting beast. WSDL is not part of the SOAP specification. Instead, WSDL is all about defining a Web service, more specifically a network service. Because many Web services use SOAP, people automatically connect WSDL to SOAP. This is not right. A Web service can use any manner of standards to define the actual Web service content and then transmit the message. Currently, WSDL defines bindings that permit the use of SOAP 1.1, HTTP Get/Post, and MIME to define the actual Web service messages.
Many tools will generate a WSDL document. However, the tools that generate WSDL all tend to be within integrated Web service packages. These tools usually provide a whole range of capabilities to support a Web service. Apache SOAP is not a Web service tool; it's a SOAP server, which we happen to be using in this book to transmit the Web services. Because Apache SOAP doesn't directly use WSDL, it won't generate a WSDL document. This means we have to either generate a WSDL manually, or find another tool for the generation of the WSDL. For learning purposes this is a good thing, so let's dive in and create ours manually.
WSDL Namespaces
Now, the first thing to consider is namespaces. Technically, all references should be fully qualified with the proper namespaces. Some WSDL documents do not use namespaces properly. This may or may not cause a problem, depending on the Web service tools you are using. If you are having a problem with a WSDL file, the first thing you should double-check is that the namespaces are correct within the document.
By default, any WSDL element will use the wsdl namespace defined with the URI http://schemas.xmlsoap.org/wsdl/.
Typically, at least the tns, xsd, soap, and wsdl namespaces must be declared for a WSDL file.
Let's examine the tns namespace for a second. tns stands for "this namespace" and refers to the current document. A tns declaration would look something like this:
xmlns:tns="http://www.jspinsider.com/jspbuzz/services/JspBuzz.wsdl"
Usually, this namespace will just use the URL to the WSDL file itself as the definition. Here's an example:
<binding name="BuzzList_Binding" type="tns:BuzzWebServices_Port">
The type attribute in this example says the binding element matches an element defined within the same document with the id of BuzzWebServices_Port. In this case, it refers back to the portType element with the name BuzzWebServices_Port:
<portType name="BuzzWebServices_Port">
Within a WSDL document, there will be quite a bit of cross-referencing between the elements.
The xsd namespace is used to define the data types used within the actual messages, while the soap namespace defines the SOAP elements used within the WSDL document. Typically, these namespaces are set as follows:
xmlns:xsd="http://www.w3.org/2001/XMLSchema" xmlns:soap="http://schemas.xmlsoap.org/wsdl/soap/"
WSDL soaks itself in namespaces, so it wouldn't hurt to brush up on namespaces if you are going to hand-generate many of these files. Personally, I would prefer to use automated tools to create WSDL files. However, to date I haven't found an open source tool that adequately meets my needs, so I still manually create the files.
Creating the JSPBuzz WSDL File
The JSPBuzz WSDL file, shown in Listing 14.9, should be saved to webapps/xmlbook/chapter14/JspBuzz.wsdl. The file is also available directly at the JSP Insider Web site at http://www.jspinsider.com/jspbuzz/services/JspBuzz.wsdl.
One line of the file on the JSP Insider site is different, as it points back to the JSP Insider SOAP server. The WSDL file in Listing 14.9 points back to the local Apache SOAP server installed on your machine.
Listing 14.9 A WSDL File to Define the JSPBuzz Web Service
<?xml version="1.0"?> <definitions name="BuzzWebServices" xmlns:tns="http://www.jspinsider.com/jspbuzz/services/JspBuzz.wsdl" xmlns:xsd="http://www.w3.org/2001/XMLSchema" xmlns:soap="http://schemas.xmlsoap.org/wsdl/soap/" xmlns="http://schemas.xmlsoap.org/wsdl/"> <message name="currentList_Response"> <part name="response" type="xsd:string"/> </message> <message name="currentList_Request"/> <message name="currentListSearch_Response"> <part name="response" type="xsd:string"/> </message> <message name="currentListSearch_Request"> <part name="as_find" type="xsd:string"/> </message> <portType name="BuzzWebServices_Port"> <operation name="currentList"> <input name="currentList" message="tns:currentList_Request"/> <output name="currentList" message="tns:currentList_Response"/> </operation> <operation name="currentListSearch" parameterOrder="as_find"> <input name="currentListSearch" message="tns:currentListSearch_Request"/> <output name="currentListSearch" message="tns:currentListSearch_Response"/> </operation> </portType> <binding name="BuzzList_Binding" type="tns:BuzzWebServices_Port"> <soap:binding style="rpc" transport="http://schemas.xmlsoap.org/soap/http" /> <operation name="currentList"> <soap:operation soapAction="urn:jspbuzz.services" /> <input> <soap:body use="encoded" namespace="urn:jspbuzz.services" encodingStyle="http://schemas.xmlsoap.org/soap/encoding/" /> </input> <output> <soap:body use="encoded" namespace="urn:jspbuzz.services" encodingStyle="http://schemas.xmlsoap.org/soap/encoding/" /> </output> </operation> <operation name="currentListSearch"> <soap:operation soapAction="urn:jspbuzz.services" /> <input> <soap:body use="encoded" namespace="urn:jspbuzz.services" encodingStyle="http://schemas.xmlsoap.org/soap/encoding/" /> </input> <output> <soap:body use="encoded" namespace="urn:jspbuzz.services" encodingStyle="http://schemas.xmlsoap.org/soap/encoding/" /> </output> </operation> </binding> <service name="BuzzWebServices"> <port name="BuzzWebPort" binding="tns:BuzzList_Binding"> <soap:address location="http://localhost:8080/soap/servlet/rpcrouter" /> </port> </service> </definitions>
The WSDL file takes a little bit of time to digest. At first glance, it isn't very friendly. On second and third glances, it's still not fun to look at. The only way to make sense of a WSDL file is to just walk through it with some friendly explanation of what is happening. This means that the best approach is to dive in and examine each section in turn.
The definitions Element
The definitions element is the root element of the WSDL document.
<definitions name="BuzzWebServices" xmlns:tns="http://www.jspinsider.com/jspbuzz/services/JspBuzz.wsdl" xmlns:xsd="http://www.w3.org/2001/XMLSchema" xmlns:soap="http://schemas.xmlsoap.org/wsdl/soap/" xmlns="http://schemas.xmlsoap.org/wsdl/">
All namespace declarations occur within the definition statement.
The message Element
Messages define the information packets being sent to and from each service method. As programmers, this translates to the method arguments and return values. The message element is merely a description for a packet of information that will be required to use the Web service.
For instance, the following statement defines a string packet (data stored in XML format used to represent a string) that will be used within the service:
<message name="currentListSearch_Response"> <part name="response" type="xsd:string"/> </message>
This describes a packet of data in the format of a string, according to the xsd namespace schema.
This message in itself doesn't tell us how the packet will be used by the service. The naming convention only gives us an indication as to the use of the message. The name in the message is arbitrary, and is merely a naming convention to make this element easier to read. If we were to skip ahead to the operation element within the portType element, we would see the actual binding of the message to the Web service method:
<operation name="currentListSearch" parameterOrder="as_find"> <output name="currentListSearch" message="tns:currentListSearch_Response"/>
Notice that tns:currentListSearch_Response refers back to the <message name="currentListSearch_Response"> statement. Within WSDL, this pattern of definition and then binding to the actual use within another element is repeated for most of the elements.
Another example is the message used to create the search parameter:
<message name="currentListSearch_Request"> <part name="as_find" type="xsd:string"/> </message>
Notice the part element. A message element can have multiple parts, which enables a message to have complicated parameters that need to be sent within the Web service.
The portType Element
A portType element defines the overall service in terms of the methods the service contains.
<portType name="BuzzWebServices_Port"> <operation name="currentList"> <input name="currentList" message="tns:currentList_Request"/> <output name="currentList" message="tns:currentList_Response"/> </operation> <operation name="currentListSearch" parameterOrder="as_find"> <input name="currentListSearch" message="tns:currentListSearch_Request"/> <output name="currentListSearch" message="tns:currentListSearch_Response"/> </operation> </portType>
The portType element must have a unique name. Within the portType, all methods available within the service are defined using the operation element.
The operation Element
Each method within a Web service is considered an operation within a WSDL file. Each operation element within a portType is given a unique name. An operation has an input element defining a message being sent to the operation:
<operation name="currentListSearch" parameterOrder="as_find"> <input name="currentListSearch" message="tns:currentListSearch_Request"/>
An operation also has an output element to define which message is being sent to the client:
<output name="currentListSearch" message="tns:currentListSearch_Response"/> </operation>
Notice that for both the input and output, the message attribute ties back to a message element defined earlier in the WSDL file.
In relation to SOAP, all operations have an input and output message that needs to be defined for use.
The binding Element
Using a service is more than just calling a method. In order to call the method, a framework must exist to convey the messages. The binding element is the way in which the WSDL document describes this framework within which the Web service resides. Now, to refresh your memory, here is the binding element:
<binding name="BuzzList_Binding" type="tns:BuzzWebServices_Port"> <soap:binding style="rpc" transport="http://schemas.xmlsoap.org/soap/http" /> <operation name="currentList"> <soap:operation soapAction="urn:jspbuzz.services" /> <input> <soap:body use="encoded" namespace="urn:jspbuzz.services" encodingStyle="http://schemas.xmlsoap.org/soap/encoding/" /> </input> <output> <soap:body use="encoded" namespace="urn:jspbuzz.services" encodingStyle="http://schemas.xmlsoap.org/soap/encoding/" /> </output> </operation>
Let's examine the binding from another angle: The binding element takes the abstract messaging information required for the Web service and produces a real physical transport model to handle the Web service messages.
Typically, SOAP is used as the framework within which to transport a Web service method.
The first step is to create the binding and attach a portType to the binding:
<binding name="BuzzList_Binding" type="tns:BuzzWebServices_Port">
By attaching a portType to the binding, the WSDL document defines the messages the service will place within the message transport framework.
The next step is attaching SOAP as the means of message transport. Because we are using SOAP, the soap:binding element is a required element:
<soap:binding style="rpc" transport="http://schemas.xmlsoap.org/soap/http" />
The transport attribute indicates the protocol to use, in this case HTTP.
The next step is to define the layout of the SOAP message:
<operation name="currentList"> <soap:operation soapAction="urn:jspbuzz.services" /> <input> <soap:body use="encoded" namespace="urn:jspbuzz.services" encodingStyle="http://schemas.xmlsoap.org/soap/encoding/" /> </input>
We will create an entry to match each Web service message that has to be embedded within the SOAP message. Each operation defined within the WSDL file has a matching soap:operation element. For the soap:operation element, the soapAction attribute is the HTTP header the client sends when invoking the service. In our example, we have defined our service to have the action of urn:jspbuzz.services.
The message the Web service expects to receive to initiate this method is defined by the input block. The message the Web service sends is defined by the output element.
The service Element
The last piece of the puzzle is the service element. This element is used to define the Web service at a high level. Briefly, it contains the data informing the world of the location of the Web service server.
In this example, the whole service element appears as follows:
<service name="BuzzWebServices"> <port name="BuzzWebPort" binding="tns:BuzzList_Binding"> <soap:address location="http:/localhost:8080/soap/servlet/rpcrouter" /> </port> </service>
The first step is to create the service element:
<service name="BuzzWebServices">
The service name should match to the name defined in the definitions element. The purpose of the service element is to group related ports together. Each port will be mapped to a defined binding within the WSDL document. For our example, we have only one port, with a location of http:/localhost:8080/soap/servlet/rpcrouter. In addition, this port maps to the binding element with the id of BuzzList_Binding:
<port name="BuzzWebPort" binding="tns:BuzzList_Binding"> <soap:address location="http:/localhost:8080/soap/servlet/rpcrouter" />
For clarification purposes, WSDL defines a port to be a network endpoint in other words, a Web service server. A port can only have one address, and a port only really defines the address information.
WSDL Implementation File
It is possible to split a WSDL file into two separate files an interface file and an implementation file. The interface file would contain the binding information, while the implementation file would refer back to an appropriate implementation file and define the service information. The purpose of using two files is to permit some separation of logical definitions.
What we created in Listing 14.9 is a combination of both; the majority of examples you will see on the Web currently merge both files into a single implementation file. Some automatic tools will probably generate both files as a standard method of file creation. It doesn't make much difference for our purposes whether to use one or two files. In fact, it's a little simpler to manually create both as a single file.
For me, building a WSDL file is a pain, and I would rather just build it all in one shot. However, when using an automated tool, I would prefer to have the tool generate both WSDL files if that's an option.
WSDL Documentation
The specifications for the WSDL files can be found at http://www.w3.org/TR/wsdl. This particular set of documentation is confusing, as it's 100% technical, very concise, and doesn't explain in detail what is happening within the WSDL document. Be warned go in fully awake along with several extra cups of coffee when tackling this documentation. Another good resource on WSDL is the IBM site at http://www-106.ibm.com/developerworks/webservices/. When at the IBM site, just search on the term WSDL and quite a few documents will turn up to help explain the mysteries of WSDL.
Registering Within UDDI
UDDI is a directory that enables businesses to list themselves on the Internet. More importantly, it is possible to register our WSDL file within a UDDI registry. This permits other programmers and projects to find our code.
Several UDDI registries exist on the Internet. The two biggest registries are supported by IBM and Microsoft. IBM's registry is located at http://www-3.ibm.com/services/uddi/. The Microsoft version of the registry is found at http://uddi.microsoft.com/default.aspx. It doesn't make a difference which UDDI registry you use. They both replicate data between each other. However, an account on one registry won't let you edit data entered from the other system. Therefore, in practice you should only use one of the two registries.
The UDDI registries are still relatively new. As a result, they are awkward to use. These registries are improving with time, but they have a long way to go before they're polished enough to be really user-friendly.
It should be noted that it is possible to create your own private UDDI registry. We will only examine the public UDDI registries.
Registering a Service
In order to register the service, the first step is to create an account. Creating an account is straightforward and a simple matter of following the provided instructions on the Web site. You won't create an account in this chapter, as we aren't registering any services. I have already registered the JSPBuzz service within the UDDI registry, and will show the highlights of registering the actual service. If you are interested in testing and have a service, then you can visit the test registry, located at https://www-3.ibm.com/services/uddi/testregistry/protect/registry.html. Keep in mind that to register a service, your Web service must be available over the Internet and not a Web service running off of your localhost server, as in this example.
Note that once a Web service is registered, it takes a few hours before it will be accessible through an automated search. When the JSPBuzz service was registered, I could see and view the entry right away. However, it took a day before the entry became viewable through third-party query tools.
I personally found the Microsoft setup screens to be less confusing than the IBM UDDI screens. Both systems pretty much do the same thing; it's more a question of layout. Because it's possible to show the same information with fewer screenshots, the Microsoft system is used here to demonstrate the creation of a UDDI registry.
NOTE
These systems are changing constantly, so some of these steps might have changed since this book was written.
To use either the Microsoft or the IBM system, the first step is to create an account.
For the Microsoft system, create a Passport account. If you already have a Passport account, the system will log you in automatically. If you have access to more than one account (as is the case for some developers), be careful that you are using the proper one. Once you have created your Passport account, you will need to accept the terms of the agreement. Then you will have to register your company within the UDDI system. Once all of these steps are done, you can register the Web service. To do so, find the Administer option. The Administer screens are the section where Web service registration occurs. In the Administer screen you will select the Add a New tModel option. tModel is the term used to describe the UDDI entry that represents the Web service.
The next step is to create the actual Web service and indicate the location of the WSDL document (see Figure 14.1).
Figure 14.1. Registering a Web service tModel within Microsoft UDDI.
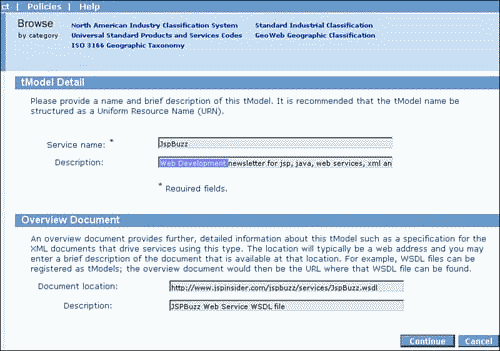
The data entered is very straightforward. We enter the service name, the location of the WSDL file, and two descriptions.
The next step is to identify some additional reference data to describe the service (see Figure 14.2).
Figure 14.2. Adding information for your Web service within Microsoft UDDI.
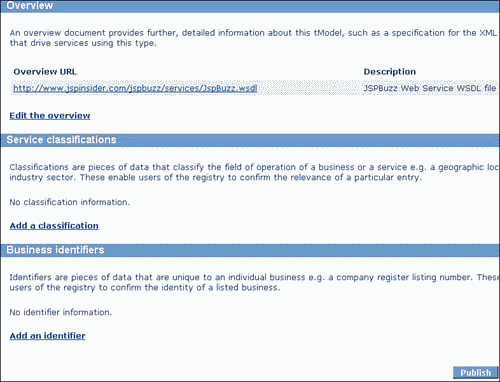
These entries will permit you to enter various standard codes that match to your Web service. The goal is to help search engines querying the UDDI locate your Web service easily. The problem comes from the fact that finding a code that maps closely to your service can be a chore.
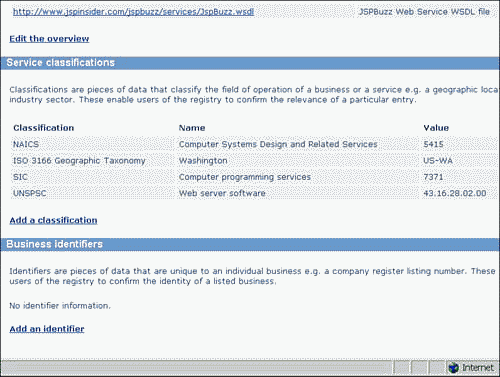
In the case of the JSPBuzz Web service, a single location code to indicate Washington state and three computer codes were selected as the closest match to the JSPBuzz (see Figure 14.3).
Figure 14.3. Codes used to describe the JSPBuzz Web service.
There isn't very much to do in registering the Web service. Overall, registering with the UDDI directory is a simple process. After the UDDI server validates your entry, it will become available to grab electronically. We are not going to build a Web page to query the UDDI registries, but it's possible. Many commercial software packages offer this capability.
Using Java to Access a WSDL Document
The last thing we will cover is building a simple Java object to query a WSDL document. We currently use the JDOM Java XML APIs. However, sometime in early- to mid-2002, this task will be made simpler with the JWSDL (Java API for WSDL) API. Currently, JWSDL has not been released, so we will have to use a little more sweat to build our process. You can find information about JWSDL at http://jcp.org/jsr/detail/110.jsp.
The first step is to build a Java class to parse the WSDL document and make the Web service calls. The class to do this is shown in Listing 14.10, and should be saved as webapps/xmlbook/WEB-INF/classes/xmlbook/chapter14/BuzzServiceCall.java.
Listing 14.10 A Class to Read the WSDL File and Make a Web Service Call
package xmlbook.chapter14; import java.net.URL; import java.util.Vector; import javax.servlet.http.HttpSession; import org.apache.soap.*; import org.apache.soap.rpc.*; import org.jdom.Document; import org.jdom.Element; import org.jdom.input.SAXBuilder; import org.jdom.Namespace; public class BuzzServiceCall extends Object { public BuzzServiceCall() {} private String serviceserver = ""; private String objecturi = ""; public BuzzServiceCall(String as_url) throws Exception { try { SAXBuilder builder = new SAXBuilder(); Document doc = builder.build(new URL(as_url)); Element root = doc.getRootElement(); Namespace nsr = root.getNamespace(); Namespace ns_soap = root.getNamespace("soap"); serviceserver = root.getChild("service",nsr) .getChild("port",nsr) .getChild("address",ns_soap) .getAttribute("location").getValue(); objecturi = root.getChild("binding",nsr) .getChild("operation",nsr) .getChild("operation",ns_soap) .getAttribute("soapAction").getValue(); } catch(Exception e){throw e;} ; } private String performCall(Call call) throws Exception { String ls_result = ""; try { Response resp = call.invoke (new URL (serviceserver), ""); if (resp.generatedFault()) {Fault fault=resp.getFault(); ls_result = " Fault code: " + fault.getFaultCode(); ls_result = " Fault Description: " +fault.getFaultString(); throw new Exception(ls_result); } else {Parameter result = resp.getReturnValue(); ls_result = result.getValue().toString(); } } catch(Exception e){throw e;} return ls_result; } public String getBuzz() { String ls_result = ""; Call call = new Call(); call.setTargetObjectURI(objecturi); call.setMethodName ("currentList"); call.setEncodingStyleURI(Constants.NS_URI_SOAP_ENC); try{ ls_result = performCall(call);} catch(Exception e) {ls_result = e.toString();} return ls_result; } } The Web service code is recycled from previous examples. However, the JDOM code has some new tricks to discuss.
The WSDL file uses namespaces heavily. This means the code must use namespaces when accessing the elements within the XML file representation.
We must first obtain references to the namespaces we will be accessing:
Namespace nsr = root.getNamespace();
The method call root.getNamespace() will obtain for the code the default namespace. The code will also need to get a handle to the soap namespace:
Namespace ns_soap = root.getNamespace("soap"); After the namespace handles are obtained, we must reference all elements and attributes, using both the name and the namespace:
serviceserver = root.getChild("service",nsr) .getChild("port",nsr) .getChild("address",ns_soap) .getAttribute("location").getValue(); One fact to remember with namespaces is that if a namespace is not declared, an element inherits the namespace of the parent element.
The JDOM method calls will take this basic format:
getChild(element name, namespace)
It isn't very hard, but the first few attempts to use namespaces can be a bit confusing, especially because a programmer will forget to reference a namespace and then receive a null, rather than the data. This usually happens when referencing child elements. As stated earlier, a child element inherits a namespace. Newer XML programmers often forget this fact.
Now, let's build a JSP to run the BuzzServiceCall class within. Shown in Listing 14.11, the page should be saved as webapps/xmlbook/chapter14/ValidateService.jsp.
Listing 14.11 ValidateService.jsp Used to Validate Web Service
<%@ page import="xmlbook.chapter14.*" %> <html><head><title>Validate Service</title></head><body> <p> Testing service calls </p> <% String ls_wsdl = (String)request.getParameter("URL"); if (ls_wsdl == null) ls_wsdl = ""; %> <form action="ValidateService.jsp" method="post" name="frm_search"> <table> <tr> <td>WSDL URL</td> <td><input type="text" name="URL" value="<%=ls_wsdl%>" size="75"/></td> </tr> <tr> <td></td> <td><input type="submit" name="submit" id="submit" /></td> </tr> </table> </form> <p> Service Call for currentList method </p> <% if (ls_wsdl.length() > 0) { BuzzServiceCall bsc = new BuzzServiceCall(ls_wsdl); out.print( bsc.getBuzz()); } else {out.print("Enter Buzz WSDL URL");} %> </body> </html> This page is basic, simply showing that everything is running, so there is nothing worth commenting on. When the code is executed, you'll see the result shown in Figure 14.4.
Figure 14.4. Running ValidateService.jsp.
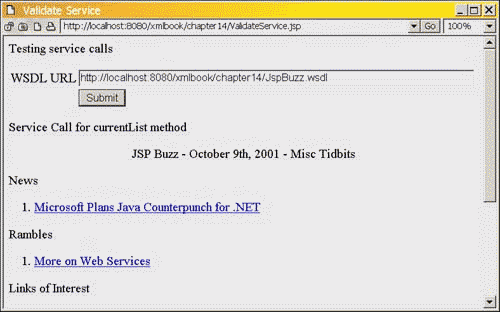
Again, there's noting exciting, but the page shows the Web service is up and running. It's also a good demonstration of parsing an XML file with namespaces.
Summary
Building a Web service is easy. The complications arise in integrating your Web service with the world. In this respect, Web services are still very new. The tools are still immature, and finding the knowledge can be tricky. All new technologies have this problem, and Web services are still in the early stages. The infrastructure to support Web services is still growing. The good news is that much of the integration will be automated in the future, and tools are now being developed to perform this integration.
| CONTENTS |
EAN: N/A
Pages: 26