Creating Subscriptions
|
|
Now that you have created the publication, you're ready to create subscriptions to it. The easiest way to create a subscription is through the Push Subscription Wizard or Pull Subscription Wizard based on the type of subscription you'd like to deploy. To access the Push Subscription Wizard, go to the Replication group in Enterprise Manager and right-click on the publication you'd like to push, selecting Push New Subscription from the shortcut menu.
| Note | You can also access these wizards through Tools | Replication and then either Push Subscriptions To Others or Pull Subscriptions To <server name>. |
The Push Subscription Wizard is much like the Create Publication Wizard with a few twists. As the first step, make sure you check Show Advanced Options in the wizard. This enables you to set features you would normally not have available. Next, choose the subscriber you'd like to send the data to. If the subscriber is not in the list of servers, you will need to register it locally on your machine.
If you're configuring the subscription remotely from your desk, you may be able to see the workstation from your desk but not from the server itself. This will cause a problem later when the subscription is actually created. Always ensure that you can see the subscribers from the server before starting. Also keep in mind that if you're using the two-phase commit, you will have to open the range of ports for MS DTC. For more information about how to make MS DTC work through a firewall, search Microsoft's site for the article entitled 'Configuring MS DTC to Work Through a Firewall.'
You are asked which database you'd like to send the data to on the subscriber. The database can be empty, since the snapshot agent will by default drop the conflicting objects and re-create them. If you have data you need in this database, be careful to back it up. You also can specify that the data not be deleted, or not have objects dropped in the publication properties. To browse the list of available databases, click the Browse or Create button. If you'd like to create an empty database, click the Create New button.
For Windows 2000 or Windows NT machines, you can offload some of the distribution or merge agent work onto another server. By default, this work is performed on the distributor, but you could offload this to gain performance to another subscriber. In most cases, your distributor will not be the database your users are querying from the application, and leaving the agents on the distributor is fine. This can be adjusted later if the need arises.
The next screen prompts you for how often you'd like the distribution agent to execute. By default, this occurs once an hour, but the decision really depends on how much latency is acceptable to your client. If you'd like the smallest amount of latency possible, you can select Continuously. This option sends data to the subscribers in as close to real time as possible. As you can imagine, performance will be degraded if you choose this option.
The next wizard screen asks you to synchronize the schema and initial data. If the schema is already on the subscriber, the No option is available. Otherwise, you have to initialize the data. To do this immediately, check the Start Snapshot Agent Immediately button.
The last step is to confirm that the appropriate services such as the SQL Server Agent service have been started.
Merge Replication Subscriptions
The only special step that merge replication has when you create the subscription is to configure the subscriptions priority. The default setting is normally fine, but if you want to customize the priority to a higher number (up to 99.99), you can adjust it here as shown in Figure 12-13. Any other subscribers appear in the list, so you can see what priority it will take to win a conflict. This is useful when you would like a certain office, such as your headquarters, to win any conflicts against the branch offices.
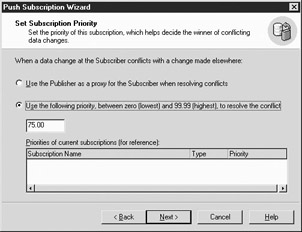
Figure 12-13: Conflict Resolver priority code
Configuring Replication After the Wizard
After the wizard is complete, you can change settings by right-clicking on the publication and selecting Properties. The Publication Properties dialog box allows you to reconfigure most of the settings. There will be some items that are grayed out, and those settings can only be reconfigured by dropping and re-adding the publication.
In the Publication Properties page, use the Snapshot Location tab to configure the publication to be accessible through the Internet. You can do this by checking the Subscribers Can Access This Folder Using FTP box and then specifying the FTP server and login information.
| Tip | In the General tab, you can add a publication to the Active Directory to enable you to find it quickly on your network. |
|
|
- Linking the IT Balanced Scorecard to the Business Objectives at a Major Canadian Financial Group
- Technical Issues Related to IT Governance Tactics: Product Metrics, Measurements and Process Control
- Managing IT Functions
- Governance in IT Outsourcing Partnerships
- The Evolution of IT Governance at NB Power