Log Shipping Role Changes
|
|
This entire setup doesn't do you a bit of good unless you can promote the secondary server to the primary and vice versa. This process is called a log shipping role change. When you revert log shipping back to its original state, it's called role reversal. While Enterprise Manager has an excellent utility for creating a log shipping environment, its system for performing role changes is pretty antiquated and requires knowledge of some system stored procedures. Essentially, you'll have to perform the following steps, which I'll cover in detail momentarily:
-
Stop the web server or application to prevent new connections and transactions.
-
Check to ensure you have good backups of the primary server in case a problem occurs.
-
Ensure that the secondary server is in synch with the latest transaction log.
-
Transfer logins to the new server.
-
Demote the primary server.
-
Promote the secondary server.
-
Update the monitoring server of the role change.
-
Resolve the logins on the secondary server.
-
Link database logins to their users and permissions.
-
Point applications to the new server or rename the SQL Server to the old primary server's name.
As you can see, this process is manual and not fun at all. To perform most of these steps, you will want to develop a DTS package and use system stored procedures. If your logins are always kept in synch, you can skip many of the hard steps.
| Note | It is extremely important to practice the role change regularly to make sure everyone has enough knowledge to perform the task and to time how long an outage you will have. |
Books Online (BOL) details the failover in a topic called 'How to set up and perform a log shipping role change (Transact-SQL)'. The biggest problem you'll have is in synchronizing the logins. As a best practice, this should be done when you first add secondary servers and should be done periodically (at least weekly) beyond that to ensure that they remain in synch. If your logins aren't regularly synched, the role change will not work.
When you create a user in the primary source database, the user will be copied to the secondary servers, but the login will not. The best way to copy the logins is to create a DTS package that uses the Transfer Logins Task to transfer the logins from the primary servers to the secondary servers. This package should be saved on the primary server and can be executed using dtsrun.exe in SQL Server Agent or manually.
To create the DTS package, open Enterprise Manager and connect the primary server. Drill down the Enterprise Manager tree into the Data Transformation Services group, selecting Local Packages. Right-click on Local Packages and select New Package. This will open DTS Designer, where you actually will create and modify packages. From the Tasks menu, select 16 Transfer Logins Task. Under the Source tab, select the primary server, and under the Destination tab, select your secondary servers. Finally, under the Logins tab (Figure 10-17), you can either select to transfer the logins that are associated with a particular database or transfer all the logins for the server. I like to keep my DTS packages granular and only have the logins transferred for a particular database.

Figure 10-17: Logins tab in the Transfer Logins Task
| Note | You'll need to create a Transfer Logins Task for each of your secondary servers. This task did not exist in DTS in SQL Server 7.0. |
Once the package is created, save it in the location of your choice and schedule it as a SQL Server Agent job. If you have saved it locally on the primary server, all you have to do is right-click on the package name in Enterprise Manager and select Schedule. Go ahead after this and execute the package manually to transfer the initial logins over to the remote system. After you run the package, the logins associated with the database will be transferred. Make sure you're running SQL Server 2000 Service Pack 2 or later, as there are some bugs in earlier releases where the passwords may not be transferred over with the logins.
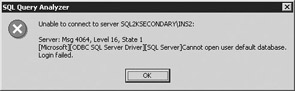
The next step is to synchronize the SIDs since you restored a login from a different server. If the logins are not synchronized after the transfer, the users trying to connect to the new database will receive an error similar to the following when they try to connect to the database.
The way you synchronize the logins for log shipping is by creating a multistep SQL Server Agent job. You can also optionally wrap it into your DTS package we created earlier. For the purpose of this example, I'll let you decide how you'd like to automate it and just show you where to run the various queries. I prefer to wrap the entire role change into a DTS package.
For the first step, you will want to BCP out the syslogins table on the primary system. You'll need these logins later when you try to synch the SIDs. The syntax to do this should look something like this (parameters will vary for your server):
bcp master..syslogins out localpath\syslogins.dat /N /S current_primary_servername /U sa /P sa_password
This will output a syslogins.dat file that will later be used. BOL shows you that the next step is to copy the syslogins.dat file to the secondary server. I prefer just to run the BCP statement shown above from the secondary server and skip that copy step altogether.
The next step is to run the following stored procedure against the current primary server:
EXEC msdb..sp_change_primary_role @db_name = 'current_primary_dbname', @backup_log = 1, @terminate = 0, @final_state = 3, @access_level = 1 GO
The parameters are fairly simple:
-
@db_name The current primary database name you want to demote.
-
@backup_log Backs up a final transaction log from the primary database when this parameter is set to 1.
-
@terminate A parameter of 1 kills and rolls back any transactions that are currently being processed and places the database in single-user mode for the duration of the stored procedure.
-
@final_state A parameter of 1 places the source database in RECOVERY mode, 2 sets it to NO RECOVERY, and 3 sets it to STANDBY mode.
-
@access_level Represents what level of access users will have to this database after it's demoted. A parameter of 1 sets it to MULTI_USER, 2 sets it to RESTRICTED_USER, and 3 sets it to SINGLE_USER.
Next, you must promote the secondary server to a primary server by running the sp_change_secondary_role stored procedure:
EXEC msdb..sp_change_secondary_role @db_name = 'current_secondary_dbname', @do_load = 1, @force_load = 1, @final_state = 1, @access_level = 1, @terminate = 1, @stopat = NULL GO
Like the last stored procedure, sp_change_secondary_role is in the msdb database and is fairly straightforward:
-
@db_name Name of the database to promote to the primary database.
-
@do_load A parameter of 1 specifies that all pending transaction log backups be copied and restored before setting the database to primary.
-
@force_load Specifies that the -ForceLoad parameter be used when restoring pending transactions logs. This option is ignored unless @do_load is set to 1.
-
@final_state A parameter of 1 places the source database in RECOVERY mode, 2 sets it to NO RECOVERY, and 3 sets it to STANDBY mode.
-
@access_level Represents what level of access users will have to this database after it's demoted. A parameter of 1 sets it to MULTI_USER, 2 sets it to RESTRICTED_USER, and 3 sets it to SINGLE_USER.
-
@terminate A parameter of 1 kills and rolls back any transactions that are currently being processed and places the database in single-user mode for the duration of the stored procedure.
-
@stopat Specifies that the database be restored to a specific date and time. Setting the option to NULL loads the database to the current date and time.
The next stored procedure to run in your role change is sp_change_monitor_role. This should be run against the monitoring server. This stored procedure informs the monitoring server of the role change.
EXEC msdb..sp_change_monitor_role @primary_server = 'current_primary_server_name', @secondary_server = 'current_secondary_server_name', @database = 'current_secondary_dbname', @new_source = 'new_source_directory' GO
This stored procedure has the following parameters:
-
@primary_server The name of the old primary server that is being replaced.
-
@secondary_server The name of the secondary server taking the primary server's place.
-
@database The name of the new source database.
-
@new_source The new share location where the transaction logs can be found.
Almost there! The next step is to run sp_resolve_logins against the new primary server. You will point this stored procedure at the path and filename of the BCP file you just outputted. The @dest_path and @filename correspond with the path and filename where this BCP file is located.
USE MASTER GO EXEC sp_resolve_logins @dest_db = 'dbname', @dest_path = 'destination_path', @filename = 'filename' GO
Before running sp_resolve_logins, look at Microsoft KB article Q310882. It documents a bug with the stored procedure that may cause the stored procedure to output the following error:
Server: Msg 208, Level 16, State 1, Line 1 Invalid object name 'syslogins'
To fix the error, you'll have to replace a bad piece of the code from the stored procedure with a corrected version.
BOL does leave out a critical step. Without running sp_change_users_login your logins will not be able to access the database. The syntax for this stored procedure was covered in Chapter 8. To use it here, run it against each login with syntax like this:
USE SourceDBName GO EXEC sp_change_users_login 'update_one', 'UserName', 'LoginName' Go
Or in my case, the syntax would look like this:
USE Northwind GO EXEC sp_change_users_login 'update_one', 'Northwinduser', 'Northwinduser' GO
After that step is complete for each user, you should be finished. Again, this can be done much more efficiently in one DTS package. You can probably now see the need to constantly test this process since there are so many steps.
| Tip | You can also use Network Load Balancing (NLB) techniques to redirect traffic between the two log shipping pairs. This can be done by assigning a virtual IP address (VIPA) for the applications to connect to and then swinging the VIPA over to the new server whenever a problem occurs. |
Role Reversals
If you think the role change to the secondary was ugly, you'll really be upset when you see how manual a process failing it back to the old primary server is going to be. To revert back to the primary server, you can do the following steps (although there is more than one way to do it):
-
Make sure the original server is functional and online.
-
Stop the application and any other processes such as web servers that may be connecting to the log shipping pair.
-
Stop the log shipping process on the current primary server.
-
Make a full backup of the current primary database and restore it onto the secondary server.
-
Switch the log shipping role, making the original primary server the new primary server, and restart log shipping.
-
Point the application connections to the new primary server.
With proper testing and documentation of your process, log shipping is a very good solution for geographically distant systems. Even though it can be difficult at times with the failover processes, you can get over this hurdle by automation.
|
|