Slowly Changing Dimension
The Slowly Changing Dimension (SCD) transform provides a great head start in helping to solve a common, classic changing-dimension problem that occurs in the outer edge of your data model — the dimension or lookup tables. The changing-dimension issue in online transaction and analytical processing database designs is too big to cover in this chapter, but a little background may be necessary to help you understand the value of service the SCD transformation provides.
A dimension table contains a set of discrete values with a description and often other measurable attributes such as price, weight, or sales territory. The classic problem is what to do in your dimension data when an attribute in a row changes, particularly when you are loading data automatically through an ETL process. Take for example something as simple as a product defined in AdventureWorks (see Figure 6-36).
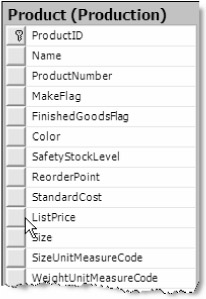
Figure 6-36
Typically in an On-Line Transaction Processing system (OLTP) you'd store one row for the product. If the price of the product changes from $10.00 to $15.00, the field StandardCost gets updated to $15.00. This accomplishes the mission of providing the answer to the question "How much does it cost now?" but you lose the historical perspective about the increases in the price of product. To solve this problem, you have really three basic options. The key to choosing which option comes down to what ultimately matters to your subject domain and can even result in the alteration of your data model. Each option is known by a common name: Type I, II, and III slowly changing dimensions.
-
Type I: Overwrite History — Implements the dimensional attribute change by potentially updating the current value with the new value. However, as discussed above, you'd lose your historical perspective on this attribute.
-
Type II: Maintain History — Implements the new change by adding a completely new row to the dimension table. This preserves the historical perspective but has side effects including complicating the lookup process and adding size to the dimension table.
-
Type III: Preserve Last History — Implements the new change by adding additional attributes to the dimension table to store the last value in the same row. This saves some history but only the last historical change. This is not typically used, but it can be a great solution to store something like a marital name change in a customer or employee dimension table. This way, both names are available in the same row.
| Note | The Slowly Changing Dimension doesn't provide an automated method of handling Type III changes, but it can identify these candidates and divert to a specific output stream to be handled by other tasks. |
The Slowly Changing Dimension transform provides a wizard-like UI that will walk you through a series of questions to guide the decisions about how to handle changes in the dimension table. An Advanced Editor provides more configurability but takes a little getting used to before you can become proficient with it. The wizard will start automatically after clicking the SCD object or the Show Editor link. Once configured, the SCD will generate several transformation tasks to accomplish the task of updating and inserting the target dimension table. Figure 6-37 is an example of the types of tasks that will be generated by this transform. You can see that it is not like the other transform tasks, which are completely contained when you drop them onto the Data Flow design surface.
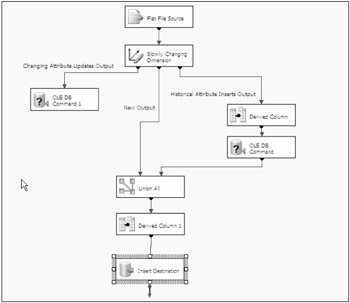
Figure 6-37
The SCD creates all these tasks because it is automating a task that is quite busy. In a nutshell, the SCD essentially consumes both an incoming data source and an OLE DB—connected dimension table, examines both sources using the results of your settings, generates at least two of six possible output streams, and then creates an OLE DB Command object for relevant stream to perform the database update. If it doesn't create exactly the scenario you need, you are at least in the neighborhood. The possible types of output steams or pipes are as follows:
-
Changing Attributes Updates Output: Essentially these are Type I changes. All attributes that were selected in the SCD as changeable will be examined in the incoming data source and compared to the dimension table. If the incoming data source and dimension table match by the business (natural) keys but the attribute values are different, then the input row is diverted to this output stream.
-
Historical Attributes Inserts Output: Essentially these are Type II changes. All attributes defined in the SCD as historical will be examined in the incoming data source and compared to the dimension table. If the incoming data source and dimension table match by the business (natural) keys but the attribute values are different, then the input row is diverted to this output stream.
-
Fixed Attributes Output: All attributes defined in the SCD as fixed will be examined in the incoming data source and compared to the dimension table. If the incoming data source and dimension table match by the business (natural) keys but the attribute values are different, then the input row is diverted to this output stream. This stream can be used to deal with Type III changes, but you have to code your own OLE DB Command. (See the earlier section on OLE DB Command transforms.)
-
Inferred Member Updates: This output is created when the option to enable inferred member support is selected in the SCD. You want to use this option if you want to load the dimension table using a fact or similar table. The output can be used to add to the dimension table rows that will be updated in a later process.
-
New Output: This is the same output stream as the historical output and is used to add rows into the destination table.
-
Unchanged Output: This output is not created by default. If the SCD detects no change in the input source and dimension tables based on the rules provided, then no action is taken. You can create a Data Flow for this output if you have an interest in these rows.
Before you go any further, you should make a point of reference by picking a real-world example and then follow through setting up an SCD transform for each type. You'll use something you know something about — your paychecks — in a rather unconventional SCD example. Every payroll cycle something gets subtracted from your checks before you get it: federal taxes, FICA taxes, health insurance premiums, 401K contributions, voluntary benefits, and even mass-transit tickets. To model these deductions, you might have a table in your OLTP database similar to Figure 6-38. You'd call this table PayrollDeductItem and it would be referenced by a Payroll Event Fact table.
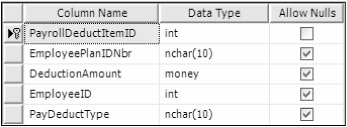
Figure 6-38
A year has gone by and now everyone is signing up for new benefits. Your task is to import the new benefits and update these payroll deduction records in the PayrollDeductItem table. When you examine the import file with the new employee benefits, you'll notice that some benefits have changed in the amount of deduction, some have been added, and if the deduction has been dropped, the amount is now zero. You can schedule an update of your data to run prior to the start of the first payroll for the new benefits period. But if you just update the benefits in place, you'll lose the ability to see trends in employee benefit elections. With this scenario in place, use the SCD transform to import the new records and experiment with the different options available. To prepare for the scenarios, run through the next few setup steps:
-
One thing you'll have to do is add some fields to allow for historical tracking. Even though you use only certain combinations depending on the type of slowly changing dimension logic, go ahead and create all the different fields now. As you work through the options, the purpose of each will become clear. Create the PayrollDeductItem table and add the current employee deductions using the following script:
Use AdventureWorks GO CREATE TABLE [dbo].[PayrollDeductItem]( [PayrollDeductItemID] [int] IDENTITY(1,1) NOT NULL, [EmployeePlanIDNbr] [varchar](50) NULL, [DeductionAmount] [money] NULL, [EmployeeID] [int] NULL, [PayDeductType] [char](10) NULL, [HistTextStatus] [char](10) NULL CONSTRAINT [DF_PDI_HistTxtStatus] DEFAULT ('CURRENT'), [HistBitStatus] [bit] NULL CONSTRAINT [DF_PDI_HistBitStatus] DEFAULT ('TRUE'), [HistStartDate] [smalldatetime] NULL, [HistEndDate] [smalldatetime] NULL, CONSTRAINT [PK_POLICY] PRIMARY KEY CLUSTERED ( [PayrollDeductItemID] ASC ) ON [PRIMARY] ) ON [PRIMARY] GO INSERT INTO PAYROLLDEDUCTITEM(EmployeePlanIDNbr, DEDUCTIONAMOUNT, EMPLOYEEID, PAYDEDUCTTYPE, HISTSTARTDATE) SELECT '000000001', 200.00, 1, '401K', '01/01/2004' UNION SELECT 'ZZ0-10001', 10.00, 1, 'LIFE', '01/01/2004' UNION SELECT '000000002', 220.00, 2, '401K', '01/01/2004' UNION SELECT 'DC001-111', 10.00, 2, 'BUSPASS', '01/01/2004' UNION SELECT '000000003', 300.00, 3, '401K', '01/01/2004' UNION SELECT 'ZZ0-10003', 10.00, 3, 'LIFE', '01/01/2004' GO -
Create a text file to represent the new benefits that have been enrolled. Some are the same, some are new, and some have changed.
EMPLOYEEID,EMPLOYEEPLANIDNBR,DEDUCTIONAMOUNT,PAYDEDUCTTYPE,ENROLLDATE,COMMENT 1,000000001,225,401K,'01/01/05',INCREASED 401K DEDUCTION 1,ZZ0-10001,15,LIFE,'01/01/05',INCREASED LIFE DEDUCTION 2,000000002,220,401K,'01/01/05',NO CHANGE 2,DC001-111,0,BUSPASS,'01/01/05',TERMINATED BUSPASS DEDUCTION 3,000000003,250,401K,'01/01/05',DECREASED DEDUCTION 3,ZZ0-10003,10,LIFE,'01/01/05',NO CHANGE 4,000000004,175,401K, ‘01/01/05',NEW 401K DEDUCTION
-
Create a package with a Data Flow task and configure a Flat File connection to the text file as a delimited file. Select the option to use the column names in the first data row. Change the sizes of the EmployeePlanNbr and PayDeductType columns in the Advanced tab to Size=10. Set the data type of EmployeeID to a 32-bit Integer [DT_I4]. Set the data type of DeductionAmount to currency [DT_CY].
-
Import the file with a Flat File Source in the Data Flow tab that uses the Flat File connector.
-
Add a Slowly Changing Dimension transform to the Data Flow design surface and connect the output of the flat file to the SCD.
For reference, the completed PayrollDeductItem table should look like Figure 6-39. One thing you might be wondering is why there are extra columns: HistTextStatus, HistBitStatus, HistStartDate, and HistEndDate. You don't need all these columns to use the SCD transform. You'll use different columns throughout this section, and the differences will be explained as you go along.

Figure 6-39
The SCD Wizard will guide you through four steps to configure the SCD transform. The steps can be categorized into the following:
-
Dimension Table and Business Key Wizard Selection step: This step requires the location of the dimension table, the mapping of the input fields from your source data to the dimension table for comparison, and a decision about what to use for a business key for this data. What fields do you need to map? Map any field that contains data to overwrite dimension field data or that makes up a natural or business key to the dimension field data. If the mapping is considered a part of the natural or business key for the dimension table, then each field should be denoted as a Business Key in the Key Type column.
-
Slowly Changing Dimension Wizard Selection step: This step focuses only on those fields mapped in the first step that aren't business keys. This step needs a decision for each of these fields to determine how to update the dimension table. Each field (or attribute) should fit into one of these categories (or should not be selected) when a row is matched using the business key:
-
Fixed Attribute: The value in the dimension table should be fixed. If the value in the incoming source doesn't match, this should create an error.
-
Changing Attribute: The value in the dimension table can always be overwritten by new values from the source. If only changing attributes are selected, the slowly changing dimension would be classified as a Type I change.
-
Historical Attribute: The value in the incoming source doesn't match the dimension table, but the change in value is significant and should be stored. If a historical attribute is selected, this implies a Type II slowly changing dimension.
-
-
Fixed and Changing Attribute Options: If you have selected any attribute that is fixed, there is the option to fail or ignore on a change in that attribute. Another choice selects whether overwrites of data are allowed only on active rows or whether overwrites on both active and outdated rows are allowed.
-
Historical Attribute Wizard Selection step: This step appears only if a historical attribute is selected. If there is a historical attribute, you are dealing with a Type II solution to a slowly changing dimension. There are two ways to store the historical change. Each way results in a new row being created and each way is represented in the wizard with separate option buttons:
-
Use a single column to show current and expired records. This option allows selection of a column in the dimension table that can be used to turn on or off or mark in some way to denote that one record is old and another more current. In the SCD transform, there are only two choices: True/False and Current/Expired.
-
Use start and end dates to identify current and expired records. This option requires the selection of one start date and one end date column. An option also requires a date variable to be chosen that will mark the end date of the old historical record and the start date of the new record.
-
-
Inferred Member selections Wizard Selection step: This step is used if you are loading your dimension tables from your fact table and you don't have all the attribute data from the dimension table or plan to load it later. Turning on inferred member support will allow you to fill the dimension table with what you have and mark these separately from any data you may have already loaded. An example of an inferred member would be a new benefit like a grocery store discount card that you don't yet have loaded in your database, but you are now receiving data about your employees who have chosen this benefit.
-
Finish Wizard Selection step: This step will go over all the decisions that you have selected prior to building the transforms. This step is the "Are you sure?" dialog box.
In the payroll deduction example, you have to make a decision about how to identify a row in your dimension table using the columns in the data as a natural or business key. Your knowledge of the subject domain tells you that the [EmployeeIDNbr] rarely changes but also that each plan selected by the employee has a unique number that doesn't change, even if the benefit amount changes. The combination of [EmployeeIDNbr] and [EmployeePlanIDNbr] would probably be your strongest business key. The primary key [PayrollDeductItemID] is not used for comparison purposes because it has no relevance outside the database. When comparing to rows in an unconnected database source, [PayrollDeductItemID] doesn't help you decide whether a row should be inserted or updated.
Your other decision is what to do if you find a match from your new enrollment data source in your dimension table. When you process the first row of the input file, what do you do with the [EmployeePlanIDNbr] of "0000000001," [EmployeeID] of "1," and [PayDeductType] of "401" when the amount of $225.00 is different for the existing benefit? Do you update the current row using the business key of [EmployeeID]=1 and [EmployeePlanIDNbr] = "0000000001" to $225.00? Figure 6-40 will give you a good idea what results you might expect based on the choices available.

Figure 6-40
Take this information in Figure 6-40 and proceed with the SCD transform. When you first open the editor, you automatically get the wizard and a start page. Click Next to navigate to the Dimension Table and Business Key Wizard Selection step. First you must select an OLE DB data source and the table that represents the dimension table. The dimension table will be the PayrollDeductItem table. All incoming source columns that either will be used as business keys or will update the dimension columns should be selected and mapped to the matching dimension columns. The Key Type for each input column defaults to "Not a key column." The columns [EmployeePlanIDNbr] and [EmployeeID] that you chose earlier as business keys should both have Key Type property values of "Business Key." Notice that the wizard requires the selection of at least one business key to move to the next step. The wizard should look like Figure 6-41. Click Next to continue.
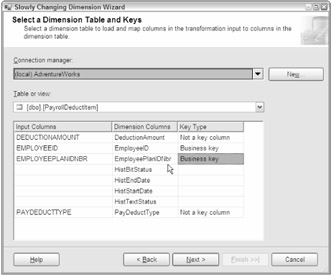
Figure 6-41
The next step will display all remaining fields that are not part of the business key. These are the only fields that are candidates for updating in the dimension table. For each field, select whether the field will be a changing or a historical attribute. If a field is selected as a Changing Attribute, column data in the dimension table will be replaced when a match is made by business key. Fields selected as a Historical Attribute column will be evaluated for changes. If a change is detected in any of these columns, a new row will be created and marked based on the type of Historical Change chosen. Experiment by setting up both columns — [DeductionAmount] and [PayDeductType] — as changing attributes and click Next. You should see the Fixed and Changing Attribute Options step as in Figure 6-42. If the attribute value for field [PayDeductType] is changed to Fixed, the Fixed attributes section would be enabled. Go back and set up the [DeductionAmount] field as a historical attribute and the [PayDeductType] as a changing attribute.
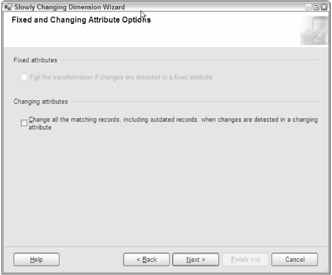
Figure 6-42
Since you've chosen one historical attribute, the Historical Attribute Wizard Selection step will be next. You have the option of choosing one of two methods to store the information historically if the DeductionAmount field changes. Now the extra fields on the PayrollDeductItem table start to make sense. All these fields are not necessary, but they are provided for you to experiment with the different storage options. The HistStartDate and HistEndDate fields would be used for the date-based historical storage option. Use HistBitStatus or HistTextStatus when using the single-column method. This method will update the old record to False or Expired. The new record will have the value of True or Current. Figure 6-43 is an example of the step with the options to use start and end dates enabled. The option to set the date value is expanded to show the available options. You can also use the value of your own variable. Set this step to System::StartTime and continue.
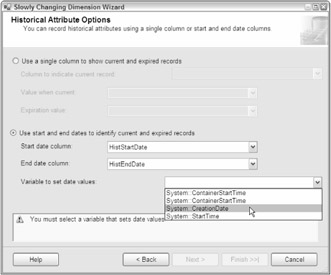
Figure 6-43
The next step is the Inferred Member selections Wizard Selection step. In this example, you should not have any deductions coming from employees that are not in the payroll system, so you don't really need any inferred member support. This option would be useful if you were loading the dimension data from this enrollment input and just needed a placeholder in the dimension data. The inferred member selection step looks like Figure 6-44. If inferred member support is enabled, you must choose to either set the values of all the attributes designated as historical or changing attributes to NULL or use a Boolean column to indicate that the data was loaded as an inferred member.
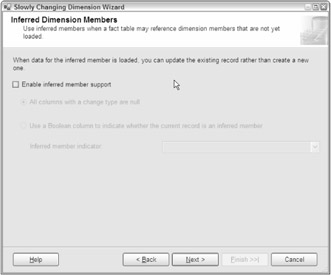
Figure 6-44
The completion of the Inferred Member support step brings up a confirmation and final step. Earlier you had gone over all the different outputs that were available in the SCD transform. This step will give you a preview of what outputs will be used based on the settings of the SCD transform. It is against these outputs that you can intercept the stream from the SCD transform and provide your own custom logic prior to, or in place of, the automatically generated OLE Command tasks. However, note that once you add customization, you should not use the wizard again. The wizard will automatically regenerate the components, wiping out any customization that you have added. The completion of the example should look similar to Figure 6-45.
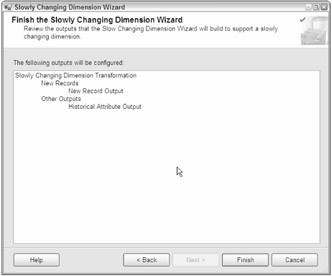
Figure 6-45
After completing the SCD Wizard, your Data Flow design page should have exploded with transform objects to look something like Figure 6-46. There are three pipes coming from the SCD transform. Starting from the left, the pipe updates all matching business key rows in the dimension table with the field contents of the Flat File Source using an OLE DB command. If you have a need to create a Type III SCD, this pipe is the one you want to intercept and use to code your own update. In the middle, the New Output pipe will contain all incoming rows that are identified as new rows. These rows will be combined in the Union All transform with the rows being created as a result of the historical attribute rules and be inserted into the dimension table. In the far-right pipe, the old rows where the historically named attributes show differences will be updated with the markings that identify that the row has expired. Since you selected to use the date ranges, the Derived Column transform generates the expiration date, and the OLE DB command updates each matching row. The second Derived Column task creates the start date and updates each incoming row with that date.
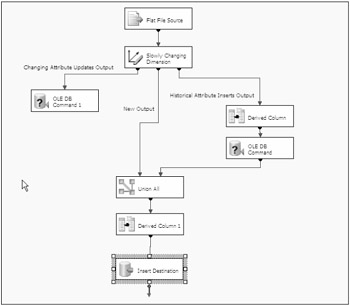
Figure 6-46
To complete the example for production use, I'd recommend examining the OLE DB commands to determine how much you are going to trust incoming data to update your dimensions. If you are updating a data warehouse with data from your OLTP system, you probably have very little work to do. If you are using the SCD transform to import data as was done in this example, the OLE DB commands need to be more discriminatory. For example, fields that have data shouldn't be replaced with missing attributes from the input source. But even with these disclaimers, it should be clear that the SCD Wizard has given you a great start and has generated most of the heavy lifting.
EAN: 2147483647
Pages: 182