Unpivot
The Unpivot transform performs the reverse of the Pivot transform. Use this transform to reengineer pivoted data quickly into a relational state. All the same ideas about pivots apply, but you'll be applying them in reverse. Use a view in the AdventureWorks works database named [Sales].[vSalespersonsalesbyfiscalyears] to demonstrate returning a pivot table back into its named columns. See Figure 6-32 for a sample set of the rows in this pivot table.

Figure 6-32
Your task, as with the Pivot transform, is to break the columns down into their pivot functions. Which column appears to define the row? The column labeled "SalesPersonID" is the best candidate for your row (or set) column since it meets the criteria of uniquely defining the row. The columns labeled "2002," "2003," and "2004" appear to be items in a series and meet the requirement of unique instances of columns. Columns [2002], [2003], and [2004] are the best candidates to be combined into your Unpivot column. Intuitively, if you are combining three different named columns, you'll need only one column and one column name. Name your Unpivot column "SalesYear." Determining the value column is not a function of choosing an available column heading. The value column is defined by the data in the matrix — the result of the row and pivot column combinations. Since your data is sales data, you can assume that this is total sales information (although it is peculiar that this data is stored at the ten-thousands place).
Call your value column "YearlySales." The remaining columns —" FullName," "Title," and "SalesTerritory" — play no significant role in the pivot process. These columns are just attributes to the row column identifier "SalesPersonID." Now you are ready to configure the Unpivot transform to extract these columns from the pivot table.
-
Create a new SSIS project named "Unpivot Example." Add a Data Flow task to the Control Flow design surface.
-
Add an OLE DB transform to the Data Flow design surface. Configure the transform to connect to the AdventureWorks database and to table [Sales].[vSalespersonsalesbyfiscalyears].
-
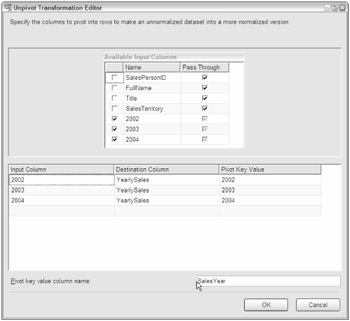
Add an Unpivot transform to the Data Flow design surface. Connect the output of the OLE DB Source to the transform. Click on the task to invoke the Unpivot Transform Editor. An example of this editor is shown in Figure 6-33. The key to understanding how to configure the transform is to understand that regardless of the number of input columns, only the columns that represent the pivot are to be selected in the Available Input Columns collection. All columns can be selected for pass-through, but only the pivot columns should appear in the grid. The grid contains three columns:
-
Input Column: Each candidate Unpivot column should be selected as an input column.
-
Destination Column: The name you have chosen to use when combining all your unpivot columns.
-
Pivot Key Value: This is the unique value that generated the pivot and will now be placed into your new destination column. Usually the default will be the same as the original pivot column. You can also put expressions in this property.
-
-
Configure the Pivot Key Value Column Name property. This is simply the pivot column name that represents your value column. Earlier you named this column "YearlySales." The Unpivot transform will use this name as your field name and move the data from this column in the pivot table into this field. The transform doesn't need the data type provided, since that can be inferred from the source data. All the other fields should be set to pass-through for this transformation. This will make these fields available as transformation output.
-
Add an OLE DB Destination to the Data Flow design surface. Connect the transform to the AdventureWorks database. Click on the New button to create a new Name of table or view. Change the CREATE TABLE statement table name to "UnPivotData." Save. Click on the Mappings tab and save the transform.
-
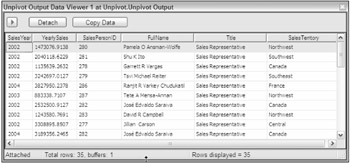
Add a data view of type grid to the pipe between the Unpivot and the OLE DB Destination. Run the package. The results should be similar to those in Figure 6-34. Notice that the SalesYear column is filled with the unpivoted column values of "2002," "2003," and "2004."

Figure 6-33

Figure 6-34
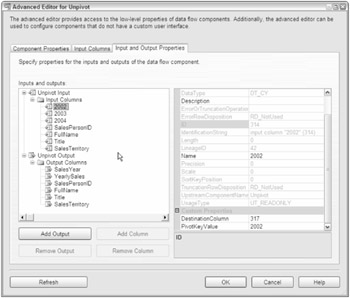
Take a side trip and review the Advanced Editor. The Advanced Editor (see Figure 6-35) is essentially the same as the Pivot transform — but configured in reverse. The input columns are the pivot table columns and the output columns are the relational columns. Notice that for each of the pivot columns [2002], [2003], and [2004] the DestinationColumn is set to 317. This is the LineageID for the [YearlySales] column and your value field.

Figure 6-35
If you view the properties for the SalesYear output column, you'll see that this column is defined as the PivotKey. The word "Pivot Key" is appropriate since the result of packaging the unpivot columns [2002], [2003], and [2004] is to create a column that can be used as a Pivot to unpack back into the separate column names.
EAN: 2147483647
Pages: 182