Chapter 2: The SSIS Tools
As with any Microsoft product, SQL Server ships with a myriad of wizards to make your life easier and reduce your time to market. In this chapter you'll learn about some of the wizards that are available to you. These wizards make transporting data and deploying your packages much easier and can save you hours of work in the long run. The focus will be on the Import and Export Wizard. This wizard allows you to create a package for importing or exporting data quickly. As a matter of fact, you may run this in your day-to-day work without even knowing that SSIS is the back-end for the wizard. The latter part of this chapter will explore other tools that are available to you, such as the Business Intelligence Development Studio.
Import and Export Wizard
The Import and Export Wizard is the easiest method to move data from sources like Oracle, DB2, SQL Server, and text files to nearly any destination. This wizard, which uses SSIS on the back-end, isn't much different from its SQL Server 2000 counterpart. The wizard is a fantastic way to create a shell of a SSIS package that you can later add to. Oftentimes as a SSIS developer, you'll want to relegate the grunt work and heavy lifting to the wizard and then do the more complex coding yourself.
Using the Import and Export Wizard
To get to the Import and Export Wizard, right-click on the database you want to import data from or export data to in SQL Server Management Studio and select Tasks Import Data (or Export Data based on what task you're performing). You can also open the wizard by right-clicking SSIS Packages in BIDS and selecting SSIS Import and Export Wizard. The last way to open the wizard is by typing dtswizard.exe at the command line or Run prompt. No matter whether you need to import or export the data, the first few screens will look very similar.
Once the wizard comes up, you'll see the typical Microsoft wizard welcome screen. Click Next to begin specifying the source connection. In this screen you'll specify where your data is coming from in the Source drop-down box. Once you select the source, the rest of the options on the dialog box may vary based on the type of connection. The default source is SQL Native Client, and it looks like Figure 2-1. You have OLE DB sources like SQL Server, Oracle, and Access available out of the box. You can also use text files, Excel files, and XML files. After selecting the source, you'll have to fill in the provider-specific information. For SQL Server, you must enter the server name, as well as the user name and password you'd like to use. If you're going to connect with your Windows account, simply select Use Windows Authentication. Lastly, choose a database that you'd like to connect to. For most of the examples in this book, you'll use the AdventureWorks database.
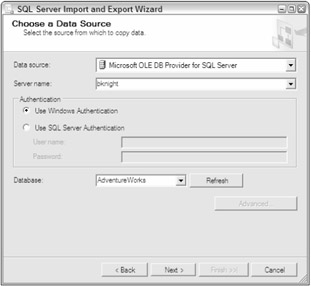
Figure 2-1
| Note | Additional sources such as Sybase and DB2 can also become available if you install the vendor's OLE DB providers. Installing Host Integration Services by Microsoft also includes common providers like DB2. |
After you click Next, you'll be taken to the next screen in the wizard, where you specify the destination for your data. The properties for this screen are exactly identical to those for the previous screen. Click Next again to be taken to the Specify Table Copy or Query screen (see Figure 2-2). On the next screen, if you select "Copy data from one or more tables or views," you'll simply check the tables you want. If you select "Write a query to specify the data to transfer," then you'll be able to write an ad hoc query (after clicking Next) of where to select the data from or what stored procedure to use to retrieve your data.
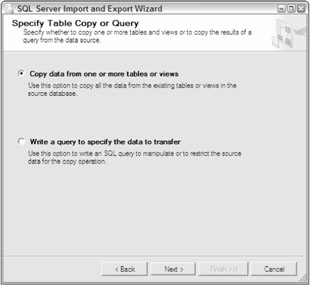
Figure 2-2
For the purpose of this example, select "Copy data from one or more tables or views" and click Next. This takes you to the screen where you can check the tables or views that you'd like to transfer to the destination (see Figure 2-3). For this tutorial, check all the tables that belong to the HumanResources schema in the AdventureWorks database.
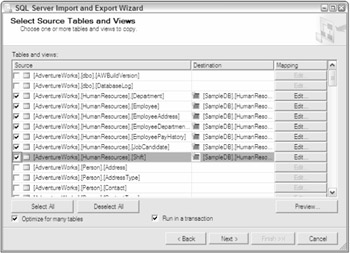
Figure 2-3
You can optionally check the "Optimize for Many Tables" and "Run in a Transaction" checkboxes to encapsulate the entire data move in a single transaction that would roll back if a problem occurs.
If you wish, you can click the Edit buttons to go to the Column Mappings dialog box (see Figure 2-4) for each table. Here you can change the mapping between each source and destination column. For example, if you want the DepartmentID column to go to the DepartmentID2 column on the destination, simply select the Destination cell for the DepartmentID column and point it to the new column, or choose SSIS to ignore the column altogether.
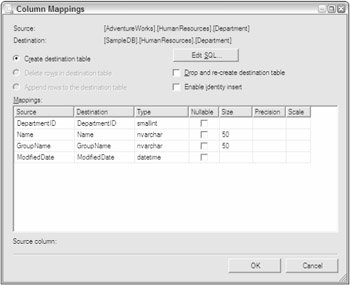
Figure 2-4
Notice that since you're moving the data to a new database that doesn't have the Department table already there, the Create Destination Table option is one of the few options enabled by default. This will create the Department table on the destination before populating it with data from the source. If the table did already exist, you could select that all the rows in the destination table will be deleted before populating it. The default setting if you already have the table there is to append the data from the source to the destination. You can also specify that you want the table to be dropped and re-created. The Edit SQL option allows you to specify the schema for the destination table that will be created.
Finally, you can enable the Identity Insert option if the table you're going to move data into has an identity column. If the table did have an identity column in it, then the wizard will automatically enable this option. If you don't have the option enabled and you try to move data into an identity column, the wizard will fail to execute.
Click OK to apply the settings from the Column Mappings dialog box and Next to proceed to the Save and Execute Package screen. Here you can specify whether you want the package to execute only once or whether you'd like to save the package off for later use. As you saw earlier, you don't necessarily have to execute the package here. You can uncheck Execute Immediately and just save the package for later modification. In this example, set the wizard to Execute Immediately, save the package as a File System file, and click Next. You'll learn more about where to save your SSIS packages in Chapter 3.
You will then be asked how you wish to protect the sensitive data in your package. Again, you'll learn more about this in Chapter 3, so for the time being, specify that you'd like to protect your sensitive data with a password and give the dialog box a password (as shown in Figure 2-5).
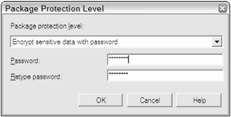
Figure 2-5
You will then be taken to the Save SSIS Package screen, where you can type the name of the package and the location to which you'd like to save the package. Optionally, you can add a description to the package. This helps you later operationally when you need to identify the purpose of the package (see Figure 2-6).
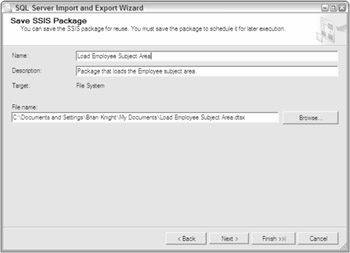
Figure 2-6
Click Next and confirm what tasks you wish the wizard to perform. The package will then execute when you click Finish, and you'll see the page in Figure 2-7. Any errors will be displayed in the Message column. You can also see how many rows were copied over in this column. You can also double-click on an entry that failed to see why it failed.
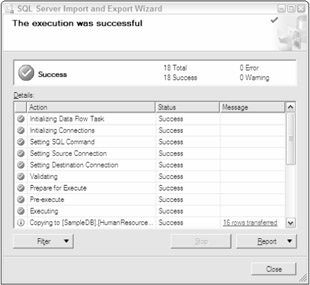
Figure 2-7
After the wizard executes, the package can be found in the location that you have specified, but the default is in the My Documents directory. You can open the package that executed in BIDS. You can see the Data Flow tab for the package in Figure 2-8. There is also a control flow step that contains the preparation steps, such as creating the tables.
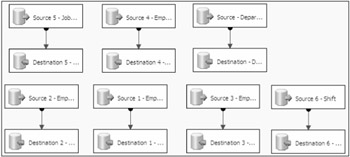
Figure 2-8
You'll also see in the package that there are only two connections: one for the destination and another for the source. Even though it's a shared connection, each transformation runs in parallel, which is a marked improvement from SQL Server 2000, where this would be a serial operation when using a single connection.
EAN: 2147483647
Pages: 182