Straightening Crooked Photos the CS2 Way
| This tutorial actually came to me while I was writing another tutorial in this book. Earlier in this chapter, I explain how to add a vignette to your photos and save the settings so you don't have to re-create them every time. Well, while I was writing that tutorial I stumbled upon a tool that lets you straighten your photos visually in Photoshop CS2. Step OneOpen a photo that needs straightening. Unfortunately, I find that I have way too many of them. Okay, maybe not way too many of them, but I do have my fair share (that's why I love shooting digital).  ©MATT KLOSKOWSKI Step TwoChoose Filter>Distort>Lens Correction. The Lens Correction dialog will open. In here, you can repair many lens-related problems that can occur in your photos. This filter is especially helpful if you're not shooting RAW, but it's got a lot of other cool features in it, as well. 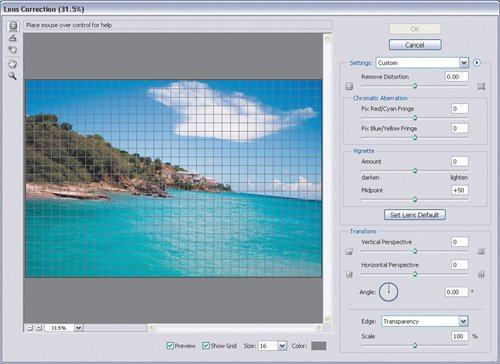
Step ThreeThe first thing I usually do is turn off the Show Grid checkbox at the bottom of the dialog. Then, along the top-left side of the filter, you'll see some tools. One of these tools happens to be a Straighten tool (I know...I never saw it either!). Using this tool is incredibly simple. First, zoom in to the horizon line. Select the Straighten tool (A) and click-and-drag it along a surface that should be straight. In this example, I'm dragging along the horizon line in the water on the right side of the image. 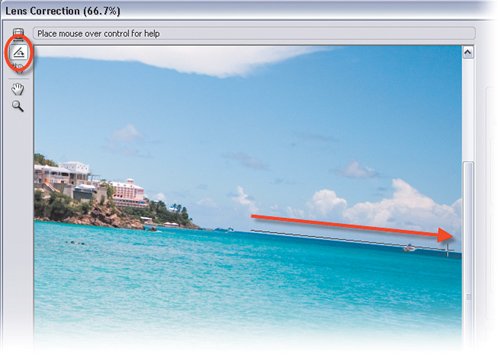 Step FourWhen you release the mouse button, the filter will automatically straighten the photo. This is the one time where I'll turn the Show Grid checkbox back on just to match up the horizon with the grid lines. There's one small issue, though. You'll see that the filter leaves the edges of the photo looking odd. To fix this you can just increase the Scale setting at the very bottom right of the dialog. Depending on the size and resolution of your photos, and how crooked they are, I find that you can easily get away with a 515% increase here. Any more than that and you may want to just press OK and crop the photo outside of the filter. Before adjusting the Scale percentage 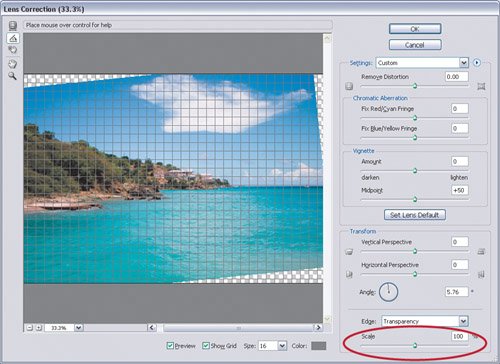 After adjusting the Scale percentage 
|


EAN: 2147483647
Pages: 113
- Chapter I e-Search: A Conceptual Framework of Online Consumer Behavior
- Chapter VI Web Site Quality and Usability in E-Commerce
- Chapter XI User Satisfaction with Web Portals: An Empirical Study
- Chapter XVI Turning Web Surfers into Loyal Customers: Cognitive Lock-In Through Interface Design and Web Site Usability
- Chapter XVIII Web Systems Design, Litigation, and Online Consumer Behavior