Converting Multiple Images from One File Type to Another
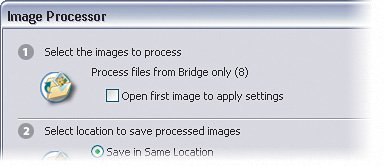
| I can't even begin to count the number of times people have asked me how to convert an entire folder of RAW files into PSD, TIFF, or JPEG files. I used to cringe when I got the question, though, because it involved creating an action and batch processing. It wasn't difficult to do but it just wasn't the quick one-minute answer they wanted. However, in Photoshop CS2, I now have my quick one-minute answer. Heck, it's really a 10-second answerit's called Image Processor and it rocks! Step OneLet's say you're a photographer and just got back from a photo shoot. It could be a professional shoot or just a day out with the kids. Either way, it's likely you've got a lot of images that need processing. If you shot in RAW, you'll have to convert those photos to an easier format for sharing and printing. Also, it's likely you'll need to resize your photos, as well, so you can email them to family or friends or put them on a website. The first thing to do is go find the photos in Bridge that you need to process. In this example, I'm going to use RAW images but it could just as easily be JPEG or TIFF. Choose Tools>Photoshop>Image Processor and the Image Processor dialog will appear. 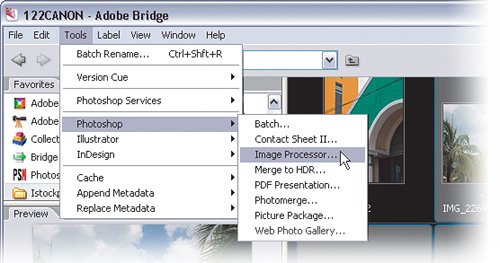 ©MATT KLOSKOWSKI 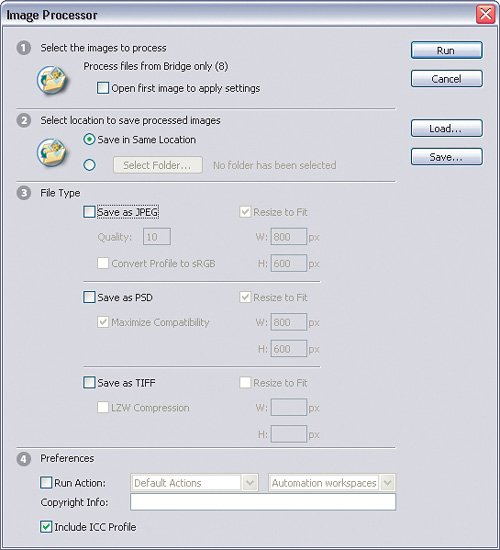 Step TwoThe nice folks at Adobe numbered the Image Processor dialog with four sections so it makes it easy to work with. In the first section, choose a folder of the images you want to process. Since we launched this through Bridge, your images should already be selected and it'll tell you how many will be processed. You can also choose to work with open images if you have some open in Photoshop already.
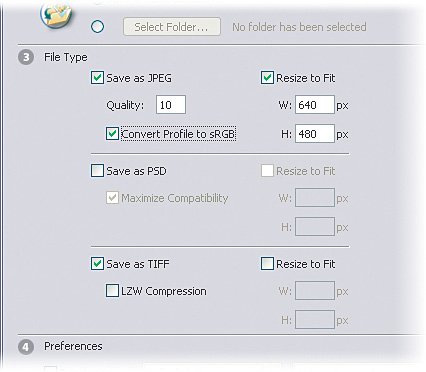
Step ThreeIn the second section, choose a destination. You can choose to save your images in the same location as the originals or you can pick a different location. I usually leave this set to Save in Same Location. Step FourIn the third section, you'll need to pick what file type you want to save the images as. Your choices are JPEG, PSD, and TIFF. You can pick any one, a combination, or all three of the file types if you choose. Photoshop will create an individual folder for each file type and a copy of your photo for each option you select. You'll also notice there are options for resizing the images, as well. Let's go ahead and select JPEG with a quality setting of 10. Turn on the Resize to Fit checkbox and enter 640 for width and 480 for height. Now, this doesn't resize each image to fit into 640x480, though. What it does is set a maximum size constraint so photos will be a maximum of 640 pixels wide and 480 pixels high. But, it doesn't change the aspect ratio, which is important to know. Finally, if you're sending files to a printer that may require them to be in the sRGB color profile, then turn on the Convert Profile to sRGB checkbox. While we're here, I'm also going to select Save as TIFF and leave these photos at their original size.
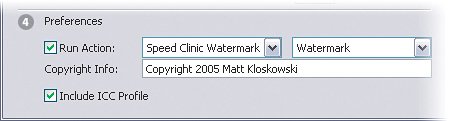
Step FiveFinally, in the fourth section, you have the option of running an action on each of the images that will be processed. This is convenient if, say, you have an action that creates a watermark on your photos automatically or even a sharpening action. You can run that action on all of these photos during this process. The last thing to choose is whether you want to add any copyright info, as well as whether to include the ICC profile. I suggest you do both here as these options may save you time down the road. Step SixThat's all there is to it. Once you've set all of the options, just click Run and watch Photoshop do its thing. Depending on how many images you're processing this could take anywhere from a few seconds to a few (or more) minutes. However, it's well worth the wait. In the end, you'll see two new folders containing your new images. 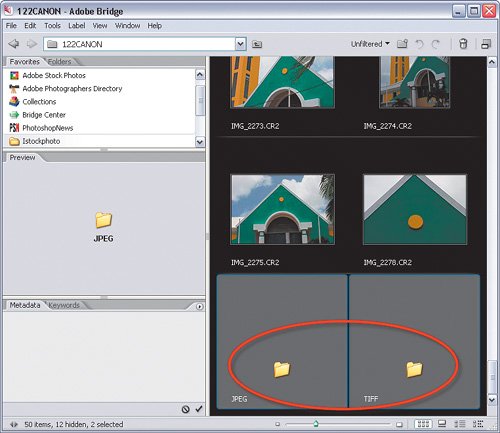
|


EAN: 2147483647
Pages: 113