Problem You want to add to a GridView row a confirmation pop-up that appears whenever a user tries to delete a row in the GridView. Solution Add a Select button to each row of the GridView and a Delete button below the GridView. Whenever the Delete button is clicked, execute some client-side script that displays the confirmation pop-up, followed by some server-side code that performs the actual deletion. In the .aspx file: Create an extra button column in the GridView to display a Select button. Add a Delete button below the GridView.
In the code-behind class for the page, use the .NET language of your choice to: Register the client-side script to be executed when the Delete button is clicked. Add an attribute to the Delete button that calls the delete script when the Delete button is clicked.
Figure 2-22 shows a GridView with this solution implemented. Examples 2-54, 2-55 through 2-56 show the .aspx and code-behind files for the application that produces this result. Figure 2-22. Confirmation pop-up before deletion in a GridView output 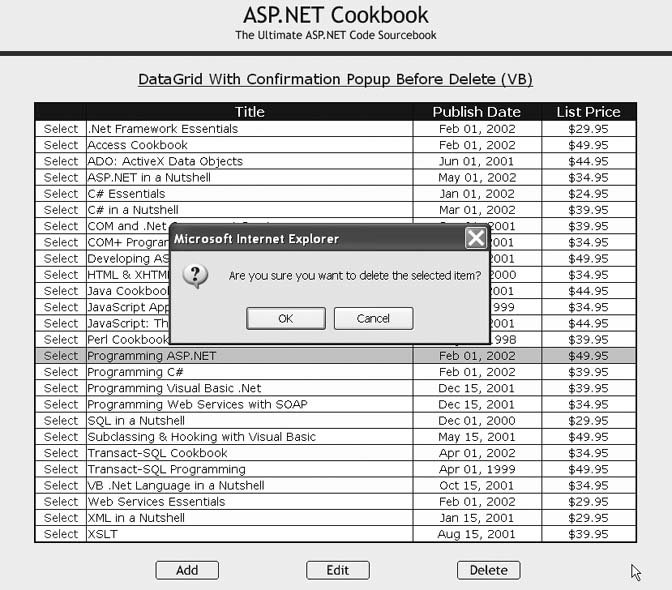
Discussion To display a confirmation pop-up when a user attempts to delete a row in a data table, you create a GridView in the same way you have done throughout this chapter, except that you add a button column to allow for row selection. Setting the ButtonType to "Link" outputs a hyperlink for selecting the row. (The ButtonType can instead be set to "Button" to output an HTMLInputButton control or "Image" to output an HTMLImageButton control.) The CommandName defines the action to be taken when the button is clicked, and the Text attribute defines the text that will be output for the button. (The "select anywhere approach" described in Recipe 2.19 can be used here instead.) <Columns> <asp:ButtonField ButtonType="Link" CommandName="Select" Text="Select" /> … </Columns>
From here on, it's easiest to explain the remaining steps of this recipe in the context of our actual example application. In the Page_Load method of the code-behind, the client-side script block to be executed when the Delete button is clicked is created and registered with the page. The ClientScript.IsClientScriptBlockRegistered method is used to ensure that the script block is not registered more than once on the page. The ClientScript.RegisterClientScriptBlock method is used to output the script block in the page when the page is rendered. This method causes the script to output immediately after the opening Form tag. If you prefer the script to be output immediately before the Form end tag, the ClientScript.RegisterStartupScript method can be used instead. In ASP.NET 1.x, the RegisterClientScriptBlock was part of the Page class and had only two parameters: the name of the script (the key) and the script that was to be output. In ASP.NET 2.0, the RegisterClientScriptBlock method has been moved to the new ClientScript class and two new parameters have been added. The first parameter is a type and can be used in conjunction with the key to identify the script uniquely. This helps avoid the problem of scripts with the same name being output from other controls, resulting in an improperly executing page. The type is generally set to the type of the controlling container such as the page class or the user control class. The second and third parameters of the RegisterClientScriptBlock are the key and script, as within ASP.NET 1.x. The fourth parameter is a Boolean that when set true will cause the script tags to be output automatically so your script block does not have to contain the tags as it did in ASP.NET 1.x. The client-side script that is output to the browser is shown here: <script type="text/javascript"> <!- function beforeDelete() {return(confirm('Are you sure you want to delete the selected item?'));} // --> </script>
 | The code that outputs the client-side script block must be executed every time the page is rendered, including postbacks, because the registered script blocks are not persisted in the Page object. |
|
After creating and registering the client script block, an attribute is added to the Delete button control to cause the client script block to be executed when the button is clicked. The resulting HTML for the delete button is shown here: <input type="submit" name="ctl00$PageBody$btnDelete" value="Delete" onclick="return(beforeDelete());" />
When the user clicks the Delete button, the beforeDelete function is called in the client-side code. The beforeDelete function outputs a standard HTML confirmation dialog box with the message, "Are you sure you want to delete the selected item?" If the user clicks the Cancel button, the function returns False, effectively canceling the postback of the page. If the user clicks the OK button, the function returns TRue, allowing the page to be posted back to the server. A server-side event handler (btnDelete_ServerClick) is added to the code-behind to handle the Delete button's server-side click event. In this method, a check is performed to ensure a row is selected, and then the required deletion code for your application is processed.  | The JavaScript registered in the code-behind and the attribute added to the Delete button can also be placed directly in the .aspx file. This was not done in this example, though, in the spirit of keeping all code in the code-behind and all presentation aspects in the .aspx file, a highly recommended practice. By using this approach, you can create a library of client-side scripts once and reuse them many times throughout your applications. |
|
| Using a radio button for row selection instead of a Select button would be preferable, but a bug in Releases 1.0, 1.1, and 2.0 of ASP.NET makes it difficult. The problem is caused by a unique name and group name being generated for every control in the grid, thus placing the radio buttons on each row in a different group. This has the unfortunate consequence of allowing a user to select multiple radio buttons at the same time. For details of the bug, see Knowledge Base article Q316495 on Microsoft's MSDN web site (http://msdn.microsoft.com). |
|
See Also Recipe 2.19 Example 2-54. Confirmation pop-up before deletion in a GridView (.aspx) <%@ Page Language="VB" MasterPageFile="~/ASPNetCookbookVB.master" AutoEventWireup="false" CodeFile="CH02GridViewWithConfirmBeforeDeleteVB.aspx.vb" Inherits="ASPNetCookbook.VBExamples.CH02GridViewWithConfirmBeforeDeleteVB" Title="GridView With Confirmation Popup Before Delete" %> <asp:Content Runat="server" ContentPlaceHolder> <div align="center" > GridView With Confirmation Popup Before Delete (VB) </div> <asp:GridView Runat="Server" AllowPaging="false" AllowSorting="false" AutoGenerateColumns="false" BorderColor="#000080" BorderStyle="Solid" BorderWidth="2px" Caption="" HorizontalAlign="Center" Width="90%" > <HeaderStyle HorizontalAlign="Center" Css /> <RowStyle css /> <AlternatingRowStyle css /> <SelectedRowStyle Css /> <Columns> <asp:ButtonField ButtonType="Link" CommandName="Select" Text="Select" /> <asp:BoundField HeaderText="Title" DataField="Title" ItemStyle-HorizontalAlign="Left" /> <asp:BoundField HeaderText="Publish Date" DataField="PublishDate" ItemStyle-HorizontalAlign="Center" DataFormatString="{0:MMM dd, yyyy}"/> <asp:BoundField HeaderText="List Price" DataField="ListPrice" ItemStyle-HorizontalAlign="Center" DataFormatString="{0:C2}"/> </Columns> </asp:GridView> <br /> <table width="40%" border="0" align="center"> <tr> <td align="center"> <asp:Button runat="server" Text="Add" OnClick="btnAdd_ServerClick" /> </td> <td align="center"> <asp:Button runat="server" Text="Edit" OnClick="btnEdit_ServerClick" /> </td> <td align="center"> <asp:Button runat="server" Text="Delete" OnClick="btnDelete_ServerClick" /> </td> </tr> </table> </asp:Content>
|
Example 2-55. Confirmation pop-up before deletion in a GridView code-behind (.vb) Option Explicit On Option Strict On Imports Microsoft.VisualBasic Imports System.Configuration Imports System.Data Imports System.Data.OleDb Namespace ASPNetCookbook.VBExamples ''' <summary> ''' This class provides the code behind for ''' CH02GridViewWithConfirmBeforeDeleteVB.aspx ''' </summary> Partial Class CH02GridViewWithConfirmBeforeDeleteVB Inherits System.Web.UI.Page '''*********************************************************************** ''' <summary> ''' This routine provides the event handler for the page load event. It ''' is responsible for initializing the controls on the page. ''' </summary> ''' ''' <param name="sender">Set to the sender of the event</param> ''' <param name="e">Set to the event arguments</param> Protected Sub Page_Load(ByVal sender As Object, _ ByVal e As System.EventArgs) Handles Me.Load Dim scriptBlock As String If (Not Page.IsPostBack) Then bindData( ) End If 'NOTE: The following code must be processed for every rendering of the ' page or the client script will not be output when server click ' events are processed. 'create the script block that will execute when the delete 'button is clicked and register it scriptBlock = "function beforeDelete( )" & vbCrLf & _ "{return(confirm('Are you sure you want to delete " & _ "the selected item?'));}" If (Not ClientScript.IsClientScriptBlockRegistered("deletePromptScript")) Then ClientScript.RegisterClientScriptBlock(Me.GetType( ), _ "deletePromptScript", _ scriptBlock, _ True) End If 'use the OnClientClick property of the button to cause the above 'script to be executed when the button is clicked btnDelete.OnClientClick = "return(beforeDelete( ));" End Sub 'Page_Load '''*********************************************************************** ''' <summary> ''' This routine is the event handler that is called when the Add button ''' is clicked. ''' </summary> ''' <param name="sender">Set to the sender of the event</param> ''' <param name="e">Set to the event arguments</param> Protected Sub btnAdd_ServerClick(ByVal sender As Object, _ ByVal e As System.EventArgs) _ 'place code here to perform Add operations End Sub 'btnAdd_ServerClick '''*********************************************************************** ''' <summary> ''' This routine is the event handler that is called when the Edit button ''' is clicked. ''' </summary> ''' <param name="sender">Set to the sender of the event</param> ''' <param name="e">Set to the event arguments</param> Protected Sub btnEdit_ServerClick(ByVal sender As Object, _ ByVal e As System.EventArgs) _ 'place code here to perform Edit operations End Sub 'btnEdit_ServerClick '''*********************************************************************** ''' <summary> ''' This routine is the event handler that is called when the Delete button ''' is clicked. ''' </summary> ''' <param name="sender">Set to the sender of the event</param> ''' <param name="e">Set to the event arguments</param> Protected Sub btnDelete_ServerClick(ByVal sender As Object, _ ByVal e As System.EventArgs) _ 'make sure an item is selected If (gvBooks.SelectedIndex >= 0) Then 'place code here to perform Delete operations End If End Sub 'btnDelete_ServerClick '''*********************************************************************** ''' <summary> ''' This routine queries the database for the data to displayed and binds ''' it to the GridView ''' </summary> Private Sub bindData( ) Dim dSource As SqlDataSource = Nothing 'configure the data source to get the data from the database dSource = New SqlDataSource( ) dSource.ConnectionString = ConfigurationManager. _ ConnectionStrings("dbConnectionString").ConnectionString dSource.DataSourceMode = SqlDataSourceMode.DataSet dSource.ProviderName = "System.Data.OleDb" dSource.SelectCommand = "SELECT Title, PublishDate, ListPrice " & _ "FROM Book " & _ "ORDER BY Title" 'set the source of the data for the gridview control and bind it gvBooks.DataSource = dSource gvBooks.DataBind( ) 'select first item in the gridview gvBooks.SelectedIndex = 0 End Sub 'bindData End Class 'CH02GridViewWithConfirmBeforeDeleteVB End Namespace
|
Example 2-56. Confirmation pop-up before deletion in a GridView code-behind (.cs) using System; using System.Configuration; using System.Data; using System.Data.OleDb; using System.Web.UI.WebControls; namespace ASPNetCookbook.CSExamples { /// <summary> /// This class provides the code behind for /// CH02GridViewWithConfirmBeforeDeleteCS.aspx /// </summary> public partial class CH02GridViewWithConfirmBeforeDeleteCS : System.Web.UI.Page { ///*********************************************************************** /// <summary> /// This routine provides the event handler for the page load event. /// It is responsible for initializing the controls on the page. /// </summary> /// /// <param name="sender">Set to the sender of the event</param> /// <param name="e">Set to the event arguments</param> protected void Page_Load(object sender, EventArgs e) { String scriptBlock; if (!Page.IsPostBack) { bindData( ); } // NOTE: The following code must be processed for every rendering of the // page or the client script will not be output when server click // events are processed. // create the script block that will execute when the delete // button is clicked and register it scriptBlock = "function beforeDelete( )\n" + "{return(confirm('Are you sure you want to delete " + "the selected item?'));}\n"; if (!ClientScript.IsClientScriptBlockRegistered("deletePromptScript")) { ClientScript.RegisterClientScriptBlock(this.GetType( ), "deletePromptScript", scriptBlock, true); } // use the OnClientClick property of the button to cause the above // script to be executed when the button is clicked btnDelete.OnClientClick = "return(beforeDelete( ));"; } // Page_Load ///*********************************************************************** /// <summary> /// This routine is the event handler that is called when the Add button /// is clicked. /// </summary> /// /// <param name="sender">Set to the sender of the event</param> /// <param name="e">Set to the event arguments</param> protected void btnAdd_ServerClick(Object sender, System.EventArgs e) { // place code here to perform Add operations } // btnAdd_ServerClick ///*********************************************************************** /// <summary> /// This routine is the event handler that is called when the Edit button /// is clicked. /// </summary> /// /// <param name="sender">Set to the sender of the event</param> /// <param name="e">Set to the event arguments</param> protected void btnEdit_ServerClick(Object sender, System.EventArgs e) { // place code here to perform Edit operations } // btnEdit_ServerClick ///*********************************************************************** /// <summary> /// This routine is the event handler that is called when the Delete button /// is clicked. /// </summary> /// /// <param name="sender">Set to the sender of the event</param> /// <param name="e">Set to the event arguments</param> protected void btnDelete_ServerClick(Object sender, System.EventArgs e) { // make sure an item is selected if (gvBooks.SelectedIndex >= 0) { // place code here to perform Delete operations } } // btnDelete_ServerClick ///*********************************************************************** /// <summary> /// This routine queries the database for the data to displayed and /// binds it to the GridView /// </summary> private void bindData( ) { SqlDataSource dSource = null; // configure the data source to get the data from the database dSource = new SqlDataSource( ); dSource.ConnectionString = ConfigurationManager. ConnectionStrings["dbConnectionString"].ConnectionString; dSource.DataSourceMode = SqlDataSourceMode.DataReader; dSource.ProviderName = "System.Data.OleDb"; dSource.SelectCommand = "SELECT Title, PublishDate, ListPrice " + "FROM Book " + "ORDER BY Title"; // set the source of the data for the gridview control and bind it gvBooks.DataSource = dSource; gvBooks.DataBind( ); // select first item in the gridview gvBooks.SelectedIndex = 0; } // bindData } // CH02GridViewWithConfirmBeforeDeleteCS }
|
|