The Deployment Process
Once you have decided on a topology, you need to install components and packages on the server machines. Usually, developers will provide packages with partially configured security and transaction settings, rather than providing stand-alone components. You finalize the package settings during deployment. You can move components from one package to another, if necessary.
You also need to install the information required to connect to the server machines, along with any presentation layer applications, on each client machine. Developers will usually provide a setup program to install presentation layer applications; however, you will need to create a client install program for each package once you have decided where the packages will be installed.
You can use either the MTS Explorer or the scriptable MTS administrative objects to deploy your application packages. The MTS Explorer is most useful for one-time deployments. The administrative objects are useful when you need to install the same package to multiple servers or you need to install the package from a setup program. As mentioned in Chapter 10, the administrative objects are documented in the MTS 2.0 Programmer's Reference. In this chapter, we will focus on using the MTS Explorer to manually deploy application packages.
As we saw in Chapter 10, you might want to export two separate versions of a package in order to minimize the size of the client install program and eliminate unnecessary registry entries from client machines, as described here:
- The full package, which includes all the components that need to be installed on the server machine
- The client package, which includes only those components that are accessed directly by client applications
If you have both a client package and the full package, the procedure you follow to deploy the package is slightly different than if you have just the full package. If you have both a client package and the full package, you would follow these steps:
- Install the prebuilt client package on the server machine.
- Create the client install program.
- Install the prebuilt full package on the server machine.
These steps are discussed in detail in the sections that follow. If you have only the full package, you would follow these steps:
- Install the prebuilt full package on the server machine.
- Create the client install program.
Once you have the full package installed on the server machine and have created the client install program, you finalize the package settings and then execute the client install programs on each client machine.
NOTE
If you do not have prebuilt packages, follow the procedures outlined in Chapter 10 to create them.
Installing a Prebuilt Package
To install a prebuilt package, start the MTS Explorer. In the left-hand pane, highlight the computer on which you want to install the package, and then select its Packages Installed folder. From the Action menu, choose the New Package command to start the Package Wizard, and then click the Install Prebuilt Packages button to display the Select Package Files screen, shown in Figure 14-7. After you have selected the packages you want to install, click the Next button to display the Set Package Identity screen, which lets you specify the user account the package will run under.
By default, the package identity is set to the interactive user. Although this setting is usually acceptable during application development, you will normally want to change it during deployment. (You do not need to do this while you are installing the client package.) You should run your application packages under a specific user account that has the appropriate permissions to access any resources used by the package. Most server machines will not have an interactive user at all times, nor can you generally rely on a particular user being logged on. Running the package under a specific user account helps reduce odd run-time errors. You might also want to specify a user account with a password that does not expire because MTS caches the password to use while impersonating the user account.
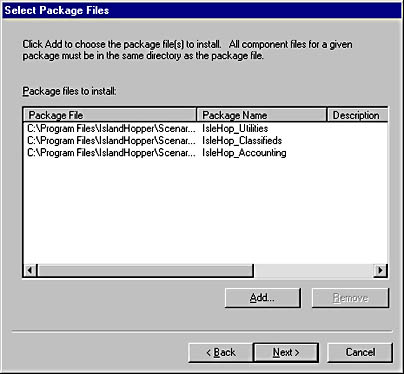
Figure 14-7. Selecting prebuilt packages using the MTS Package Wizard.
After setting the package identity, click the Next button again to move to the Installation Options screen. This dialog box lets you specify the directory in which your packages should be installed. By default, packages are placed in the \Program Files\MTS\Packages directory. If Microsoft Windows NT user accounts mapped to roles were saved with the package, you also have the option to add those during installation. Once you have set your installation options, click the Finish button to exit the Package Wizard. Your packages should now appear in the Packages Installed folder.
Creating a Client Install Program
After you have installed a package that contains the components client machines will access directly, you can create a client install program, using the procedure described in Chapter 10. When you export a package, the export utility creates a client install program in the Clients subdirectory of your package location.
By default, the client install program will point clients to the machine from which the package was exported. If you are exporting the package from the server machine, this is exactly what you want. If you are exporting the package from a different machine, you can change the destination machine name by highlighting My Computer in the left-hand pane of the MTS Explorer. From the Action menu, choose the Properties command to display the My Computer Properties window. Select the Options tab, and enter the desired server machine name in the Remote Server Name edit box, as shown in Figure 14-8. All client install programs you generate will point clients to this server machine until you change the remote server name again. This procedure comes in handy when you want to install an MTS package on multiple servers and have each client machine connect to a particular server. You export the package once for each server machine name and then distribute the machine-specific client install programs as appropriate.
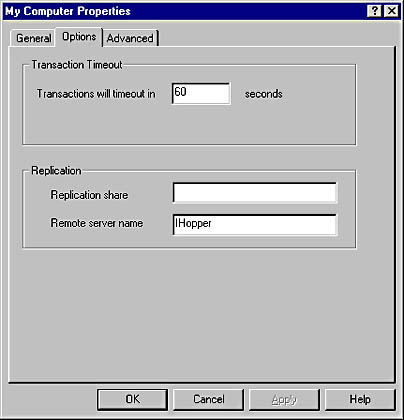
Figure 14-8. Changing the remote server name in the MTS Explorer.
Finalizing Package Settings
Once you have installed the full package on your server, you will probably need to make some changes to the package settings. Application developers will normally take care of setting activation properties, setting transaction properties, and configuring some security settings. Procedures for configuring these settings are described in Chapter 10. During deployment you populate roles and lock the package to prevent accidental changes.
Populating roles
All the appropriate security settings might not be known at development time. In particular, it is unlikely that roles in the package will be populated with user accounts. Populating roles is normally done during deployment.
To populate a role, highlight the name of your package in the left-hand pane of the MTS Explorer, and then select the package's Roles folder. Highlight the role you want to populate, and then select its Users folder. From the Action menu, choose the New User command to display the Add Users And Groups To Role dialog box, as shown in Figure 14-9. This is the standard Windows dialog box for selecting Windows NT user accounts. Select the user accounts or groups you want to add to the role, and then click the OK button to close the dialog box. The user accounts and groups will appear in the Users folder.
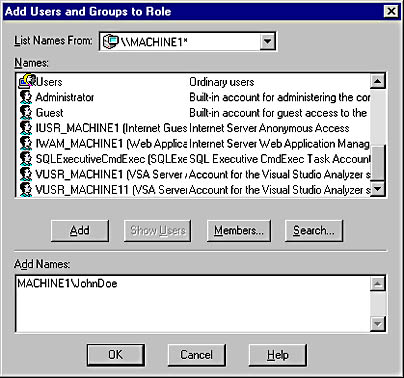
Figure 14-9. Populating a role in the MTS Explorer.
A convenient way to manage roles for MTS is to define a Windows NT group corresponding to each role in your application packages. Populate the role by adding the Windows NT group. Add the specific users who belong to the role to the Windows NT group. This technique is particularly useful if the same group of users must also be granted permissions to other resources, such as network shares or databases.
Locking the package
After you have finalized the settings, you should lock the package against changes, to prevent accidental changes to the package settings. To lock the package, select the name of the package in the left-hand pane of the MTS Explorer, and then choose the Properties command from the Action menu to display the package's Properties window. Select the Advanced tab, and then check the Disable Changes check box to prevent any changes to the package settings, as shown in Figure 14-10. You might also want to check the Disable Deletion check box to prevent the package from being deleted from the machine. If at some later time you need to make changes to the package settings, you can unlock the package by clearing the check boxes.
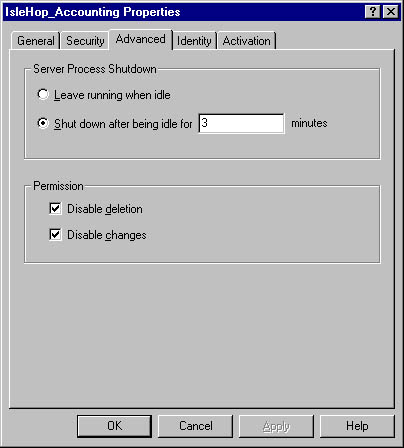
Figure 14-10. Locking a package against changes in the MTS Explorer.
Installing Client Programs
After your servers have been deployed, you need to distribute the client install programs, along with any presentation layer programs, to the client machines. For applications developed in-house, this process might be as simple as placing the programs on a network share and sending users an e-mail message telling them to click on the embedded link(s) to install the application. You might also want to create a single setup program that installs all the presentation layer programs and client install programs at once. (We'll leave that as an exercise for the reader.)
The most difficult part of installing client programs today is ensuring that users get the correct client install programs. If you have MTS packages installed on multiple server machines, you need to create a client install program that points to each machine and ensure that the program for each machine is distributed only to the users who should be using that machine.
EAN: 2147483647
Pages: 98
- The Second Wave ERP Market: An Australian Viewpoint
- Context Management of ERP Processes in Virtual Communities
- Data Mining for Business Process Reengineering
- Healthcare Information: From Administrative to Practice Databases
- Relevance and Micro-Relevance for the Professional as Determinants of IT-Diffusion and IT-Use in Healthcare