55. Filter Audio with Dynamic Effects  BEFORE YOU BEGIN BEFORE YOU BEGIN
29 About the Timeline and Video Tracks 33 Add or Move a Clip on the Timeline
 SEE ALSO SEE ALSO
74 About Advanced Effects 121 Add Audio to a Menu
Just as in a real recording studio, Premiere Elements gives you access to some high-quality audio gear. The Dynamics audio effect in Premiere Elements provides you with Expander, Compressor, Limiter, and Gate options that you can apply to an audio clip and then adjust just like you would in a recording studio, knobs and all. You can apply many audio filters to your clips, each with a special purpose. The Premiere Elements help system provides detailed descriptions of each of these effects. In this task, we use the Dynamics effect. 1. | Open the Effects and Transitions Panel
To gain access to the audio tools included with the Dynamics effect, we must add that effect to the audio clip. First, open the Effects and Transitions panel by choosing Window, Effects. When the panel opens, click the Audio FX button at the top of the panel to view the audio effects.
| 2. | Expand the Audio Effects Group
Open the Audio Effects group by clicking the arrow to the left of the group's name and locate the Dynamics effect.
| 3. | Drag the Dynamics Effect to an Audio Clip in the Timeline
After locating the Dynamics effect in the Audio Effects group, drag it to the audio clip you want to modify on the Timeline and drop it on the clip.
55. Filter Audio with Dynamic Effects 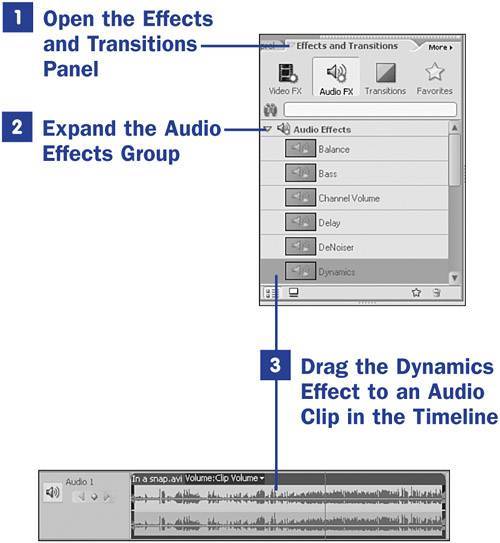 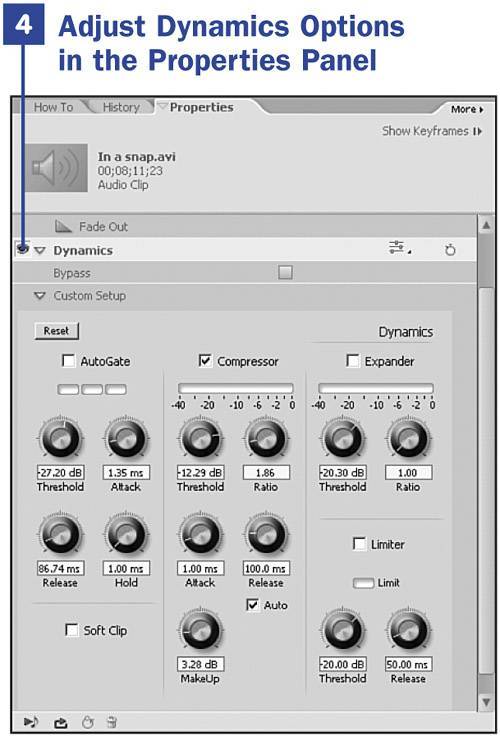
| 4. | Adjust Dynamics Options in the Properties Panel
Open the Properties panel for the targeted audio clip and click the Dynamics effect to access all the tools offered by this effect. The options offered by the Dynamics effect help eliminate unwanted background signals, balance the dynamic range, and reduce clipping:
- Gate So called because it acts as an audio gate. When the volume reaches a particular point, the gate opens and audio is heard. When volume drops below a particular level, the gate closes and there is no audio output. This option is very useful when you're working with analog audio with hiss or static in the background. There is also an AutoGate check box; enable this option to automatically set the gate.
- Compressor These settings compress the audio output at varying levels. You set the point where the compression takes place.
- Expander This control reduces all signals below the specified threshold. The result is similar to the Gate control, but subtler. The Expander settings work well for audio clips that have very quiet segments and help make them equal to the louder segments.
- Limiter Use this control to set the maximum level for signals, between 12 and 0dB. Signals that exceed the threshold are reduced to the threshold level. This control is similar to the Normalize feature described in 54 Raise, Lower, and Normalize Sound Volume.
|
|