54. Raise, Lower, and Normalize Sound Volume  BEFORE YOU BEGIN BEFORE YOU BEGIN
29 About the Timeline and Video Tracks 53 Track Audio Volume
 SEE ALSO SEE ALSO
55 Filter Audio with Dynamic Effects 56 Balance Sound over Left and Right Channels
Volume levels are important to the overall quality of your production. There is nothing worse that having the volume increase by 20db just as a cannon is being shot off in the video clip. Poor audio levels can really put a damper on the whole video experience. With Premiere Elements, you can control the volume level for each clip individually. You can even split a clip and then control the volume for each piece individually, if you need that kind of control. You can also normalize the sound over an entire clip, making the audio volume levels more consistent over the length of the clip and the project. 1. | Right-click an Audio Clip in the Timeline
Right-click an audio clip in the Timeline to select it and open the clip's context menu.
| 2. | Choose Audio Gain
From the context menu, select Audio Gain to open the Clip Gain dialog box.
54. Raise, Lower, and Normalize Sound Volume 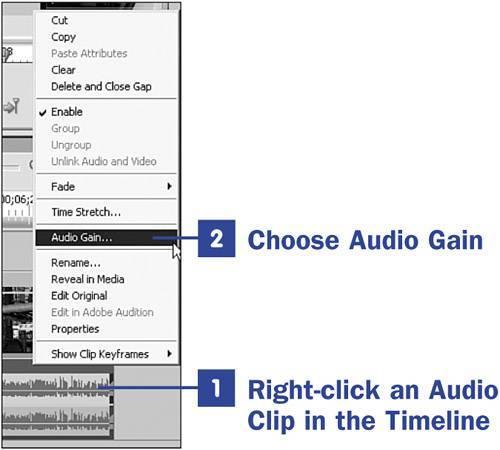

| 3. | Select Volume +/
To change the clip's volume, position the mouse pointer over the 0.0 area. Click and drag to the right or left: Drag left to decrease the number and the volume; drag right to increase the number and the volume. Alternatively, click the 0.0 value and type a specific number, rather than dragging. The 0.0 value is the clip's volume at the point before you make any changes. Entering a positive number increases the volume by that many decibels; entering a negative number lowers the volume by that many decibels.
 NOTE NOTE
When adjusting the volume, remember that 0.0db is the clip's original volume level. Any positive value is an increase in the original volume, and any negative value is a decrease in the original volume. | 4. | Normalize the Volume and Click OK
After you have made any volume changes necessary, you can normalize the audio levels. By selecting this option, the audio levels of the clip are automatically adjusted. Levels that are too high are reduced and levels that are too low are increased to create a more even volume across the entire clip. If there are certain places in the audio clip where you want the levels higher or lower on purpose, normalizing might do more harm than good. Listen to the normalized clip to ensure you get the desired result.
After you have made any volume changes and normalized the audio levels for the clip, click the OK button. Play your adjusted clip to see whether the changes made accomplished your goal of adjusting the clip's volume. If not, open the Clip Gain dialog box again and make finer adjustments. Don't forget you can always undo your changes!
|
|