34. Trim a Clip on the Timeline  BEFORE YOU BEGIN BEFORE YOU BEGIN
33 Add or Move a Clip on the Timeline
 SEE ALSO SEE ALSO
36 Split a Clip 37 Remove a Section of a Clip 39 Remove Audio or Video from a Clip
  | As you start your editing experience, you will need to recognize the Trim icons. Move the mouse pointer over the edge of a clip and notice that one of these Trim icons appears. The only way you can trim your clip is when one of these icons is visible. |
There is more than one way to trim a clip, and this is one of them. Later in this chapter you will be instructed in other trimming methods. The trimming method described in this task is not intended for fine, detailed editing, but it is a good way to quickly remove unwanted scenes or footage from a clip. As you trim your clip, you can see the corresponding frame in the Monitor to help you keep track of where you are and what you are trimming. 1. | Drag the Right Edge to Extend the Duration of a Still
Drag a still image from the Media panel to the beginning of the Timeline. If the default Still Image Duration has not been changed, the image will have a duration of 5 seconds on the Timeline. If you need to extend the duration of a single clip without changing the default setting for still-image duration, you can drag out some additional time for this specific still image.
 NOTE NOTE
To change the default Still Image Duration, select Edit, Preferences, General from the menu at the top of your screen. The default duration for a still image is 150 frames (30 frames per second times 5 seconds). Change this value and click OK to change the default duration for still images. Click the left mouse button over the right edge of the still image clip in the Timeline. Make sure that you can see the Right Trim icon before clicking. Drag the edge to the right until the CTI gets to the 8-second mark. Release the mouse button; this single still image clip now has an 8-second duration. All other still images maintain the default duration set in the Preferences dialog box.
34. Trim a Clip on the Timeline  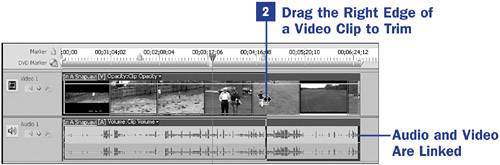 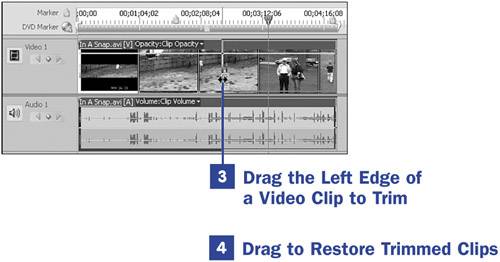 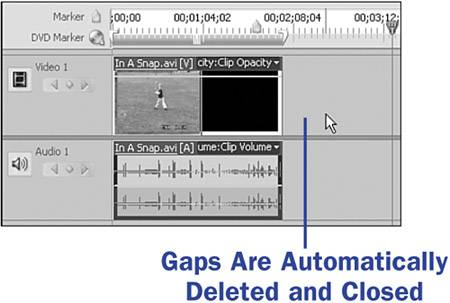
NOTES If you drag the mouse to the left, you will decrease the duration of the still. When trimming or extending a still image, you are adding or removing identical frames. The only change trimming makes to a still image is to its duration on the Timeline. When you release the mouse button after extending or decreasing the duration of a still image on the Timeline, the work area bar adjusts to the new image length. This works as long as you have not manually made adjustments to the position of the bar. Now right-click the still image in the Timeline and select Clear from the context menu to delete this practice still from the Timeline. Alternatively, select the clip and press the Delete key to delete the clip.
| 2. | Drag the Right Edge of a Video Clip to Trim
Drag a video clip from the Media panel and drop if at the beginning of the Timeline. Click the right edge of the video clip, making sure that you see the Right Trim icon before clicking the mouse button.
If you are working with a still image, you can always drag the trimmer to the right; Premiere Elements adds as many additional frames as needed. However, if you are working with video- or audio-only clips, you can only extend to the end of the clip; Premiere Elements will not add or repeat frames in this case. You can grab a still of the last image in the clip and drag that out farther if that is your goal (see 21 Grab a Still from Video).
NOTE As you drag the Right Trim icon, watch the Monitor; it will give you a view of what you are trimming from your clip. Drag the edge of the clip to the left 10 seconds. As you drag, notice that both the video and audio tracks are being trimmed. Release the mouse button, and your trimmed clip will be 10 seconds shorter than it originally was.
To trim only the video or the audio, right-click the clip and select Unlink Audio and Video from the context menu. To trim only the audio, position the mouse pointer over the edge of the audio track and drag without affecting the video track; to trim only the video, position the mouse pointer over the edge of the video track and drag without affecting the audio track.
TIP If you are trimming your clip to be used in an L-cut or a J-cut, see 38 Create an L-Cut or a J-Cut. | 3. | Drag the Left Edge of a Video Clip to Trim
Now move to the beginning of the clip, the left side. Click the left edge of the clip, making sure that you see the Left Trim icon before clicking.
Drag the edge to the right 10 seconds and release the mouse button. The clip will now be 20 seconds shorter than the originalyou've trimmed 10 seconds off each end of the clip. You can trim as much or as little as necessary; it is totally up to you. Don't be afraid to experiment because the original clip on the hard drive is not altered during the nonlinear editing process.
NOTE As you trim your clips, the clips automatically move to the left on the Timeline to close any space or gaps. (see 35 Delete and Close Gaps in the Timeline). If your trimming has left gaps in the Timeline, Premiere Elements automatically deletes and closes any gaps. In the example you just completed, the clip was moved back to the beginning of the Timeline, even though you trimmed 10 seconds from that end.
TIP If you would rather the clip did not move to the left and fill in any gaps in the Timeline, hold the Ctrl key while you drag the Trim icon. Be sure to release the mouse button before releasing the Ctrl key. As you hold the mouse pointer over a clip and press the Ctrl key or the Shift key, notice the messages under the Timeline. These messages let you know what will happen when you drag or drop with one of these keys pressed. | 4. | Drag to Restore Trimmed Clips
If you accidentally trim too much from a clip, move the Trim icon in the opposite direction to get the trimmed parts back. The trimmed scenes are never deleted from the actual footage, so the trimmed frames are always available to be added to your project.
|
|