Working with Menus VB6 had cobbled support for menus. Menus were managed through the IDE's menu editor. Menus were not full-fledged components, controllable at runtime. Visual Basic .NET introduces the MainMenu and ContextMenu components . These two components come replete with design-time and runtime capabilities. You can easily add menu items at design time using the menu editors, and at runtime using the methods and properties of these two subclasses of the Menu component. I will briefly describe how to use the redefined Menu Designer and proceed to the technical steps for programmatically adding menu items at runtime. Defining a MainMenu or ContextMenu Most of the steps for implementing either MainMenu or ContextMenu are identical. I will present the MainMenu steps in this section and point out the few differences between MainMenu and ContextMenu at the end of this subsection. The MainMenu is a component. You have to select the MainMenu component from the Windows Forms toolbox and drop it onto the form. The component is actually placed into the component tray beneath the form, but the Menu Designer adds a box region where you would expect a menu at the top-left corner of the form. The text has the words "Type Here". To design a menu, that is exactly what you do. Type the text for the menu in place of the words Type Here, adding an ampersand immediately before any letter that is meant to be a hot key. When you begin typing the menu caption, a submenu is added beneath the menu and a sibling menu is added to the right of the menu. Right-clicking over a menu item displays a context menu on which you can click Insert New to add submenus or nested submenus. In this manner you visually design the menu system by adding submenus and typing menu captions. Use the Properties window to modify properties like the menu name . Adding Supporting Menu Code Menus are event-driven components. There is one crucial event for menus, the Click event. If you double-click on the menu item itself in the designer, the designer will generate the Click event handler for you. There are four other MenuItem events that you might want to use: DrawItem, MeasureItem, Popup, and Select. We will return to these events in a moment. MenuItem is actually a component that is also generalized from the Menu component. The relationship between MenuItem objects and a Menu is that a Menu has 0 to many MenuItem objects. The subsection "Adding Menu Items Dynamically" goes into more detail about working with MenuItem objects in code. When you have created a Click event handler, the result is that the menu designer will generate an EventHandler delegate method for you. (Recall that the signature of an EventHandler delegate method is a subroutine that has an Object parameter named sender and a System.EventArgs parameter named e.) When the menu is clicked, the sender object will be the specific MenuItem and the EventArgs argument will contain benign data. If you need a reference to the specific MenuItem, you can dynamically cast the sender object to a MenuItem with the following code: CType(sender, MenuItem) As a good general rule, the Click event handler should simply invoke a method of the Form rather than having code in the event handler. This is a good rule because it allows you to document what the event handler does by providing a good procedure name, and that implementation procedure can be used in some other context besides the Click event. Of course, you can ignore this general rule if the Click event contains very simple code like the following: Private Sub MenuItem4_Click(ByVal sender As System.Object, _ ByVal e As System.EventArgs) Handles MenuItem4.Click Application.Exit() End Sub When you have designed the menu, implementing click event handlers is very similar to implementing menu event handlers in VB6. DrawItem and MeasureItem Events The menu DrawItem and MeasureItem events work hand in hand. When you set the MenuItem.OwnerDraw property to True, the DrawItem and the MeasureItem events are raised. MeasureItem is raised first, allowing you to express the size of the displayed menu. The DrawItem event is raised second, allowing you to render the menu item. MeasureItem is passed an object, e, that is a MeasureItemEventArgs type. The properties ItemHeight and ItemWidth are used to express the dimension of the custom-drawn menu. The following code demonstrates how to establish the size of an owner-drawn menu item: Private Sub MenuItemRectangle_MeasureItem(ByVal sender As Object, _ ByVal e As System.Windows.Forms.MeasureItemEventArgs) _ Handles MenuItemRectangle.MeasureItem e.ItemHeight = 20 e.ItemWidth = 60 End Sub Tip To implement the DrawItem menu, in the code editor, select the specific MenuItem from the Class Name list and the DrawItem event from the Method Name list.
After the size of the custom menu is established, you can draw the menu using the Graphics object passed as a property of the DrawItem event argument DrawItemEventArgs. The second argument of the DrawItem event contains a Graphics object representing the device context of the menu item that raised the event. Suppose you have a drawing application, and you elect to use a visual metaphor for menu operations rather than text. When the user selects a menu item to insert a rectangle, for example, he or she can click a menu with a rectangle on it instead of the text Rectangle. By combining the MeasureItem and DrawItem events, you can achieve the result shown in Figure 16.3. The code for both events is shown in Listing 16.1. Figure 16.3. Custom-drawn menu item. 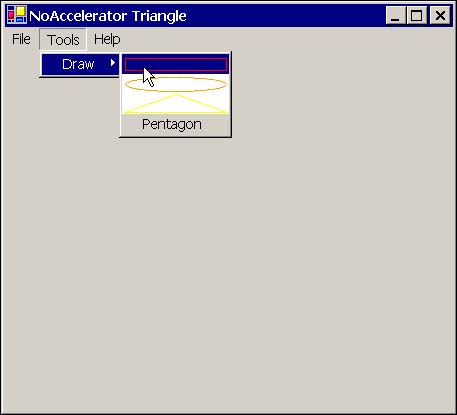 Listing 16.1 Combining the OwnerDraw property with DrawItem and MeasureItem events to create custom menu items 1: Private Sub MenuItemRectangle_MeasureItem(ByVal sender As Object, _ 2: ByVal e As System.Windows.Forms.MeasureItemEventArgs) _ 3: Handles MenuItemRectangle.MeasureItem 4: 5: e.ItemHeight = 20 6: e.ItemWidth = 60 7: End Sub 8: 9: Private Sub MenuItemRectangle_DrawItem(ByVal sender As Object, _ 10: ByVal e As System.Windows.Forms.DrawItemEventArgs) _ 11: Handles MenuItemRectangle.DrawItem 12: 13: e.DrawBackground() 14: Dim R As Rectangle = e.Bounds 15: R.Inflate(-3, -4) 16: e.Graphics.DrawRectangle(Pens.Red, R) 17: 18: End Sub MeasureItem sets the width and height of the menu item. DrawItem draws the background, which will show the selected menu item background, copies the bounds of the rectangle to a local variable, and shrinks the rectangle a bit. This allows the visual metaphor to fit within the space available to the menu item. Popup Event The MenuItem.Popup event occurs before a menu's submenu items are displayed. This event allows you to insert custom behavior before menu items are available to the user. Select Event The MenuItem.Select event occurs when the user places the mouse over a menu item. You could insert custom effects associated with the menu to respond when the user hovers over a menu item. Differences between MainMenu and ContextMenu The differences between MainMenu and ContextMenu are few from the application developer's point of view. Both menus can contain submenus and nested submenus. Both menus contain a collection of MenuItem objects that can be customized by setting OwnerDraw equal to True and implementing the MeasureItem and DrawItem events. The one difference you will note is when you visually describe the menu items. MainMenu supports adding a top-level MenuItem, but ContextMenu does not. Additionally, you can implement as many ContextMenu objects as you see fit. The Control class introduces the ContextMenu property. Any subclass of the Control class supports associating a ContextMenu with the control by selecting ContextMenu from a drop-down list in the Properties window. Only forms support MainMenu. You can implement multiple MainMenu objects and assign a particular MainMenu control to the Form.Menu property based on the state of your application; this is useful, for example, to sometimes show a complete menu but other times show a partial menu. Adding Menu Items Dynamically A powerful feature of the Menu class is the capability to dynamically add and remove menus programmatically at runtime and associate delegates with those menus' events. Generally you will need to write the code to support dynamic menus at design time, but you can easily devise a means of determining when to show those menus and wire them up. For example, suppose you have both professional and enterprise versions of your software. If a DLL is present, its presence indicates that the user has the enterprise features and associated menus should be displayed. The code in Listing 16.2 demonstrates the technical aspects of adding a dynamic menu item to the MenuDemo.sln available for download. Listing 16.3 demonstrates an approach to dynamically adding behaviors defined in an external assembly. Listing 16.2 The basics of creating a dynamic menu option 1: Private Sub DoAbout(ByVal sender As Object, _ 2: ByVal e As System.EventArgs) 3: 4: Const Message As String = _ 5: "Menu Demo" & vbCrLf & _ 6: "Sams VB .NET Unleashed" & vbCrLf & _ 7: "Written by Paul Kimmel. Copyright (c) 2001." 8: 9: MsgBox(Message, MsgBoxStyle.Information, "About") 10: 11: End Sub 12: 13: Private Sub Form1_Load(ByVal sender As System.Object, _ 14: ByVal e As System.EventArgs) Handles MyBase.Load 15: 16: Dim About As New MenuItem("About") 17: AddHandler About.Click, AddressOf DoABout 18: MenuItemHelp.MenuItems.Add(About) 19: 20: End Sub The Load event creates a MenuItem named About and associates the subroutine DoAbout with the MenuItem.Click delegate. In the last step, the menu is added to the MenuItems collection of the menu that will play the role of parent menu. The DoClick event handler performs the behavior you would reasonably expect for an About menu. Listing 16.3 demonstrates the scenario introduced near the beginning of this section, a pluggable extension to the application. Listing 16.3 Plugging a class library into a Windows application using dynamic menus 1: Imports System.Windows.Forms 2: Imports System.Drawing 3: 4: Public Class AdvancedShape 5: 6: Implements PluggableShape 7: 8: Public Function GetMenuItem(ByVal Click As EventHandler) _ 9: As MenuItem Implements PluggableShape.GetMenuItem 10: 11: Dim MenuItem As New MenuItem("Pentagon") 12: AddHandler MenuItem.Click, Click 13: 14: Return MenuItem 15: End Function 16: 17: Public Function GetPoints(ByVal Rect As Rectangle) As Point() 18: Dim p1 As New Point(Rect.X + Rect.Width / 2, Rect.Y) 19: Dim p2 As New Point(Rect.X, Rect.Y + Rect.Height / 3) 20: Dim p3 As New Point(Rect.X + Rect.Width / 4, _ 21: Rect.Y + Rect.Height) 22: Dim p4 As New Point(Rect.X + Rect.Width * 3 / 4, _ 23: Rect.Y + Rect.Height) 24: Dim p5 As New Point(Rect.X + Rect.Width, _ 25: Rect.Y + Rect.Height / 3) 26: 27: Return New Point() {p1, p2, p3, p4, p5} 28: End Function 29: 30: Public Sub Draw(ByVal Graphics As Graphics, _ 31: ByVal Rect As Rectangle) _ 32: Implements PluggableShape.Draw 33: 34: Graphics.DrawPolygon(Pens.Red, GetPoints(Rect)) 35: End Sub 36: 37: End Class 38: 39: Public Interface PluggableShape 40: 41: Function GetMenuItem(ByVal Click As EventHandler) As MenuItem 42: Sub Draw(ByVal Graphics As Graphics, _ 43: ByVal Rect As Rectangle) 44: 45: End Interface Listing 16.3 uses a generic interface named PluggableShape to allow consumers a nonspecific means of incorporating PluggableShape objects into a client application. Lines 4 to 37 contain the class AdvancedShape, which implements PluggableShape. AdvancedShape returns a MenuItem and implements a Draw method that draws the actual shape based on a bounding rectangle and the device context of the control the shape is to be drawn on. Draw is implemented on lines 30 to 35. The shape is defined by the array of points returned by GetPoints. (The shape drawn is a pentagon.) By using a generic interface, we could feasibly implement many advanced shapes and dynamically plug them into our application. Listing 16.4 demonstrates using the PluggableShape interface to plug the AdvancedShape capability into our Windows application. Listing 16.4 Plugging in a MenuItem and additional behavior supported in a class library 1: Private FPlug As PluggableShape 2: 3: Private Sub Plugin(ByVal Plug As Drawing.PluggableShape) 4: Try 5: FPlug = Plug 6: MenuItemDraw.MenuItems.Add(_ 7: FPlug.GetMenuItem(AddressOf DoClick)) 8: Catch 9: FPlug = Nothing 10: End Try 11: End Sub 12: 13: Private Sub Form1_Load(ByVal sender As System.Object, _ 14: ByVal e As System.EventArgs) Handles MyBase.Load 15: 16: Plugin(New AdvancedShape()) 17: 18: End Sub Note Chapter 6, "Reflection," demonstrates the technical aspects of reflection. You could use reflection to dynamically discover classes implementing the PluggableShape interface in any assembly and make the code completely generic. As it stands, Listing 16.4 would require you to change line 16 to plug in a new shape library.
There is nothing special about the actual code. Add a reference to the class library containing AdvancedShape to the Windows application that will use the custom feature. Add an Imports statement to the Windows Form that will use the behavior of the shapethe form that will display the menuand initialize the menu when the form loads. Notice that everything in Form1 references the generic interface PluggableShape rather than a specific class; in this way, any object implementing the interface PluggableShape could be plugged into the client without significant changes. | 