Building Web Sites with Authentic and Cocoon
|
Building Web Sites with Authentic and Cocoon
Building Web sites is what preoccupied the industry throughout the nineties. There were various techniques that used technologies such as PHP, ASP, or JSP. In each approach, there was a traditional programming language that was responsible for the business logic and generation of the HTML or XML content. But with XMLSPY, there is another way of building an application, which is illustrated in Figure 7-1.
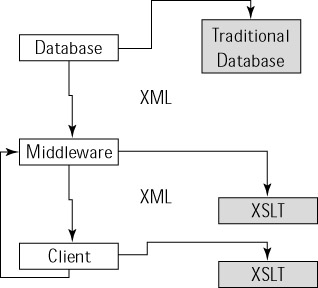
Figure 7-1: XSLT architecture of building applications.
In the architecture shown in Figure 7-1, the data is kept in a traditional database; but from there on, it is an XML document from the backend to the client and back again. In both the middleware and client layers, XSLT modifies the XML data. To illustrate such an architecture, I use the Cocoon subproject and the Authentic control. Cocoon serves as an example of how the middleware can be programmed. Cocoon is a Java-based framework used to simplify server-side content generation. The focus is on the Authentic toolkit and the XSLT Designer. Authentic is a set of tools created by Altova (makers of XMLSPY) that focuses on using XSLT to generate content.
An introduction to Cocoon and Authentic
Cocoon is an Apache subproject that uses XSLT as its core architecture to build applications. The focus of Cocoon is to build an architecture in which the style, business logic, and data are separate (see Figure 7-2).
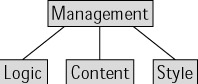
Figure 7-2: The Cocoon separation of logic, content, and style.
The Authentic control is similar to Cocoon, except that XSLT and XML are combined to produce HTML output displayed in a browser. The advantage of the Authentic control is that a user can edit the HTML like an XML form. In architectural terms, Authentic is illustrated in Figure 7-3.
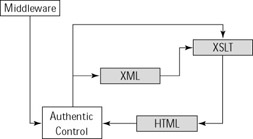
Figure 7-3: The Authentic separation of XML and XSLT to produce HTML.
The application
The application that you are going to build here is based on the original XML document presented at the beginning of this chapter. The application has two steps associated with it. The first step is to clean up the XML document to make it resemble data a bit simpler to process. The second step is to take the modified data and display it in the Authentic browser.
Setting up the data
You may recall that in Chapter 6 I used a specific XML document throughout most of the examples to illustrate how XSL works. But in all frankness, the design and structure of that XML document leaves much to be desired. Consider the original XML:
<data> <child> <elements index="1">Hello</elements> </child> <elements index="2"><sub> <elements index="3">World</elements> </sub></elements> </data>
The problem with this XML is that the elements XML node is incorrectly named and should be called element. The other aspect is that the important data is scattered throughout the XML document. When deciding how to move data from the middleware to the client, keep the following design guidelines in mind:
-
Use a schema. A schema is useful because it ensures that the data is formatted a specific way.
-
Keep the XML data as simple as possible. This means not embedding elements within elements.
-
Use tags that actually mean something. For example, elements should be called element.
-
Use namespaces. I have avoided them here to keep things simple.
-
Do not store your data as attributes. Attributes are descriptors of the data, similar to the way adjectives describe nouns.
The purpose of the middleware is to clean up the XML into something that can be processed by the client. The XSLT document that will manage this is as follows:
<xsl:stylesheet version="1.0" xmlns:xsl="http://www.w3.org/1999/XSL/Transform"> <xsl:template match="elements"> <element> <xsl:value-of select="text()" /> </element> <xsl:apply-templates /> </xsl:template> <xsl:template match="/"> <data> <xsl:apply-templates /> </data> </xsl:template> <xsl:template match="text()" mode="?"> </xsl:template> </xsl:stylesheet>
In this XML document an xsl:template with match of / exists. The output stream in a properly formatted XML document needs to be generated. Notice the placement of the xsl:apply-templates instruction, which is placed between the data XML nodes. After an elements XML node has been found, the value of the node is output. Notice the placement of the xsl:apply-templates in this case. It has been placed after the element XML node. This is done so that nested elements nodes are normalized. Executing the XSLT document generates the following output:
<?xml version=”1.0” encoding=”UTF-8”?><data><element>Hello</element> <element>World</element><element></element></data>
This new document serves as the basis of the data for the client-side processing using the Authentic plugin. But before we can use the Authentic plugin, a schema has to be defined for the new data. The simplest way to do this would be to use XMLSPY to generate a schema for you automatically. Doing that would result in the following schema definition:
<?xml version=”1.0” encoding=”UTF-8”?> <!--W3C Schema generated by XMLSPY v5 U (http://www.xmlspy.com)--> <xs:schema xmlns:xs=”http://www.w3.org/2001/XMLSchema” elementFormDefault=”qualified”> <xs:element name=”data”> <xs:complexType> <xs:sequence> <xs:element ref=”element” maxOccurs=”unbounded”/> </xs:sequence> </xs:complexType> </xs:element> <xs:element name=”element”> <xs:simpleType> <xs:restriction base=”xs:string”> <xs:enumeration value=”Hello”/> <xs:enumeration value=”World”/> </xs:restriction> </xs:simpleType> </xs:element> </xs:schema>
This is a very simple schema that defines the two different elements used in the XML document. The only change that has to be made is to remove the xs: enumeration instructions because they will cause problems when validating real test data.
Generating the Data Using Cocoon
The focus of this book is not Cocoon, so I’m keeping the details simple. I want you to focus on how the XML document is generated. I simply use Cocoon here because it’s an outstanding XML/XSLT platform and is available for free with source code from http://xml.apache.org.
In Cocoon, the transformation process is controlled using a pattern match and transformation metaphor. In the example of generating the improved XML data, the following entry is made to the Cocoon execution map:
<map:match pattern=”output.xml”> <map:generate src=”content/helloworld.xml”/> <map:transform src=”stylesheets/middleware.xsl”/> <map:serialize type=”xml”/> </map:match>
Therefore, when the client makes a method call using http for the document output.xml, Cocoon automatically associates the helloworld.xml document with the middleware.xsl XSLT document and generates XML output.
The client
Now assuming that the content has been sent to the client, the Authentic plugin can consume the XML data and apply its own XSLT document to generate HTML output. Unlike in previous steps, the new XSLT document is not generated by the XMLSPY IDE, but by the XSLT designer environment. Stylesheet Designer is a tool that makes it simple to create XSLT documents. When Stylesheet Designer is started, it looks like the screen shown in Figure 7-4.
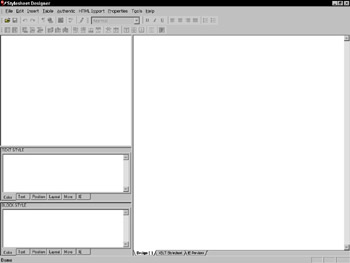
Figure 7-4: Startup image of Stylesheet Designer.
If you attempt to open a dialog box within the Stylesheet Designer, the first surprising thing you realize is that it is not possible to edit an XSLT file directly. This restriction is not without purpose. Stylesheet Designer is not a tool geared toward editing XSLT documents; it’s intended for editing applications that happen to involve generating XSLT documents.
When the previously defined schema document is opened in Stylesheet Designer, your screen resembles Figure 7-5.
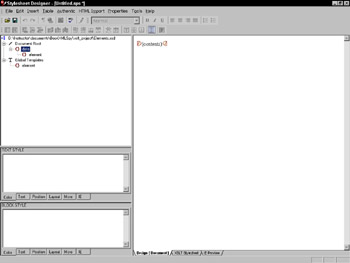
Figure 7-5: Image of Stylesheet Designer with a loaded Schema document.
In the upper-left corner of the screen is an example XML document structure based on the schema document that you just loaded. In the right-hand window is an XSLT sheet that, when transformed, results in the HTML shown. The XSLT document is defined when you click the tab XSLT Stylesheet (see Figure 7-5).
<?xml version="1.0" encoding="UTF-8"?> <xsl:stylesheet version="1.0" xmlns:xsl="http://www.w3.org/1999/ XSL/Transform" xmlns:xs="http://www.w3.org/2001/XMLSchema"> <xsl:template match="/"> <html> <head /> <body> <xsl:apply-templates /> </body> </html> </xsl:template> </xsl:stylesheet>
Notice that this XSLT document includes an xsl:template with a match of the root node. This is the place where the basis of the HTML page is generated.
The objective of the Stylesheet Designer tool is to take an XML stream and an XSLT document and combine them into a generated HTML document that can be viewed in the browser. The viewing part is available with every browser, but only the Authentic plugin makes it possible to edit the content.
When the XSLT document is saved, an .sps file is generated. The .sps file serves as the basis of the transformation. The original XML document is modified to the following:
<?xml version=”1.0” encoding=”UTF-8”?> <?xmlspysps D:\Instructor\documents\BookXMLSpy\xslt_project\ Client.sps?> <data xmlns:xsi=”http://www.w3.org/2001/XMLSchema-instance” xsi:noNamespaceSchemaLocation=”D:\Instructor\documents\BookXMLSpy\ xslt_project\Elements.xsd”> <element>Hello</element> <element>Worldfgd</element> <element></element> </data>
There are two major changes to the original XML document. The first is the addition of the xmlns:xsi instruction, which references the schema file created for the XML data. The second change is the addition of the xmlspysps processing instruction. This processing instruction indicates to XMLSPY that, when this XML document is loaded, it should be presented as using the defined .sps file. If you load the XML document and activate the Large Tags feature from the toolbar, XMLSPY IDE gives you a screen that resembles Figure 7-6. (The Large Tags button is the one with a red A. Enabling this feature makes it easier to read the XML content.)
Notice that the tags are labeled identically to the XML document. This correlation is not accidental because the output is the XML document. To really show off how this works, look at the last element node, which is empty. Move your cursor to that node and click. Type Bonjour and switch to Text view. Your XML document should look like the following:
<?xml version="1.0" encoding="UTF-8"?> <?xmlspysps D:\Instructor\documents\BookXMLSpy\xslt_project\ Client.sps?> <data xmlns:xsi="http://www.w3.org/2001/XMLSchema-instance" xsi:noNamespaceSchemaLocation="D:\Instructor\documents\BookXMLSpy\ xslt_project\Elements.xsd"> <element>Hello</element> <element>World</element> <element>Bonjour</element> </data>

Figure 7-6: XMLSPY IDE with the XML document loaded.
The amazing bit here is that the XML has been modified, even though the HTML page is the result of an XSLT transformation. This makes building form applications much simpler.
To test the validation, add the following XSD instructions to the schema used to validate the document (to generate the XSD instructions, you use the Auto Schema generation feature available in XMLSPY):
<xs:restriction base=”xs:string”> <xs:enumeration value=”Hello”/> <xs:enumeration value=”World”/> <xs:enumeration value=”Bonjour”/> </xs:restriction>
Reload the document in the Authentic viewer and attempt to modify any field. The modifications should result in some red text appearing, as shown in Figure 7-7.
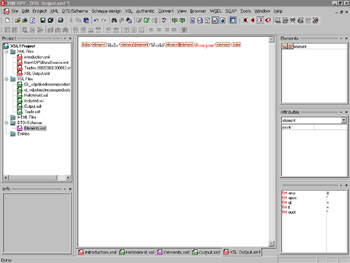
Figure 7-7: XMLSPY with the XML document loaded; an error is represented by red text.
The red text represents an error in the schema validation, which means that the XML document cannot be saved. This typically is handled using HTML and JavaScript; but with XML Schema, this operation is more consistent and maintainable.
|