Controlling Color
| < Day Day Up > |
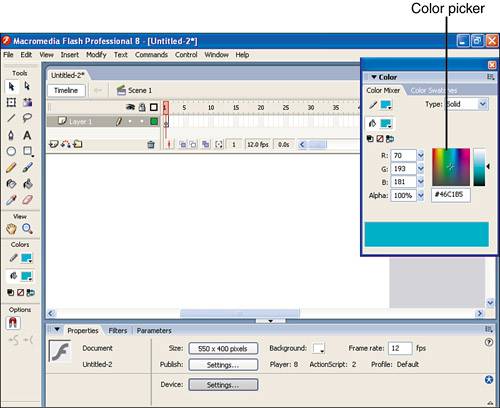
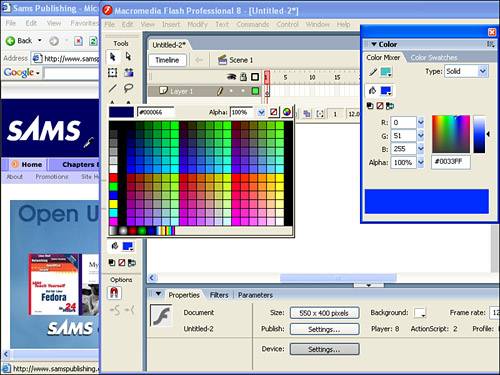
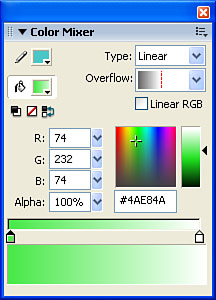
| Choosing colors in Flash is a matter of personal choice. You can use any color or color combination you want. In the following sections you'll learn how to create and save color swatches to easily create customized color palettes for movies. This will help you ensure a color theme is maintained throughout a Flash Movie or an entire site. You'll also see how to create and control gradients. Creating Solid and Gradient SwatchesIn Hour 2, "Drawing and Painting Original Art in Flash," anytime you wanted to color a line or fill, you selected the swatch of your choice from the Fill Color or Stroke controls in the Tools panel or Properties panel. Clicking the fill color exposes all the swatches that are currently available. By default, only 216 "web-safe" colors are available. If your computer's display can show only 256 colors (that is, "8 bit"), it is recommended that you use only colors within the web-safe selection of 216 colors. The remaining 40 colors are used in the browser's buttons and menus for different platforms and may not display as expected. Most likely, your users will not be limited to 256 colors, so this topic might be best for a history book. You can create any color you want. Creating a custom color swatch involves two basic steps: using the Color Mixer panel to pick a color and then saving it as a swatch. This process is easy, but it's still worth stepping through carefully the first time. In the following task, you'll create a custom color by using both the Color Mixer panel and the Swatches panel. Try It Yourself: Create a Custom Color and Swatch In this task you'll look at several ways to create colors and then save them as swatches for use later. Here are the steps to follow:
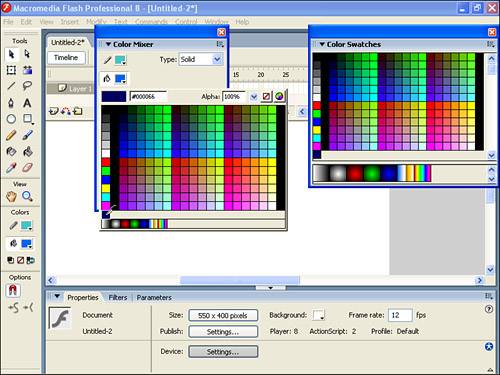
You've seen a couple ways to select colors and one way to save a swatch. Even though we added a swatch for a custom color selected from the Web, it's also convenient to save any color even one for which there is already a swatch. For example, if you're using the same orange color repeatedly, you don't have to remember it's the one in the 18th column and 7th row of the Color Swatches panel. Just save a swatch and it will be one of the few swatches in the last row. I often create a whole row of black swatches (21 across) just so I can easily see where my custom swatches begin. In the preceding task you sampled a color and added it to the swatches. You can also enter the exact RGB if you know it. Alternatively, you can use HSB (for hue, saturation, brightness) if you change the setting in the color Mixer panel's options menu. Also, the Hex value always appears under the color picker. In addition, that same editable Hex field appears in the color swatches that pop up next to the fill color or stroke color (in the Tools panel or Properties panel). Finally, notice that for any color setting, there's an option for the percentage of alpha. The lower this percentage, the more transparent the color will be. This is convenient; however recall from Hour 4 that you can also simply apply the Alpha color effect on a symbol instance. That's not the same thing unless the symbol is all one color. But I'm pointing this out because the exact appearance of a color changes when you modify the alpha. If the color is in your client's corporate logo, you probably don't want to change its alpha.
Even though the process you just learned for creating swatches is time-consuming at first, it can really help you down the line. For instance, although swatches are saved only with the current Flash file, after you've taken the time to create custom swatches, you can save them as a Flash Color Set file. From the Swatches panel's options menu, you select Save Colors. The file that you save can be used with other files or by other team members. To load colors that have been saved this way, you select Replace Colors from the Swatches panel's options menu. (Notice that the feature is called Replace, not Add so it will replace any custom colors you've already created.) No doubt you've noticed that the fill color can be a gradient. You'll see both radial and linear gradients in the default color swatches any time you click to specify the fill color. In the following task, you'll learn how to create your own custom gradient. Try It Yourself: Create a Custom Gradient In this task you'll create a custom gradient. This task requires that the Mixer is fully expanded and that the Swatches panel is present. Follow these steps:
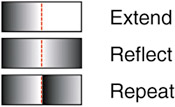
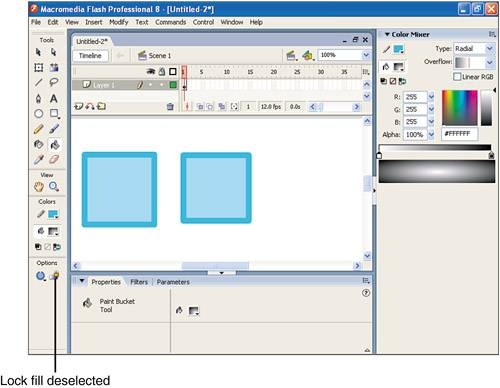
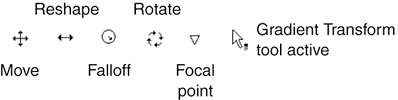
Now that you have a custom gradient, you'll learn how it can be used in a movie. Using and Transforming GradientsWhether you use the default gradients or create your own (as you did in the previous task), there's more to using gradients than simply selecting one of your choice for the fill or stroke colors. The Gradient Transform tool gives you some powerful ways to edit the precise look of your gradients. It's interesting that the Gradient Transform tool does nothing but edit gradients already applied to a fill or stroke on stage that is, it doesn't create anything. If you select the Gradient Transform tool, then select an existing gradient, you're given handles that let you adjust the attributes of a gradation. You can adjust the falloff rate, center point, rotation, and (in the case of radial gradients) the shape and focal point. Also, when you create fills that use a gradation such as when you use the Bucket tool you have an option called Lock Fill. While Lock Fill is selected all the shapes you fill are part of the same gradient. If that gradient goes from black to white, the transition is spread out through all the objects. If Lock Fill is not selected, each shape repeats a single gradient from black to white. In the following task you'll practice using the Gradient Transform Tool and the Lock Fill option. Try It Yourself: Transform Attributes of Gradients Used in a Movie In this task you'll explore using the Lock Fill option and the Gradient Transform tool to gain full control of gradients. Follow these steps:
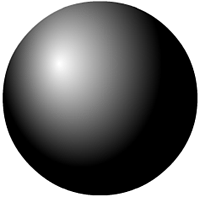
You might think that we've spent an inordinate amount of time with gradations. However, it's really a quite powerful effect sort of the poor-man's 3D. Figures 5.9 and 5.10 show two simple examples (including a pseudo-sphere) that I created using gradients. Figure 5.9. A simple filled circle becomes a sphere when you tweak a radial gradient.
Figure 5.10. A subtle gradient (with Overflow set to reflect) adds a subtle touch to this picture frame.
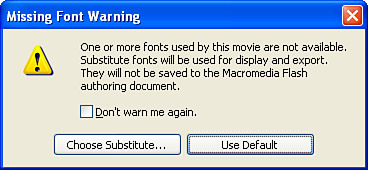
Setting TextBack in hour 2 you learned the basics of placing text in your movies. Here you'll learn additional details to ensure text appears exactly as you intend especially when that text changes at runtime or includes special effects. Plus, I have a few incidental tricks to help make text appear exactly how you intend. Static Text LayoutAny time you need text that's going to be locked down you should use the Static Text option (from the Text Type drop down in the Properties panel). When I say "locked down" I mean the text doesn't need to change at runtime. For example, if you want to display the time or a different message every day the user visits, you need to use Dynamic Text. If you want a field into which the user can type his name, you must use Input Text. That is, both Dynamic and Input can change at runtime; Input is changeable by the user. In other cases the text is locked down, so use Static text. We'll get to Dynamic and Input text in a minute, but for now let me point out the ways to control static text. One of the main benefits of Static text is that the user doesn't need the font you use. However, you will need the fonts at the time you generate the .swf. This is important when working on a team when your colleague sends you a .fla that uses a font you don't have installed. You can make changes to any part of the file, except the text. And, as long as you send the file back to be published, everything should work just fine. When you open a .fla that contains fonts you don't have installed, Flash displays the "Missing Font Warning" dialog shown in Figure 5.11. Unless you want to globally substitute a particular font (that is, if you're planning to create the .swf on a machine that does have the missing fonts), simply select "Use Default." Figure 5.11. Select "Use Default" on the Missing Font Warning dialog and you can send a .fla back to a teammate to publish with the necessary fonts.
There are a few more points I want to share about using Static text. First, be conscious of the Selectable option (in the Properties panel when a text block is selected) and only enable selectable text when it makes sense. That is, users probably don't need to select things like headlines or text that appears only briefly during an animation. I see a lot of cases where it looks like a mistake when text is selectable as well as cases where I want to select the text but can't. I have another tip for making any color text look good on any background. Sometimes you'll notice, on a foreign film, they'll use white subtitles. That works great on a dark background but the same white is impossible to read on a white background. If you want to ensure text will stand out on any color background you can use the Glow Filter that's included in Flash Professional 8. For example, if your text is light, you can create a Glow in a dark color as shown in Figure 5.12. Just set the blur factors to something low, like 2. Interestingly, the low quality setting makes the text stand out more (the blur isn't as smooth, but that makes the text sharper). Figure 5.12. The Glow Filter or Drop Shadow Filter can add the needed contrast to make light text stand out on a light background.
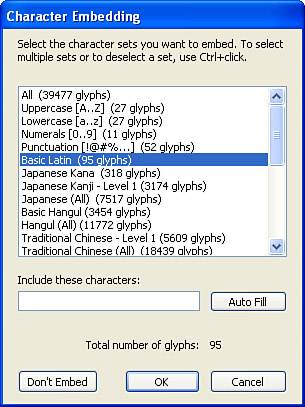
We're going to move on to Dynamic and Input text which are really everything Static text is plus more. That is, the tricks I showed for Static text apply to Dynamic and Input text. (The only exception is the way Flash automatically includes font outlines for Static text.) Embedding Fonts for Dynamic TextI've explained that Dynamic and Input text can change at runtime. Obviously, the user can change Input text by simply typing. But to see how to write the instructions to change Dynamic Text at runtime, you'll have to wait until Hours 15 and 16 before learning how to use ActionScript. Fonts become an issue with Dynamic or Input text when you consider the fact Flash doesn't know all the characters it needs to include when publishing a .swf (the way it does with Static text). When the movie runs on your user's machine Flash will find a substitute for any missing fonts. (This only happens with Static text if you select "Use device fonts" from the font rendering drop down in the Properties panel.) Because the exact characters appearing in a Dynamic or Input text field can change Flash, by default, embeds no fonts. So, this is a problem only when the end user doesn't have the particular font installed. There are ways to reduce or prevent Flash from having to find a substitute font which is always different and often worse than your preferred font. You can select one of the Device Fonts listed at the top of the font drop down list: _sans, _serif, or _typewriter. These not only have little to no impact on file size, they force the Flash player to find a working substitute on the user's system, respectively: Arial (or Helvetica), Times, or Courier. The disadvantages of this approach are, one, it's not 100% foolproof (because a user could have removed the font though this is pretty unlikely because they're such common fonts) and two, you're limited to only three very basic fonts! To ensure a font used in your Dynamic or Input text appears to the user exactly as it does on your machine (where that font is installed) you need to embed the necessary characters. I say "necessary characters" because you shouldn't embed more than you need as every added character adds to the file size. For example, if you're using Dynamic text to display a digital clock you only need the numerals 0 tHRough 9 plus : and A,M,P (for AM or PM). The way you select the characters to embed press the Embed button in the Properties panel which is only available with Dynamic or Input text that uses a font other than one of the three device fonts listed earlier. The Character Embedding dialog, shown in Figure 5.13, lets you select groups of glyphs (what I'd call characters). For example, you can embed just the uppercase alphabet (A through Z). Here's a huge tip: don't click the "All" option. If you want to include "all" characters you probably just need to select the Basic Latin choice (that's the same as upper and lower case, numerals, and all punctuation). Often you won't need all 52 punctuation marks. For the digital clock I mentioned you can select Numerals in the list above and then type AMP: into the "Include these characters" (which can be read "also include these characters" because they get added to the groups you've selected above). Figure 5.13. You can selectively embed specific characters (glyphs) to ensure users will see text with a font installed on your machine.
There are other reasons why you may need to embed font characters. Embedding is also required when you want to:
You've already seen how to use the Transform tool to rotate objects. If that object is a block of Dynamic or Input text or a symbol instance which itself contains Dynamic or Input text, you'll need to embed the characters. In Hour 11 you'll see how a mask layer lets you hide and reveal parts of objects in other layers. Odd shaped masks won't work on Dynamic or Input text unless you embed the characters. Finally, if you plan on applying Filters to Dynamic or Input text (with Flash Professional 8), you need to embed the font. If you're getting the feeling that it's just easier to always embed fonts when using Dynamic or Input text, I suppose that's true however, don't embed unless you have to! It always adds significantly to the final file size for your .swf (around 50K per font). Also, remember when you do need to embed, only embed the characters you're using. Applied Examples Using Color Styles, Blends, and FiltersAfter you learned how to create symbols in the Library last hour, you learned about Color Styles, Blends, and Filters because they only work on instances of symbols. In this section you'll learn a variety of practical uses for these. I can't cover every combination because, besides the fact there are so many, the idea behind having so many options available is for you to explore and use for your own expressiveness. Using Color StylesThere's not a whole lot to say about the Color Styles. The most common effects are tinting or changing the alpha of a clip. Compared to Blends and Filters, Color Styles may seem rudimentary. However, they're fairly powerful and besides they're all that's available in Flash Basic 8. The first "effect" I'll show is really more of a trick: how to tint and set the alpha on a clip. That is, you can select either Tint or Alpha from the Color Style drop down menu (but not both). In order to set both in an intuitive manner, select Tint and then select the base color you want to use. Next, select Advanced and then press the Settings button where you can set the Alpha percentage. When the advanced settings dialog appears it will match the tint you previously set. Here's a real effect, drop shadow. However, let me warn you that you can do this much more effectively and easily using the Drop Shadow Filter if you have Flash Professional 8. You can also use the following technique if you want a drop shadow to appear for users with the Flash Player 7. Try It Yourself: Simple Drop Shadow on Text You can use this trick for any symbol, but in this task I walk you through adding a shadow to text. Here are the steps.
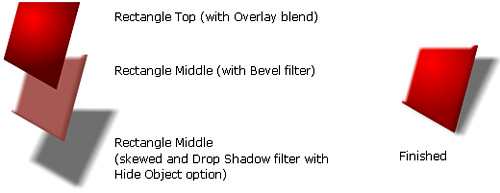
Why did we put the text inside a Movie Clip first? Check it out: if you want to edit the wording on your text you can simply go inside the symbol and edit the contents. The change is propagated to each instance on stage. Incidentally, you can do this poor-man's drop shadow with any symbol regardless of whether it contains text. Practical Uses for BlendsThe key to understanding the Flash Professional 8 feature Blends is to remember there are usually two players: the overlaying instance (the one with a blend applied to it) and all the objects underneath (which gets composited with the overlay). Also, realize you can nest the blends by applying a blend on one symbol instance residing inside another instance. You should also feel free to explore the different blends. When you find one that works well for a particular effect be sure to take time to study why it worked. That is, it doesn't do you any good to simply memorize the technical effect for each blend if you can't use them in a practical manner. Perhaps the most powerful blend is Layer. When a Movie Clip instance on which you want to apply an alpha contains multiple overlapping objects, Layer is a lifesaver. For example, I created a Flower Movie Clip (shown in Figure 5.14) by repeatedly duplicating an instance of just the petal and rotating it. (In fact, I set the registration point to the corner of the petal then used the Transform panel by typing in 30 degrees and pressing the "Copy and apply transform" button 12 times.) When I applied the Alpha Color Style on the flower instance, the portions of contained petals that were overlapping had a different alpha amount (as shown on the left of Figure 5.14). I simply left the alpha setting as is, and changed the Blend to Layer and it came out as expected. Figure 5.14. The overlapping petals inside a flower clip with an alpha Color Style has an unexpected look (left) but improves when the Blend is also set to Layer (right).
Another useful Blend is Hard Light (as well as the similar Overlay). The basic orientation is to apply the Hard Light or Overlay blend to a clip containing a gradient. This effect is nice because you can add a highlight or sheen that doesn't permanently change an imported raster graphic. (After all, you could create the same effect using Photoshop before you import an image but that wouldn't be editable once inside Flash.) In addition, when you learn how to animate starting in Hour 7, you can animate the highlight making an otherwise static image almost come to life. Try It Yourself: Use the Hard Light or Overlay Blend to Add a Highlight
This technique works best when you keep the effect subtle. By the way, there's a similar technique to make a ribbon-like sheen. Instead of the radial gradient, make a multi-step gradient (or one that repeats). It's probably best for something like the picture frame shown earlier in Figure 5.10 not necessarily a car however. The highlight effect just shown is much more interesting when you add a little bit of motion that is, when you animate it. The following "practical" use for the Invert blend really requires animation for you to see anything. But, it's still worth looking at now. Basically, you can get a lot of mileage by applying the Invert blend to a black rectangle (the same size as the stage) covering your entire stage. To see the effect, draw a bunch of shapes on to the stage. Then, make sure Object Drawing is turned on when you draw a black filled rectangle the same size as the stage. Convert the rectangle to a Movie Clip and set the Blend to Invert. Then, to simulate how the effect can be animated, select the clip and then alternate between cut (Ctrl+X) and undo (Ctrl+Z). So just imagine that a ball animates across the screen and when it hits a window this inverted blinking happens. It's pretty effective despite the simplicity. There are so many more practical and gratuitous situations for the Blends. Hopefully this section has given you a couple starter effects that you can expand upon. Practical Uses for FiltersA lot of the Flash Professional 8's Filters are effective on their own. For example, just add a Drop Shadow filter to a clip and it immediately appears to float over the stage. I've got one simple and one advanced example to give you a taste for using Filters for practical situations. You might laugh when you see how easy you can use Filters to desaturate a photograph so it looks black and white. (But, then again, if you ever tried this in earlier versions of Flash you'll be blown away!) One sentence task: Import a photograph, convert it to a Movie Clip symbol, use the Filters panel to select Adjust Color, then move the Saturation slider all the way to the left (-100). It's easy, too, to make a photo look old-fashioned with a sepia-tone effect. Just bump up the Saturation a little and use the Hue slider to pick a yellow tinge. If the desaturation trick was too easy, the following effect is more involved. Basically, it's a combination of a few things you've already done this hour: old-school drop shadow and the Hard Light Blend, all on top of the Bevel Filter. Basically, it adds some realism to the plastic-looking effect you get with a plain Bevel Filter. Try It Yourself: Combining Techniques to Improve the Bevel Filter There's a definite trend to make icons have a soft 3D plastic looking character. Even the Flash application icon has this look. It's easy to create by combining a few features.
|


| < Day Day Up > |
EAN: 2147483647
Pages: 235