Sharpening within Camera Raw
|
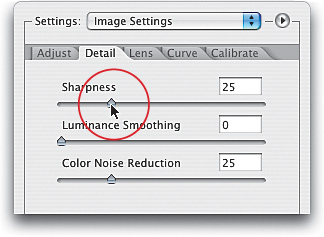
Although Camera Raw enables you to sharpen your image at this early stage in the correction process, you have to decide if this is something you really want to do. I've heard arguments for sharpening at this stage, but many more against it, so like most corrections, it'll come down to your own personal preference. If you do decide to sharpen now (or if you want to turn off the sharpening that's on by default), here's how: Step OneWhen you open an image in Camera Raw, by default it applies a small amount of sharpening to your photo. You can see how much by going to the Detail tab (along the right side of the dialog) and looking at the Sharpness slider. To add additional sharpness, drag the slider to the right (if you do this, first make sure to set your view to 100% in the bottom left of the preview so you can see the effect of sharpening). Step TwoNow that you know how to apply more sharpness (I hate to tell you this), I recommend setting the Sharpness at 0% (essentially turning it off). I recommend this for two reasons: First, because there's just one slider, so you basically have to take what it gives you. Second, I feel sharpening should be done right before you save the file, not when you're initially creating it, so it does the minimum amount of damage to the image. However, if you'd like to see what the "sharpened" image would look like, you can sharpen just the preview, not the actual file. Just press Command-K (PC: Control-K) while the Camera Raw dialog is open, and in the Camera Raw Preferences dialog, choose Preview Images Only in the Apply Sharpening To pop-up menu. 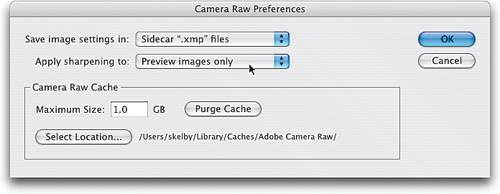 |

|
EAN: N/A
Pages: 187