Advanced Blending in Photomerge
|
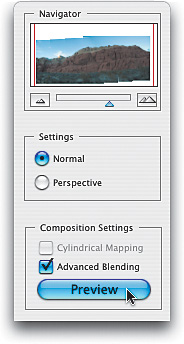
| If you shoot everything perfectly (you used a tripod, you didn't shoot from an extreme angle, you were careful when panning the camera to the next segment so it didn't move up or down, etc.), then your pano will come together pretty easily, with little interaction from you. Ah, but if life were only that simple. Sometimes you're going to have a little camera movement, a little deviation in exposure, or some other problem that's not going to let Photomerge blend the edges of your photos perfectly. That's why we need to know about Advanced Blending. Step OneIn the Adobe Bridge, select the photos you shot for your panorama by Command-clicking (PC: Control-clicking) on them. Now, go under the Bridge's Tools menu, under Photoshop, and choose Photomerge. Note: We're not going to do any color correction or sharpening yetwe'll save that for after our pano has been created, so we're working with one single image. 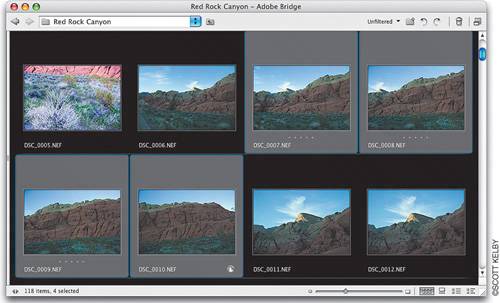 Step TwoWhen the Photomerge dialog opens, by default it will try to stitch your panorama together. In the example shown here, it did just that, but because the exposures are off by a little bit, you can see a distinct diagonal line between each of the four photos (in other words, they didn't blend together well). (Note: Press Z to switch to the Zoom tool in the dialog and zoom into the preview window to see the merge better.) This is when it's time to try Photomerge's Advanced Blending option.  Step ThreeOn the right side of the Photomerge dialog, in the Composition Settings section, turn on the checkbox for Advanced Blending. When you turn this on, nothing happens onscreen until you click on the Preview button that appears just below the Advanced Blending checkbox. Step FourNow Photomerge will re-blend the edges, and display the results in this Preview Mode. Notice that the blend between photos is much smoother, even though the top edges are a bit frayed between each image, but you can pretty much ignore that because you're going to crop away those "stairsteps" soonso just be concerned with the difference in tone between the four images, which is minimal now (at least, compared to what it was in Step 2). By the way, while you're in Preview Mode, you can only view the panonot make any changes to it. You have to click Exit Preview to be able to make changes. 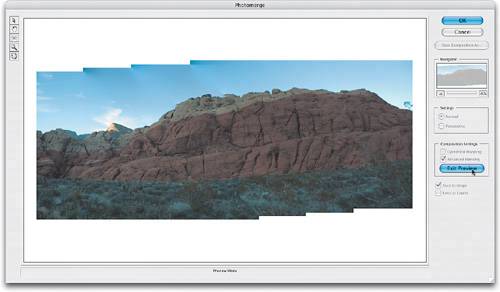 Step FiveWhen you click OK, Photomerge creates the panorama for you in a separate document. You can still see the "stairstepped" areas along the top and bottom, so in the next step you'll need to crop that away. 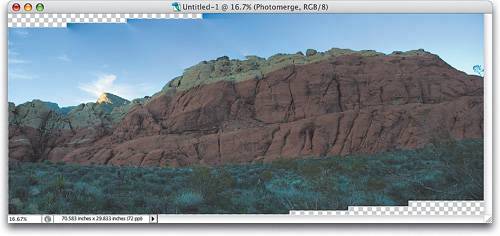 Step SixPress the letter C to get the Crop tool, and click-and-drag a cropping border with the top border landing just below the stairsteps in the top of the image and the border ending just above the stairstepped edges along the bottom. 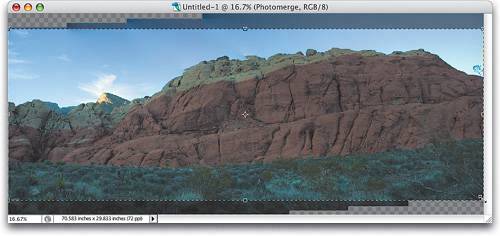 Step SevenPress Return (PC: Enter) to complete your crop, leaving the photo cropped down to size without the stairstepped edges. If you look closely, you can see we still have some work to do (that's because the original pano wasn't shot perfectlythe angle and exposure were all off by a little bit, and that makes our job a little bit harder). 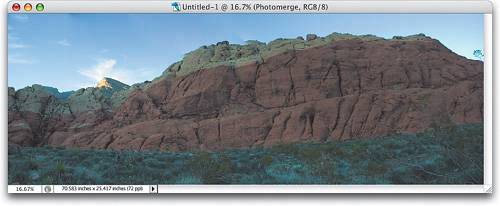 Step EightPress Z to get the Zoom tool and zoom in on the rocks along the top center of the image. You'll see that there are two areas that didn't blend perfectly. The quickest way to fix this is to use the Clone Stamp tool to clone some sky over the smudged rocks. 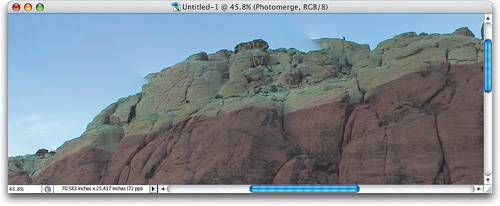 Step NinePress S to switch to the Clone Stamp tool. In the Options Bar, click on the thumbnail to the right of the word "Brush", and choose a soft-edged brush from the Picker. Now, Option-click (PC: Alt-click) in the sky near the rock problem area to sample the sky, and then paint (clone) blue sky over the smudged edge of the rock. You may need to zoom in even closer (with the Zoom tool), then switch to a smaller, hard-edged brush and clone along the rocks so the edge looks hard, rather than soft. 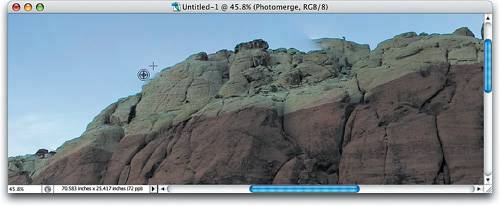 Step TenYou'll use the same technique to fix the other smudged rock areas: Option-click (PC: Alt-click) in the sky beside the smudged rock, clone nearby sky right over the edge of the rock, and use a smaller, hard-edged brush to touch up the edges. With the problem areas cloned away, it's time to adjust the pano. 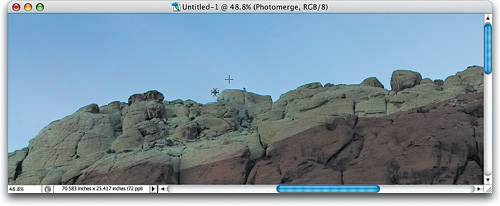 Step ElevenDouble-click the Zoom tool to view your image at 100% zoom. Now, use Curves (press Command-M [PC: Control-M]) to balance the overall color of the shot (see "Color Correcting Digital Images" in Chapter 6). Then, to get the sky looking richer and bluer, I used the "Neutral Density Gradient Filter" technique from Chapter 11, and then chose Flatten Image from the Layers palette's flyout menu. Finally, I applied Photoshop CS2's Smart Sharpen filter (found under the Filter menu, under Sharpen) with the Amount set at 58% and the Radius set to 1 pixel to complete the photo. |

|
EAN: N/A
Pages: 187