Using Match Color to Fix Pano Exposure Problems
|
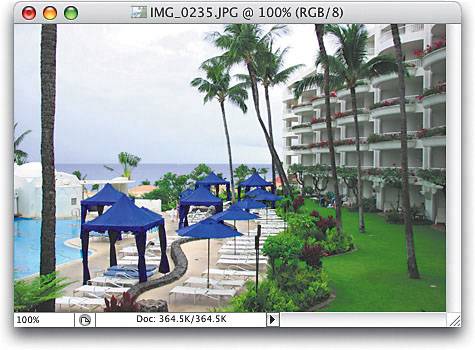
| When you're shooting panos, you can really get burned by using the automatic exposure setting on your camera because at least one of your segments will wind up either lighter or darker than the rest, creating very obvious seams in your pano. The way around this (when taking the shot) is to compose the first segment, hold the shutter half way down to set the exposure, then memorize that exposure setting, and switch to manual. Now shoot all the segments in manual mode, using that exact exposure. If you didn't do that, here's what to do in Photoshop CS2: Step OneOpen the segments of your pano (taken using auto exposure mode) and examine them for color shifts. If you're not sure if the colors are off, do a quick Photomerge (go under the File menu, under Automate, and choose Photomerge), and when the photos are stitched together, the problem will be pretty obvious. In the example shown here, you can see that the third segment from the left is underexposed, making the seams obvious (and the pano unusable). In fact, it was off by so much, that Photomerge could only auto-stitch three sectionsI had to place one manually from the Lightbox. 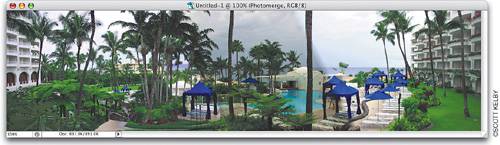 Step TwoGo ahead and click Cancel to delete the test pano you just created, and then, from the segments you already have open, click on one of the photo segments that is properly exposed. Tip In the intro above, I recommended turning off auto exposure when shooting panos. Another tip that will make things easier is to turn off auto focus as well, and manually focus each segmentthat way, both your exposure and focus will be consistent from segment to segment. Step ThreeClick on the open photo segment with the exposure problem (this one is underexposed, compared to the other segments taken within seconds of each other). Step FourGo under the Image menu, under Adjustments, and choose Match Color. When the Match Color dialog appears, from the Source pop-up menu at the bottom of the dialog, choose the photo segment you clicked on in Step 2 (the one you want to match it to), and you'll instantly see an onscreen preview of how the tones have matched. In the example shown here, the match came out a little bit too purple, so you can drag the Color Intensity slider to the left just a little bit until the two images match even closer. You can now click OK, and the tone of the two segments will now match up pretty darn closely. 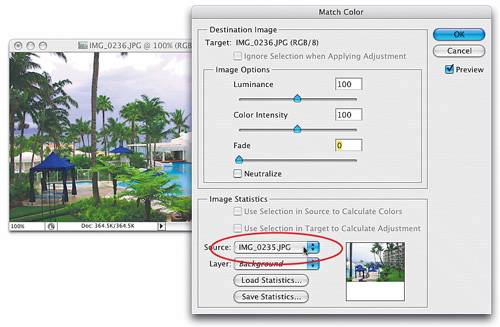 Step FiveNow you can use Photomerge again to merge all four photos into one panorama, where all four segments match up perfectly. Incidentally, once I adjusted the tone of the third segment, Photomerge was able to stitch all four segments together automatically. 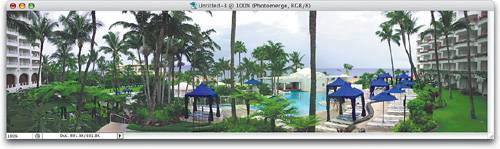 |
|
EAN: N/A
Pages: 187