Customizing the Look of Your Slides
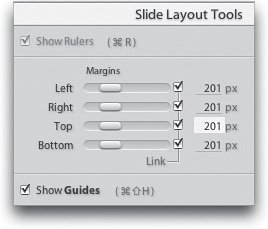
| The defaults are okay, but after you create a slide show or two with them, you're going to be saying stuff like, "I wish I could change the background color" or "I wish I could add some text at the bottom" or "I wish my slide show looked better." (Note: You're not saying you wish your photos looked betteryou wish your slide show looked better.) Well, this is where you start to create your own custom look for your slides, so it looks just the way you want it, every time. Step OneOnce the photos you want in your slide show are in place, now it's time to focus on the look of your slide show. Lightroom comes with several pre-designed templates, and you can apply any of them by just clicking on them in the Template Browser on the left side of the Lightroom window (as shown here, where I've clicked on the Default template, which puts your photos over a gray background with a thin white border and a hard drop shadow, and makes your Identity Plate appear in the upper-left corner. More on this later). 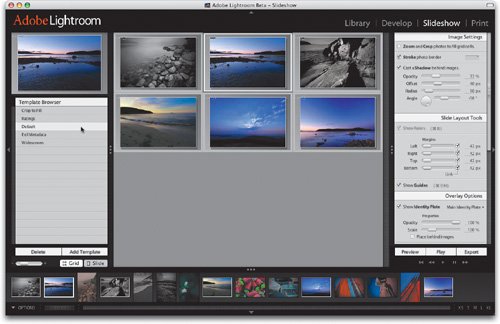 Step TwoIf you move your cursor over each template name in the Template Browser, you'll see a preview (up in the preview window above the Template Browser) of how a slide in your slide show will look if you use that particular template. Besides the Grid view, there's also a Slide view so you can see your slide layouts up close. To switch to Slide view, either double-click on a slide, or click the Slide button (shown circled here). Once in Slide view, click on the EXIF Metadata template to put your photo on a black background with your photo's metadata printed below it. 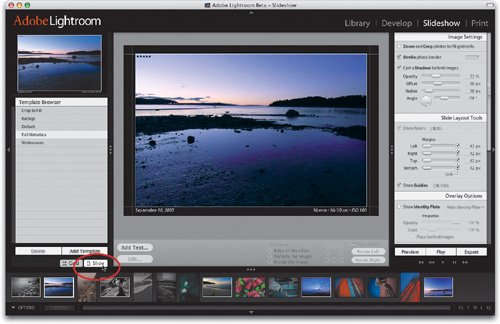 Step ThreeIf you decide that you'd prefer to create your own custom look for your slides, rather than using Adobe's templates, then you might as well tuck the Template Browser out of sight so you have a larger work area. To do that, just click once on the far-left side of Lightroom's window (as shown) and the panel will tuck itself away. Look how much larger your work area is now, and all the essential adjustment panels are still on the far-right side of the window. Now, let's get to customizing your look. 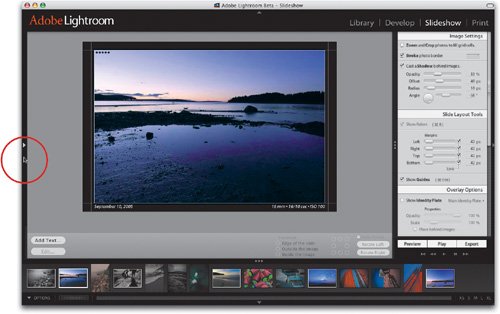 Step FourTo create your own custom look, you can use the current template as a starting place (if you like), or you can switch to a different template and use that (if you move your cursor to the left side of the screen, your Template Browser will pop back out). For our example here, we'll just use that EXIF Metadata template as a starting place to customize our slide show. First, let's look at sizing your photos on the slide (basically, determining how large your photos will appear). You do this by clicking-and-dragging on the margin grid lines that appear around your photo. If you click-and-drag inward, it shrinks your photo (as shown here). 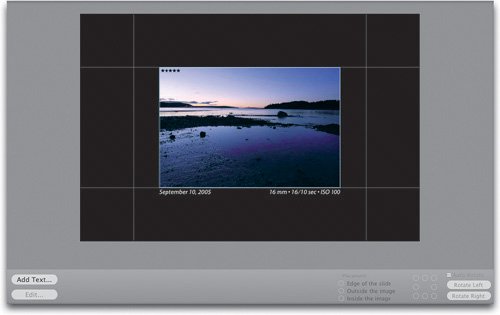 Step FiveYou can move the margins by dragging them, or you can use the Margins sliders in the Slide Layout Tools panel (shown here). As you can see, the margins are all set at exactly the same amount201 pixels. That's because by default they're linked together (see the checkbox at the end of each Margins slider? They're all checked, so your margins move as one unitif you click-and-drag one margin, they all move in unison. Same thing with the slidersmove the Left Margins slider and all the other Margins sliders move as well). Step SixNow, what if you want to change just one margin's size while leaving the other margins unchanged? Then just turn off the Link checkbox beside the margin you want to adjust. For example, if you want to create more room below your photo (so you can create a gallery print effect), turn off the checkbox beside the Top slider (as shown here), then within the Slide view area, click on the top margin grid line and drag it straight upward. As you can see, this gives you a smaller margin at the top of the slide, and the photo increases in size until it hits the side and bottom margins. Remember, as the margins get smaller, the photo gets larger (and vice versa). By the way, anytime you want to hide those margin grid lines, just press Command-Shift-H. 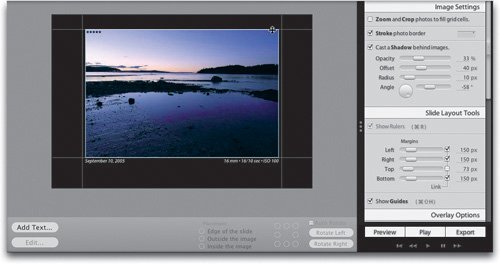 Step SevenNow, there's still that EXIF data under the photo. Before you delete all that text (you'd just click on it, then press the Delete key on your keyboard), you'll want to know how to edit that text, in case on a different project you actually do want that info to appear on the slide. First, click on the block of text you want to edit (as shown here). When you do this, the controls that appear below the slide become active. These controls let you decide which text is visible and where it winds up on your slide. 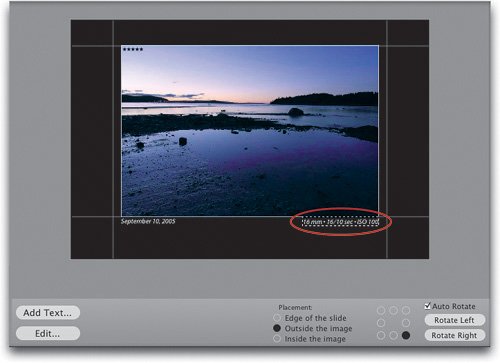 Step EightOn the bottom-right side of the Slide view area are some controls for the placement of your text. For example, if you want your text to appear on the edge of your slide, it's a two-click process: (1) click directly on the words Edge of the Slide, then (2) pick a black dot in the nine-dot grid to the right of your placement choices. You use these dots to choose on which edge your text appears. By default, your text appears on the edge of the slide in the same grid position it was in to begin with (that's why the lower right-hand corner dot was filled in). If, instead, you wanted that text to appear on the upper left-hand corner of the slide, you'd click the upper-left grid dot. 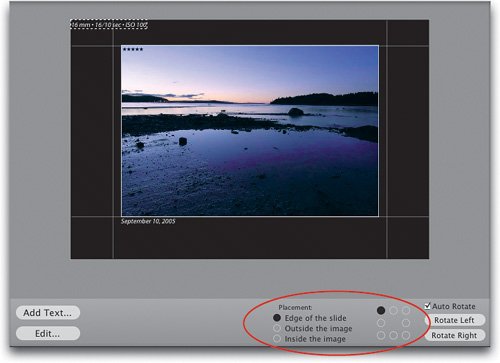 Step NineNow let's change the position of the text. In the Placement controls, click on Outside the Image so it appears just outside the edge of your photo, then click the right-center dot (on the dot grid) so your text appears centered on the right side of your image. If you need to rotate your text, then you'll use the Rotate Left and Rotate Right buttons to the right of the dot grid (shown circled here). By default, the Auto Rotate checkbox is turned on. While your text is highlighted, click the Edit button at the bottom left of the Slide view window. This brings up the Edit Text Adornment dialog where you can change the font, font style (bold, italic, etc.), and point size using the popup menus in the center of the dialog. To change the color of your type, click on the button to the immediate right of the Point Size pop-up menu. 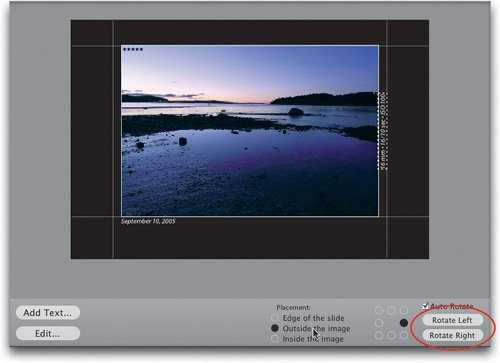 Step TenOkay, so now that you know how to work with type on your slide, let's get rid of those blocks of type. Click on either one and then press the Delete key on your keyboard. Now click on the other block, and delete it as well. You'll also need to click on the rating stars (if your image had any) in the upper-left corner of the photo and delete them. Now there should be no text visiblejust your photo, with a thin white stroke around it, on a black background, with no visible text (and, of course, the margin guides are still visible). 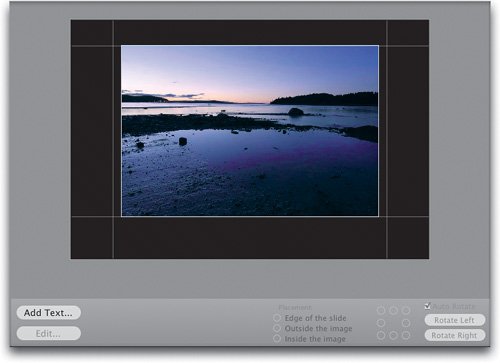 Step ElevenLet's hide the margin guides from view (press Command-Shift-H), so now you see just your photo on a black background. However, the reason your photo has that thin white border around it is because that feature was included in the EXIF Metadata template we originally started with (you can see the white border in the previous step). To turn off this thin white border, go to the Image Settings panel on the right side of the window and turn off the checkbox beside Stroke Photo Border (as shown circled in red here). 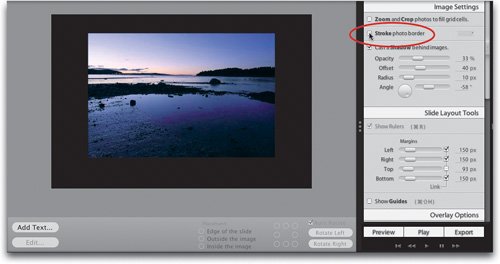 Step TwelveWhile we're up there in the Image Settings panel, turning off the Stroke Photo Border checkbox, take a look at the checkbox right above it called Zoom and Crop Photos to Fit Grid Cells. Here's what this very handy checkbox does: First, go back two steps and look at how the photo doesn't fill the margins on the sides. Although the photo touches the top and bottom, there's an empty gap on the left and right sides. Turn this check-box on, and your photo will increase in size (zoom) until there are absolutely no gaps whatsoever, as shown here (make the margin guides visible by pressing Command-Shift-H, then turn on the Zoom and Crop checkbox, and you'll see what I mean). The little lines that appear above the top and bottom margins when you click on the image show the area of your photo that extends beyond the margins, but is hidden from view. 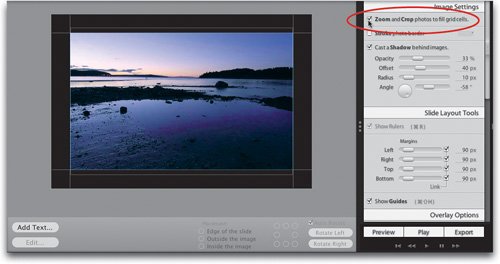 |
EAN: N/A
Pages: 71