| For a web service to be usable by other applications, a WSDL file must be published for the web service. The application uses this WSDL file to construct the necessary artifacts. The NetBeans Web Service Client wizard automates the creation process and updates the deployment descriptor files with the appropriate <service-ref> elements for the web application project. You can also consume web services from general Java projects. To create a WSDL file: Open the Web Service Client wizard by right-clicking the node of a web application project or a Java project and choose New | Web Service Client. In the wizard (shown in Figure 12-1), pick a WSDL file from the URL of the running service or from a local directory on your system. Figure 12-1. New File wizard: create web service client 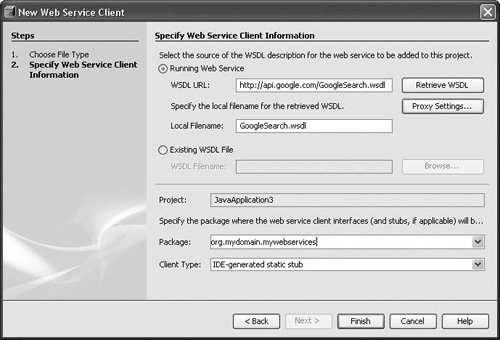 Make sure you pick a package name for the generated interfaces that your user code will use to access and interact with this web service. Then choose a client type from the Client Type combo box. Two types of web service clients can be generated: J2EE Container-generated static stub (JSR-109 Enterprise web services). Defines the packaging of web services into standard Java EE modules, including a new deployment descriptor, and defines web services that are implemented as session beans or servlets. This is the recommended and portable (via the J2EE 1.4 specification) way. IDE-Generated static stub (JSR-101 JAX-RPC). Defines the mapping of WSDL to Java classes and vice versa. It also defines a client API to invoke a remote web service and a runtime environment on the server to host a web service.
Click Finish. In the Projects window, you should see a new logical node under the Web Services References node (see Figure 12-2). Explore the children of this node; for each web service operation defined in the WSDL file, the IDE shows a node that has the operation's name and a popup menu that allows you to test this operation directly within the IDE without writing a single line of code.
Figure 12-2. Projects window with populated Web Service References node 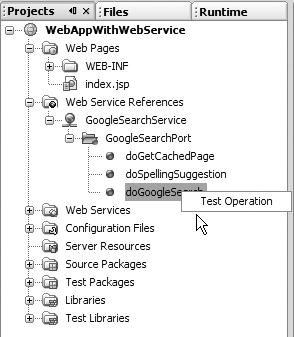
The necessary Web Service References entry in the web.xml file for this web application is updated, so you can use this web service from either a servlet or a utility Java class within your web application. The entry in the web.xml file should look something like the following code block: <service-ref> <service-ref-name>service/GoogleSearchService</service-ref-name> <service-interface>org.mydomain.mywebservices.GoogleSearchService </service-interface> <wsdl-file>WEB-INF/wsdl/GoogleSearch.wsdl</wsdl-file> <jaxrpc-mapping-file>WEB-INF/wsdl/GoogleSearch-mapping.xml </jaxrpc-mapping-file> <port-component-ref> <service-endpoint-interface> org.mydomain.mywebservices.GoogleSearchPort </service-endpoint-interface> </port-component-ref> </service-ref>
 | Publishing of the WSDL file is often done via a Universal Discovery, Description, and Integration (UDDI) registry. NetBeans IDE does not provide a user interface for publishing web services to a UDDI registry. However, this does not prevent you from using WSDL files that come from a UDDI registry or other source. Although most of the time, the IDE selects the correct wscompile tool options for generating client code from the WSDL file, you can refine these options. |
To modify the wscompile tool options for a project (this is for advanced developers and is not a common task): Right-click the project's main node and choose Properties to open the Project Properties dialog box. Select the Web Services | Web Services Clients node (see Figure 12-3). Figure 12-3. Project Properties dialog box with Web Service Clients panel displayed 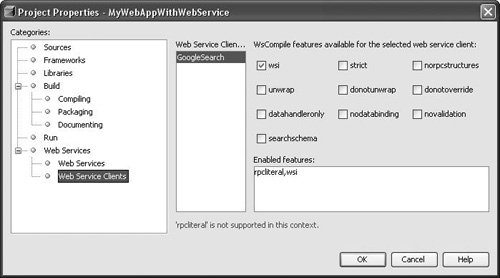 For example, you can use checkboxes to set or disable the strict, unwrap and novalidation flags and to enter which wscompile options to use. For now, keep the default values used by the IDE.
For advanced configuration, see the key to the wscompile tool options in Table 12-1. Table 12-1. wscompile Tool OptionsOption | Effect on Web Service Client |
|---|
datahandleronly | Maps attachments to the DataHandler type. | donotoverride | No regeneration of classes that already exist on the classpath. | donounwrap | Disables unwrapping of document/literal wrapper elements in WSI mode(default). | explicitcontext | Turns on explicit service context mapping. | jaxbenumtype | Maps anonymous enumeration to its base type. | nodatabinding | Turns off data binding for literal encoding. | noencodedtypes | Turns off encoding type information. | nomultirefs | Turns off support for multiple references. | norpcstructures | No generation of RPC structures (-import only). | novalidation | Turns off full validation of imported WSDL documents. | resolveidref | Resolve xsd:IDREF. | searchschema | Searches schema aggressively for types. | serializeinterfaces | Turns on direct serialization of interface types. | strict | Generates code strictly compliant with JAXRPC Specification. | unwrap | Enables unwrapping of document/literal wrapper elements in WSI mode. | wsi | Checks for compliance with the WSI-Basic Profile, which is a specification for improved interoperability. For example, the WS-I Basic Profile prohibits the use of rpc/encoded. Therefore, if you set the wsi feature, a warning will be generated when you build a web service client that uses a WSDL file that uses rpc/encoded. |
Now you will want to call an operation for this web service within your Java code or even in your JSP page. To call an operation: Right-click the location in your Java source code or your JSP page where you want to insert some code, and choose Web Service Client Resources | Call Web Service Operation (see Figure 12-4). Figure 12-4. Generating code in the Source Editor for calling a web service operation  Select an operation from the Select Operation to Invoke dialog box. After calling the operation, you can see the new code that the IDE has added within your Java file. You should see a try/catch block that looks something like the following:
try { getGoogleSearchPort().doSpellingSuggestion( //TODO enter operation arguments */); } catch(java.rmi.RemoteException ex) { // TODO handle remote exception }
Make sure you replace the //TODO comment with the list of correct parameters for this operation. In our example, the doSpellingSuggestion method takes two arguments. We also want to display the output parameter. So, the updated code looks like the code below: try { getGoogleSearchPort().doSpellingSuggestion( out.println( getGoogleSearchPort().doSpellingSuggestion( "cx5Str9QFHJu96fb3CY920ie3aAiAVr6", //my key "NetBeanss") //the term I need a suggestion for ); } catch(java.rmi.RemoteException ex) { out.println(ex.toString()); }
("cx5Str9QFHJu96fb3CY920ie3aAiAVr6" is a private key to access the Google search via APIs. To get yours, go to http://www.google.com/apis/ and register). You should also see some generated private methods that do the web service reference lookup from the initial context and the RPC Port accessor for the selected operation, as follows: private org.mydomain.mywebservices.GoogleSearchService getGoogleSearchService() { org.mydomain.mywebservices.GoogleSearchService googleSearchService = null; try { javax.naming.InitialContext ic = new javax.naming.InitialContext(); googleSearchService = (org.mydomain.mywebservices.GoogleSearchService) ic.lookup("java:comp/env/service/GoogleSearchService"); } catch(javax.naming.NamingException ex) { // TODO handle JNDI naming exception } return googleSearchService; } private org.mydomain.mywebservices.GoogleSearchPort getGoogleSearchPort() { org.mydomain.mywebservices.GoogleSearchPort googleSearchPort = null; try { googleSearchPort = getGoogleSearchService().getGoogleSearchPort(); } catch(javax.xml.rpc.ServiceException ex) { // TODO handle service exception } return googleSearchPort; }
| Notice the // TODO statements in the added code. The IDE's Java EE wizards always add some TODO statements so that you can quickly find in the Java source code the areas you need to fill in, such as business logic that you need to complete. You can view all outstanding TODO statements in a single list by choosing Window | To Do. |
|