Creating a Mac OS X Application with RubyCocoa
Credit: Alun ap Rhisiart
Problem
You want to create a native Mac OS X program with a graphical user interface.
Solution
Use the Mac OS X Cocoa library along with RubyCocoa and the Interface Builder application. RubyCocoa creates real OS X applications and provides a GUI interface for building GUIs, as opposed to other libraries, which make you define the GUI with Ruby code. RubyCocoa is a free download, and the Cocoa development tools are on the Mac OS X installation DVD.
Interface Builder is very powerful: you can create simple applications without writing any code. In fact, it takes longer to explain what to do than to do it. Heres how to create a simple application with Interface Builder:
Start the Xcode application and create a new project from the File menu. Choose "Cocoa-Ruby Application" from the "New Project" list, hit the Next button, give your project a name and location on disk, and click Finish.
XCode will create a project that looks like Figure 21-7.
Figure 21-7. A new Cocoa-Ruby project

The Cocoa-Ruby project template comes with two files: main.m (an Objective-C file) and rb_main.rb (a RubyCocoa file). For a simple application, this is all the code you need.
Open the NIB Files group and doubleclick MainMenu.nib to open Interface Builder. You get a new application window, into which you can drag and drop GUI widgets, and a menubar labeled MainMenu.nib (English)MainMenu.
Youll also see a palette window with a selection of GUI objects; a nib document window named MainMenu.nib (English), containing classes, instances, images and sounds; and an inspector. If the inspector is not open, select Show Inspector from the Tools menu.
The screenshot in Figure 21-8 shows what we e going to do to our new application window (seen in the upper left).
Figure 21-8. Our destination Interface Builder screenshot
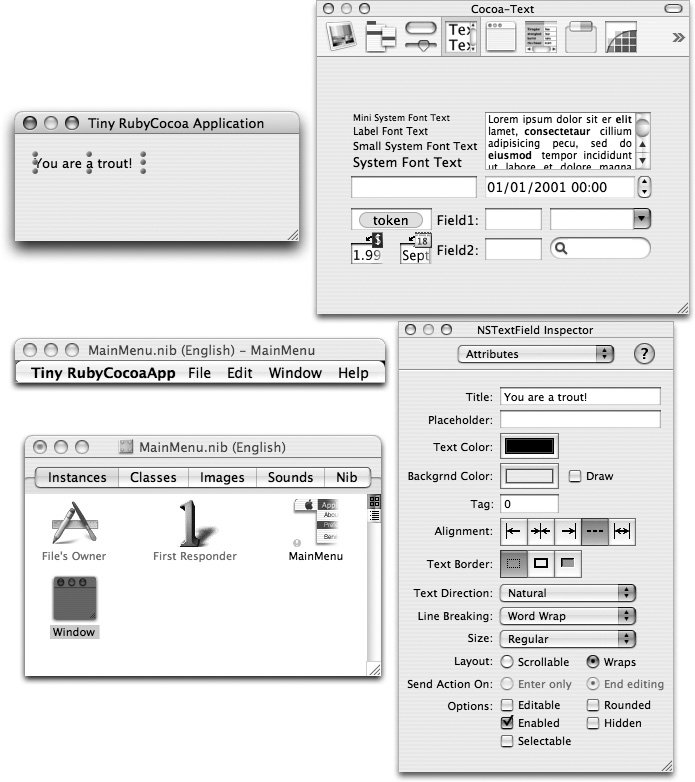
Select the new application window and set the applications title. Type "Tiny RubyCocoa Application" in the inspectors Window Title field (you need to select the "Attributes" tab to see this field).
Add a text label to the application window. Select the Text palette in the palette window. The visible controls are all text fields, with only slight differences between them. Well use the control called System Font Text: drag this control into your application window.
Double-click the new text field in the application window and type "You are a trout!"
For completeness, go through the menus in the menubar and change "New Application" to "Tiny RubyCocoaApp" wherever it occurs. Save your nib.
Go back to Xcode. Click the Build and Go button. Your application should now run; it will look like Figure 21-9.
Figure 21-9. You are a Mac OS X trout
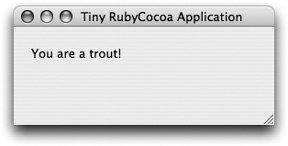
A compiled, doubleclickable version of the application will be found in your project build folderusually within the project subfolder.
Discussion
This simple application doesn show much about RubyCocoa, but it gives a glimpse of the power of the Cocoa framework. The NSApplication class gives you a lot of functionality for free: spellchecking, printing, application hiding, and so on. Ruby-Cocoa creates an instance of NSApplication, which deals with the run loop, handling events from the operating system, and more. You could have created this GUI application entirely in code (it would have looked something like the Tk example), but in practice, programmers always use Interface Builder.
For a more realistic example, well need to write some code that interacts with the interface. Like Rails and many other modern frameworks, Cocoa uses a Model-View-Controller pattern.
- The view layer consists of the windows and widgets: NSView and its subclasses, such as NSTextField. These are built using Interface Builder.
- The model layer is coded by the programmer, based on NSObject or a more specialised subclass.
- The Controller layer can be dealt with in Interface Builder using subclasses of NSController (these are in the Controllers palette), or in code.
Lets create a RubyCocoa version of the Stopwatch program seen in previous GUI recipes like Recipe 21.12. First, we need to create a new Cocoa-Ruby Application project in Xcode, and once more open the MainMenu.nib file in Interface Builder. Because RubyCocoa makes it easy, well display the time on the stopwatch two ways: as a digital readout and as an analog clock face (Figure 21-10).
Figure 21-10. The RubyCocoa stopwatch in analog mode
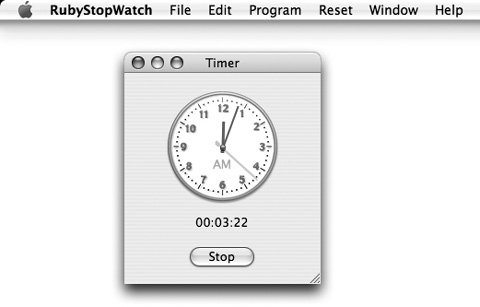
Create a new Cocoa-Ruby application. Select the new application window and change its title in the inspector to Timer.
Create the clock. From the Text palette we used before, drag a NSDatePicker (a label that displays a date and time) into the application window. In the inspector, change the style to "Graphical", date selection to "None", and time selection to "Hour, Minute, and Second". The NSDatePicker now shows up as a clock.
Create the digital readout. Drag an NSTextField ("System Font Text", as in the previous example) onto the window below the clock. Now drag a date formatter (marked with a small calendar in the palette) onto the NSTextField. The Inspector changes to show a list of possible formats; select %H:%M:%S.
Create the stopwatch button. Switch to the button palette and drag a normal, rounded, NSButton to the application window. In the Inspector, change the title to "Start" and make sure its type is "Push Button".
Build the menu bar. Change to the menus palette and drag Submenu objects onto the "MainMenu" menubar. Double-click them to change their titles (to "Program" and "Reset"), and drag Item objects onto the menu objects to add items to the menu. As in the stopwatch examples for other GUI libraries, our "Program" menu will contain menu items for "Start" and "Stop". The "Reset" menu will have a single menu item: "Reset Stopwatch". Unlike in the other examples, the application menus will contain no menu item for "Exit". This is because Mac OS X already provides a way to exit any program from the apple menu.
Now we have all our interface elements in place. We need a model object to actually do the work. Click on Classes in the MainMenu.nib window, to bring up the class browser (Figure 21-11).
Figure 21-11. The class browser
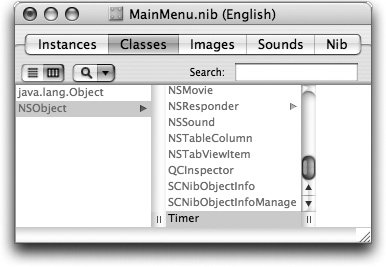
Select NSObject and then "Subclass NSObject" from the Classes menu. Change the name of the new class to Timer. This class will implement the stopwatch code.
We need to tell Interface Builder about the interface to this class. Start by specifying three methods. In the inspector, with the new class still selected in the class browser, make sure that the Attributes-Actions tab is selected and hit the Add button three times. Name the methods reset:, start:, and stop:. These are the methods that will be called from the button and menus.
The model class we are creating also needs to know about some interface elements; for instance, it needs to know about the time controls so it can change the displayed time. The model class accesses Interface Builder widgets through instance variables called outlets. Switch to the "Attributes-Outlets" tab and click Add tHRee times. Name the outlets clock, timeField, and button.
With the model object declared and all the interface elements in place, we can connect everything together. Recall that Interface Builder deals with instances of objects; we have a Timer class that implements the stopwatch functionality, but as of yet we have no instance of the class. Keeping the Timer class selected in the class browser, choose "Instantiate Timer" from the Classes menu. The window switches to the Instances tab, with a new icon representing the Timer instance.
To make a connection between two objects, we drag from the object that needs to know, to the object it needs to know about. First, lets deal with the actions.
When we click the Start button, we want the start method on our Timer class to be called. The button needs to know about the start: method. Control drag from the Start button to the Timer instance icon. The Inspector changes to show the methods of Timer, and automatically selects the start: method for you (it matches the button label). Click the Connect button to make the connection.
Make the same connection from the menu item "Program/Start" to the Timer, and then from "Program/Stop" to the stop: method. Connect "Reset/Reset Stopwatch" to the reset: method.
The controls now know which Ruby methods they trigger. We need to tell our Timer class which interface elements are accessible from its outlets (instance variables). Now the connections are made from the Timer class to the interface controls it needs to know about. Control-drag the Timer instance to the clock control: the inspector changes to show the outlets tab for Timer. Select clock and click the Connect button.
Connect the textField and button outlets to the digital time control and the start button. Save the nib file as Timer.rb.
Back in Xcode, we are finally ready to write the Ruby code that actually implements the stopwatch. Choose "New File…" from the File menu, and then select "Ruby-Cocoa NSObject subclass" from the list. The core model object code is very similar to the Tk recipe, with some small differences:
	require osx/cocoa
	include OSX

	ZeroDate = NSDate.dateWithString(2000-01-01 00:00:00 +0000)

	class Timer < NSObject
	 ib_outlets :clock, :timeField, :button

	 def initialize
	 @timer = NSTimer.
	 scheduledTimerWithTimeInterval_target_selector_userInfo_repeats(
	 1.0, self, :tick, nil, true)
	 end
First, we call the ib_outlets decorator to specify instance variables that are matched up with the objects specified in Interface Builder.
In the other GUI examples, we displayed a plaintext label and formatted the time as a string for display. Here, the label has its own date formatter, so we can tell it to display an NSDate object and have it figure out the formatting on its own.
NSTimer is a Cocoa class we can use to tap into the Mac OS X user-event loop and call a method at a certain interval. We can get submillisecond time intervals from NSTimer, but theres not much point because NSDate won display fractions of a second. So we set it up to call the tick method once a second.[5]
[5] If, as in the other GUI recipes, wed decided to format the time ourselves and display it as a string, we could set a shorter interval and make the fractions of a second whiz by.
Now we define the start method, triggered when the end user pushes the "Start" button:
	 def start(sender)
	 @running = true
	 @start = NSDate.date
	 @accumulated = 0 unless @accumulated
	 @elapsed = 0.0
	 @button.setTitle(Stop)
	 @button.setAction(:stop)
	 end
One thing to note here: NSTimer hooks into the operating systems event loop, which means it can be switched off. We define a @running variable so we know to ignore the timer when we are not running the stopwatch.
The rest of the code is similar to the other GUI examples:
	 def stop(sender)
	 @running = false
	 @accumulated += @elapsed
	 @button.setTitle(Start)
	 @button.setAction(:start)
	 end

	 def reset(sender)
	 stop(nil)
	 @accumulated, @elapsed = 0.0, 0.0
	 @clock.setDateValue(ZeroDate)
	 @timeField.setObjectValue(ZeroDate)
	 end

	 def tick()
	 if @running
	 @elapsed = NSDate.date.timeIntervalSinceDate(@start)
	 d = ZeroDate.addTimeInterval(@elapsed + @accumulated)
	 @clock.setDateValue(d)
	 @timeField.setObjectValue(d)
	 end
	 end
	end
This recipe is pretty long-winded compared to the other GUI recipes, but thats because it takes more words to explain how to use a GUI application than to explain how a block of Ruby code works. Once you e familiar with Interface Builder, you can create complex Cocoa applications very quickly.
The combination of Ruby and Cocoa can make you very productive. Cocoa is a very big class library, and the GUI part, called AppKit, is only a part of it. There are classes for speech recognition, Bluetooth, disc recording, HTML rendering (Web-Kit), database (Core Data), graphics, audio, and much more. The disadvantage is that a RubyCocoa program is tied to Mac OS X, unlike Tk or wxRuby, which will work on Windows and Linux as well.
With Apples recent change to Intel processors, youll want to create "universal binaries" for your application, so that your users can run it natively whether they have a PowerPC or an Intel Mac. The Ruby code doesn need to change, because Ruby is an interpreted language; but a RubyCocoa application also contains Objective-C code, which must be compiled separately for each architecture.
To make a universal binary, select the top-most group in the "Groups & Files" list in Xcode (the one with the name of your project). Get Info on this (Command-I), go to the "Build" tab, select "Architectures", and click the Edit button. Select both the PowerPC and Intel checkboxes, and your packaged application will include compiled code for both architectures.
See Also
- While Ruby, Xcode, and Interface Builder come as standard with all Macintoshes, RubyCocoa does not (yet!); there is a standard installer, available from http://rubycocoa.sourceforge.net, which includes both the framework classes and the Xcode project templates
- RubyCocoa comes with some documentation and a number of examples; however, once you know how to translate Objective-C messages to RubyCocoa messages, you can reference the huge amount of Cocoa documentation available via Xcodes Help menu, and a large number of examples: there are also many useful and free add-on libraries and Interface Builder palettes, for instance from The Omni Group
- Cocoa Programming for Mac OS X by Aaron Hillegass (Addison-Wesley)
- Cocoa Programming by Scott Anguish, Erik M. Buck, and Donald A. Yacktman (Sams)
Strings
- Strings
- Building a String from Parts
- Substituting Variables into Strings
- Substituting Variables into an Existing String
- Reversing a String by Words or Characters
- Representing Unprintable Characters
- Converting Between Characters and Values
- Converting Between Strings and Symbols
- Processing a String One Character at a Time
- Processing a String One Word at a Time
- Changing the Case of a String
- Managing Whitespace
- Testing Whether an Object Is String-Like
- Getting the Parts of a String You Want
- Handling International Encodings
- Word-Wrapping Lines of Text
- Generating a Succession of Strings
- Matching Strings with Regular Expressions
- Replacing Multiple Patterns in a Single Pass
- Validating an Email Address
- Classifying Text with a Bayesian Analyzer
Numbers
- Numbers
- Parsing a Number from a String
- Comparing Floating-Point Numbers
- Representing Numbers to Arbitrary Precision
- Representing Rational Numbers
- Generating Random Numbers
- Converting Between Numeric Bases
- Taking Logarithms
- Finding Mean, Median, and Mode
- Converting Between Degrees and Radians
- Multiplying Matrices
- Solving a System of Linear Equations
- Using Complex Numbers
- Simulating a Subclass of Fixnum
- Doing Math with Roman Numbers
- Generating a Sequence of Numbers
- Generating Prime Numbers
- Checking a Credit Card Checksum
Date and Time
- Date and Time
- Finding Todays Date
- Parsing Dates, Precisely or Fuzzily
- Printing a Date
- Iterating Over Dates
- Doing Date Arithmetic
- Counting the Days Since an Arbitrary Date
- Converting Between Time Zones
- Checking Whether Daylight Saving Time Is in Effect
- Converting Between Time and DateTime Objects
- Finding the Day of the Week
- Handling Commercial Dates
- Running a Code Block Periodically
- Waiting a Certain Amount of Time
- Adding a Timeout to a Long-Running Operation
Arrays
- Arrays
- Iterating Over an Array
- Rearranging Values Without Using Temporary Variables
- Stripping Duplicate Elements from an Array
- Reversing an Array
- Sorting an Array
- Ignoring Case When Sorting Strings
- Making Sure a Sorted Array Stays Sorted
- Summing the Items of an Array
- Sorting an Array by Frequency of Appearance
- Shuffling an Array
- Getting the N Smallest Items of an Array
- Building Up a Hash Using Injection
- Extracting Portions of Arrays
- Computing Set Operations on Arrays
- Partitioning or Classifying a Set
Hashes
- Hashes
- Using Symbols as Hash Keys
- Creating a Hash with a Default Value
- Adding Elements to a Hash
- Removing Elements from a Hash
- Using an Array or Other Modifiable Object as a Hash Key
- Keeping Multiple Values for the Same Hash Key
- Iterating Over a Hash
- Iterating Over a Hash in Insertion Order
- Printing a Hash
- Inverting a Hash
- Choosing Randomly from a Weighted List
- Building a Histogram
- Remapping the Keys and Values of a Hash
- Extracting Portions of Hashes
- Searching a Hash with Regular Expressions
Files and Directories
- Files and Directories
- Checking to See If a File Exists
- Checking Your Access to a File
- Changing the Permissions on a File
- Seeing When a File Was Last Used Problem
- Listing a Directory
- Reading the Contents of a File
- Writing to a File
- Writing to a Temporary File
- Picking a Random Line from a File
- Comparing Two Files
- Performing Random Access on Read-Once Input Streams
- Walking a Directory Tree
- Locking a File
- Backing Up to Versioned Filenames
- Pretending a String Is a File
- Redirecting Standard Input or Output
- Processing a Binary File
- Deleting a File
- Truncating a File
- Finding the Files You Want
- Finding and Changing the Current Working Directory
Code Blocks and Iteration
- Code Blocks and Iteration
- Creating and Invoking a Block
- Writing a Method That Accepts a Block
- Binding a Block Argument to a Variable
- Blocks as Closures: Using Outside Variables Within a Code Block
- Writing an Iterator Over a Data Structure
- Changing the Way an Object Iterates
- Writing Block Methods That Classify or Collect
- Stopping an Iteration
- Looping Through Multiple Iterables in Parallel
- Hiding Setup and Cleanup in a Block Method
- Coupling Systems Loosely with Callbacks
Objects and Classes8
- Objects and Classes8
- Managing Instance Data
- Managing Class Data
- Checking Class or Module Membership
- Writing an Inherited Class
- Overloading Methods
- Validating and Modifying Attribute Values
- Defining a Virtual Attribute
- Delegating Method Calls to Another Object
- Converting and Coercing Objects to Different Types
- Getting a Human-Readable Printout of Any Object
- Accepting or Passing a Variable Number of Arguments
- Simulating Keyword Arguments
- Calling a Superclasss Method
- Creating an Abstract Method
- Freezing an Object to Prevent Changes
- Making a Copy of an Object
- Declaring Constants
- Implementing Class and Singleton Methods
- Controlling Access by Making Methods Private
Modules and Namespaces
- Modules and Namespaces
- Simulating Multiple Inheritance with Mixins
- Extending Specific Objects with Modules
- Mixing in Class Methods
- Implementing Enumerable: Write One Method, Get 22 Free
- Avoiding Naming Collisions with Namespaces
- Automatically Loading Libraries as Needed
- Including Namespaces
- Initializing Instance Variables Defined by a Module
- Automatically Initializing Mixed-In Modules
Reflection and Metaprogramming
- Reflection and Metaprogramming
- Finding an Objects Class and Superclass
- Listing an Objects Methods
- Listing Methods Unique to an Object
- Getting a Reference to a Method
- Fixing Bugs in Someone Elses Class
- Listening for Changes to a Class
- Checking Whether an Object Has Necessary Attributes
- Responding to Calls to Undefined Methods
- Automatically Initializing Instance Variables
- Avoiding Boilerplate Code with Metaprogramming
- Metaprogramming with String Evaluations
- Evaluating Code in an Earlier Context
- Undefining a Method
- Aliasing Methods
- Doing Aspect-Oriented Programming
- Enforcing Software Contracts
XML and HTML
- XML and HTML
- Checking XML Well-Formedness
- Extracting Data from a Documents Tree Structure
- Extracting Data While Parsing a Document
- Navigating a Document with XPath
- Parsing Invalid Markup
- Converting an XML Document into a Hash
- Validating an XML Document
- Substituting XML Entities
- Creating and Modifying XML Documents
- Compressing Whitespace in an XML Document
- Guessing a Documents Encoding
- Converting from One Encoding to Another
- Extracting All the URLs from an HTML Document
- Transforming Plain Text to HTML
- Converting HTML Documents from the Web into Text
- A Simple Feed Aggregator
Graphics and Other File Formats
- Graphics and Other File Formats
- Thumbnailing Images
- Adding Text to an Image
- Converting One Image Format to Another
- Graphing Data
- Adding Graphical Context with Sparklines
- Strongly Encrypting Data
- Parsing Comma-Separated Data
- Parsing Not-Quite-Comma-Separated Data
- Generating and Parsing Excel Spreadsheets
- Compressing and Archiving Files with Gzip and Tar
- Reading and Writing ZIP Files
- Reading and Writing Configuration Files
- Generating PDF Files
- Representing Data as MIDI Music
Databases and Persistence
- Databases and Persistence
- Serializing Data with YAML
- Serializing Data with Marshal
- Persisting Objects with Madeleine
- Indexing Unstructured Text with SimpleSearch
- Indexing Structured Text with Ferret
- Using Berkeley DB Databases
- Controlling MySQL on Unix
- Finding the Number of Rows Returned by a Query
- Talking Directly to a MySQL Database
- Talking Directly to a PostgreSQL Database
- Using Object Relational Mapping with ActiveRecord
- Using Object Relational Mapping with Og
- Building Queries Programmatically
- Validating Data with ActiveRecord
- Preventing SQL Injection Attacks
- Using Transactions in ActiveRecord
- Adding Hooks to Table Events
- Adding Taggability with a Database Mixin
Internet Services
- Internet Services
- Grabbing the Contents of a Web Page
- Making an HTTPS Web Request
- Customizing HTTP Request Headers
- Performing DNS Queries
- Sending Mail
- Reading Mail with IMAP
- Reading Mail with POP3
- Being an FTP Client
- Being a Telnet Client
- Being an SSH Client
- Copying a File to Another Machine
- Being a BitTorrent Client
- Pinging a Machine
- Writing an Internet Server
- Parsing URLs
- Writing a CGI Script
- Setting Cookies and Other HTTP Response Headers
- Handling File Uploads via CGI
- Running Servlets with WEBrick
- A Real-World HTTP Client
Web Development Ruby on Rails
- Web Development Ruby on Rails
- Writing a Simple Rails Application to Show System Status
- Passing Data from the Controller to the View
- Creating a Layout for Your Header and Footer
- Redirecting to a Different Location
- Displaying Templates with Render
- Integrating a Database with Your Rails Application
- Understanding Pluralization Rules
- Creating a Login System
- Storing Hashed User Passwords in the Database
- Escaping HTML and JavaScript for Display
- Setting and Retrieving Session Information
- Setting and Retrieving Cookies
- Extracting Code into Helper Functions
- Refactoring the View into Partial Snippets of Views
- Adding DHTML Effects with script.aculo.us
- Generating Forms for Manipulating Model Objects
- Creating an Ajax Form
- Exposing Web Services on Your Web Site
- Sending Mail with Rails
- Automatically Sending Error Messages to Your Email
- Documenting Your Web Site
- Unit Testing Your Web Site
- Using breakpoint in Your Web Application
Web Services and Distributed Programming
- Web Services and Distributed Programming
- Searching for Books on Amazon
- Finding Photos on Flickr
- Writing an XML-RPC Client
- Writing a SOAP Client
- Writing a SOAP Server
- Searching the Web with Googles SOAP Service
- Using a WSDL File to Make SOAP Calls Easier
- Charging a Credit Card
- Finding the Cost to Ship Packages via UPS or FedEx
- Sharing a Hash Between Any Number of Computers
- Implementing a Distributed Queue
- Creating a Shared Whiteboard
- Securing DRb Services with Access Control Lists
- Automatically Discovering DRb Services with Rinda
- Proxying Objects That Cant Be Distributed
- Storing Data on Distributed RAM with MemCached
- Caching Expensive Results with MemCached
- A Remote-Controlled Jukebox
Testing, Debugging, Optimizing, and Documenting
- Testing, Debugging, Optimizing, and Documenting
- Running Code Only in Debug Mode
- Raising an Exception
- Handling an Exception
- Rerunning After an Exception
- Adding Logging to Your Application
- Creating and Understanding Tracebacks
- Writing Unit Tests
- Running Unit Tests
- Testing Code That Uses External Resources
- Using breakpoint to Inspect and Change the State of Your Application
- Documenting Your Application
- Profiling Your Application
- Benchmarking Competing Solutions
- Running Multiple Analysis Tools at Once
- Who s Calling That Method? A Call Graph Analyzer
Packaging and Distributing Software
- Packaging and Distributing Software
- Finding Libraries by Querying Gem Respositories
- Installing and Using a Gem
- Requiring a Specific Version of a Gem
- Uninstalling a Gem
- Reading Documentation for Installed Gems
- Packaging Your Code as a Gem
- Distributing Your Gems
- Installing and Creating Standalone Packages with setup.rb
Automating Tasks with Rake
- Automating Tasks with Rake
- Automatically Running Unit Tests
- Automatically Generating Documentation
- Cleaning Up Generated Files
- Automatically Building a Gem
- Gathering Statistics About Your Code
- Publishing Your Documentation
- Running Multiple Tasks in Parallel
- A Generic Project Rakefile
Multitasking and Multithreading
- Multitasking and Multithreading
- Running a Daemon Process on Unix
- Creating a Windows Service
- Doing Two Things at Once with Threads
- Synchronizing Access to an Object
- Terminating a Thread
- Running a Code Block on Many Objects Simultaneously
- Limiting Multithreading with a Thread Pool
- Driving an External Process with popen
- Capturing the Output and Error Streams from a Unix Shell Command
- Controlling a Process on Another Machine
- Avoiding Deadlock
User Interface
- User Interface
- Getting Input One Line at a Time
- Getting Input One Character at a Time
- Parsing Command-Line Arguments
- Testing Whether a Program Is Running Interactively
- Setting Up and Tearing Down a Curses Program
- Clearing the Screen
- Determining Terminal Size
- Changing Text Color
- Reading a Password
- Allowing Input Editing with Readline
- Making Your Keyboard Lights Blink
- Creating a GUI Application with Tk
- Creating a GUI Application with wxRuby
- Creating a GUI Application with Ruby/GTK
- Creating a Mac OS X Application with RubyCocoa
- Using AppleScript to Get User Input
Extending Ruby with Other Languages
- Extending Ruby with Other Languages
- Writing a C Extension for Ruby
- Using a C Library from Ruby
- Calling a C Library Through SWIG
- Writing Inline C in Your Ruby Code
- Using Java Libraries with JRuby
System Administration
- System Administration
- Scripting an External Program
- Managing Windows Services
- Running Code as Another User
- Running Periodic Tasks Without cron or at
- Deleting Files That Match a Regular Expression
- Renaming Files in Bulk
- Finding Duplicate Files
- Automating Backups
- Normalizing Ownership and Permissions in User Directories
- Killing All Processes for a Given User
EAN: 2147483647
Pages: 399
- Chapter III Two Models of Online Patronage: Why Do Consumers Shop on the Internet?
- Chapter V Consumer Complaint Behavior in the Online Environment
- Chapter VI Web Site Quality and Usability in E-Commerce
- Chapter VII Objective and Perceived Complexity and Their Impacts on Internet Communication
- Chapter XII Web Design and E-Commerce
