Inserting Records Using a DataSet Object
|
All this messing around with INSERT statements is all very well, and in some circumstances it can be a powerful technique, but there's another way of doing things. We saw in the last chapter that DataSet objects are very powerful, enabling us to represent part of a database in memory. In order to get information from the database into our DataSets, we had to use methods of a data adapter object - and we can use the same communication path to make information travel in the opposite direction. We can add records to a DataSet object, and then call the data adapter's Update() method to have them inserted into a database. We can summarize the steps involved in inserting a new record using a DataSet object as follows:
As we saw in Chapter 5, DataSet objects are adept at dealing with XML, and it's also possible to insert new records into a database after reading them straight from an XML file. We would do this in the following way:
We'll demonstrate this second way of using a DataSet object to insert information into a database in the second of the two examples that conclude this chapter.
Command Builder ClassesThe ADO.NET library provides some classes that are capable of creating SQL INSERT, UPDATE, and DELETE statements automatically, based on the SELECT statement that was specified during the creation of the data adapter object. Command builder classes can be very useful when you have a simple SELECT statement, but sadly you can't use them when your data adapter object was created from a SELECT command that retrieves records from two or more tables joined together. In the following demonstration, you'll see how they work. Try It Out - Inserting a New Record Using the DataSet Object
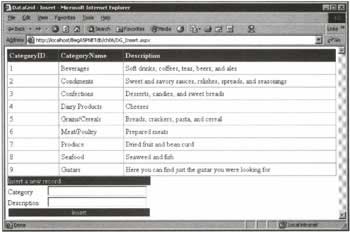
In this example, we're going to create an ASP.NET page that will be capable of adding records to the Categories table contained in the Northwind database. We'll use a DataGrid control to show the records in the table, and a DataSet object to add a new record. Thanks to the DataGrid control's DataBind() method, we'll see the new record appear in the grid after the insertion process.
How It WorksIn the next chapter, we'll see how the DataGrid control provides some properties and methods that enable users to edit the rows it contains directly - you just select the row you want to modify, and the DataGrid will show text box fields to receive the new data. Sadly, however, the DataGrid control doesn't provide an automatic way to insert a new record, so we have to add input controls for each value to be added into the database. This is the reason for those two text box controls in the HTML code:
<tr> <td colSpan="3"> <asp:Label runat="server" Width="85px"> Category</asp:Label> <asp:TextBox runat="server" Width="220px" /> <asp:RequiredFieldValidator runat="server" ErrorMessage="Please insert the category name..." ControlToValidate="txtCategory" /> </td> </tr> <tr> <td colSpan="3"> <asp:Label runat="server" Width="85"> Description</asp:Label> <asp:TextBox runat="server" Width="220" /> </td> </tr> The DataGrid used in the example creates columns by reading their names from the SELECT statement we specified during creation of the data adapter object. Moreover, the DataGrid uses ItemStyle, HeaderStyle, FooterStyle and PagerStyle elements in order to give a more agreeable aspect to the grid.
<asp:DataGrid runat="server" Width="728" Height="234" BorderColor="#CC9966" BorderStyle="None" BorderWidth="1" BackColor="White" CellPadding="4" EnableViewState="False"> <ItemStyle ForeColor="#330099" BackColor="White" /> <HeaderStyle Font-Bold="True" ForeColor="#FFFFCC" BackColor="#990000" /> <FooterStyle ForeColor="#330099" BackColor="#FFFFCC" /> <PagerStyle HorizontalAlign="Center" ForeColor="#330099" BackColor="#FFFFCC" /> </asp:DataGrid> Moving on, the most interesting part of the Page_Load() event handler is the creation of the SqlCommandBuilder object. Rather unusually, having created the cb variable, we never use it again - but this line of code is essential, nonetheless. Without it, the call to the data adapter object's Update() method that takes place in the button-click handler would simply fail. The creation of this object, which takes our data adapter object as a parameter to its constructor, is key to the automatic creation of UPDATE, INSERT, and DELETE SQL statements that will result in any changes made to the dataset being reflected in the database:
Sub Page_Load(Source As Object, E As EventArgs) Dim strConnection As String = ConfigurationSettings.AppSettings("NWind") objConnection = New SqlConnection(strConnection) Dim strSQL As String = "SELECT CategoryID, CategoryName, Description " & _ "FROM Categories" daNorthwind = New SqlDataAdapter(strSQL, objConnection) ' Create a command builder object in order to create ' INSERT, UPDATE, and DELETE SQL statements automatically Dim cb As New SqlCommandBuilder(daNorthwind) ' Is the page being loaded for the first time? If Not Page.IsPostBack Then FillDataGrid() End If End Sub In FillDataGrid(), we use the DataBind() method that's exposed by the DataGrid control in order to refresh the records in the grid. Also, thanks to the DataSource property of the DataGrid object, we can inform the grid about which part of the in-memory database we want to display.
Sub FillDataGrid() ' Create a new dataset to contain categories' records dsNorthwind = New DataSet() ' Fill the dataset retrieving data from the database daNorthwind.Fill(dsNorthwind) ' Set the DataSource property of the DataGrid dgNorthwind.DataSource = dsNorthwind.Tables(0).DefaultView ' Bind the dataset data to the DataGrid dgNorthwind.DataBind() End Sub Finally, when the user presses the Insert button, our first check is to verify that the rules of the RequiredFieldValidator control have been met. After that, we create a temporary DataSet that will eventually contain the record we want to insert in the database, and fill it with the records from the Categories table that we earlier read into the data adapter object.
Sub btnInsert_Click(Sender As Object, E As EventArgs) ' If user has filled every text box correctly... If Page.IsValid Then ' Create a temporary dataset to contain the new record Dim dsTemp As New DataSet() ' Fill the temporary dataset daNorthwind.Fill(dsTemp) Last of all, we have to add a new row to the temporary DataSet, specifying the category name and the description provided by the user on the ASP.NET page. With that done, calling the Update() method (now) provided by the SqlDataAdapter object will insert the record in the database. We don't have to open the connection and close it after the record insertion, because the SqlDataAdapter object manages everything automatically.
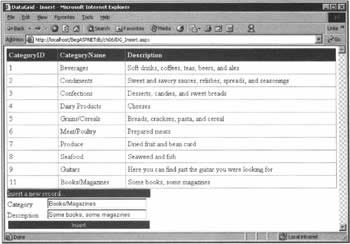
' Create a new row Dim r As DataRow = dsTemp.Tables(0).NewRow() ' Add the category name, reading its value from the text box r("CategoryName") = txtCategory.Text ' Add the category description, reading its value from the text box r("Description") = txtDescription.Text ' Add the new row into the dataset's rows collection dsTemp.Tables(0).Rows.Add(r) ' Update the database using the temporary dataset daNorthwind.Update(dsTemp) And now we can call the FillDataGrid() method in order to refresh the data in the grid.
' Refresh the data grid to display the new record FillDataGrid() End If By producing the necessary INSERT statement on our behalf, the ADO.NET SqlCommandBuilder object has enabled us to update the database with our new category without the need to construct another SQL query - something that you'll surely agree to be a good thing! Try It Out - Using a Calendar, a DataSet, and XML to Insert Records
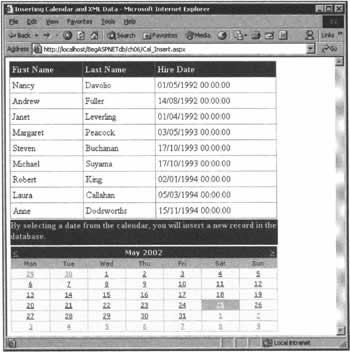
In the last example of this chapter, we'll create an ASP.NET page that displays a DataGrid control containing records from the Employees table of the Northwind database. Also on the page is a Calendar control that we'll use to specify the hiring date of a new employee. When a date has been selected, we'll use a DataSet to add the new employee to the database, along with two more new employees whose details will be read from an XML file.
How It WorksLet's start by examining the ASP.NET Calendar control. We want to insert a new record when the user selects a date, so we specify a handler for the OnSelectionChanged event. Moreover, we've specified some attributes that change the default appearance of the calendar:
<asp:Calendar runat="server" OnSelectionChanged="calHire_SelectionChanged" BorderColor="#FFCC66" Height="153" Width="479" BackColor="#FFFFCC" BorderWidth="1" ForeColor="#663399" EnableViewState="False" ShowGridLines="True" Font-Names="Verdana" Font-Size="8pt"> <TodayDayStyle ForeColor="White" BackColor="#FFCC66" /> <SelectorStyle BackColor="#FFCC66" /> <NextPrevStyle Font-Size="9pt" ForeColor="#FFFFCC" /> <DayHeaderStyle Height="1" BackColor="#FFCC66" /> <SelectedDayStyle Font-Bold="True" BackColor="#CCCCFF" /> <TitleStyle Font-Size="9pt" Font-Bold="True" ForeColor="#FFFFCC" BackColor="#990000" /> <OtherMonthDayStyle ForeColor="#CC9966" /> </asp:Calendar> When the user selects a date in the calendar control, the calHire_SelectionChanged() event handler is called. The first operation performed is to check that the date is less than or equal to the current date; if it's not, an error will be displayed.
Sub calHire_SelectionChanged(Source As Object, E As EventArgs) ' If the user chooses a date in the future, an error message is displayed If calHire.SelectedDate <= Today() Then ' Data manipulation code, discussed in a moment. Else Response.Write("Hire date can't be in the future!") Response.End() End If End Sub In the main body of the event handler, we first fill a new DataSet object with the contents of the Employees.xml file, using the ReadXml() method:
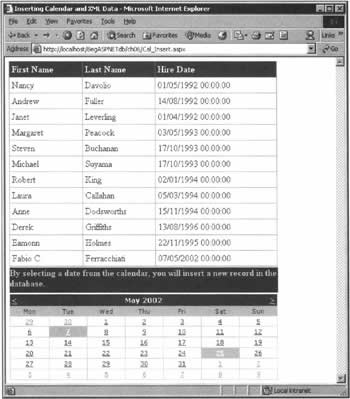
' Create a temporary dataset to contain the new record Dim dsTemp As New DataSet() dsTemp.ReadXml("C:\BegAspNetDb\datastores\Employees.xml") And now we can treat this DataSet in the same way as we treated the one in the previous example. We have to add a new row to the Rows collection, specify the fields we want to insert in the database, and finally call the Update() method specifying the name of the table contained in the XML file.
' Create a new row Dim r As DataRow = dsTemp.Tables(0).NewRow() r("LastName") = "Ferracchiati" r("FirstName") = "Fabio C." r("HireDate") = Convert.ToDateTime(calHire.SelectedDate) ' Add the new row into the dataset's rows collection dsTemp.Tables(0).Rows.Add(r) ' Update the database using the temporary dataset daNorthwind.Update(dsTemp, "EMPLOYEE") In the interests of brevity, we've cut down the complexity of this demonstration by writing some of the new data into the code of the application. Hopefully, though, you can begin to see how you might assemble the techniques we've examined so far to produce something rather more complicated. For example, the hard-wired data that was entered into the database in this example could certainly be replaced by values from text boxes or drop-down list controls, if that's what you needed to do. Do experiment with the things you've seen so far, and see what you can come up with. | ||||||||||||||||||||||||||||||||||||||

EAN: 2147483647
Pages: 263