Look at Layers
Look at Layers
If you ve bumped your head up against the difficulty of selecting and editing sections of a complex drawing, you re ready to use layers to help solve your problem. In addition, layers can be used to apply effects and other editing tools across an entire layer of objects. For example, you might want to apply the same transparency to all objects within a layer.
You can create many layers in a single illustration. Once they are defined, you can move the layers (i.e., change their order), lock them to prevent changes, group them together, and even apply styles to them. Getting into the habit of creating objects on separate layers will end up saving you time as you create more complex illustrations.
Explore the Layers Palette
To view the Layers palette, choose Window Layers or press F7 . Both of these actions are toggles, meaning that if the palette is not visible, pressing F7 or choosing Window Layers will show the palette, and pressing F7 or choosing Window Layers again will hide the palette.
| Tip | Hovering the mouse over any part of the Layers palette will bring up a small tooltip that describes that part of the palette. |
Figure 20-1 shows a Layers palette for the grocery store illustration.
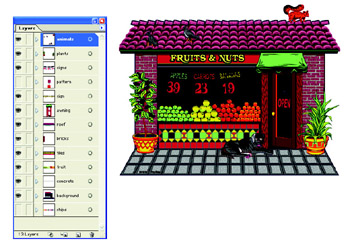
Figure 20-1: This illustration is broken into 13 layers.
There are two columns of icons to the left of each layer. The first column toggles visibility, allowing you to display or hide the selected layer. The second column toggles locking, which either allows you to edit a layer (unlocked) or prevents you from editing a layer (locked). Figure 20-2 illustrates the use of the Layers palette to lock the animals layer, preventing any accidental editing of the squirrel and his animal friends .
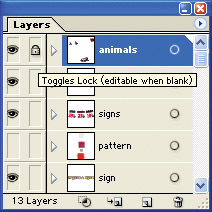
Figure 20-2: Animals are protected ”the layer is locked to prevent editing.
Change Layer Options
Sometimes you may want to work on a particular object and you need to have a clear, uncluttered view of it. Having your objects occupy different layers can be a real lifesaver at that time because you can control the visibility of separate layers.
To toggle the visibility of any layer, simply click the Visibility icon (the small eye icon to the left of the layer s name in the Layers palette). Because this is a toggle, you can reverse the process by clicking the same area to make the layer visible again. (The eye will disappear, of course, indicating that the layer is hidden.) Figure 20-3 shows the grocery store with all but the animals layer hidden.
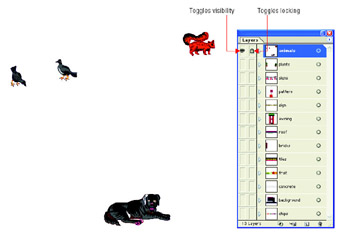
Figure 20-3: Each individual layer can be either visible or hidden, locked or editable.
Locking a layer prevents you from being able to select its contents. Thus, you can select objects on overlapping layers without affecting the objects on the locked layer. With a layer locked, you can click and drag the Selection tool to select partly obscured objects while preventing other objects from being selected.
To toggle the lock on a layer, click the space to the right of the Visibility icon next to the layer that you want to lock. Again, because this is a toggle, you can unlock the layer by clicking the small lock symbol that appears in the same space.
You can help the process along by using meaningful names for your layers. Naming a layer is quite easy. To name an existing layer, double-click the layer s entry in the Layers palette to open the Layer Options dialog box. In the space provided, enter a new name for the layer, as shown in Figure 20-4.
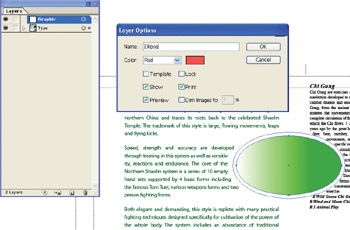
Figure 20-4: Naming a layer
Every layer has an icon associated with it. The icon is a small thumbnail representation of that layer s contents. Depending on the size and resolution of your screen, this thumbnail may be rather difficult to see. Fortunately, you can change the size of the thumbnail view.
Follow these steps to change the size of the thumbnail:
-
Open the Layers palette menu.
-
Choose Palette Options to open the Layers Palette Options dialog box.
-
In the Row Size area of the dialog box, choose Small, Medium, Large, or Other.
Note If you choose Other, enter a size (in pixels) at which you want the thumbnail to be displayed.
Layers are identified by both names and colors. You can accept the default setting for a layer color or set the color of any given layer yourself.
Follow these steps to set the color of a layer:
-
From the Layers palette menu, choose Options for Layer Name . (The menu will show the actual layer name in this option instead of Layer Name .)
-
In the Layer Options dialog box, choose a color from the list or click the small color swatch to open the Color Picker dialog box.
-
After you select a color for your layer, click OK to close the Layer Options dialog box.
EAN: 2147483647
Pages: 175