Resource Discovery Methods
In this section, we'll examine the individual discovery methods. You'll learn how to configure each discovery method if applicable, the mechanics involved in carrying out the discovery process, the network traffic generated, and the elements you might need to troubleshoot when you work with each discovery method.
Site System Discovery
There are two site system discovery methods: Windows NT Server Discovery and NetWare Bindery Server Discovery. Both methods are designed to automatically create discovery records for Windows NT and NetWare Bindery servers that have been assigned a site system role such as logon point, client access point (CAP), distribution point, and so on. Both methods are nonconfigurable, and they do not appear in the SMS Administrator Console. Instead, they are automatically initiated by the WINNT Server Discovery Agent and the NetWare Bindery Server Discovery Agent. These discovery agents are SMS threads that discover Windows NT or NetWare Bindery site systems to ensure that their discovery data is updated in the SMS site database.
Site System Discovery Process
Each method generates about 30 KB of network traffic, and the resulting discovery data includes the server name, operating system, version, and platform. In addition, both discovery agents generate status messages when a new Windows NT or NetWare Bindery site system is discovered or a discovery record is generated. For the WINNT Server Discovery Agent, look for status messages with code range 4200 through 4202, and for the NetWare Bindery Server Discovery Agent, look for status messages with code range 4800 through 4802, indicating the creation of DDRs for these servers. Refer to Chapter 3 for information about viewing status messages.
SMS client software is automatically installed on Windows NT site systems when they are discovered, provided the server lies within the site boundaries. If the site system doesn't lie within the site boundaries, DDRs will be generated but the SMS client software will not be installed. If you want to include those site systems as clients for the SMS site, you will need to install the SMS client software using a different method. SMS client software is not installed on NetWare Bindery servers or NetWare NDS servers.
Checkpoints
The most common source of problems with the site system discovery methods is the inability of the agent to connect to the server in question. In this case, you should take a look at the site system connection account. As we saw in Chapter 3, the successful creation of a site system requires a valid site system connection account or that you assign the SMS Service account administrative permissions (or Supervisor equivalence, in the case of NetWare Bindery servers) on the site system. This account will be used by SMS to contact the site system. Without a valid site system connection account, the discovery agent won't connect to the site system.
Logon Discovery
The Windows Networking Logon Discovery method is designed to generate discovery records for all resources that log on to the Windows NT network and that are running supported SMS operating systems (Microsoft Windows 3.x and later, that is). The NetWare Bindery and NetWare NDS Logon Discovery methods are designed to generate discovery records for all NetWare client resources that log on to a NetWare Bindery or NDS server. With the exception of inboxes and agents, these two discovery methods function in much the same way.
Enabling and configuring the three logon discovery methods involves two main tasks. The first is to identify and assign logon points. The second is to enable the logon process by modifying users' logon scripts. Both tasks can be accomplished by enabling the discovery method through the SMS Administrator Console.
In Chapter 3, we explored the process of installing and configuring a logon point. Let's review the basic steps here and go one step further, enabling logon scripts.
Enabling Logon Discovery and Logon Scripts
To enable logon discovery and logon scripts, follow these steps:
- In the SMS Administrator Console, navigate to the Site Settings folder, expand it, and then expand the Discovery Methods folder.
- Select the discovery method you want to enable. The procedures for enabling Windows Networking Logon Discovery, NetWare Bindery Logon Discovery, and NetWare NDS Logon Discovery are essentially the same. For this example, select Windows Networking Logon Discovery, right-click on it, and choose Properties from the context menu to display the Windows Networking Logon Discovery Properties window, shown in Figure 7-1.
- On the General tab, select the Enable Windows Networking Logon Discovery check box. (This option will vary depending on the discovery method you've chosen.)
- The Keep Logon Point Lists For Discovery And Installation Synchronized option is enabled by default and ensures that the domain entries in the Logon Points list box are the same for both the discovery and installation methods. If you intend to use this discovery method to discover resources only and not necessarily install them, clear this check box.
- To add a Windows NT domain to the list, click the New button (the yellow star) in the Logon Points section to display the New Windows Networking Logon Point dialog box. Then enter a domain name and click OK to close the dialog box. Note that every domain controller in the domains specified will be installed as logon points for the SMS site.
- Click the Logon Settings tab, shown in Figure 7-2. If you want SMS to automatically modify users' logon scripts to include the SMSls.bat script used to initiate logon discovery, select the Modify User Logon Scripts check box.
- Modify the Logon Point Update Schedule setting if necessary. This setting defines the frequency at which logon scripts will be updated.
- Click OK to begin the setup process.
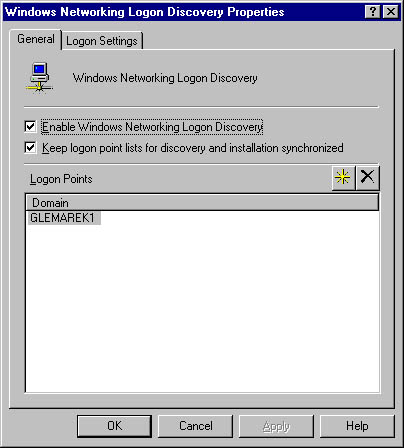
Figure 7-1. The Windows Networking Logon Discovery Properties window.
If you chose to enable the NetWare Bindery or NDS Logon Discovery, you can also add a new NetWare Bindery server or NDS container to the Logon Points list by clicking the New button to display the New NetWare Bindery (or NDS) Logon Point dialog box. Enter the appropriate server or tree, container, and volume entries, and then click OK.
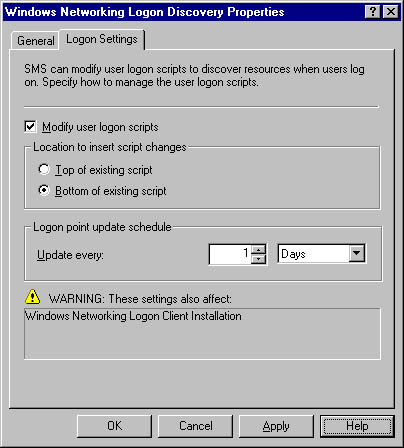
Figure 7-2. The Logon Settings tab.
Notice that you can have SMS add its script to the top or bottom of existing logon scripts.

CAUTION
Only existing logon scripts that have a filename extension will be modified by this process. A logon script that does not have an extension will be ignored.
Modifying the user logon script in this manner is an automatic process and ensures that all existing users' logon scripts will reflect the SMS script. If you don't already use a logon script, or if your existing logon scripts are fairly straightforward, go ahead and use this method. However, if your existing logon scripts are more complex, having SMS append its script to the top or bottom of an existing script would probably not be a good idea. In that case, it would be wise to not enable the Modify User Logon Scripts options and instead modify the logon scripts yourself.

TIP
It's a good idea to modify NetWare logon scripts yourself simply because they use a different set of script commands than the Windows NT logon script, and you'll have more control over what happens if you make the modifications yourself.
![]()
REAL WORLD Modifying Logon Scripts ManuallyMany organizations prefer to handle the SMS script by modifying their own logon scripts. This approach can be useful for a variety of reasons. Suppose you support dial-in access to your network for several users. Because client settings for an SMS site are sitewide, dial-in clients and local network clients would have the same configuration for receiving packages, collecting inventory, and so on. When users access the network through a dial-in connection, you might not want their computers to be installed into the SMS site. Or perhaps you don't want advertisements to be made available when a user is dialed in from a client machine because of the line speed. For various reasons, it is not always possible or practical to segment these users into their own subnet.
A common solution involves creating a logon script that tests Windows NT environment variables to determine whether a user is dialed in from a client machine to the network. If a dial-in client is detected, you could then direct the script to skip the SMS portion—which in the case of discovery would effectively keep that client from being discovered by the SMS site.
Logon Discovery Process
The discovery process for NetWare logon points is remarkably similar to that for Windows NT logon points. The primary exception is in the support files that are executed by the SMS script to check for slow network speed and to install Cliex32.dll.
When a user logs in and the SMS logon script is executed, the script initiates a series of boot processes that create the MS\SMS\Core directory on the client and install some basic data files (SMSboot1.exe and Boot32wn.exe for Windows NT clients, SMSnw1.exe and Boot32nw.exe for NetWare Bindery clients, and SMSnds1.exe and Boot32nd.exe for NetWare NDS clients). If the client is a 32bit client (Windows 95 and later) it installs a .DLL file named Cliex32.dll on that client. This .DLL generates the DDR and stores it on the client computer. If the client is a 16-bit client (Windows 3.x and Windows for Workgroups), Boot16wn.exe is run on the client to generate the DDR.
Although this DDR differs slightly between client types, it always contains the following information:
- SMS Unique Identifier
- NetBIOS Name
- IP Addresses
- IP Subnets
- IPX Addresses
- IPX Network Numbers
- MAC Addresses
- Resource Domain
- Operating System Name
- Last Logon User Name
This information is saved in a DDR on the client as SMSDisc.ddr. It is then copied to the logon point's SMSLogon\Ddr.box folder and given a new unique filename.
If you are enabling Windows Networking Logon Discovery, the DDR is forwarded by the Windows Networking Logon Discovery Agent from the logon point to Discovery Data Manager's inbox on the site server (SMS\Inboxes\Ddm.box). Discovery Data Manager in turn updates the site database with the new information.
Because NetWare servers do not run Windows NT services, there is no agent capable of forwarding the DDR to the SMS site server. Instead, NetWare Bindery Logon Manager and NetWare NDS Logon Manager scan the SMSLogon\Ddr.box for DDRs once per day and copy them to Discovery Data Manager's inbox on the site server (SMS\Inboxes\Ddm.box). Discovery Data Manager in turn updates the site database with the new information.
DDRs generated for computers and other devices are automatically made members of the All Systems collection, which is viewable through the SMS Administrator Console. They are also added to the other default collections based on the operating system of the resource (Windows 3.1, Windows 95, and so on). To view the properties and values of all the collected data for a selected resource, right-click on the computer entry under All Systems in the SMS Administrator Console, and choose Properties from the context menu to display the Resource Properties window, shown in Figure 7-3.
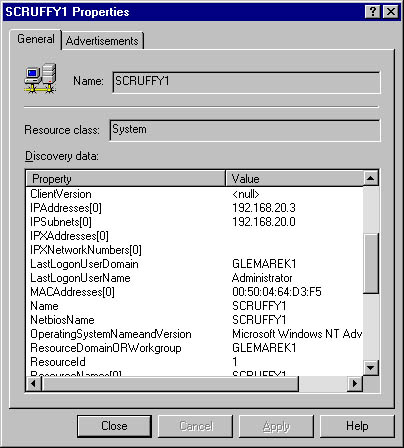
Figure 7-3. The Resource Properties window.
Each client that is discovered using these discovery methods will have the MS\SMS\Core directory created and some data files installed. Altogether, the client footprint is just over 5 MB; the bulk of this is an executable named Clicore.exe, which does the installing of Cliex32.dll. The DDRs themselves are only about 1 KB in size. Each client's DDR is stored in the MS\SMS\Core\Data directory on the client as SMSDisc.ddr. The DDR is also copied to the logon point (or to the CAP, when the client is also installed) and to the site server. At 1 KB per record, we're not talking a significant amount of data. However, if ten thousand clients are hitting the same logon points, CAPs, or site server, that adds up to about 10 MB of storage space.
TIP
Refer to Chapter 3 for a complete discussion of the logon point setup process and the SMS components involved.
Checkpoints
Outside of the logon discovery method not being enabled or configured correctly, there are not too many areas for failure when you use the Windows Networking Logon Discovery method or the NetWare Bindery and NetWare NDS Logon Discovery methods. The most likely problem may involve slow networks. As it happens, part of the client setup process involves running a check for a slow network connection. If SMS detects that the network speed is less than 40 KB per second, the discovery process will simply stop.
Another possible area of failure is access to the logon point. The SMS script initiates processes that read information from and write discovery data to the SMSLogon share created on the logon point when it was defined as a site system. Make sure that the logon points are accessible and that the permissions to this share have not been altered.
Windows NT User Account and User Group Discovery
The Windows NT User Account Discovery and Windows NT User Group Discovery methods are designed to discover domain user accounts and domain global group accounts and to add them as resources to the SMS database. When you enable either of these discovery methods, you can specify which Windows NT domains to poll for user and group account information. A corresponding DDR is generated for each user and group account discovered. By default, these resources will be added to the All Users and All User Groups collections, which can be viewed through the SMS Administrator Console.
The primary purpose in enabling either of these discovery methods is to provide the SMS administrator with an alternative target for advertising programs through SMS. Although we haven't discussed package distribution in great length yet, we have talked briefly about the advertisement process. (Chapter 12 covers the details of package distribution.) As we saw in Chapter 1, in SMS 2.0 a package reaches a target destination by advertising a program associated with that package. This program might be a Typical installation of Microsoft Office, for example, or a Custom installation of Microsoft Project. Programs are always advertised to collections. If you want a specific group of SMS clients to receive a particular program, you must create a collection that contains those clients and then advertise the program to that collection.
![]()
REAL WORLD Packages for Discovered Users or User GroupsThe beauty of SMS 2.0 in the context of package distribution is that you can also advertise programs to collections that contain discovered users or user groups. This gives the SMS administrator an alternative target for certain packages. For example, suppose you have a budget spreadsheet that must be distributed and available to all finance department users regardless of which computer they are logged into. If you have discovered those users through SMS or discovered a Windows NT global group named Finance that contains these users, you can create an SMS collection with those users or that group as its members. You can then create a package that contains the spreadsheet and advertise it to your user or group collection. Whenever a member of that collection checks for advertisements on whatever SMS client the member happens to log in on, that spreadsheet will be made available. Furthermore, if the collection gains any new members, those users (or group members) will automatically receive all advertisements targeted to that collection.
Enabling Windows NT User Account and User Group Discovery
To enable the Windows NT User Account Discovery and Windows NT User Group Discovery methods, follow these steps:
- In the SMS Administrator Console, navigate to the Site Settings folder, expand it, and then expand the Discovery Methods folder.
- Right-click on Windows NT User Account Discovery or Windows NT User Group Discovery, as appropriate. The two procedures are essentially the same, so in this example, we'll select User Account Discovery. Choose Properties from the context menu to display the Windows NT User Account Discovery Properties window, shown in Figure 7-4.
- On the General tab, select the Enable Windows NT User Account Discovery check box (or Enable Windows NT User Group Discovery, if you're enabling the other discovery method).
- Click the New button in the Logon Points section of the Properties window to add a Windows NT domain to the list for the discovery agent to poll. The New Domain dialog box will appear, as shown in Figure 7-5.
- Click on the Polling Schedule tab, shown in Figure 7-6.
- Click the Schedule button to display the Schedule dialog box, shown in Figure 7-7.
- Define the frequency with which the User Account Discovery Agent or User Group Discovery Agent should poll the specified domains for user accounts, and then click OK.
- Click OK to begin the discovery process.
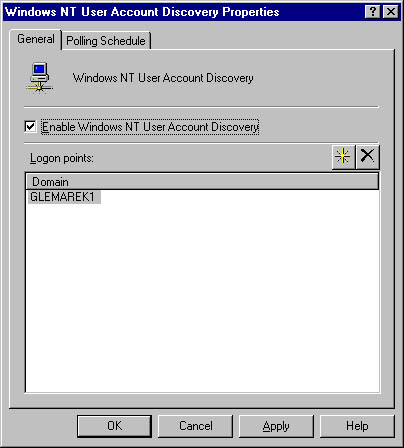
Figure 7-4. The Windows NT User Account Discovery Properties window.
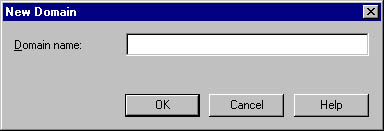
Figure 7-5. The New Domain dialog box.
Enter the name of the Windows NT domain for which you want to discover user accounts, and then click OK.
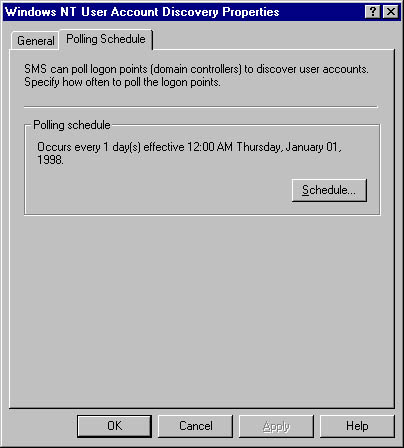
Figure 7-6. The Polling Schedule tab.
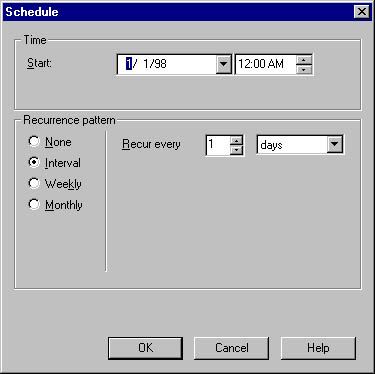
Figure 7-7. The Schedule dialog box.
Windows NT User Account and User Group Discovery Process
The discovery process for these two methods is fairly straightforward as SMS processes go. When you enable either method, the corresponding discovery agent on the site server makes a secure connection to the primary domain controller of the Windows NT domain you specified, and according to the schedule you specified when you enabled the discovery method.
The discovery agent enumerates the user accounts or global groups in the Windows NT domains and generates a DDR for each one it discovers. These DDRs are written directly to Discovery Data Manager's inbox on the site server (SMS\Inboxes\Ddm.box). Discovery Data Manager in turn updates the SMS database with the new discovery information. User resources are automatically added to the All Users collection, viewable through the SMS Administrator Console, and user group resources are automatically added to the All User Groups collection. To view this discovery data, right-click on the user resource under All Users in the SMS Administrator Console, and choose Properties from the context menu. A sample user resource discovery record is shown in Figure 7-8.
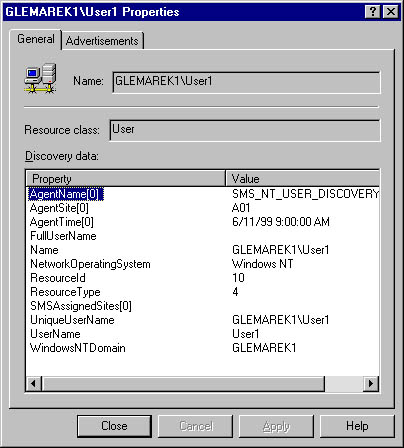
Figure 7-8. A sample user resource discovery record Properties window.
In terms of network traffic, each user and group will generate, on average, 2 KB of traffic. If your Windows NT account database contains, say, 10,000 users and 100 groups, you will experience around 20 MB of network traffic to generate the corresponding DDRs. The frequency at which this traffic is generated, of course, depends on the polling schedule you have defined. If your Windows NT account databases are relatively stable and rarely change, you do not have to poll frequently, and network traffic relating to user or user group discovery will be largely a one-time experience. On the other hand, if your Windows NT account database is volatile, you may need to enumerate users and groups more frequently, and, of course, you will generate a corresponding amount of network traffic.
Each agent generates status messages when it starts, stops, and generates DDRs. These status messages can be viewed through the SMS Administrator Console. Look for messages in the 410x range for SMS_NT_USER_GROUP_DISCOVERY_AGENT and messages in the 430x for SMS_NT_USER_DISCOVERY_AGENT. The sample status message window shown in Figure 79 tells us that in this case four Windows NT user groups were enumerated and discovered. These agents also write detailed processing information to their respective log files (Ntuser.log and Ntusrgp.log) if you have enabled logging through the SMS Service Manager tool in the SMS Administrator Console.
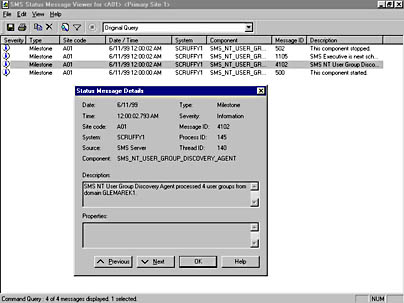
Figure 7-9. A sample status message window, and the Status Message Details dialog box.
Checkpoints
The main problems you may encounter with these discovery methods have to do with access. The SMS Service account must have Administrator rights on the primary domain controller that it is polling for resources. If this condition is not met, user and group discovery will fail. Other possible problems, of course, are that the discovery agent has not been enabled or that the scheduled polling time has not yet been encountered.
Network Discovery
The Network Discovery method is designed to provide the SMS administrator with the means of discovering any network resources that are IP addressable, which means that you can discover not only computers, but also printers, routers, bridges, and so on. The discovery that takes place using this method can be far reaching. You can discover these resources on the local subnet in which the site server resides, or you can discover resources throughout your enterprise network using DHCP, SNMP, and other mechanisms. Resources discovered using this method are automatically added to the All Systems collection, which is viewable through the SMS Administrator Console.
Network Discovery includes the following information as part of the discovery record:
- SMS Unique Identifier
- NetBIOS Name
- IP Addresses
- IP Subnets
- IPX Addresses
- IPX Network Numbers
- Last Logon User Domain
- Last Logon User Name
- MAC Addresses
- Name
- Resource Domain
- User Domain
- Operating System Name and Version
- Resource ID
- SMS Assigned Sites
- SNMP Community Name
- System Roles
This discovery method can be useful in a variety of contexts. It can be used, for example, to find computers that could become SMS clients. When a computer is discovered, its IP address and subnet mask are included in the discovery record. This information can help you identify where your potential SMS clients are located and how they are distributed among the subnets, enabling you to formulate a more specific plan for locating and implementing your SMS sites, site servers, and site systems.
You can also use this information to plan the best client installation method for implementing SMS 2.0 on those computers. As mentioned at the beginning of this chapter, some discovery methods have corresponding client installation methods associated with them. Network Discovery is associated with the Windows Remote Client Installation method, which we'll look at in detail in Chapter 8. Briefly, the Windows Remote Client Installation method is a kind of "push" installation that can install the SMS client components automatically on discovered Windows NT 4.0 and Windows 2000 client computers. So, you could enable Network Discovery to "find" potential SMS clients and enable Windows Remote Client Installation to automatically install the SMS client components on the Windows NT 4.0 and Windows 2000 computers that Network Discovery finds. If you did not want such an automatic and "intrusive" combination, you could enable a different client installation method, perhaps based on the computer's domain membership or subnet mask.
Network Discovery can also make your Network Trace map more meaningful. As we saw in Chapter 6, the Network Trace utility provides a graphical mapping of your SMS site structure showing the routes between site systems and site servers. This mapping can include any routers, switches, and the like that the route between systems encounters.
If you don't enable Network Discovery to discover these links between systems, they will be represented in the Network Trace window as "clouds." The Network Trace map is built based on the DDRs that have been generated for site systems and devices on the network. Again, since Network Trace provides a means of testing connectivity, problem links can be more easily identified if all possible routes between systems are displayed in the Network Trace window. As you can see, some unique benefits can be gained by enabling the Network Discovery method.
Enabling Network Discovery
Like the other discovery methods, Network Discovery is enabled through the SMS Administrator Console. To enable Network Discovery, follow these steps:
- Expand the Site Settings folder, and then expand the Discovery Methods folder.
- Right-click on Network Discovery, and choose Properties from the context menu to display the Network Discovery Properties window, shown in Figure 7-10.
- On the General tab, select the Enable Network Discovery check box.
- Specify the type of discovery you want. Selecting the Topology option will cause Network Discovery to discover IP-addressable resources such as subnets and routers using SNMP. (You would also configure options on the Subnets, SNMP, SNMP Devices, and DHCP tabs, as we'll see shortly.) The Topology And Client option additionally discovers computers and resources such as printers and gateways using SNMP, DHCP, and the Windows NT Browser. Topology, Client, And Client Operating System also picks up the computer's operating system name and version using SNMP, DHCP, Windows NT Browser, and Windows Networking calls.
- Select the Slow Network check box for networks with speeds less than 64 Kbps. This option will cause Network Discovery to decrease the number of outstanding SNMP sessions it generates by doubling SNMP time-outs.
- Select the Subnets tab, shown in Figure 7-11. Here you can add, Click on , enable, and disable the subnets you want Network Discovery to search. By default, Network Discovery will search the local subnet in which the site server is a member. If you want to ignore that subnet, clear the Search Local Subnets check box.
- To add subnets to the list, click the New button to display the New Subnet Assignment dialog box, shown in Figure 7-12. Provide the appropriate subnet address and subnet mask and click OK.
- If you have selected a discovery type other than Topology on the General tab, click on the Domains tab, shown in Figure 7-13, and enter the name of the Windows NT domain that you want to search for resources.
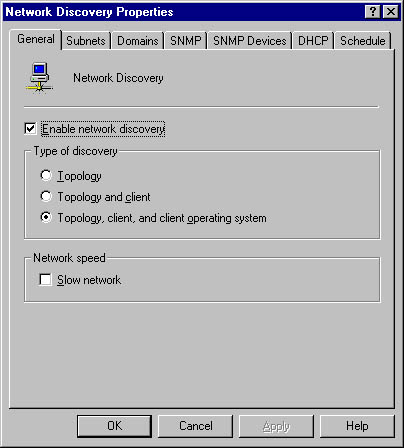
Figure 7-10. The Network Discovery Properties window.
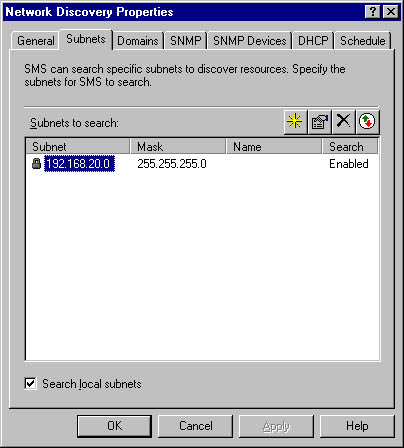
Figure 7-11. The Subnets tab.
Network Discovery will display the subnets it discovered during each previous search. As it discovers the subnets, it marks them with a lock to indicate that they cannot be modified or deleted—in fact, subnets discovered by Network Discovery, unlike those you add yourself, cannot be modified or deleted once they have been discovered. However, you can enable or disable those subnets that you want Network Discovery to search on subsequent cycles.
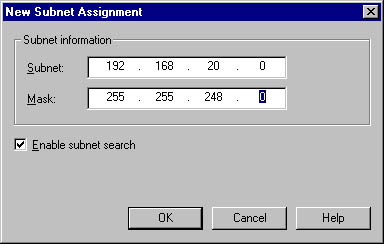
Figure 7-12. The New Subnet Assignment dialog box.
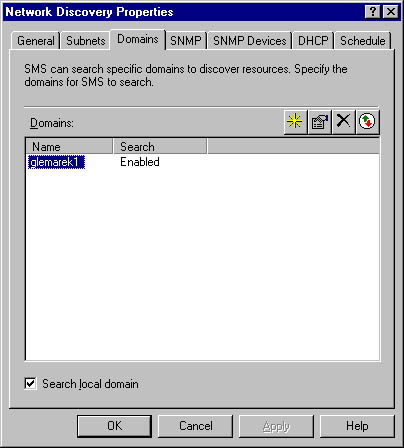
Figure 7-13. The Domains tab.
By default, the local Windows NT domain to which the site server belongs will be searched. If you want to ignore that domain, clear the Search Local Domain check box.
![]()
NOTE
Network Discovery can find any computer that you can find using Network Neighborhood to browse the network. Once it finds a computer, it still must obtain its IP address and will use one of the other methods (DHCP, SNMP, and so on) to do so. Network Discovery will ping each computer to determine whether it is active, find its subnet mask, and generate a DDR for it.
- To add Windows NT domains to the list, click the New button to display the Domain Properties dialog box, shown in Figure 7-14. Enter the appropriate domain name. The domain must be accessible through the network. By default, the Enable Domain Search check box is selected. This option enables Network Discovery in the domain. Click OK to close the dialog box.
- Click on the SNMP tab, shown in Figure 7-15, and specify the SNMP community you want Network Discovery to search.
- To add SNMP communities, click the New button to display the New SNMP Community Name dialog box, shown in Figure 7-16. Enter the appropriate community name and click OK to return to the SNMP tab. If you enter multiple communities, you can specify the order in which you want them searched by using the two Order buttons.
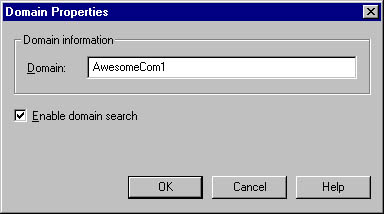
Figure 7-14. The Domain Properties dialog box.
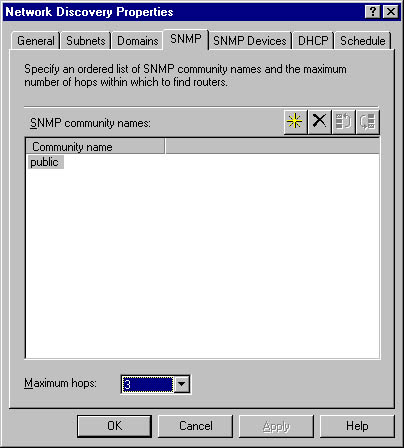
Figure 7-15. The SNMP tab.
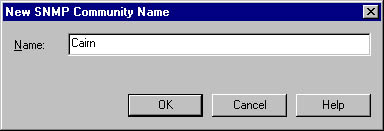
Figure 7-16. The New SNMP Community Name dialog box.
![]()
NOTE
It's not necessary to have the SNMP Service installed on the site server performing Network Discovery. This discovery method uses its own SNMP stack to make requests and discover data.
- Network Discovery attempts to access the local router to obtain IP addresses and data from the device. If the Maximum Hops value is set to 0, Network Discovery will search only the default gateway. You can set this value as high as 10. Each successive increment extends discovery to another set of routers. For example, setting Maximum Hops to 1 enables Network Discovery to search the default gateway and any routers connected to it.
- Click on the SNMP Devices tab (a companion to the SNMP tab) shown in Figure 7-17.
- Click on the DHCP tab, shown in Figure 7-18, and identify which Microsoft DHCP servers you want Network Discovery to query for a list of IP addresses leased to computers.
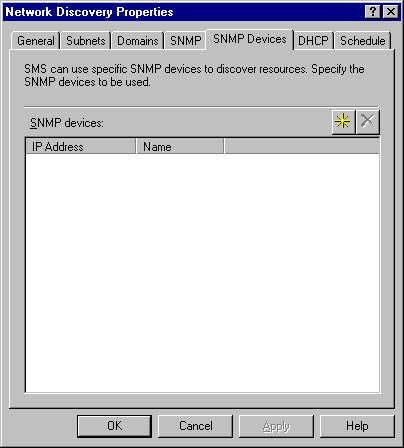
Figure 7-17. The SNMP Devices tab.
On this tab, you can identify specific SNMP devices that you want to discover by clicking the New button and supplying the IP address or name of the device. The SNMP devices can include routers, hubs, and token-ring media access units.

Figure 7-18. The DHCP tab.
If the site server is itself a DHCP client, Network Discovery will automatically query the site server's DHCP server. If you want to ignore that DHCP, clear the Use Local DHCP Servers check box.
TIP
Network Discovery uses RPC calls to retrieve information from the DHCP database. Because of this, the SMS Service account must be listed as a domain user in the DHCP server's Windows NT domain.
- To add Microsoft DHCP servers to the list, click the New button and provide the appropriate subnet address or server name.
- Click on the Schedule tab, shown in Figure 7-19, and identify the frequency at which you want Network Discovery to run.
- To add a new schedule, click the New button to display the Schedule dialog box, shown in Figure 7-20.
- To modify a schedule's properties, click the Properties button (the hand holding a piece of paper) to display the same Schedule dialog box.
- Click OK twice to save your settings and initiate the Network Discovery process.

Figure 7-19. The Schedule tab.

Figure 7-20. The Schedule dialog box.
In the Schedule dialog box, enter the time you want discovery to begin. You can also specify a Recurrence pattern. Selecting None directs Network Discovery to search only one time for resources. You might select this option as a first pass, to find all subnets, for example. The other options direct Network Discovery to perform subsequent searches according to your specified schedule. Duration indicates the period of time Network Discovery has to complete its search for resources. On a local subnet, two hours might be sufficient. However, if you are performing a search of an enterprise network across several router hops with several thousand potential resources, you may need to increase this number so that Network Discovery has enough time to complete its search. If Network Discovery runs out of time, it will log a message to that effect and complete DDRs only for the part of the search that was completed.
![]()
NOTE
Network Discovery is the only discovery method that isn't enabled automatically when you run Express Setup to install SMS. As we saw in Chapter 3, no discovery methods are enabled for Custom Setup.
Network Discovery Process
The discovery process itself is once again fairly straightforward. Depending on the discovery options you enabled, Network Discovery will attempt to search for subnets, routers, computers, and other devices. It needs to retrieve an IP address and subnet mask for each resource in order to generate a DDR for it. Network Discovery uses the information it receives from DHCP servers and SNMP to communicate directly with a device, such as a router, and then uses the router's ipNetToMedia table and Router Interface table to obtain subnet masks. It also uses Router Information Protocol (RIP), SNMP, and Open Shortest Path First (OSPF) multicast addresses to discover routers.
Network Discovery uses Windows Management Insrtumentation (WMI) to store discovered resource information and generates DDRs based on this information. When Network Discovery generates a DDR, it writes the DDR to Discovery Data Manager's inbox (SMS\Inboxes\Ddm.box). Discovery Data Manager in turn adds the record to the SMS database.
Network Discovery is capable of discovering literally thousands of devices on your network, and in doing so, it can generate a fair amount of network traffic. For this reason, your choice of schedule will be significant. If you need to find large numbers of devices, you may opt to schedule Network Discovery to run during quiet periods on the network. And as suggested earlier, the Duration value (shown in Figure 7-20) may also need to be increased to accommodate processing of larger numbers of resources.
TIP
Discovery Data Manager processes DDRs at an average rate of two to five per second.
Like the other discovery methods, Network Discovery generates status messages that can be viewed through the SMS Administrator Console. Figure 7-21 shows a representative set of messages generated by Network Discovery. Messages in the 13xx range relate specifically to the discovery of resources.
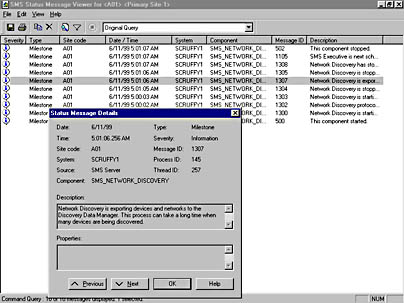
Figure 7-21. A sample status message window for Network Discovery, showing the Status Message Details dialog box.
Also, if you have enabled logging for Network Discovery, more detailed information will be written to the Netdisc.log file.
Checkpoints
When you are performing a Topology, Client, And Client Operating System search, the operating system on Windows 95 and Windows 98 clients will be returned only if file sharing has been enabled on those computers. In addition, the operating system will be returned as Windows 9x until the SMS client software has been installed.
When using DHCP to retrieve IP addresses, it is important to note that unless SMS 2.0 Service Pack 1 is installed, Network Discovery ignores reserved IP addresses and those that are part of an excluded range and will not retrieve any resources from the DHCP server if the DHCP has been configured to offer unlimited leases.
Remember that the SMS Service account must be a domain user for the domain in which the DHCP server is a member. Network Discovery uses existing trust relationships or pass-through authentication to authenticate its connection to the DHCP server.
Finally, verify that you have identified not only the correct subnet address to search, but also the correct subnet mask. Network Discovery is more concerned with the subnet mask when retrieving device IP address information.
The All Systems collection displays discovered system resources. System resources include any IP-addressable device. Network Discovery also discovers logical networks and subnets. To view these resources, you will need to create a query to display the logical networks and subnets that were discovered. Refer to Chapter 15 for more information about creating queries in SMS 2.0.
Heartbeat Discovery
Heartbeat Discovery is designed to keep DDRs up-to-date for computers that either do not use any other method of discovery or, in the case of logon discovery, have users that either seldom log on (namely, servers) or seldom log off. This discovery method is significant because it ensures that resource records will not be accidentally aged out of the SMS database.
By default, SMS periodically executes a maintenance routine that deletes records whose discovery data is older than 90 days out of the database. For computers such as Windows NT servers, to which users should seldom log on, it could be problematic for users to be deleted from the database. Heartbeat Discovery is designed for just these types of situations.
Enabling Heartbeat Discovery
Heartbeat Discovery is enabled by default and generates DDRs from each client every seven days. If you choose to disable Heartbeat Discovery, you will need to have enabled some other discovery method to keep the DDR information uptodate. Furthermore, Heartbeat Discovery is active only on computers that have already been installed as SMS clients.
To configure Heartbeat Discovery, follow these steps:
- In the SMS Administrator Console, expand the Site Settings folder and then expand the Discovery Methods folder.
- Right-click on Heartbeat Discovery, and choose Properties from the context menu to display the Heartbeat Discovery Properties window, shown in Figure 7-22.
- Specify the frequency at which you want Heartbeat Discovery to generate DDRs.
- Click OK to implement your schedule.
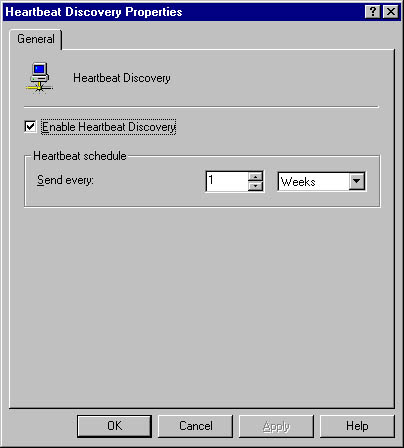
Figure 7-22. The Heartbeat Discovery Properties window.
If you want to disable Heartbeat Discovery, clear the Enable Heartbeat Discovery check box.
Heartbeat Discovery Process
Heartbeat Discovery runs on installed SMS clients according to the schedule you specified. With this method enabled, Client Component Installation Manager (CCIM) on the client causes the Cliex32.dll to generate a DDR, which is written to the CAP by the Copy Queue component (refer to Chapter 8 for details on Copy Queue). The network traffic generated is the size of a normal DDR—that is, about 1 KB per client.
Checkpoints
The only potential problem here is ensuring that Heartbeat Discovery has in fact been enabled and not disabled by accident. Also, be sure that the schedule you create causes the DDRs to be generated frequently enough that the DDR is not accidentally deleted from the SMS database.
Manual Discovery
Manual discovery is just that—a discovery method that is initiated by you on a per-client basis to generate DDR information for that client. This method is predominantly used as part of a manual client installation process. Part of this process actually ends in installing the SMS software on the client if the client can be assigned to the SMS site.
Initiating Manual Discovery
To initiate manual discovery, follow these steps:
- Make a network connection to the SMSLogon share, volume, or directory on an SMS logon point.
- Navigate to the appropriate \platform.bin directory (Alpha.bin or X86.bin), and open the \00000409 directory.
- In this directory, run the appropriate wizard or program for that client's operating system. The available programs are listed here:
- Manboot.exe for MS-DOS clients
- SMSMan.exe for 32-bit clients
- SMSMan16.exe for 16-bit clients
- Click Next to display the Select A Systems Management Installation Option screen, shown in Figure 7-24. If the client can be assigned to an SMS site, specify the appropriate logon point or domain name from which to initiate the client installation, or let SMS make the assignment.
- Click Next to display the Completing The Systems Management Installation Wizard screen.
- Click Finish to start the installation process.
In this example, we've run SMSMan.exe to display the Systems Management Installation Wizard welcome screen, shown in Figure 7-23.
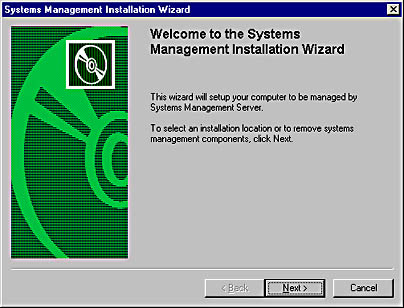
Figure 7-23. The Systems Management Installation Wizard welcome screen.

Figure 7-24. The Select A Systems Management Installation Option screen.
![]()
NOTE
Alternatively, you can run SMSMan.exe from a floppy disk, from any of the potential client's local or network drives, or from an e-mail message. Refer to Chapter 8 for detailed information about the executable file.
Manual Discovery Process
When the program executes, a DDR will be generated just as it would if you had used a logon discovery method. The DDR will be stored on the client as SMSDisc.ddr in the MS\SMS\Core\Data directory. It will be copied to the discovery data inbox on the logon point (SMSLogon\Ddr.box) and then forwarded to Discovery Data Manager's inbox on the site server (SMS\Inboxes\Ddm.box). Discovery Data Manager in turn will update the SMS database with the new record.
![]()
NOTE
The Manboot.exe program can be used only to generate a DDR for an MSDOS client. MS-DOS clients are not supported as valid SMS client computers and cannot be installed using SMS client software.
Checkpoints
There are no real "gotchas" in manual discovery—you either run it or you don't. The main thing to remember is that if the client is also assigned to an SMS site, it will be installed as an SMS client as part of this process. If the client is not assigned to an SMS site, only the DDR will be generated.
EAN: 2147483647
Pages: 167
- Business Continuity Planning and Disaster Recovery Planning
- Continuous Monitoring Process
- Appendix A Answers to Assessment Questions
- Appendix C The Information System Security Architecture Professional (ISSAP) Certification
- Appendix E The Information System Security Management Professional (ISSMP) Certification